
Don’t Be Tardy! An Arduino Warning System
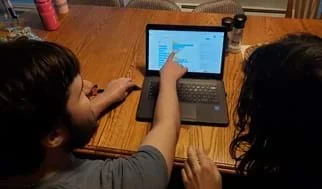 Students working on coding their Tinkercad simulation.Copyright Becky Eyestone-Malbouef
Students engineer a device to alert peers who are about to be late to class. To do this, students first define the problem and success criteria for an alert system. Students plan the algorithm for their system and then code an Arduino circuit to display a repeating/blinking message on an LCD screen with LED lights (in Tinkercad). Then they work collaboratively in groups of 2 or 3 to build (put it together) an Arduino circuit with an LCD screen and LED lights. Students create a simulation first and then build a physical model. As part of the coding, they learn about loops, conditionals, and variables, and they test their code in stages to identify and fix errors. Students learn more about circuitry and coding and how the skills apply to many applications in the real world. Students have the option to refine and improve their design by adding other elements to their warning system. Finally, they share and analyze their solutions based on their defined success criteria.
Electrical engineers can take a basic circuit and transform it into a more complex circuit that is programmed to alert people to various events. These circuits can be used to promote safety (e.g., smoke alarm) or support accessibility (e.g., doorbell for the hearing impaired). In this activity, students build a circuit and program it to deliver a message to help students not be late for class.
After this activity, students should be able to:
- Define a problem and success criteria in the school where a new alert system would benefit all.
- Apply what they learned about block coding, and how circuits are constructed, to design a system for alerting students in the hallway 30 seconds before the tardy bell rings.
- Build and code an Arduino circuit that gives off a 30-second alert before the tardy bell rings.
- Test and discuss what other challenges would need to be considered to implement the circuit in the whole building (connecting them all throughout the hallways, how to mount them in the hallways out of reach of students, programming them for half days, etc.).
- Improve their design by adding in other elements to their design.
- Evaluate their designs based on agreed-upon success criteria.
- MS-ETS1-1 Define the criteria and constraints of a design problem with sufficient precision to ensure a successful solution, taking into account relevant scientific principles and potential impacts on people and the natural environment that may limit possible solutions.
Grades 6-8
Do you agree with this alignment? - MS-ETS1-2 Evaluate competing design solutions using a systematic process to determine how well they meet the criteria and constraints of the problem.
Grades 6-8
Do you agree with this alignment?
- MS-ETS1-1 Define the criteria and constraints of a design problem with sufficient precision to ensure a successful solution, taking into account relevant scientific principles and potential impacts on people and the natural environment that may limit possible solutions.
Grades 6-8
This resource focuses on the following Three Dimensional Learning aspects of NGSS:
Science & Engineering Practices- Define a design problem that can be solved through the development of an object, tool, process or system and includes multiple criteria and constraints, including scientific knowledge that may limit possible solutions.Do you agree with this alignment?
Disciplinary Core Ideas- The more precisely a design task's criteria and constraints can be defined, the more likely it is that the designed solution will be successful. Specification of constraints includes consideration of scientific principles and other relevant knowledge that is likely to limit possible solutions.Do you agree with this alignment?
Crosscutting Concepts- The uses of technologies and any limitations on their use are driven by individual or societal needs, desires, and values; by the findings of scientific research; and by differences in such factors as climate, natural resources, and economic conditions.Do you agree with this alignment?
- All human activity draws on natural resources and has both short and long-term consequences, positive as well as negative, for the health of people and the natural environment.Do you agree with this alignment?
Do you agree with this alignment? - Define a design problem that can be solved through the development of an object, tool, process or system and includes multiple criteria and constraints, including scientific knowledge that may limit possible solutions.
- MS-ETS1-2 Evaluate competing design solutions using a systematic process to determine how well they meet the criteria and constraints of the problem.
Grades 6-8
This resource focuses on the following Three Dimensional Learning aspects of NGSS:
Science & Engineering Practices- Evaluate competing design solutions based on jointly developed and agreed-upon design criteria.Do you agree with this alignment?
Disciplinary Core Ideas- There are systematic processes for evaluating solutions with respect to how well they meet the criteria and constraints of a problem.Do you agree with this alignment?
Do you agree with this alignment? - Evaluate competing design solutions based on jointly developed and agreed-upon design criteria.
Each group needs:
- Arduino from SparkFun
- an LCD screen
- 4 M/F wires
- 4 M/M wires (more if using more than 2 LEDs or the optional materials)
- USB Mini-B cable
- 2 LEDs
- resistor (more if using LEDs in a pattern or adding in the optional materials)
- breadboard (solderless)
- computer
- for optional extension activity:
- buzzer
- button
Students should have some coding experience before tackling this assignment; Tinkercad and Scratch are both great sites that provide tutorials. Students should also have basic knowledge of how circuits are constructed.
Have you ever wondered how traffic lights and pedestrian crosswalk signals work together? (Students could write or draw their ideas.) Traffic lights are programmed to follow specific signal phases that control the movement of vehicles and pedestrians. Pedestrian crosswalk signals are usually timed with the traffic light phases. Traffic lights and pedestrian crosswalks are designed to be coordinated with the overall traffic flow. The collaboration between traffic lights and pedestrian crosswalks is essential for maintaining a safe and orderly flow of both vehicular and pedestrian traffic at intersections and road crossings.
What other types of alert signals do we have out in the real world? (Possible student answers: heart monitor, blood sugar, home heating/cooling, fire/smoke, etc.) Why do you think there are so many different types of alert systems in place? (Possible student answers: safety, warning.)
Have you ever put together a basic circuit, such as by combining a power supply, conductors such as electric wires, a switch, and load-electrical components such as a bulb? How do engineers take a basic circuit and transform it into a more complex circuit that is programmed to alert people? (Students should mention computer programming/code, etc. in their responses; if not, lead them toward this answer.)
Today, we are going to design and program our own circuits that would be used in the school. What are some ideas on how we would design and program a circuit system? (Answer: code with Tinkercad.) What types of alerts would be helpful for students at school? (Answer: tardy warning in hallways.) What do you think should be our success criteria for creating and building our own warning system in the middle school?
Background
The students solve a problem using the engineering design process steps to create a simulation and a physical model using Arduino.
Arduino circuits are an essential aspect of modern education, enabling teachers to introduce students to the fascinating world of electronics, programming, and creative problem-solving. Arduino is an open-source microcontroller platform that provides an accessible, hands-on approach to learning about circuits and their applications. With its user-friendly interface and an extensive community of enthusiasts, Arduino allows educators to engage students of all ages in various projects, from basic LED blinking to complex robotic systems. By teaching Arduino circuits, teachers can nurture critical skills such as logical thinking, coding, and engineering, while fostering a spirit of innovation and curiosity among their students. The versatility of Arduino makes it an ideal tool for incorporating science, technology, engineering, and mathematics (STEM) concepts into the curriculum, inspiring the next generation of inventors and innovators. As teachers delve into this exciting world, they open up doors to creativity and empower their students to tackle real-world challenges through the power of electronics and programming.
Before the Activity
- Gather and lay out the materials (wires will most likely need to be pulled apart/separated).
- Give students the Pre-Assessment (PDF).
- Divide students into groups of 2 or 3.
- Set up a classroom in Tinkercad, which links with Google Classroom (will be able to see each group’s simulation). Click on Profile in the top-right corner and select “My Classes.” Click on Create New Class. Enter information requested. Share link in Google Classroom or post/display class link.
- If students do not have coding or circuit experience, allow them time to access the many tutorials available on the Tinkercad site and YouTube to get familiar with it.
With the Students:
- Go through the introduction above to present the problem. Have students brainstorm individually and then as a class to identify success criteria and the constraints for their problem and solution. Remind students that determining criteria and constraints is an important part of the engineering design process.
- Have students share their ideas with the class. Write down students’ ideas for the whole class to see (whiteboard, use doc camera, etc.). Students should decide as a class which criteria and constraints they will abide by to create a class rubric together.
Digital Circuit
- Distribute copies of the Student Instructions (PDF). Have students access Tinkercad and follow the instructions on the handout to create a digital circuit for their Arduino warning system.
- Walk around to monitor students. As needed, provide guidance using the Cheat Sheet for Tinkercad's Blockly Code (PDF).
- If everything is correct, after coding students will see the simulator work; the LCD screen will flash a countdown of “Don’t be tardy,” with the time counting down by 2s from 30 to 0. The LED lights will blink on and off with the countdown. See Figure 1.
- Encourage students to identify and correct errors in their code by using a checklist of common issues, such as unconnected wires or incorrectly assigned variables.
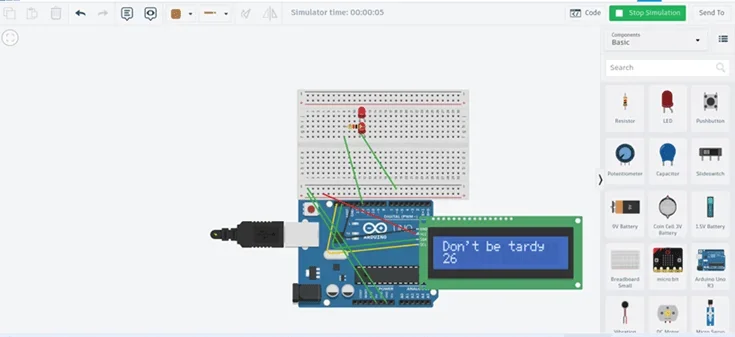 Figure 1. Working simulationCopyright Becky Eyestone-Malbouef
Physical Model
- After their setup works on the simulation, have students collect their physical materials and make a physical model of the Arduino circuit. Students may watch a 6:06-minute video tutorial for help connecting an LCD display to the Arduino Uno.
- Ensure that students have installed the driver per instructions on the create.arduino.cc "downloads" website. Do not allow students to proceed until this step is completed. On Chromebooks, students should go to the Chrome Webstore and search for Arduino Create for Education. Students should install and then open the app and create an account.
- While students work in Tinkercad, check that they go in the blocks and change the serial communication number (Student Instructions Step 34) and change the text code that lists the LiquidCrystal variable settings (Student Instructions Step 36; see Figure 2).
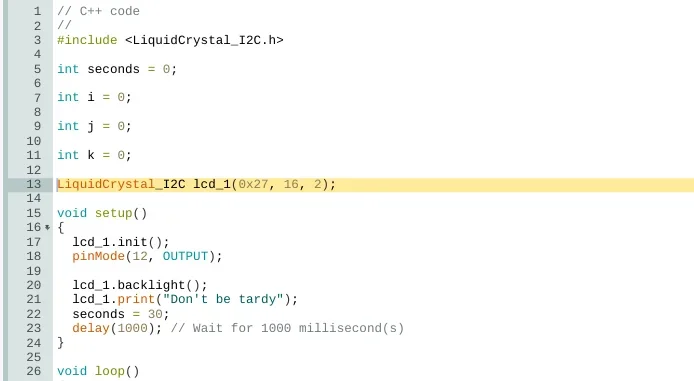 Figure 2. Where to change the variable settings on the Arduino siteCopyright Becky Eyestone-Malbouef
 - Have students connect the physical circuit to the computer and upload the code to their physical model. The circuits should duplicate the simulation. If not, prompt them to make sure all of the wires are connected securely and in the correct areas. See Figure 3.
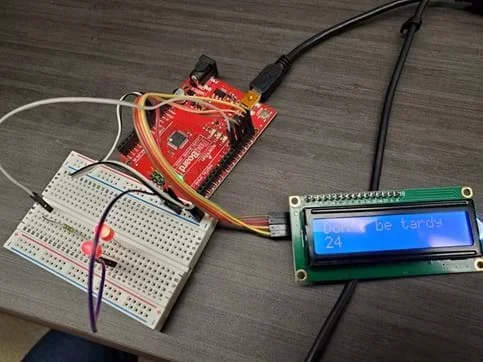 Figure 3. Physical model of the working Tardy warning systemCopyright Becky Eyestone-Malbouef
 - Give students 10-15 minutes to customize their screen, add or change the sequence of lights, or solve the problem posed.
- Have students present their solutions and discuss whether it met their original success criteria for an alert system in their school.
- anode
- The positive side of an LED light (longer wire).
- arduino
- An open-source electronics platform based on easy-to-use hardware and software. Arduino boards are able to read inputs and turn them into an output.
- breadboard
- A rectangular plastic board with a bunch of tiny holes in it that let you easily insert electronic components to prototype an electronic circuit.
- cathode
- The negative side of an LED light (shorter wire).
- f/m wire
- A simple wire that has one connector pin at one end and a receiver hole at the other end.
- lcd screen
- A display of information on a screen, which uses liquid crystals that become visible when electricity is passed through them.
- led (light-emitting diode) lights
- A semiconductor device that produces light from electricity.
- m/m wire
- A simple wire that has connector pins at each end, allowing them to be used to connect two points to each other.
- resistor
- The part of an electrical circuit that resists, or limits, the power of an electrical current in a circuit.
- terminal strip
- An area on a breadboard that you plug various electronic components in and connect them to each other.
Pre-Activity Assessment
Written Pre-assessment: Provide the Pre-Assessment (PDF) questions to students to prompt them to think about the activity.
Activity Embedded (Formative) Assessment
Monitor Student Progress: The teacher can check the students’ simulations to determine whether they are on the right track or whether they need additional guidance. The teacher can access through Tinkercad or check individual student screens.
Post-Activity (Summative) Assessment
Post-Assessment/ Written Self-Reflection: Provide the Reflection Questions (PDF) for students to reflect on the activity. Student answers may vary for all of the questions.
When using an Arduino circuit, it's important for middle school students to prioritize safety. Here are some tips to ensure safe usage:
- Power Supply: Use a suitable power supply for your Arduino circuit. Avoid using high-voltage power sources or batteries with incorrect voltages, as they can damage the components or pose a safety risk.
- Proper Wiring: Ensure that the wiring connections are correct and secure. Double-check the pin configurations and make sure the wires are properly insulated to prevent short circuits or accidental contact.
- Component Handling: Handle the components with care, especially if they are sensitive to static electricity. Before handling electronic parts, discharge any static electricity by touching a grounded object. Avoid bending or applying excessive force to fragile components.
- Use a Breadboard: When prototyping circuits, it's recommended to use a breadboard. Breadboards provide a safe and organized platform for connecting components, reducing the risk of accidental short circuits.
- Unplug the Power: Before making any changes or adjustments to the circuit, disconnect the power supply from the Arduino and any external power sources. This helps prevent accidental shocks or damage to the components.
- Avoid Wet Environments: Keep the Arduino circuit away from water or other liquids. Moisture can damage the components and pose a safety hazard. Ensure that your workspace is dry and free from any potential liquid spills.
- Avoid Overheating: Be cautious of components getting too hot during operation. Overheating can indicate a problem with the circuit design or incorrect use of components. If you notice excessive heat, disconnect the power supply and troubleshoot the circuit.
- Follow Tutorials and Guidelines: When working on Arduino projects, follow reliable tutorials or guidelines provided by reputable sources. These resources often include safety precautions specific to the project you are working on.
- Ask for Guidance: If you're unsure about any aspect of working with an Arduino circuit, don't hesitate to seek guidance from a teacher, mentor, or knowledgeable adult. They can provide valuable assistance and ensure you're following safe practices.
Remember, safety should always be a top priority when working with any electrical components or circuits.
**If students are unfamiliar with block coding, please see the Cheat Sheet for Tinkercad's Blockly Code (PDF).
Here is the LCD Screen Library as a troubleshooting piece in case the library is not loaded in Arduino. Instructions to add the Library are in the 6:06-minute video linked here.
As an extension, refer students to this procedure for wiring a buzzer (Piezo Speaker) or this 5:33-minute video procedure for adding a push button, then have them incorporate it into their design and explain why they chose to do what they did.
Contributors
Becky Eyestone-Malbouef; Leyf Starling; Matt Jourden; Drew Kim; Dr. Wen Li; Dr. Xiaobo Tan; Claudia Chen
Supporting Program
Research Experience for Teachers (RET), Michigan State University College of Engineering, and the National Science Foundation
Acknowledgements
This curriculum was developed through the Michigan State University College of Engineering NSF RET program under grant number CNS-1854985 under National Science Foundation. However, these contents do not necessarily represent the policies of the NSF, and you should not assume endorsement by the federal government.
Copyright
2024 by Regents of the University of Colorado; original © 2023 Michigan State University