Quick Look
Grade Level: 7 (6-8)
Time Required: 45 minutes
(Three optional extensions requiring quantitative measurements, and two engineering design challenges add 30 minutes, 45 minutes and 50 minutes respectively.)
Expendable Cost/Group: US $5.00
Group Size: 4
Activity Dependency: None
Subject Areas: Measurement, Physics, Science and Technology
NGSS Performance Expectations:

| MS-ETS1-4 |
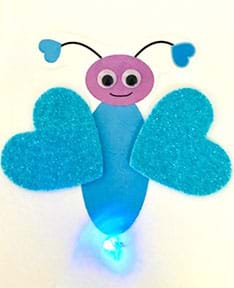
Summary
Students engage as engineering consultants for a firm called the “Conductive Circuit Card Company” to design and make a prototype greeting card using conductive paints. This company has made its LED light-up cards using copper tape for its circuits, but the company has determined that it takes too long to apply the tape. In line with the industry’s shift to printing circuits, the company has purchased a flexible electronics printing machine. Student reverse-engineer a copper tape card, analyzing how to constructs its circuit elements. They design and create a new circuit element using stencils and conductive paint.Engineering Connection
Student consultants in this activity experience a taste of this manufacturing process by analyzing how an electric circuit is constructed and then print and test their own circuit using conductive paints on a flexible substrate (paper). Students engage in the engineering design process by following a set of parameters and exploring how to build a circuit and product within those parameters.
Learning Objectives
After this activity, students should be able to:
- Explain how the different elements of a simple LED circuit work.
- Explain a circuit.
- Build and troubleshoot an LED card.
Educational Standards
Each TeachEngineering lesson or activity is correlated to one or more K-12 science,
technology, engineering or math (STEM) educational standards.
All 100,000+ K-12 STEM standards covered in TeachEngineering are collected, maintained and packaged by the Achievement Standards Network (ASN),
a project of D2L (www.achievementstandards.org).
In the ASN, standards are hierarchically structured: first by source; e.g., by state; within source by type; e.g., science or mathematics;
within type by subtype, then by grade, etc.
Each TeachEngineering lesson or activity is correlated to one or more K-12 science, technology, engineering or math (STEM) educational standards.
All 100,000+ K-12 STEM standards covered in TeachEngineering are collected, maintained and packaged by the Achievement Standards Network (ASN), a project of D2L (www.achievementstandards.org).
In the ASN, standards are hierarchically structured: first by source; e.g., by state; within source by type; e.g., science or mathematics; within type by subtype, then by grade, etc.
NGSS: Next Generation Science Standards - Science
| NGSS Performance Expectation | ||
|---|---|---|
|
MS-ETS1-4. Develop a model to generate data for iterative testing and modification of a proposed object, tool, or process such that an optimal design can be achieved. (Grades 6 - 8) Do you agree with this alignment? |
||
| Click to view other curriculum aligned to this Performance Expectation | ||
| This activity focuses on the following Three Dimensional Learning aspects of NGSS: | ||
| Science & Engineering Practices | Disciplinary Core Ideas | Crosscutting Concepts |
| Develop a model to generate data to test ideas about designed systems, including those representing inputs and outputs. Alignment agreement: | Models of all kinds are important for testing solutions. Alignment agreement: The iterative process of testing the most promising solutions and modifying what is proposed on the basis of the test results leads to greater refinement and ultimately to an optimal solution.Alignment agreement: | |
International Technology and Engineering Educators Association - Technology
-
Students will develop an understanding of the characteristics and scope of technology.
(Grades
K -
12)
More Details
Do you agree with this alignment?
-
Students will develop an understanding of the attributes of design.
(Grades
K -
12)
More Details
Do you agree with this alignment?
-
Students will develop an understanding of engineering design.
(Grades
K -
12)
More Details
Do you agree with this alignment?
State Standards
New Mexico - Science
-
Evaluate the usefulness and relevance of data to an investigation.
(Grade
6)
More Details
Do you agree with this alignment?
-
Know that electrical energy is the flow of electrons through electrical conductors that connect sources of electrical energy to points of use, including:
- electrical current paths through parallel and series circuits
- production of electricity by fossil-fueled and nuclear power plants, wind generators, geothermal plants, and solar cells
- use of electricity by appliances and equipment (e.g., calculators, hair dryers, light bulbs, motors).
Do you agree with this alignment?
Materials List
Each student receives the Circuit Card Company Conductive Paint Report.
Each group needs a pre-made card element with copper tape by the teacher which uses:
- 3-volt cell CR2032 battery
- 3 mm through-hole LED, available online
- two ~5 cm pieces of copper tape
- transparent tape
- a choice of decorations or printed designs for the front of the card (see below for details on LED and batteries)
Each group needs:
- paint brushes, sponge paint brushes or cosmetic sponges
- conductive paint or a small container of copper paint; conductive and copper paints are available online
- water container (to clean brushes)
- paper towels
- transparent tape
- pre-cut stencils from transparencies, available online
- pens
To share with the entire class on a Resource Table:
- cardstock: a Blank Template pre-printed using your own images or those from the Template 1 or Template 2 in the attachments and pre-cut; four card elements from each piece of standard printer paper
- scissors
- art supplies such as markers, stickers, pre-printed images, pre-cut shapes, glue, glitter, magazine pages, construction or other colored paper
- (optional) blow dryer for drying paint
- (optional) multimeter(s) for Extension 1, and for older students, extra cardstock, paint for resistance test cards.
- (optional) extra paper for Extension 2
- (optional) copper tape, extra LEDs, batteries and cardstock for Extension 3, the two-LED activity
Worksheets and Attachments
Visit [www.teachengineering.org/activities/view/unm-2490-conductive-circuit-card-company-activity] to print or download.Pre-Req Knowledge
Performing the hands-on activity Paper Circuits Greeting Cards prior to this activity is helpful, but not required.
Introduction/Motivation
Everyone knows what a cell phone looks like: It’s rectangular and rigid and fits in your jean pocket. Have you ever thought about why it’s shaped like that? Why does a phone have to be in a hard casing? What if you could wear your phone? What if you could roll it up and snap it around your wrist like a watch while you’re in gym class and later unroll it to analyze your workout performance from heartbeat and sweat sensors? What if you could look through it to see prices and accessory suggestions when you’re at the store shopping for clothes?
In the future, electronics are most likely going flexible and wearable in clothes, on skin tattoos and even inside your body. From games and entertainment, athletics and fashion to health and medicine you are going to see some astounding changes in your lifetime. Today we’re going to get a peek at the future and some of the creative researchers who are bringing it closer. Already, electronics companies know that augmented reality, virtual reality, artificial intelligence and all kinds of emerging technologies are going to require big screens, and that means they are making circuits and displays that are foldable, stretchable, and pliable.
Engineers are combining centuries-old printing techniques (such as gravure printing used for fine art reproductions, magazines, and gift wrap) with electronics and other special inks so they can print many of the components that go into a cell phone and other devices. These products use flexible plastic materials in what is called “roll-to-roll manufacturing,” similar to what is used in making plastic wrap.
In this activity you are going to print with similar conductive paints using stencils. Your flexible material will be paper, and you will be making a circuit that lights an LED. We will use the engineering design process to help us guide our designs. Let’s get started!
Procedure
Background
Paint
There is a wealth of educational resources for making paper circuits using copper tape in the Paper Circuits Greeting Cards activity. In general, conductive paints and inks can be used in the same way as copper tape, but they tend to be more expensive and a little more difficult to use. Conductive paints made out of carbon are not as conductive as copper, so the circuit lines have to be shorter. However, printing with conductive paints approximates the way circuits are produced in real research and industrial processes. This type of design thinking gives students the opportunity to experiment with sheet resistivity as a function of line width and length and to think about carbon as a conductive medium, which may be surprising to many students. The website for BareConductive paint (https://www.bareconductive.com) offers wonderful examples of how artists are incorporating this paint to make innovative, multi-media artwork.
Watering down the BareConductive paint makes it a bit easier to spread. It will also dry faster and cost less per student. However, it will be less conductive. You may also find less expensive ways of making your own conductive paints by exploring the internet.
Stencils
Because it takes about 15 minutes for the paints to dry, and the paint will smear if you take the stencil off before the paint dries, each student should have her/his own set of two stencils.
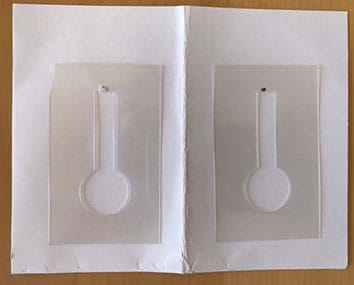
If you have access to a die or laser cutter machine, you can easily cut stencils for many students. If you do not have access to this kind machine and only have a few students, you may try cutting a few stencils with a pen knife. (See Figure 1)
Card design
The card elements supplied by the card company is the front part of the card. In the simplest activity, this is all students are required to prototype with conductive paint. In Extension 2, students are challenged to make a complete card that consumers can open and write a message inside. This means that students will need to think about how they will fold their cardstock. A “Z” pattern is a simple solution. Make a few examples as hints and place them on the resource table. Extension 3 is to have the students design a card with two LEDs. In the interests of time, they can prototype these cards using copper tape.
Artwork
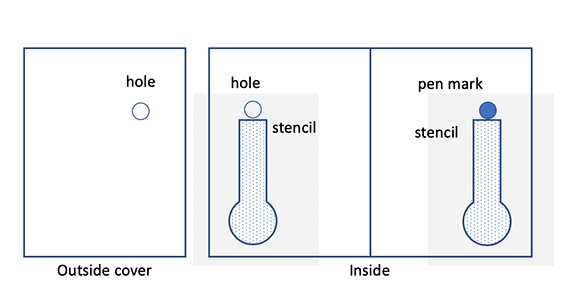
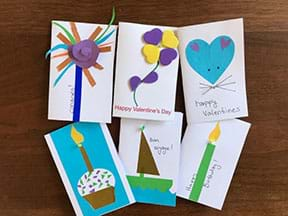
You may use the artwork we provide (see Template 1, Template 2, and Bug Template), or come up with your own based on your students’ interests using the Blank Template. Alternatively, have your students make their own artwork (examples are shown in Figure 4). It is important to make a hole for the LED (with a pen) through the cardstock and mark the LED position on the inside page so that the ends of the stencils can be lined up very close that point. (See Figures 1 and 3). In some cases, students may select a spot on their card for the LED that requires that battery will be at the top of the card at the end.
Before the Activity
- Make the copper tape card elements, enough for at least half of the number of students in your class.
- Fold a piece of card stock in half.
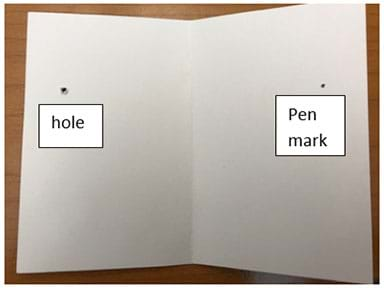
- Decide where the LED will go and make a hole for it with a ball point pen in the front panel.
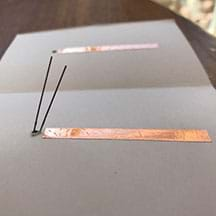
- Close the card. From the outside, make a mark with the pen through the hole to the far side of the card. (Shown in Figure 5)
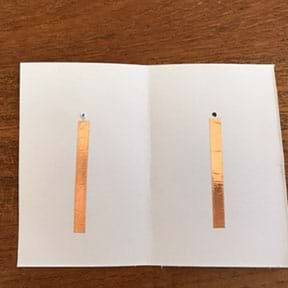
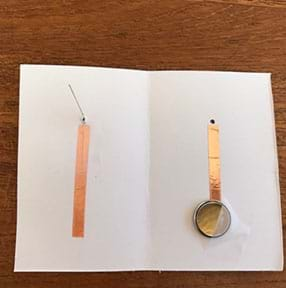
- Cut two pieces of copper tape about 5 cm (2 to 2.5 in) long and carefully place them below the hole and the pen mark inside the card, as demonstrated in Figure 6.
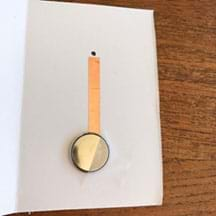
- Place a 3-volt cell battery, positive (+) side down on the copper tape on the right side of the card and tape it with transparent tape. Be careful to leave as much of the battery exposed as possible. (Shown in Figure 7)
- Close the card.
- Hold an LED horizontally with the long wire on top. Push the LED all the way through the hole, as shown in Figure 8. Open the card.
- Bend the short LED wire down along the copper tape and secure with transparent tape. The transparent tape should cover the entire length of the LED wire, but not go much farther. (See Figure 9)
- Cut a piece of transparent tape that is about the length of the long LED wire. Place it on top of the short LED wire, sticky side up. Then bend the long wire down on top of it. (Demonstrated in Figure 10)
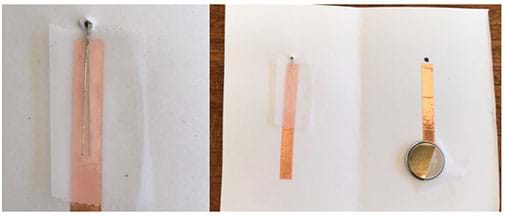
- Gently close the card, making sure that the long wire is securely taped to the copper tape on the right side of the card.
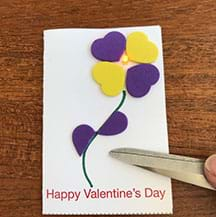
- Test the card by pushing down on the outside above the battery, as shown in Figure 11.
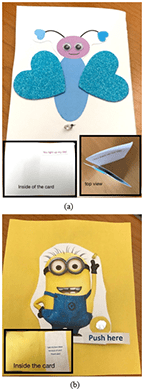
- For Extension 1, make a complete card that can be opened to write a message inside. Do this either by a) folding a piece of cardstock into a “Z” shape and use the front two panels to construct a card element circuit with stencils and paint (Figure 12a), or b) folding a piece of cardstock in half and gluing a card element to the front cover (Figure 12b).
- Prepare stencils if you have access to a cutting machine or are hand cutting. Cut enough stencils of transparency material so that each student has two stencils, and then cut several extras. Spray adhesive on the stencils and stick them on sheets of acetate or a transparency sheets, so that you have a set of stencils for each group. Stencils may be reused several times without needing to reapply more adhesive. (See the Stencil Pattern below.)
- Prepare art supplies. Pre-print and/or Pre-cut any images you would like to offer your students. Collect other art supplies for students to make their own images, such as stickers, pens, pencils, sequins, glue, pre-cut images, tissue paper, scissors, and magazines for collages.
- Prepare a box of materials for each group of students as listed under the materials section. Prepare Resource table materials.
With the Students
- Have students sit in groups and instruct each student to choose a partner. Tell them, “Your engineering consultant company has been selected by the Conductive Circuit Card Company to come up with a new kind of card. Up until now, they have been making LED greeting cards using copper tape. (Hold up an example of a card element and some copper tape). However, they are finding that applying the copper tape is too time consuming and expensive. Moreover, the electronics industry is rapidly changing to printing circuits on flexible materials. So, they have purchased a conductive paint printing machine, and they want you to come up with a new conductive paint prototype and a report.”
- Explain to students that, with a partner, they will first gently reverse-engineer an existing card element and answer the questions in the Consultation Report. Then students will individually design and construct their own prototype greeting card using the supplies at your table and on the Resource Table.
- Pass out an LED and a battery to every student.
- Ask the class to first see if they can make their LED light with their battery. Do not tell them how to light the LED, but know that the battery is sandwiched between the two leads of the LED and the longer LED wire lies flat along the positive side of the battery while the short wire lies along the negative side of the battery. Hopefully there will be a student who sandwiches the battery in between the two LED wires but has the orientation reversed so that the LED will not light.
- Go to that student and tell the class, “this student has made a very important discovery. Sometimes in science and engineering, finding that something does not work is as important as finding something does. This student has discovered that an LED will not allow electricity to flow in one direction in order to light the light.” Tell your student to turn the battery around 180 degrees, then diode will allow electricity to flow. “This is because an LED is a diode. Diodes are a fundamental device in electronics everywhere. And what does this diode emit? What comes out of it? Light! That is why it is called a Light Emitting Diode.”
- Ask the students if the wires coming out of their LED are the same length. (One is longer). Which wire has to touch the positive side of the battery for electricity to flow? (The longer side has to touch the positive side of the battery).
- Ask students the following questions: What makes the LED light up? (Answer: electrical energy or electricity.) Where did that come from? (Answer: the battery. The battery stores energy in a chemical form. Then it converts that chemical energy into electrical energy.)
- Ask the students to put their LED and battery on their desk in a safe place. They will use these later.
- Tell students to produce their Consultation Report and pass out 1 pre-made copper card to each group.
- Depending on the level of your class, students can either go through the steps on their own or may be guided through it via the following steps:
- Have them press the card to see how it turns on and ask what keeps the card from being on all the time. In electronics, a device which keeps current from flowing and turning the light on is called a switch. Ask students what is the switch in this card? (Answer: It is a very simple thing. The stiffness of the cardstock keeps the copper on one side of the card from touching the other side of the card and completing the circuit until you push down on the card.) In engineering and science, simple solutions like this are often highly valued. A simple LED pointer or key chain can use the stiffness of an LED wire itself as a switch that gets pushed up and down. Another important point is that engineers and scientists invest a lot of time and energy in material science, studying how materials behave mechanically, electrically and optically. Even simple materials like paper play a huge role in engineering.
- Have students gently open the card element by taking off the tape holding the LED on the right-side of the card. You can ask an open-ended question such as: What do you notice about how the card is put together and write down their observations by drawing diagrams on the board. The ideas you want them to notice are:
- The positive side of the battery is face down on the right side of the card.
- The long LED wire was taped to the copper tape leading to the positive side of the battery on the right side of the card.
- The tape holding the battery down does not cover the entire face of the battery, only a very small part. This allows most of the battery to be available to touch the copper.
- The short LED wire is taped to the copper tape on the left side. When the card closes the exposed copper on the left side of the card touches the negative side of the battery.
- The switch is the opening between the left side and the right side of the card at the bottom near the battery.
- The LED wires are completely covered with tape (so they do not touch each other when the card is closed and short out), but the rest of the copper is not taped over.
- The copper tapes on each side line up together, especially the tape on the left has to touch the battery when the card closes or the circuit will not work.
- There is a pen mark on the right side that is exactly opposite where the hole for the LED is on the left side. This lines up the copper tape where the LED will attach on the right-hand side. Make a hole for the LED with a pen first, then close the card and use the pen to mark through to the opposite side. In print engineering, engineers use marks like these for alignment. They are called registration marks.
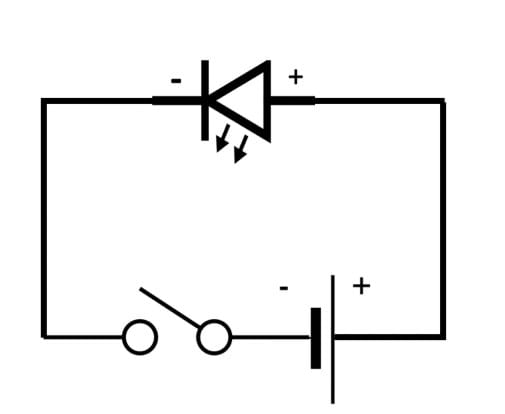
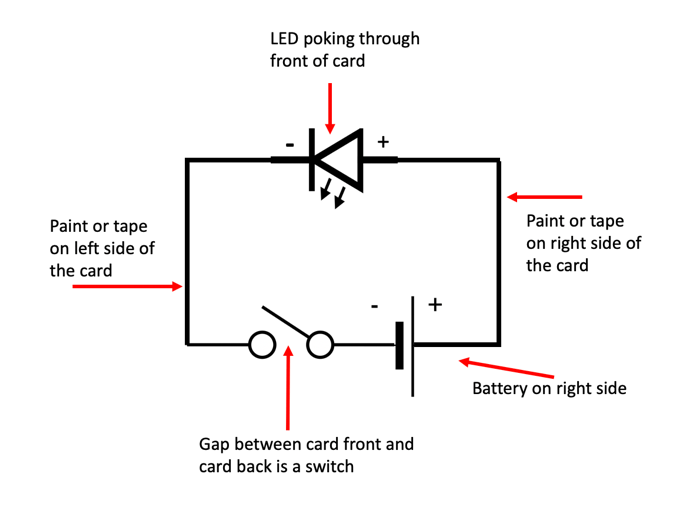
- Have a student come up to the board and draw the card circuit, drawing the components in any way they like. Ask the student to relate their drawing to the physical parts of an actual card. Next draw the symbols for LED, battery, and switch on the board (shown in Figure 13). Ask another student to draw the circuit using the electric symbols and relate these to physical parts of the card. (See Figures 14 and 15)

- Finally show the students the stencils they will have to work with. Ask them why they think there is a bulb at one end? (Answer: the battery pad maximize the amount of contact the battery has with conductive paint, which will not be as conductive as the copper tape). Where do they think the bulb part of the stencil should go – close to the LED hole or away from it? (Answer: away from it). Have a student draw how they think they will place their stencils. It is very important that when they put their stencils on, the stencils lie flat and smooth, are clearly stuck on strongly so that they don’t leak paint and that students leave the stencil till the paint is dry, which should take about 24 hours.
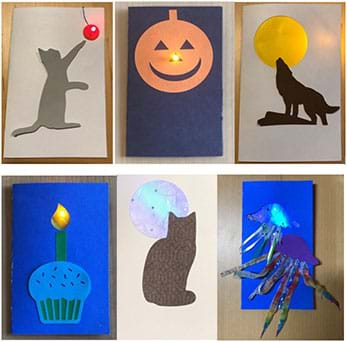
- Now it is time for the students to make their cards. They may make their own artwork on a blank card or they may use a pre-printed card. Figure 16 shows a few examples of blank cards made with pre-cut shapes, but students can use a host of other materials to make their own artwork.
- Students may look at the art supplies on the table to plan but they will not be able to decorate their cards until after the paint dries.
- When they are back at their tables, remind them of some of their previous observations as they go through the steps of making a card.
- Ask them to locate where the LED will go by looking at the inside of the card. The pens are for making the LED holes in the cover and a registration mark on the inside right cover.
- Remind students that the tape goes right up to the top of the LED, so the inside of the stencil should line up right below the LED hole and pen mark. Also remind them that the bulb goes away from the LED hole and pen mark.
- Students should make certain that the stencils are smooth and not buckling anywhere, and that are strongly sticking to the cardstock so that no paint will leak under them.
- Students should then paint a thin coat of paint over the stencil and leave the stencil on until the paint dries. This can take about 15 minutes depending on the thickness and kind of the paint. (copper paint dries faster). Blow dryers will hurry this process along.
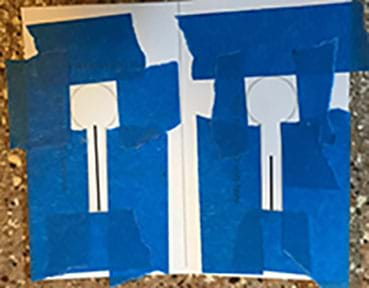
- If students are not using pre-cut stencils, then they will first apply painter’s tape to the card, using the stencil lines as a guide (Figure 2). They do not need to follow the circular shape of the battery pad – a square area will be fine.
- While the paint dries, show the Flexible Circuit Presentation on how printed electric circuits are made and used in industry and by artists. You may show as little or as much of the presentation as you have time for. Depending on how long you linger on each slide, the presentation takes about 10 – 15 minutes.
- (Optional) See the Additional Multimedia Support section below for videos you can show to your students for a peek into the future and a glimpse of what is already happening in the present.
- Once the paint has dried, tell the students to carefully pull up the stencils
- The assembly of the cards is the same as that described above in making the copper tape card elements:
- Tape down the battery on the right-side battery pad with the positive side down. Make sure to cover only a small part of the battery, leaving a lot of it exposed.
- Hold the LED in a horizontal direction with the long wire on the top and push the LED wires through the hole from the outside, leaving the LED bulb on the outside.
- Next bend the short wire down vertically on the left side. Tape it down, making sure to cover all of the LED wire as you adhere it to the paint trace, but leave as much of the rest of the paint trace uncovered as possible.
- Take a piece of tape the length of the long LED lead and lay it sticky side up on top of the short LED wire.
- Bend the long LED wire down on to it, centered in the middle.
- Gently close the card.
- Test the card. (See Troubleshooting below for help.)
- With the remaining time, students may decorate their cards or take home supplies to finish the job.
Vocabulary/Definitions
conductivity: The measure of a material's ability to conduct an electric current.
current (I): A flow of electric charge through a medium; or, the number of electrons that flow per unit time. Measured in amperes (A) or amps.
diode: A two-terminal electronic component that conducts current primarily in one direction; it has low resistance in one direction, and high resistance in the other.
electric circuit: A closed loop that carries a current of electrons or charged particles through a conductive substance.
LED: Abbreviation for Light Emitting Diode, a semiconductor light source that emits light when current flows through it.
metrology: The science of measurement.
Ohms Law: States that the current through a conductor between two points is directly proportional to the voltage across the two points.
parallel circuit: A closed circuit in which the current divides into two or more paths before recombining to complete the circuit.
prototype: A working model used to test a design concept.
resistance (R)`: Opposition to the flow of electric current.
series circuit: A closed circuit in which the current follows one path.
substrate: The underlying layer upon which a circuit is printed.
voltage (V): The difference in electric potential between two points.
Assessment
Activity Embedded Assessment
Consultation Report: Students can go through the Consultation Report themselves, fill it in as the class progresses, or you can assign it for homework after the activity to check their understanding.
Engagement: Observe students during the activity to make sure each makes progress and does not get stuck at any step of the process.
Post-Activity Assessment
Testing Your Knowledge and Going Beyond: The Testing Your Knowledge and Going Beyond homework assignment is designed to test basic knowledge of the learning objectives and to have students think more deeply about their project.
Safety Issues
- Students should take safety precautions when using the conductive paint.
Troubleshooting Tips
If the LED does not light, check that:
- Both wires are securely taped to their paint traces and the tape is covering them completely (so that the two wires are not touching each other and shorting out).
- Tape is not covering the entire face of the battery.
- The battery is fresh.
- Battery pads on each page are aligned so the battery and the painted battery pad touch when the card is closed.
- The long LED wire is taped to the paint trace on the inside right page and the positive side of the battery is facing down.
Activity Extensions
Note, the Consultation Report includes directions for these extensions.
Extension 1. Using multimeters, students measure the resistance of the carbon paint “wires” and the copper tape. They then calculate the current with Ohms law (V=IR) where V is the voltage of the 3-volt battery and compare the currents of the two cards. The currents are a proxy for the brightness of LEDs. The students will find that the carbon paint has a greater resistance, and hence a lower brightness. They will also discover that their multimeter readings jump around for the paint measurement – they will be asked to speculate about the reason for this (non-uniformity of the paint).
Older students may explore the dimension dependence of carbon paint. You can make cards of different carbon paint lines similar to the notes on the BareConductive website: https://cdn.shopify.com/s/files/1/0520/3669/8292/files/ep_application_notes.pdf?v=1655713221, which compare lines of similar lengths and different widths, and vice versa. The object is for students to discover that resistance increases with the length of a paint trace (the electrons have longer to travel; in stream analogy, water bumps into more stones) and decreases with increasing line width (electrons have a larger area to flow through).
Extension 2. Instead of a card element, you can ask students to design a new card that integrates a new conductive paint circuit element into a full-size card that can be opened so that a customer can write a message inside the card. Demonstrate with the card you have made previously or with a piece of paper to get the general idea across, but do not share the details of the design too closely. See Figures 12a and 12b for two design ideas.
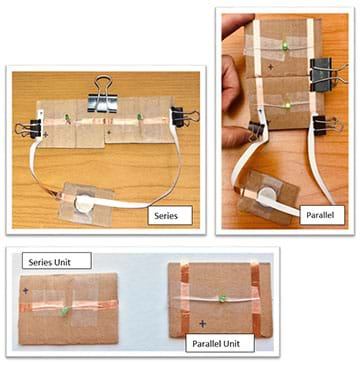
Extension 3. After students have completed a one-LED card, ask them to design a two or even three LED circuit card using only one battery. They may use copper tape for prototyping instead of paint in the interests of time. Although beyond the scope of this activity, this extension fits nicely with a discussion about parallel and series circuits. You may let them experiment on their own or you may use or make something similar to Figure 17 to have students explore parallel and series circuits first to see which produces a brighter light.
Activity Scaling
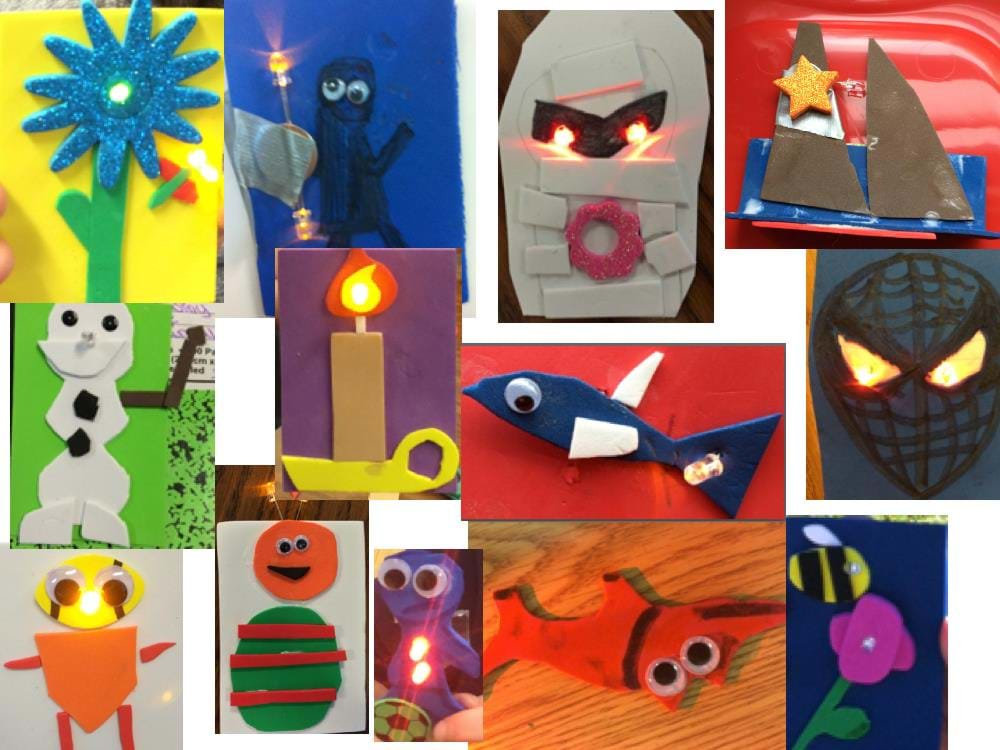
For lower grades and situations where you cannot use paints, students can make LED artwork with craft foam, LEDs, cell batteries, duct tape and art supplies. Add yarn and hole punch to make necklaces.
For younger students, use 5 mm LEDs, which are pushed through the foam, directly straddle the battery and are secured with a piece of duct tape (it’s easier to tear the tape than cut it). Students have to plan carefully if they are using more than 1 LED to make sure both will reach the battery because of the limit of the students to one battery. As an engineering challenge, tell the students that the LEDs will last forever, but the batteries will not, so they must invent a switch. (See Figure 18)
Additional Multimedia Support
- Future vision of smart screens as envisioned by Corning Glass: https://www.youtube.com/watch?v=-NsCyjQWgog
- A Day of Glass 2 (5:58): https://www.youtube.com/watch?v=jZkHpNnXLB0 (This one is more child-centered)
- A Day of Glass 1 (5:32): https://www.youtube.com/watch?v=6Cf7IL_eZ38
- Gatorade commercial featuring John Roger’s sweat sensor tattoo: https://www.youtube.com/watch?v=XfdX1OrwmIU (with S. Williams, J. Tatum, C. Pulisic, L. Sanders)
- Olay commercial featuring John Roger’s tattoo sweat sensor to measure pH: https://www.youtube.com/watch?v=f_018IMHSKo
Subscribe
Get the inside scoop on all things Teach Engineering such as new site features, curriculum updates, video releases, and more by signing up for our newsletter!More Curriculum Like This

Students are introduced to the technology of flexible circuits, some applications and the photolithography fabrication process. They are challenged to determine if the fabrication process results in a change in the circuit dimensions since, as circuits get smaller and smaller (nano-circuits), this c...

Students learn about nondestructive testing, the use of the finite element method (systems of equations) and real-world impacts, and then conduct mini-activities to apply Maxwell’s equations, generate currents, create magnetic fields and solve a system of equations. They see the value of NDE and FEM...
Other Related Information
A lot of great work in making paper circuits using copper tape with conductive adhesive, cell batteries and LEDs was pioneered at MIT’s Media Lab. (http://highlowtech.org/?p=2505 and https://vimeo.com/40904471). Also see the Exploratorium (https://www.exploratorium.edu/tinkering/projects/paper-circuits and https://www.exploratorium.edu/tinkering/blog/2018/03/27/paper-circuit-cards-video) for different kinds of LEDs.
Copyright
© 2020 by Regents of the University of Colorado; original © 2018 University of New MexicoContributors
Stefi Weisbur, Pre-College Education and Outreach Manager, School of Engineering, University of New MexicoSupporting Program
NASCENT (Nonmanufacturing Systems for Mobile Computing and Mobile Energy Technologies) Engineering Research CenterAcknowledgements
This work is based upon work supported by the National Science Foundation under Cooperative Agreement No EEC-1160494. Any opinions, finding and conclusions or recommendations expressed in this material are those of the author(s) and do not necessarily reflect the views of the National Science Foundation.
The author would like to thank educators at Explora for trying out this activity and Dr. Leah Buechley, now at the University of New Mexico, for her kind advice.
Last modified: February 8, 2024


User Comments & Tips