Quick Look
Grade Level: 7 (6-8)
Time Required: 2 hours 15 minutes
(three 45-minute class periods)
Expendable Cost/Group: US $2.80 This activity uses many items from previous activities in this unit, as well as some non-expendable items such as shovels, loppers and trundle wheels; see the Materials List for details.
Group Size: 3
Activity Dependency:
Subject Areas: Science and Technology
NGSS Performance Expectations:

| MS-ESS3-3 |
| MS-LS2-5 |
Summary
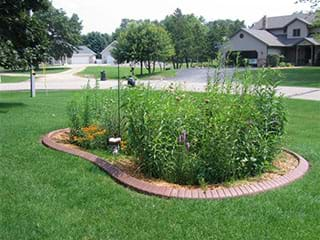
Students are presented with a guide to rain garden construction in an activity that culminates the unit and pulls together what they have learned and prepared in materials during the three previous associated activities. They learn about the four vertical zones that make up a typical rain garden with the purpose to cultivate natural infiltration of stormwater. Student groups create personal rain gardens planted with native species that can be installed on the school campus, within the surrounding community, or at students' homes to provide a green infrastructure and low-impact development technology solution for areas with poor drainage that often flood during storm events.Engineering Connection
Rain gardens are a promising green infrastructure (GI) and low-impact development (LID) technology. Similar to stormwater ponds and treatment wetlands, they rely on ecological interactions in a natural system to provide stormwater retention and pollution removal. Unlike stormwater ponds and treatment wetlands, rain gardens rely on terrestrial forested ecosystems, and dissimilar to treatment wetlands are designed to drain in hours. Rain gardens are typically constructed with high-permeability media, consisting of soil, sand and organic matter, designed to maximize infiltration, improve water quality and promote vegetative growth (Roy-Poirier, 2010).
From an environmental perspective, rain gardens recharge groundwater, provide natural stormwater management, reduce energy usage, improve water quality, reduce the heat-island effects and increase habitat. Social aspects to consider are the beautification and increase in recreational opportunities, improved health through cleaner air and water and improved psychological well-being. Economic concerns that are met range from a reduction in future cost of stormwater management and an increase in property value and local tourism.
Learning Objectives
After this activity, students should be able to:
- Explain the steps involved in creating a rain garden.
- Summarize the importance of planting native plant species.
- Create a personal rain garden.
Educational Standards
Each TeachEngineering lesson or activity is correlated to one or more K-12 science,
technology, engineering or math (STEM) educational standards.
All 100,000+ K-12 STEM standards covered in TeachEngineering are collected, maintained and packaged by the Achievement Standards Network (ASN),
a project of D2L (www.achievementstandards.org).
In the ASN, standards are hierarchically structured: first by source; e.g., by state; within source by type; e.g., science or mathematics;
within type by subtype, then by grade, etc.
Each TeachEngineering lesson or activity is correlated to one or more K-12 science, technology, engineering or math (STEM) educational standards.
All 100,000+ K-12 STEM standards covered in TeachEngineering are collected, maintained and packaged by the Achievement Standards Network (ASN), a project of D2L (www.achievementstandards.org).
In the ASN, standards are hierarchically structured: first by source; e.g., by state; within source by type; e.g., science or mathematics; within type by subtype, then by grade, etc.
NGSS: Next Generation Science Standards - Science
| NGSS Performance Expectation | ||
|---|---|---|
|
MS-ESS3-3. Apply scientific principles to design a method for monitoring and minimizing a human impact on the environment. (Grades 6 - 8) Do you agree with this alignment? |
||
| Click to view other curriculum aligned to this Performance Expectation | ||
| This activity focuses on the following Three Dimensional Learning aspects of NGSS: | ||
| Science & Engineering Practices | Disciplinary Core Ideas | Crosscutting Concepts |
| Apply scientific principles to design an object, tool, process or system. Alignment agreement: | Human activities have significantly altered the biosphere, sometimes damaging or destroying natural habitats and causing the extinction of other species. But changes to Earth's environments can have different impacts (negative and positive) for different living things. Alignment agreement: | Relationships can be classified as causal or correlational, and correlation does not necessarily imply causation. Alignment agreement: The uses of technologies and any limitations on their use are driven by individual or societal needs, desires, and values; by the findings of scientific research; and by differences in such factors as climate, natural resources, and economic conditions. Thus technology use varies from region to region and over time.Alignment agreement: |
| NGSS Performance Expectation | ||
|---|---|---|
|
MS-LS2-5. Evaluate competing design solutions for maintaining biodiversity and ecosystem services. (Grades 6 - 8) Do you agree with this alignment? |
||
| Click to view other curriculum aligned to this Performance Expectation | ||
| This activity focuses on the following Three Dimensional Learning aspects of NGSS: | ||
| Science & Engineering Practices | Disciplinary Core Ideas | Crosscutting Concepts |
| Evaluate competing design solutions based on jointly developed and agreed-upon design criteria. Alignment agreement: | Biodiversity describes the variety of species found in Earth's terrestrial and oceanic ecosystems. The completeness or integrity of an ecosystem's biodiversity is often used as a measure of its health. Alignment agreement: Changes in biodiversity can influence humans' resources, such as food, energy, and medicines, as well as ecosystem services that humans rely on—for example, water purification and recycling.Alignment agreement: There are systematic processes for evaluating solutions with respect to how well they meet the criteria and constraints of a problem.Alignment agreement: | Small changes in one part of a system might cause large changes in another part. Alignment agreement: The uses of technologies and any limitations on their use are driven by individual or societal needs, desires, and values; by the findings of scientific research; and by differences in such factors as climate, natural resources, and economic conditions. Thus technology use varies from region to region and over time.Alignment agreement: Scientific knowledge can describe the consequences of actions but does not necessarily prescribe the decisions that society takes.Alignment agreement: |
Common Core State Standards - Math
-
Understand the concept of a ratio and use ratio language to describe a ratio relationship between two quantities.
(Grade
6)
More Details
Do you agree with this alignment?
-
Fluently add, subtract, multiply, and divide multi-digit decimals using the standard algorithm for each operation.
(Grade
6)
More Details
Do you agree with this alignment?
-
Solve real-world and mathematical problems involving area, volume and surface area of two- and three-dimensional objects composed of triangles, quadrilaterals, polygons, cubes, and right prisms.
(Grade
7)
More Details
Do you agree with this alignment?
International Technology and Engineering Educators Association - Technology
-
Students will develop an understanding of the relationships among technologies and the connections between technology and other fields of study.
(Grades
K -
12)
More Details
Do you agree with this alignment?
-
Students will develop abilities to assess the impact of products and systems.
(Grades
K -
12)
More Details
Do you agree with this alignment?
-
Meeting societal expectations is the driving force behind the acceptance and use of products and systems.
(Grades
6 -
8)
More Details
Do you agree with this alignment?
-
Explain how knowledge gained from other content areas affects the development of technological products and systems.
(Grades
6 -
8)
More Details
Do you agree with this alignment?
-
Conduct research to inform intentional inventions and innovations that address specific needs and wants.
(Grades
9 -
12)
More Details
Do you agree with this alignment?
-
Evaluate ways that technology can impact individuals, society, and the environment.
(Grades
9 -
12)
More Details
Do you agree with this alignment?
State Standards
Florida - Math
-
Understand the concept of a ratio and use ratio language to describe a ratio relationship between two quantities.
(Grade
6)
More Details
Do you agree with this alignment?
-
Fluently add, subtract, multiply, and divide multi-digit decimals using the standard algorithm for each operation.
(Grade
6)
More Details
Do you agree with this alignment?
-
Solve real-world and mathematical problems involving area, volume and surface area of two- and three-dimensional objects composed of triangles, quadrilaterals, polygons, cubes, and right prisms.
(Grade
7)
More Details
Do you agree with this alignment?
Florida - Science
-
Identify the impact that humans have had on Earth, such as deforestation, urbanization, desertification, erosion, air and water quality, changing the flow of water.
(Grade
7)
More Details
Do you agree with this alignment?
-
Describe and investigate various limiting factors in the local ecosystem and their impact on native populations, including food, shelter, water, space, disease, parasitism, predation, and nesting sites.
(Grade
7)
More Details
Do you agree with this alignment?
Materials List
Each group needs:
- 12-inch biodegradable coir hanging basket or planter with the group's media mix combination; use the same one as used in the previous two activities of this unit: Does Media Matter? Infiltration Rates and Storage Capacities and Making "Magic" Sidewalks of Pervious Pavement
- native plant species in 1-gallon or 4-inch container, selected from those researched for the Just Breathe Green: Measuring Transpiration Rates activity
- pervious pavement mix from Making "Magic" Sidewalks of Pervious Pavement activity
- shovel
- access to water, hoses and buckets
- Personal Rain Garden Worksheet, one per student
For the entire class to share:
- 1-cu. ft. bag sustainably sourced hardwood mulch, such as Melaleuca or eucalyptus
- bypass loppers
- 4 trundle wheels, a long-handled, rolling distance measuring device; alternatively, use long measuring tapes
Worksheets and Attachments
Visit [www.teachengineering.org/activities/view/usf_stormwater_lesson02_activity4] to print or download.Pre-Req Knowledge
This activity combines the three previous activities (and many of their materials) in this unit: Just Breathe Green: Measuring Transpiration Rates, Does Media Matter? Infiltration Rates and Storage Capacities, and Making "Magic" Sidewalks of Pervious Pavement and guides student groups to create personal rain gardens to solve a stormwater problem on the school campus, in the surrounding community, or at students' homes.
Introduction/Motivation
When we think about new technology, we often think about new computers, phones, games or electronic devices. But everything around us is continuously evolving and not all technologies must be plugged in or turned on with a key or switch. Civil and environmental engineers and more specifically, those who manage our water resources, have identified a new technology for managing stormwater runoff. This new approach is known as green infrastructure. Green infrastructure manages stormwater at its sources (where precipitation falls) and uses natural systems, in other words plants and soil, in a decentralized fashion.
This activity introduces you to this new technology, and after completing this activity, you will be able to apply this new technology at your home and throughout your community just like engineers. With this knowledge, you will be able to educate and inform your community on how to design and construct rain gardens and be able to describe the advantages of green infrastructure.
Procedure
Background
During the past two decades, rain gardens have become an alternative and increasingly popular green infrastructure improvement for managing urban stormwater runoff. The first rain garden, or bioretention, manual was introduced in 1993 by Prince George County, MD, as part of its LID program to improve the water quality of Chesapeake Bay. (Prince George's County, 1993) Following the recommended guidelines within this manual, bioretention systems were designed and constructed within the immediate and surrounding county. The first laboratory and field research on these systems began in 2001 at the University of Maryland (Davis, 2001), collecting performance data on theit treatment efficiency and performance.
Since the introduction of the Prince George County Bioretention Manual and subsequent research, rain gardens have been highly sought after for green urban infrastructure projects, Leadership in Energy and Environmental Design (LEED) certification, and have become a critical component of the LID philosophy. (Davis, 2009) This has provided incentives for state, county and local municipalities to recommend rain gardens as part of their infrastructure design guidelines. However, the lack of region-specific design guidelines and performance data discourages regulatory agencies from accepting bioretention systems as an alternative to conventional stormwater management practices. Thus, a high degree of redundancy is commonly incorporated into the design of these systems. (Morzaria-Luna, 2004)
It is the goal of this unit to educate students about the importance, functionality and installation of green infrastructure and low-impact development technologies, specifically the installation of rain gardens on school campuses and within the community. It is theorized that as people in the community become familiar with the technology, they will insist their local municipalities, planners and design consultants implement these systems throughout their neighborhoods.
Before the Activity
- Gather materials and make copies of the Personal Rain Garden Worksheet, one per student.
- Make available several native plant species for students to select from, to be placed within their personal rain gardens.
- Familiarize yourself with areas on the school campus that flood during rain events, have poor drainage, and that might benefit from enhanced green space.
- Have handy shovel, loppers and access to outdoor water supply so students can water their personal rain gardens after construction is finished.
With the Students
- Divide the class into groups of two or three students each, depending on class size and the availability of resources. Hand out the worksheets.
- Direct students to record the date, time of day, temperature, humidity, dew point and weather conditions on their worksheets. Refer to an online weather website that provides localized weather conditions, such as Weather Underground at http://www.wunderground.com.
- Then have students fill in worksheet tables #1, #2 and #3 by referring to their completed worksheets from two previous activities in this unit.
- Have students record the materials and ratio they used to create the media mix combinations from the Does Media Matter? Worksheet that was used in the Does Media Matter? Infiltration Rates and Storage Capacities activity.
- Then have students record the slope of the line, representing the average infiltration rate from the previously completed Does Media Matter? Worksheet.
- Similarly, have students record the materials and ratio they used to create their pervious pavements from the Magic Sidewalk Worksheet that was used in the Making "Magic" Sidewalks of Pervious Pavement activity.
- Then have students record the average infiltration rate from the previously completed Magic Sidewalk Worksheet. Remember the infiltration rate was calculated by taking the average from the three experimental runs (volume / time).
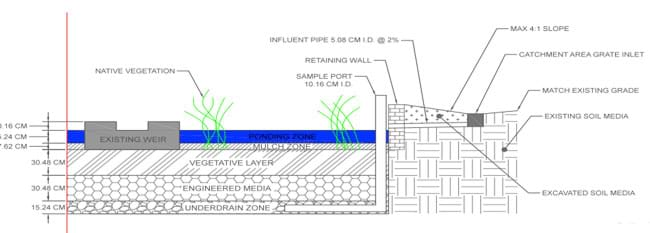
Figure 1. What is the functional purpose of each zone within a rain garden?
- As a class, review the major components of a traditional rain garden and complete worksheet #4. (It may help to sketch the zones on the classroom board as you talk about them; see Figure 1.) Traditional rain gardens consist of four major zones, from top to bottom they are: Ponding zone (rainfall runoff collection area), mulch zone (provides carbon source for biological processes and maintains soil moisture), vegetative layer (native plant species and media mix), and a secondary media zone or engineered media layer. The ponding zone is an open space that allows for a certain volume of stormwater runoff to collect. Some rain garden designs also incorporate an underdrain or submerged zone, depending on site-specific conditions.
Overview: Rain Garden Construction Steps
- Select an appropriate location. Look for areas that naturally collect water during storm events, near roof drain downspouts, adjacent to impervious surfaces, low-lying areas, or areas with moist soil conditions (see Figure 2-left).
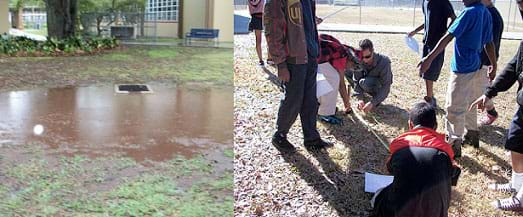
Figure 2. Does your school campus, home or community have areas that flood? - Appropriately size the rain garden based on the overall area that contributes rainfall runoff (catchment). The surface area required is typically between 2% and 5% of the contributing rainfall runoff area.
- Excavate the existing area to provide a storage area for the stormwater to collect and infiltrate during and after rainfall events (see Figure 3).
- For this activity, students are asked to dig to a depth that enables them to plant their planters/baskets and provide 2 to 8-inches of ponding area.
- For larger-scale rain gardens, provide 6 to 12-inches of ponding zone, 2 to 3 inches of mulch zone and 18 to 48 inches of media zone. This is for a large-scale system, typically for areas collecting water from 1-2 acres.
- For smaller (homeowner) scale, provide 4 to 8 inches of ponding zone, 2 to 3 inches of mulch zone, and 6 to 12 inches of media zone or depth of vegetative root zone.
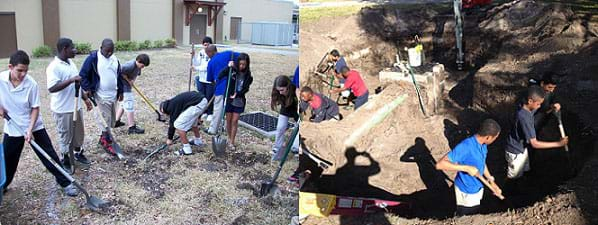
Figure 3. Designing and installing a rain garden on school grounds engages students in site assessment, surveying, project sizing, project management, excavation, drain and port installation, media layer and planter selection and installation, and final elevation grading.
- Backfill the media zone with an earth material that promotes infiltration, maximizes storage area and promotes microbial processes to occur (see Figure 4). A typical media material consists of one or combination of construction sand, compost, topsoil and other types of aggregate.
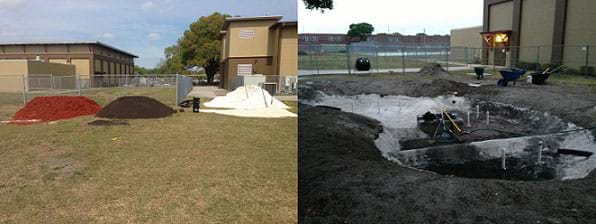
Figure 4. The rain garden at this Florida school incorporates mulch, topsoil, sand and crushed limestone (left). Final site grading is shown on the right. - Level the site to assure an equal distribution of rainwater across the ponding zone during storm events.
- Select location-appropriate species. Choose native plants based on a high evapotranspiration rate, physical plant characteristics, drought and flooding tolerance, aesthetics and wildlife attraction properties.
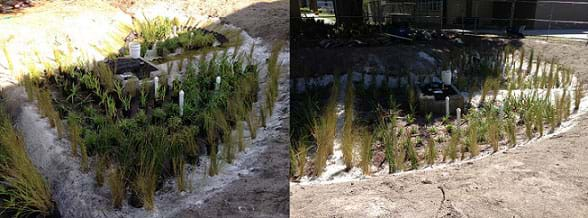
Figure 5. A rain garden native plant installation at a Florida school. - Lay out plant species based on their shade tolerance, growth habit, tolerance for flooding and drought conditions (see Figure 5).
- Install a 2 to 3-inch mulch layer, as shown in Figure 6.
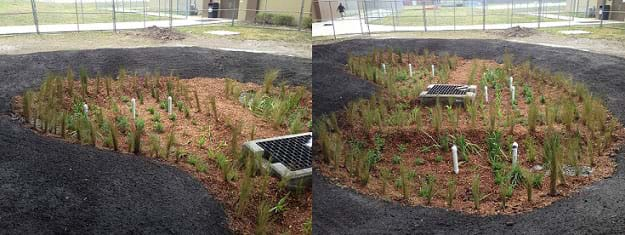
Figure 6. Melaleuca mulch provides the top zone in this finished rain garden on a Florida school campus. - Water and enjoy the natural native habitat, reduction in flooding, reduced impact on the environment, and benefits to the community.
Personal Rain Garden Installation
- Take students on a tour of the school campus to identify areas suitable for a rain garden (see Figure 2-left). Take them to several areas that you have previously identified as potential bioretention areas. Guide students to selecting an appropriate location and review why that location is suitable for a rain garden. Have students record their observations of the site by describing characteristics of the area. Refer to #5 on the worksheet.
- Have students determine the rainfall runoff area. Describe the limits of the area to students and have them use trundle wheels and/or measuring tapes to determine the rainfall runoff area (see Figure 2-right). Record the square footage of the area on the worksheets (#5).
- With the rainfall runoff area known, direct students to calculate an appropriately sized rain garden area. This area is typically roughly estimated to be 2% to 5% of the rainfall runoff area. Refer to #5 on the worksheet.
- Have students sketch the rainfall runoff area and rain garden area on their worksheets (#6), including length and width measurements.
- Have groups select plant species based on the results they recorded on their completed Just Breathe Green Worksheets from the Just Breathe Green: Measuring Transpiration Rates activity. Choose plant species with a high evapotranspiration rate, an aesthetic appeal to the students, and likelihood to survive in the rain garden conditions (shade, flooding, drought) determined by students. Refer to #7 on the worksheet.
- Have students describe the characteristics and preferred conditions of the native plant species (#7 on the worksheet). Include in the description the plant species common name, scientific name, light, water and soil requirements, height, evapotranspiration rate and overall description and sketch. Usually, state food and agricultural sciences divisions and/or county master gardener programs provide significant native plant data online, such as the University of South Florida Water Atlas at http://www.florida.plantatlas.usf.edu.
- Have groups each remove the magic sidewalk from inside its 12-inch biodegradable hanging basket or planter and plant its chosen native plant species in the center of the basket/planter.
- Then place the magic sidewalk around the now planted native plant species and apply a 2-inch mulch layer around the plant, making sure not to cover the magic sidewalk. Now the personal rain garden is complete and ready to be planted within the selected rain garden area.
- At the rain garden area, let teams position their personal rain gardens where they have the best opportunity to thrive and in an arrangement that the class agrees is aesthetically pleasing.
- Have students return to their rain garden drawings and finalize the finished layout of the rain garden. Have them mark the locations of each personal rain garden within the boundary and label each with the group/students' names and plant species.
- Give students some time to plant and water their personal rain gardens within the rain garden area. If desired, fill in any spaces between the personal rain gardens with an appropriate media, such as soil, compost, sand, mulch or other permeable mix.
- Have students compare and contrast other team's rain gardens as well as discuss how effective the gardens are.
- Conclude by leading a class discussion, asking the questions provided in the Assessment section.
Vocabulary/Definitions
bioretention: A rain garden typically constructed with high-permeability media consisting of soil, sand and organic matter, designed to maximize infiltration, improve water quality, promote vegetative growth and biological transformation processes.
green infrastructure: A type of LID that uses natural systems to manage stormwater runoff in a decentralized fashion, typically receiving stormwater from areas less than 2 acres. Abbreviated as GI.
low-impact development: To manage water resources at their sources (that is, where the rain falls, and where it would go without human influence). Abbreviated as LID.
ponding zone: Rainfall runoff collection area.
Assessment
Pre-Activity Assessment
Predictions: You have now completed three activities: 1) Just Breathe Green: Measuring Transpiration Rates, 2) Does Media Matter? Infiltration Rates and Storage Capacities, and 3) Making "Magic" Sidewalks of Pervious Pavement. Ask students:
- How would you combine everything you learned from these activities to create solutions to real world problems relating to stormwater management? (Example answer: We have learned that plants and media such as sand, soil and organic matter act as natural filters, improving water quality by the removal of pollutants in stormwater runoff. These ideas can be combined to solve stormwater flooding and help protect water quality of downstream ecosystems.)
- How could you incorporate this solution into your community? (Example answer: Everything learned from these three activities in this unit can be combined to identify areas in the neighborhood, at home or on the school campus that frequently flood or receive a lot of stormwater runoff. These areas can be engineered to promote water infiltration, improve water quality and cultivate location-appropriate plant species. Additionally, impervious surfaces could be transformed into pervious surfaces by creating magic sidewalks.)
- What are some of the challenges involved in making your solution a reality? (Answers will vary and may include some or all of the steps involved in creating rain gardens.)
Activity Embedded Assessment
Worksheet: Have students complete the Personal Rain Garden Worksheet. This requires them to full in some information from the worksheets their groups completed in some of the associated activities, and then answer new questions related to the preparation, design and installation of their personal rain gardens for this activity. Review their information, answers, calculations and drawings to gauge the depth of their comprehension in pulling together everything they have learned in the unit.
Post-Activity Assessment
Wrap-Up Questions: Remember from our previous lesson that rain gardens typically collect stormwater from areas less than two acres and preferably less than one acre, and traditional stormwater ponds collect stormwater from regions of 100 acres or more.
- You are an engineer for a local design company. How would you use the information from this activity to plan for a new development that uses rain gardens instead of traditional stormwater ponds? What would a stormwater management plan look like for this community? (Answer: Engineers could design the stormwater collection system to collect stormwater from small areas in a decentralized fashion. So, for example one to four homes, portions of a shopping center, or one to three units of an apartment complex might each drain to a specific rain garden location. The community would have access to open green space and could create a walking trail that connected each of the rain gardens to one another. Along the way, informative signage and specific characteristics of each rain garden could be displayed. This information could include plant species and total contributing collection areas. Homeowners would be responsible for the upkeep and maintenance of these rain garden systems and the homeowners association would be responsible for providing funding for new plant installation, mulch and any necessary maintenance so that these systems continue to function as designed.)
- As an engineer, how would you use the information from this activity to create a stormwater management plan for an existing neighborhood that experiences flooding? (Answer: Engineers could identify areas that are prone to flooding and determine areas that intercept stormwater before it collects in larger areas and causes flooding. To accomplish this, engineers might educate the local community on urban stormwater management practices and new technologies such as rain gardens and ask these community members to take photographs of areas that flood. With this data, engineers could create a plan to install rain gardens throughout the community and educate the community members on the ongoing care and maintenance of these systems.)
- What are the benefits of installing GI and LID technologies within your community, compared to traditional stormwater ponds and storm sewer infrastructure? (Answer: We have learned that treating stormwater at its sources, as opposed to traditional stormwater collection systems (ponds, rivers, lakes), improves water quality and restores the natural hydrology of developed sites to pre-development conditions.
- In your own words, describe the steps involved in creating a rain garden. (Answer: 1] locate an area that floods or generates significant amounts of runoff to storm sewers, 2] survey the site and determine the appropriate size for the selected green infrastructure or low-impact development technology, 3] excavate the area, 4] backfill with appropriate materials that promote infiltration and vegetative growth, 5] provide a ponding area to capture excess stormwater runoff, 6] plant the location with suitable plant species, and 7] mulch, water and enjoy!)
- What is important to consider before planting native plant species and why is it best to plant native plant species instead of non-native? (Answer: It is important to consider the appropriate location for a given plant species, taking into consideration its light, soil and water requirements, potential height and width size, and wildlife attracting characteristics. Native plant species are adapted to the local climate and weather conditions and meet location-appropriate wetting and drying conditions. Thus, given the appropriate environment, native plant species do not require irrigation or fertilizing, and are less susceptible to pests and disease.)
Making Sense: Have students reflect about the science phenomena they explored and/or the science and engineering skills they used by completing the Making Sense Assessment.
Additional Multimedia Support
Watch a video (7:17 minutes) about the program that generated this unit: USF-Green Space Based Learning at https://www.youtube.com/watch?v=8UWeJ8ky43w. The first one-third of the video describes the vision and overview of the university and K-12 schools framework, the middle one-third (starting at about minute 4) describes this unit and the personal rain garden project, and the final one-third of the video summarizes the construction of a rain garden at a middle school in Florida. The video includes images of students performing the surveying, project management, site assessment, project sizing, excavation, underdrain sample port installation, media layer and planter selection and installation, and final elevation grading to install a rain garden at their school.
Subscribe
Get the inside scoop on all things Teach Engineering such as new site features, curriculum updates, video releases, and more by signing up for our newsletter!More Curriculum Like This

Students are introduced to innovative stormwater management strategies that are being used to restore the hydrology and water quality of urbanized areas to pre-development conditions. A PowerPoint® presentation provides photographic examples, and a companion file gives students the opportunity to sk...

Through the two lessons in this unit, students are introduced to green infrastructure (GI) and low-impact development (LID) technologies, including green roofs and vegetative walls, bioretention or rain gardens, bioswales, planter boxes, permeable pavement, urban tree canopies, rainwater harvesting,...

Students examine in detail the water cycle components and phase transitions, and then learn how water moves through the human-made urban environment. Students show their understanding of the process by writing a description of the path of a water droplet through the urban water cycle, from the dropl...

Students gain an understanding of the parts of a plant, plant types and how they produce their own food from sunlight through photosynthesis. They learn how plants play an important part in maintaining a balanced environment in which the living organisms of the Earth survive. This lesson is part of ...
References
Davis, Allen P., Hunt, William F., Traver, Robert G., and Clar, Michael. (2009). Bioretention Technology: Overview of Current Practice and Future Needs. Journal of Environmental Engineering, 135(3), 109-117. doi: 10.1061/(asce)0733-9372(2009)135:3(109)
Davis, Allen P., Shokouhian, M., Sharma, H., and Minami, C. (2001). Laboratory study of biological retention for urban stormwater management. Water Environment Research, 73(1), 5-14. doi: 10.2175/106143001x138624
Morzaria-Luna, H. N., Schaepe, K. S., Cutforth, L. B., and Veltman, R. L. (2004). Implementation of bioretention systems: A Wisconsin case study. Journal of the American Water Resources Association, 40(4), 1053-1061. doi: 10.1111/j.1752-1688.2004.tb01066.x
Prince George's County. (1993). Design manual for use of bioretention in stormwater management. Landover, MD: Maryland Department of Environmental Protection, Watershed Protection Branch.
Roy-Poirier, A., Champagne, P., and Filion, Y. (2010). Review of Bioretention System Research and Design: Past, Present, and Future. Journal of Environmental Engineering-Asce, 136(9), 878-889. doi: 10.1061/(asce)ee.1943-7870.0000227
Copyright
© 2014 by Regents of the University of Colorado; original © 2013 University of South FloridaContributors
Ryan Locicero, Maya Trotz, Krysta Porteus, Jennifer Butler, William Zeman, Brigith SotoSupporting Program
Water Awareness Research and Education (WARE) Research Experience for Teachers (RET), University of South Florida, TampaAcknowledgements
This curriculum was developed by Water Awareness Research and Education (WARE) Research Experience for Teachers (RET) at the University of South Florida, funded by National Science Foundation grant number EEC 1200682. However, the contents do not necessarily represent the policies of the NSF, and should not be assumed an endorsement by the federal government.
Last modified: October 20, 2020


User Comments & Tips