
Simple Snow Load Roof Model Demo: Which Roof Is Tops?
When you look around your neighborhood, what do the roofs look like? What if you lived in an area with a different climate, how might that affect the style of roofs that you see? Through this introductory engineering activity, students consider the advantages of different roof shapes for different climates or situations. During a teacher demo, they observe and discuss what happens when a "snow load" (sifted cups of flour) is placed on three different model roof shapes. A student worksheet is included.
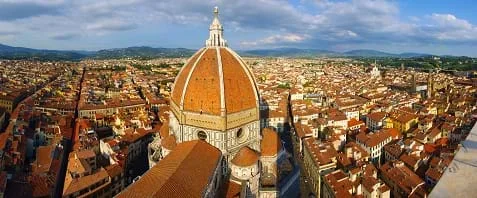 Look at all the different roof top shapes!Copyright 2011 Darren Po, Wikimedia Commons CC BY-SA 3.0 https://commons.wikimedia.org/wiki/File:Florence_rooftops.jpg
Civil engineers always consider the climate of the area in which they plan to design and build structures. They consider the types of natural disasters that the area is prone to having. The design and materials chosen for a building's roof help to maintain the desired temperature within the building and provide a stable structure to protect against the local weather conditions. Engineers use models to test the shapes, materials and functionality of their designs.
After this activity, students should be able to:
- Understand that materials, both natural and human-made, have specific characteristics that determine their suitable use.
- Understand that engineering design requires creative thinking and consideration of a variety of ideas to solve practical problems.
- Explain why climate and natural disasters have an impact of how engineers design buildings and structures.
- CCSS.Math.Content.1.G.A Reason with shapes and their attributes.
Grade 1
Do you agree with this alignment?
- STEL-4B Illustrate helpful and harmful effects of technology.
Grades -1-2
Do you agree with this alignment? - STEL-5B Explore how technologies are developed to meet individual and societal needs and wants.
Grades -1-2
Do you agree with this alignment? - STEL-7A Apply design concepts, principles, and processes through play and exploration.
Grades -1-2
Do you agree with this alignment? - STEL-7E Illustrate that there are different solutions to a design and that none are perfect.
Grades -1-2
Do you agree with this alignment?
- 1.G.A Reason with shapes and their attributes.
Grade 1
Do you agree with this alignment?
- 2.K-2-ETS1-3 Analyze data from tests of two objects designed to solve the same design problem to compare the strengths and weaknesses of how each object performs.
Grade 2
Do you agree with this alignment?
- K-2-ETS1-2 Develop a simple sketch, drawing, or physical model to illustrate how the shape of an object helps it function as needed to solve a given problem.
Grades K-2
This resource focuses on the following Three Dimensional Learning aspects of NGSS:
Science & Engineering Practices- Develop a simple model based on evidence to represent a proposed object or tool.Do you agree with this alignment?
Disciplinary Core Ideas- Designs can be conveyed through sketches, drawings, or physical models. These representations are useful in communicating ideas for a problem's solutions to other people.Do you agree with this alignment?
Crosscutting Concepts- The shape and stability of structures of natural and designed objects are related to their function(s).Do you agree with this alignment?
Do you agree with this alignment? - Develop a simple model based on evidence to represent a proposed object or tool.
- K-2-ETS1-3 Analyze data from tests of two objects designed to solve the same problem to compare the strengths and weaknesses of how each performs.
Grades K-2
This resource focuses on the following Three Dimensional Learning aspects of NGSS:
Science & Engineering Practices- Analyze data from tests of an object or tool to determine if it works as intended.Do you agree with this alignment?
Disciplinary Core Ideas- Because there is always more than one possible solution to a problem, it is useful to compare and test designs.Do you agree with this alignment?
Do you agree with this alignment? - Analyze data from tests of an object or tool to determine if it works as intended.
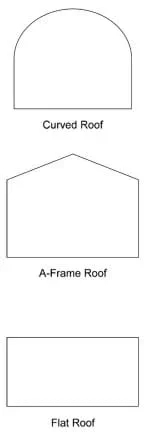 Figure 1. Three different roof shapes.Copyright 2004 Tufts University
- 3 shoeboxes or similar containers
- 1 poster board
- 1 newspaper and/or cookie sheet
- ~2 cups flour
- (optional) flour sifter or sieve
- Roof Shape Worksheet (PDF), one per student
What shape is the roof on your house? What is the climate where you live? Can you think of reasons why the climate might influence the shape of your roof?
Ask students what type of natural disasters can affect the shape of your roof. Elicit responses from students. Explain that snowstorms and blizzards have a large influence on the shape of your roof because of the weight of the snow. Architects and engineers who design homes in regions that get a lot of snow think about how snow builds up on the roofs. If a roof is not strong enough, the weight of the snow (the "snow load") may cause the roof to cave in.
Today you are an engineer designing a roof for a snowy climate. What roof shapes would you consider to prevent snow from building up on the roof? What types of materials would you use to build your roof to help prevent snow from sticking to it?
Background
A model is a copy of an object that is too big, too small or too complicated, costly or dangerous to study easily. Engineers use models to test and study how well things are built or to test different designs. To an engineer, a "load" is any force that pushes or pulls. For example, the weight of snow pushes down on a building, and that's what we call a snow load. A wind load pushes on the sides of a building and the structures of a bridge.
Before the Activity
- Gather materials. Obtain flour and containers to hold about 2 cups of flour. A flour sieve is helpful, if available.
- Make copies of the Roof Shape Worksheet (PDF), one per student.
- Gather a collection of photographs from the Internet that show different types of roofs in various climates to show the class.
- Create three model roofs for a class demo. Cut away one end of each box so that students can view the effects of snow loads. Use poster board to make three different roof types, one for each box: curved, A-frame and flat (see Figure 1 or the worksheet). Using a single piece of masking tape, tape each edge of the roof to the open top of the box. Place newspaper and/or a cookie sheet under the testing station to catch any loose flour (to control the mess and collect flour to use again in the next test).
With the Students
- Show the class photographs of different roof designs. Talk about what types of climates each roof might be found in. What characteristics make a roof good or bad for a given climate? Incorporate the Investigating Questions into the activity.
- Show the class the example roofs you prepared in advance. We call these models.
- Explain that the flour represents snow. Ask students to make predictions as to which roof would be best for a snowy climate.
- Slowly sprinkle "snow" onto the center of the roof as students watch the roof through the open end of the box.
- Have students make observations on their worksheets as the snow is applied to the roof and builds up to a weighty amount ("the snow load").
- Repeat the process with each model roof type.
- Conclude with a class discussion to share and compare observations and conclusions. Refer to the Investigating Questions.
Questions: Throughout the activity, ask students the Investigating Questions to gauge their comprehension of the concepts. Refer to the Rubric for Performance Assessment (PDF) for suggested criteria to assess their knowledge and understanding of the concepts.
To avoid a flour storm after done loading one roof type, carefully lift the roof and gently tap the bottom so that the flour falls into the box. Empty the flour from the box into a container to be reused for the next test.
Supporting Program
Center for Engineering Educational Outreach, Tufts University
Copyright
2013 by Regents of the University of Colorado; original © 2004 Worcester Polytechnic Institute