
Quick Look
Grade Level: 8 (6-8)
Time Required: 15 minutes
Lesson Dependency: None
Subject Areas: Physical Science
Summary
Students learn about the types of possible loads, how to calculate ultimate load combinations, and investigate the different sizes for the beams (girders) and columns (piers) of simple bridge design. They learn the steps that engineers use to design bridges by conducting their own hands on associated activity to prototype their own structure. Students will begin to understand the problem, and learn how to determine the potential bridge loads, calculate the highest possible load, and calculate the amount of material needed to resist the loads.
Engineering Connection
Engineers who design structures must completely understand the problem to be solved, which includes the complexities of the site and the customer needs. To design for safety and longevity, engineers consider the different types of loads, how they are applied and where. Engineers often aim for a design that is strongest and lightest possible—one with the highest strength-to-weight ratio.
Learning Objectives
After this lesson, students should be able to:
- List several examples of loads that could affect a bridge.
- Explain why knowledge about various loads or forces is important in bridge design.
- Describe the process that an engineer uses to design a bridge, including determining loads, calculating the highest load, and calculating the amount of material to resist the loads.
Educational Standards
Each Teach Engineering lesson or activity is correlated to one or more K-12 science,
technology, engineering or math (STEM) educational standards.
All 100,000+ K-12 STEM standards covered in Teach Engineering are collected, maintained and packaged by the Achievement Standards Network (ASN),
a project of D2L (www.achievementstandards.org).
In the ASN, standards are hierarchically structured: first by source; e.g., by state; within source by type; e.g., science or mathematics;
within type by subtype, then by grade, etc.
Each Teach Engineering lesson or activity is correlated to one or more K-12 science, technology, engineering or math (STEM) educational standards.
All 100,000+ K-12 STEM standards covered in Teach Engineering are collected, maintained and packaged by the Achievement Standards Network (ASN), a project of D2L (www.achievementstandards.org).
In the ASN, standards are hierarchically structured: first by source; e.g., by state; within source by type; e.g., science or mathematics; within type by subtype, then by grade, etc.
NGSS: Next Generation Science Standards - Science
-
Structures can be designed to serve particular functions.
(Grades 6 - 8)
More Details
Do you agree with this alignment?
Common Core State Standards - Math
-
Fluently add, subtract, multiply, and divide multi-digit decimals using the standard algorithm for each operation.
(Grade
6)
More Details
Do you agree with this alignment?
International Technology and Engineering Educators Association - Technology
-
The selection of designs for structures is based on factors such as building laws and codes, style, convenience, cost, climate, and function.
(Grades
6 -
8)
More Details
Do you agree with this alignment?
State Standards
Colorado - Math
-
Solve real-world and mathematical problems involving the four operations with rational numbers.
(Grade
7)
More Details
Do you agree with this alignment?
Colorado - Science
-
Predict and evaluate the movement of an object by examining the forces applied to it
(Grade
8)
More Details
Do you agree with this alignment?
Worksheets and Attachments
Visit [www.teachengineering.org/lessons/view/cub_brid_lesson02] to print or download.Pre-Req Knowledge
The students should have a familiarity with bridge types, as introduced in the first lesson of the Bridges unit, including area, and compressive and tensile forces.
Introduction/Motivation
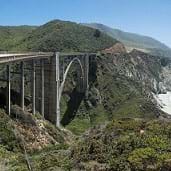
We know that bridges play an important part in our daily lives. We know they are essential components of cities and the roadways between populations of people. Some bridges are simple and straightforward; others are amazingly complex. What are some bridges that you know that might be called simple bridges? (Possible answers: Log over a creek, bridges over streams.) What are some bridges you know that might be considered more complicated? (Possible answers: Golden Gate Bridge, other large bridges, bridges that carry both highway traffic and train traffic.) What makes some bridges simple and other complex? (Possible answers: Their size, multiple purposes, environmental conditions, environmental forces, material maintenance requirements, etc.)
One amazing example of a bridge's contribution to connecting people to other populations and places for both social and commerce reasons is the Sky Gate Bridge connecting people to Japan's Kansai International Airport, located in Osaka Bay.
It all started when the nearby Osaka and Tokyo airports were unable to meet demand, nor be expanded. To solve the problem, the people of Japan took on one of the most challenging engineering projects the world has ever seen. Since they had no land for a new airport, they decided to create the Kansai International Airport by constructing an entire island! On this new, artificial island, they built the airport terminal and runways. Then, they needed a bridge to access it. Spanning 3.7 km from the mainland in Osaka to the airport in an ocean bay, the Sky Gate Bridge is one of the longest truss bridges in the world and has an upper deck for auto transport and a lower, internal deck for rail lines.

Considered a modern engineering marvel, the airport and bridge opened in 1994. Four months later, it survived a magnitude 6.7 earthquake with only minor damage. Because the airport site is built on compact soil, it sinks 2-4 cm per year — another condition for engineers to consider in the ongoing safety and maintenance of the airport and bridge.
It is not easy to create a bridge the size of the Sky Gate Bridge. Have you ever wondered how engineers actually go about designing an entire bridge? Bridges are often designed one piece at a time. Each pier (columns) and girder (beams) has to meet certain criteria for the success of the whole bridge. Structural engineers go through several steps of the engineering design process before even coming up with ideas for their final designs.
- Ask: First and foremost, engineers must understand the problem completely. To do this, they ask a lot of questions. What are some questions the engineers might ask? (Possible answers: How strong would you need to make the bridge? What materials would you use? How would you anchor the pier foundations? What natural phenomena might your bridge need to be capable of withstanding?)
- Research: Next, engineers must determine what types of loads or forces they expect the bridge to carry. Loads might include traffic such as trains, trucks, bikes, people and cars. Other loads might be from the natural environment. For example, bridges in Florida must be able to withstand hurricane forces. So, engineers research the local weather, soil, and other factors to consider loads such as winds, hurricanes, tornadoes, snow, earthquakes, rushing river water, and sometimes standing water. Can you think of any other loads that may act on a bridge of any kind?
- The next step is to determine if these loads can occur at the same time and what combination of loads provides the highest possible force (stress) on the bridge. For example, a train crossing a bridge and an earthquake in the vicinity of the bridge could occur at the same time. However, many vehicles crossing a bridge and a tornado passing close to the bridge probably would not occur at the same time.
- After having calculated the largest anticipated force from all the possible load combinations, engineers use mathematical equations to calculate the amount of material required to resist the loads in that design. (For simplicity, we will not consider how these forces act on the bridge; just knowing that they do act on the bridge is sufficient.)
- Imagine: After they have considered all of these calculations, engineers brainstorm different design ideas that would accommodate the anticipated loads and amount of material needed. They split their design into smaller parts and work on the design criteria for all the components of the bridge.
Lesson Background and Concepts for Teachers
For designing safe bridge structures, the engineering design process includes the following steps: 1) developing a complete understanding of the problem, 2) determining potential bridge loads, 3) combining these loads to determine the highest potential load, and 4) computing mathematical relationships to determine the how much of a particular material is needed to resist the highest load.
Understanding the Problem
One of the most important steps in the design process is to understand the problem. Otherwise, the hard work of the design might turn out to be a waste. In designing a bridge, for instance, if the engineering design team does not understand the purpose of the bridge, then their design could be completely irrelevant to solving the problem. If they are told to design a bridge to cross a river, without knowing more, they could design the bridge for a train. But, if the bridge was supposed to be for only pedestrians and bicyclists, it would likely be grossly over-designed and unnecessarily expensive (or vice versa). So, for a design to be suitable, efficient and economical, the design team must first fully understand the problem before taking any action.
Load Determination
Determining the potential loads or forces that are anticipated to act on a bridge is related to the bridge location and purpose. Engineers consider three main types of loads: dead loads, live loads and environmental loads:
- Dead loads include the weight of the bridge itself plus any other permanent object affixed to the bridge, such as toll booths, highway signs, guardrails, gates or a concrete road surface.
- Live loads are temporary loads that act on a bridge, such as cars, trucks, trains or pedestrians.
- Environmental loads are temporary loads that act on a bridge and that are due to weather or other environmental influences, such as wind from hurricanes, tornadoes or high gusts; snow; and earthquakes. Rainwater collecting might also be a factor if proper drainage is not provided.
Values for these loads are dependent on the use and location of the bridge. Examples: The columns and beams of a multi-level bridge designed for trains, vehicles and pedestrians should be able to withstand the combined load all three bridge uses at the same time. The snow load anticipated for a bridge in Colorado would be much higher than that one in Georgia. A bridge in South Carolina should be designed to withstand earthquake loads and hurricane wind loads, while the same bridge in Nebraska should be designed for tornado wind loads.
Load Combinations
During bridge design, combining the loads for a particular bridge is an important step. Engineers use several methods to accomplish this task. The two most popular methods are the UBC and ASCE methods.
The Uniform Building Code (UBC), the building code standard adopted by many states, defines five different load combinations. With this method, the load combination that produces the highest load or most critical effect is used for design planning. The five UBC load combinations are:
- Dead Load + Live Load + Snow Load
- Dead Load + Live Load + Wind Load (or Earthquake Load)
- Dead Load + Live Load + Wind Load + (Snow Load ÷ 2)
- Dead Load + Live Load + Snow Load + (Wind Load ÷ 2)
- Dead Load + Live Load + Snow Load + Earthquake Load
The American Society of Civil Engineers (ASCE) defines six different load combinations. As with the UBC method, the load combination that produces the highest load or most critical effect is used for design planning. However, the load calculations for ASCE are more complex than the UBC ones. For the purposes of this lesson and the associated activity Load It Up!, we will use the five UBC load combinations.
Determination of Member Size

After an engineer determines the highest or most critical load combination, they determine the size of the members. A bridge member is any individual main piece of the bridge structure, such as columns (piers) or beams (girders). Column and beam sizes are calculated independently.
To solve for the size of a column, engineers perform calculations using strengths of materials that have been pre-determined through testing. The Figure 1 sketch shows a load acting on a column. This force represents the highest or most critical load combination from above. This load acts on the cross-sectional area of the column.
The stress due to this load is σ = Force ÷ Area. In Figure 1, the area is unknown and hence the stress is unknown. Therefore, the use of the tensile and compressive strength of the material is used to size the member and the equation becomes Force = Fy x Area, where force is the highest or most critical load combination. Fy can be the tensile strength or compressive strength of the material. For common building steel, this value is typically 50,000 lb/in2. For concrete, this value is typically in the range of 3,500 lb/in2 to 5,000 lb/in2 for compression. Typically, engineers assume that the tensile strength of concrete is zero. Therefore, solving for the Area, Area = Force ÷ Fy. Keeping the units consistent is important: Force is measured in pounds (lbs) and Fy in pounds per square inches (lb/in2). The area is easily solved for and is measured in square inches (in2).

To solve for the size of a beam, engineers perform more calculations. The sketch in Figure 2 shows a beam with a load acting on it. This load is the highest or most critical load combination acting on the top of the beam at mid-span. Compressive forces usually act on the top of the beam and tensile forces act on the bottom of the beam due to this particular loading. For this example, the equation for calculating the area becomes a bit more complicated than for the size of a column. With a single load acting at the mid-span of a beam, the equation is Force x Length ÷ 4 = Fy x Zx. As before, force equals the highest or most critical load combination pounds (lbs). Length is the total length of the beam that is usually known. Usually, units of length are given in feet (ft) and often converted to inches. Fy is the tensile strength or compressive strength of the material as described above. Zx is a coefficient that involves the dimensions of the cross-sectional area of the member. Therefore, Zx = (Force x Length) ÷ (Fy x 4), where Zx has units of cubed inches (in3).

Every beam shape has its own cross sectional area calculations. Most beams actually have rectangular cross sections in reinforced concrete buildings, but the best cross-section design is an I-shaped beam for one direction of bending (up and down). For two directions of movement, a box, or hollow rectangular beam, works well (see Figure 3).
Associated Activities
- Load It Up! - Students take a hands-on look at the design of bridge piers (columns). Using clay, marshmallows or foam, they design and test model columns to resist predetermined loads and perform calculations to determine the columns' cross-sectional areas.
Lesson Closure
Take a moment and think of all the bridges you know around your home and community. Maybe you see them on roadways, bike paths or walking paths. Think of those that have piers (columns) and girders (beams). What do they look like? Can you remember the sizes of the piers and girders? (Discussion point: Students may recall noticing that piers and girders for pedestrian and bicycle bridges are much smaller than those for highway or railway traffic.)
What are examples of load types? (Possible answers: Vehicles, people, snow, rain, wind, the weight of the bridge and its railings and signs, etc.) Why would the loads make a difference in how an engineer designed a bridge? (Answer: Engineers must figure out all of the loads that might affect bridges before they design them.) If you were an engineer, how would you go about designing a bridge to make sure it was safe? (Discussion points: First, fully understand the problem to be solved with the bridge, its requirements and purpose. Then figure out all the possible types of loads [forces] that the bridge might need to withstand. Then calculate the highest possible load the bridge might have to withstand at one time. Then figure out the amount of construction material required that can resist that projected load.)
Vocabulary/Definitions
brainstorming: A method of shared problem solving in which all members of a group quickly and spontaneously contribute many ideas.
compressive strength: The amount of compressive stress that a material can resist before failing.
cross-sectional area: A "slice" or top-view of a shape (such as a girder or pier).
design: (verb) To plan out in systematic, often graphic form. To create for a particular purpose or effect. Design a bridge. (noun) A well thought-out plan.
engineer: A person who applies their understanding of science and mathematics to creating things for the benefit of humanity and our world.
engineering: Applying scientific and mathematical principles to practical ends such as the design, manufacture and operation of efficient and economical structures, machines, processes and systems.
engineering design: The process of devising a system, component or process to meet desired needs. (Source: Accreditation Board for Engineering and Technology, Inc.)
force: A push or pull on an object, such as compression or tension.
girder: The "beam" of a bridge; usually horizontal member.
load: Any of the forces that a structure is calculated to oppose, comprising any unmoving and unvarying force (dead load), any load from wind or earthquake (environmental load), and any other moving or temporary force (live load).
member: An individual angle, beam, plate or built piece intended to become an integral part of an assembled frame or structure.
pier: The "column" of a bridge; usually vertical member.
tensile strength: The amount of tensile stress that a material can resist before failing.
Assessment
Pre-Lesson Assessment
Pairs Drawing: Divide the class into teams of three students each. Have each engineering team sketch a bridge to carry a train across a river that is 100-meters wide. Have them describe the type of bridge and where the compressive and tensile forces are acting on it.
Post-Introduction Assessment
Complete the Design/Presentation: Have student teams return to their bridge design from the pre-lesson assessment and think about the potential loads on their bridge, given the just-discussed engineering design process steps. Have them draw in the loads and the direction that they would act on the bridge. What do they think the highest load combination would be (how many of these loads could actually happen at the same time)? Then, ask for one or two engineering teams to volunteer to present the details of their bridge design to the class.
Lesson Summary Assessment

Human Bridge: Have students use themselves as the raw construction material to create a bridge that spans the classroom and is strong enough that a cat could walk across it. Encourage them to be creative and design it however they want, with the requirement that each person must be in direct contact with another class member. How many places can you identify tension and compression? How would you change the design if the human bridge had to be strong enough for a child to walk across it? What other loads might act upon your bridge?
Concluding Discussion: Wrap up the lesson and gauge students' comprehension of the learning objectives by leading a class discussion using the questions provided in the Lesson Closure section.
Homework
Math Worksheet: Assign students the attached Load Combinations Worksheet as homework. After using the five UBC load combinations to calculate the highest or most critical load on the first page, they use that information to solve three problems on subsequent pages, determining the required size of bridge members of specified shapes and materials. The three problem questions increase in difficulty: younger students should complete only problem 1; older students should complete problems 1 and 2; advanced math students should complete all three problems.
Lesson Extension Activities
Have students build and test the load-carrying capacity of balsa wood bridges. Begin by looking at Peter L. Vogel's website on the Balsa Bridge Building Contest at http://www.balsabridge.com/
Accidents happen! Assign students to investigate and report on what went wrong when a steel beam from a highway viaduct fell onto a moving vehicle. Read the May 2004 National Transportation Safety Board highway accident brief with photos. See NTSB Abstract HAB-06/01, Passenger Vehicle Collision with a Fallen Overhead Bridge Girder at: http://www.ntsb.gov/news/events/2006/golden_co/presentations.html
Have the class participate in the yearly West Point Bridge Design Contest. Access excellent and free downloadable bridge design software and other educational resources at the US Military Academy at West Point website: bridgecontest.usma.edu/
Additional Multimedia Support
Use the online Bridge Designer software (no downloading required!) provided by Virtual Laboratories, Whiting School of Engineering, Johns Hopkins University: http://engineering.jhu.edu/ei/bridge-designer/
Subscribe
Get the inside scoop on all things Teach Engineering such as new site features, curriculum updates, video releases, and more by signing up for our newsletter!More Curriculum Like This

Students take a hands-on look at the design of bridge piers (columns). They determine the maximum possible load for that scenario, and calculate the cross-sectional area of a column designed to support that load.

Students are presented with a brief history of bridges as they learn about the three main bridge types: beam, arch and suspension. They are introduced to two natural forces — tension and compression — common to all bridges and structures.

Learn the basics of the analysis of forces engineers perform at the truss joints to calculate the strength of a truss bridge known as the “method of joints.” Find the tensions and compressions to solve systems of linear equations where the size depends on the number of elements and nodes in the trus...
References
ACI Committee 318, Building Code Requirements for Structural Concrete (ACI 318-02) and Commentary (ACI 318R-02): An ACI Standard. Farmington Hills, MI: American Concrete Institute, 2002.
AISC Committee on Manuals and Textbooks, Manual of Steel Construction: Load and Resistance Factor Design. Third Edition. American Institute of Steel Construction, 2001.
Hibbeler, R.C. Mechanics of Materials. Third Edition. Upper Saddle River, NJ: Prentice Hall, 1997.
Kansai Airport. Earth Observatory Newsroom, National Aeronautics and Space Administration.
Uniform Building Code. International Conference of Building Officials: Whittier, CA, 1991.
Copyright
© 2007 by Regents of the University of ColoradoContributors
Jonathan S. Goode; Joe Friedrichsen; Natalie Mach; Christopher Valenti; Denali Lander; Denise W. Carlson; Malinda Schaefer ZarskeSupporting Program
Integrated Teaching and Learning Program and Laboratory, University of Colorado BoulderAcknowledgements
The contents of this digital library curriculum were developed under grants from the Fund for the Improvement of Postsecondary Education (FIPSE), U.S. Department of Education and the National Science Foundation (GK-12 grant no. 0338326). However, these contents do not necessarily represent the policies of the DOE or NSF, and you should not assume endorsement by the federal government.
Last modified: September 11, 2024
User Comments & Tips