Summary
Students take a hands-on look at the design of bridge piers (columns). First they brainstorm types of loads that might affect a Colorado bridge. Then they determine the maximum possible load for that scenario, and calculate the cross-sectional area of a column designed to support that load. Choosing from clay, foam or marshmallows, they create model columns and test their calculations.Engineering Connection
The engineering design process begins by thoroughly understanding the problem to be solved. Once all aspects of the problem are understood, engineers explore many possible design solutions to determine the one that best meets all the objectives. Performing a load analysis helps engineers determine how to design a structure that is strong enough and what types of materials to use. Engineers also keep in mind how material choices may affect construction speed and cost.
Learning Objectives
After this activity, students should be able to:
- Describe the process that an engineer uses to design a bridge, including determining loads, calculating the highest load, and calculating the amount of material to resist the loads.
- Use appropriate calculations to model pier (column) design in a bridge.
Educational Standards
Each Teach Engineering lesson or activity is correlated to one or more K-12 science,
technology, engineering or math (STEM) educational standards.
All 100,000+ K-12 STEM standards covered in Teach Engineering are collected, maintained and packaged by the Achievement Standards Network (ASN),
a project of D2L (www.achievementstandards.org).
In the ASN, standards are hierarchically structured: first by source; e.g., by state; within source by type; e.g., science or mathematics;
within type by subtype, then by grade, etc.
Each Teach Engineering lesson or activity is correlated to one or more K-12 science, technology, engineering or math (STEM) educational standards.
All 100,000+ K-12 STEM standards covered in Teach Engineering are collected, maintained and packaged by the Achievement Standards Network (ASN), a project of D2L (www.achievementstandards.org).
In the ASN, standards are hierarchically structured: first by source; e.g., by state; within source by type; e.g., science or mathematics; within type by subtype, then by grade, etc.
NGSS: Next Generation Science Standards - Science
| NGSS Performance Expectation | ||
|---|---|---|
|
MS-ETS1-2. Evaluate competing design solutions using a systematic process to determine how well they meet the criteria and constraints of the problem. (Grades 6 - 8) Do you agree with this alignment? |
||
| Click to view other curriculum aligned to this Performance Expectation | ||
| This activity focuses on the following Three Dimensional Learning aspects of NGSS: | ||
| Science & Engineering Practices | Disciplinary Core Ideas | Crosscutting Concepts |
| Evaluate competing design solutions based on jointly developed and agreed-upon design criteria. Alignment agreement: | There are systematic processes for evaluating solutions with respect to how well they meet the criteria and constraints of a problem. Alignment agreement: | |
| NGSS Performance Expectation | ||
|---|---|---|
|
MS-ETS1-4. Develop a model to generate data for iterative testing and modification of a proposed object, tool, or process such that an optimal design can be achieved. (Grades 6 - 8) Do you agree with this alignment? |
||
| Click to view other curriculum aligned to this Performance Expectation | ||
| This activity focuses on the following Three Dimensional Learning aspects of NGSS: | ||
| Science & Engineering Practices | Disciplinary Core Ideas | Crosscutting Concepts |
| Develop a model to generate data to test ideas about designed systems, including those representing inputs and outputs. Alignment agreement: | Models of all kinds are important for testing solutions. Alignment agreement: The iterative process of testing the most promising solutions and modifying what is proposed on the basis of the test results leads to greater refinement and ultimately to an optimal solution.Alignment agreement: | |
Common Core State Standards - Math
-
Reason abstractly and quantitatively.
(Grades
K -
12)
More Details
Do you agree with this alignment?
-
Fluently divide multi-digit numbers using the standard algorithm.
(Grade
6)
More Details
Do you agree with this alignment?
-
Fluently add, subtract, multiply, and divide multi-digit decimals using the standard algorithm for each operation.
(Grade
6)
More Details
Do you agree with this alignment?
-
Solve real-world and mathematical problems involving area, volume and surface area of two- and three-dimensional objects composed of triangles, quadrilaterals, polygons, cubes, and right prisms.
(Grade
7)
More Details
Do you agree with this alignment?
International Technology and Engineering Educators Association - Technology
-
Students will develop an understanding of the attributes of design.
(Grades
K -
12)
More Details
Do you agree with this alignment?
-
Students will develop an understanding of engineering design.
(Grades
K -
12)
More Details
Do you agree with this alignment?
-
The selection of designs for structures is based on factors such as building laws and codes, style, convenience, cost, climate, and function.
(Grades
6 -
8)
More Details
Do you agree with this alignment?
State Standards
Colorado - Math
-
Fluently add, subtract, multiply, and divide multidigit decimals using standard algorithms for each operation.
(Grade
6)
More Details
Do you agree with this alignment?
-
Fluently divide multi-digit numbers using standard algorithms.
(Grade
6)
More Details
Do you agree with this alignment?
-
Solve real-world and mathematical problems involving area, volume and surface area of two- and three-dimensional objects composed of triangles, quadrilaterals, polygons, cubes, and right prisms.
(Grade
7)
More Details
Do you agree with this alignment?
Colorado - Science
-
Predict and evaluate the movement of an object by examining the forces applied to it
(Grade
8)
More Details
Do you agree with this alignment?
Materials List
Each group needs:
- Pier (Column) Design Worksheet
- calculator
- measuring stick or ruler with 1/16-in (1-mm) marks
- weights for measuring, totaling at least 7 lbs (3 kg), such as weights, books or a coffee can filled with coins or rocks
- (optional) sculpting tool, such as a metal spoon or scissors to cut clay, foam and marshmallows
For the entire class to share:
- modeling clay pieces, ~ 2 in x 2 in x 3 in tall (~5 cm x 5 cm x 7.5 cm)
- 1 bag large-sized marshmallows
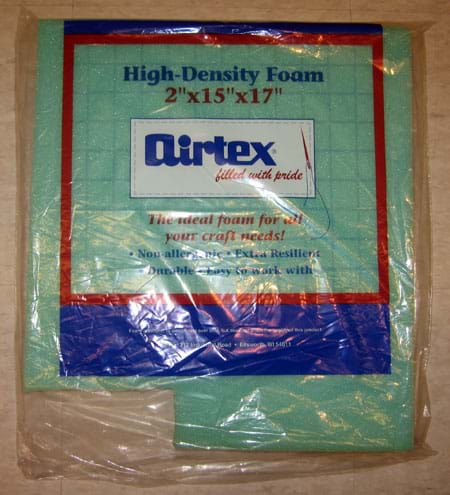
- high-density foam, about 1 ft2 (9 dm2) by 1-2-inches (2.5-5-cm) thick; available at fabric and craft stores
- scale, to weigh books
- scrap paper and tape, to note book weights on each book
- tape, to hold marshmallows together
- (optional) wax paper or plastic wrap, to keep clay moist before use
- (optional) toothpicks (if students redesign using "reinforced" materials)
Worksheets and Attachments
Visit [www.teachengineering.org/activities/view/cub_brid_lesson02_activity1] to print or download.Pre-Req Knowledge
Students should have a familiarity with bridge types, as introduced in the first lesson of the Bridges unit, including area of a rectangle, and compressive and tensile forces.
Introduction/Motivation
Bridges are essential components of our communities, cities and roadways. What would happen to the normal course of your life if one day all the bridges over rivers and water, and all the bridges that enable our highway system suddenly collapsed because they could no longer withstand the forces of the load placed on them every day? (Collect responses from students.) Would it be a problem for people in Japan if the 3.7 km Sky Gate Bridge that connects Japan's Kansai International Airport in Osaka Bay to the mainland failed? What are the real-world consequences of un-planned-for compressive or tensile forces? What happens to a structure or a bridge if the forces on it are too much for the design and materials to withstand? (Show students photographs in the attached Failed Bridges Images PowerPoint presentation, or from an Internet image search using keywords such as: bridge, highway, failure, collapse, damage.) Engineers do not want to be put in the position of having failed or collapsed bridges, although sometimes it happens when the materials of bridges deteriorate or are not maintained over the years, or they become used for more load than originally planned.
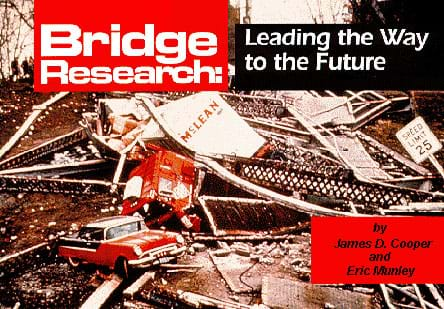
What are some examples of loads that a bridge might need to withstand? (Take suggestions from students. Possible answers: Vehicles, people, snow, rain, wind, the weight of the bridge and its railings and signs, etc.) Engineers would organize your answers into three main types of loads: dead loads, live loads and environmental loads. Dead loads include the weight of the bridge itself plus any other object permanently fixed to the bridge, such as highway signs, guardrails or a concrete road surface. Live loads are temporary loads that act on a bridge, such as cars, trucks, trains or pedestrians. Lastly, environmental loads are temporary loads that act on a bridge and that are due to weather or other environmental influences, such as wind from hurricanes, tornadoes or high gusts; snow; and earthquakes. Rainwater collecting on the bridge might also be a factor if proper drainage is not provided. What if more than one of these types of loads happened to the bridge at the same time? Engineers design bridges for the high possible combination of these loads at one time to determine the "ultimate load."
So, how does an engineer figure out how big to make the bridge parts, like girders (beams) and piers (columns), so they can withstand the combined loads that might be placed on them over a long lifespan? If you were an engineer, how would you go about designing a bridge to make sure it was safe? Engineers have several things to consider before they can create a final design. Let's review these.
First, engineers must understand the problem completely. To do this, they ask a lot of questions, such as how strong the bridge needs to be, and what materials can they use. Next, engineers determine what types of loads or forces they expect the bridge to carry. These include all dead, live and possible environmental loads. The next step is to determine if these loads can occur at the same time and what combination of loads provides the highest possible force (stress) on the bridge. For example, a train crossing a bridge and an earthquake in the vicinity of the bridge could occur at the same time. However, many vehicles crossing a bridge and a tornado passing close to the bridge probably would not occur at the same time. After having calculated the largest possible force from all the load combinations, engineers use mathematical equations to calculate the amount of material required to support the loads in that design. Then, engineers brainstorm different bridge design ideas that would accommodate the anticipated loads and amount of material they calculated. They can also split their design into smaller parts and work on the design criteria for all the different components of the bridge.
Engineers are continually refining the materials used to make the members (beams, piers, columns, girders) of a bridge, and testing them so we construct safe and dependable bridges. Today you are engineers working for a structural design company in Colorado. Your team will design a model of a bridge pier (column) by performing some initial load calculations and choosing from one of several materials (clay, marshmallows and foam) to test those calculations.
Procedure
Before the Activity
- Gather materials and make copies of the Pier (Columns) Design Worksheet, one per team.
- Place materials available for the columns (clay, marshmallows, foam) on a table for students to see.
- Weigh the books, enough for 7 lbs per team, and tape to each book its weight on a piece of paper. Be as accurate as possible when weighing the books.
- Divide the class into teams of two or three students each.
With the Students
- Give the students the following scenario: You are engineers working for a structural design company in Colorado. The state of Colorado needs a new transportation bridge to serve as an overpass connecting a highway to a small mining town business district. They want you to design a model of the bridge by performing some initial calculations on a pier (column), and choosing one of several materials (clay, marshmallows and foam) to test those calculations.
- Hand out worksheets. Ask students to consider a bridge design for this scenario and brainstorm a list of questions they would need answered before designing the bridge. (For example: What vehicles would be crossing the bridge? How often? How wide is the highway? What is the weather like?) Have students write their questions on their worksheet; write a few of their ideas on the board.
- Next, have student teams make lists of the possible loads that their bridges must withstand. The worksheet provides hypothetical values for each of these loads. Students will later construct a pier (column) able to resist (hold, support) that load (simulated with books).
- Have students calculate the maximum load (ultimate load) that their bridge must be able to hold and record their answers on their worksheets. (We are looking at the load over one pier.)
- Have each team work together to calculate the required cross-sectional area needed for their columns to support their predetermined maximum load (up to 7 lbs). On the worksheet, they are given the following compressive strength values: clay = 7 lb/in2, large marshmallows = 5 lb/in2, foam = 3 lb/in2. With this information, have them solve to find the cross-section area of the column using the equation, Area = Force (max load) ÷ Fy (compressive strength). Remind students to show their work on their worksheets and record their answers.
- Next, have each team calculate the length of each side of the cross sectional area for their pier. (The pier/column works best if both sides of the cross-section area are approximately equal (a square shape), enabling students to determine the area's side length by using their calculators to find the square root of the area. (For marshmallows, use the calculated side length as diameter.) Have students confirm this calculation by multiplying the lengths of their two sides to get the cross-sectional area.) The area that they calculate must be equal to or greater than the required area calculated above. Remind students to show their work and record their answers.
- Next, have teams gather the amount of material they need to create a model of their column that has the cross sectional area they just calculated and a height of 3 inches. Have students shape their columns to match these dimensions.
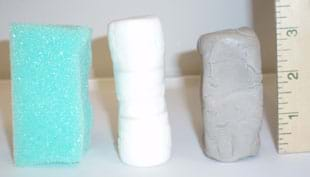
- Next, have each team sketch a design of their column. Review the force concepts of compression and tension. Which forces do they think will affect their column? (Compressive forces press down on the top of the pier/column.)
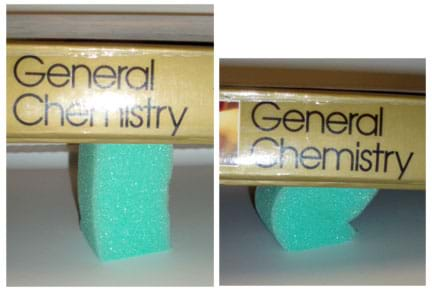
- Next, have students test their model piers to see if they can support the predetermined load. Using pre-weighed and labeled books (or some other weight system), have students choose enough books to equal the ultimate load. (We are looking at the load over one pier.) Starting with the lightest books first, place one book at a time on top of the column. Remind students to record their book weights and pier measurements and observations on their worksheets. Keep adding books until the ultimate load is placed on top of the column. Is the pier still standing? Is it shrinking? Fast or slow? (Some columns collapse or fall over right away, such as foam. Those that remain standing usually compress. Some compress quickly down to an inch tall; others, such as clay, compress more slowly and stop at about 2 inches tall.)
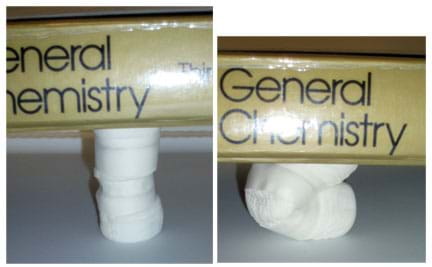
- Lastly, as a class, compare and discuss each team's pier/column test results, and review worksheet answers. Have students analyze and discuss the performance of their columns, and describe on their worksheets what they could do to improve their design. Conduct the post-activity assessment activities described in the Assessment section.
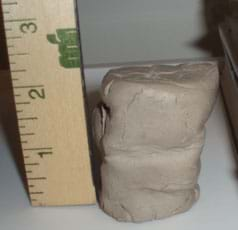
Vocabulary/Definitions
beam: A long, rigid, horizontal support member of a structure.
beam bridge: A bridge that consists of beams supported by columns (piers, towers).
compression: A pushing force that tends to shorten objects.
compressive strength: The amount of compressive stress that a material can resist before failing.
cross-sectional area: A "slice" or top-view of a shape (such as a girder or pier).
engineer: A person who applies her/his understanding of science and mathematics to creating things for the benefit of humanity and our world.
force: A push or pull on an object, such as compression or tension.
girders: The "beams" of a bridge; usually horizontal members.
load: Any of the forces that a structure is calculated to oppose, comprising any unmoving and unvarying force (dead load), any load from wind or earthquake, and any other moving or temporary force (live load).
member: An individual angle, beam, plate or built piece intended to become an integral part of an assembled frame or structure.
model: (noun) A representation of something, sometimes on a smaller scale. (verb) To make or construct something to help visualize or learn about something else.
piers: The "columns" of a bridge; usually vertical members.
tensile strength: The amount of tensile stress that a material can resist before failing.
tension: A pulling or stretching force that tends to lengthen objects.
Assessment
Pre-Activity Assessment
Brainstorming: Ask students to consider bridge design and brainstorm a thorough list of questions they would need answered before designing the bridge. (For example: What obstacle is the bridge crossing over? How wide does the bridge need to be? What vehicles would be crossing the bridge? How often? What else would be using the bridge? What is the weather like?) Write their ideas on the board.
Activity Embedded Assessment
Worksheet: Have each team follow along with the activity by recording measurements and observations, and showing calculations on the attached Pier (Column) Design Worksheet. Review their answers to gauge their mastery of the concepts.
Post-Activity Assessment
Question/Answer: Pose the following questions to the class as a whole, or individually as homework:
- What effect does the height of a pier/column have on its strength? (Answer: As the column gets taller, it tends to buckle and not support as much weight. Imagine pushing down on a vertical yardstick; it bows out. If you push down on a shorter ruler, it does not bow out unless you push with much more force.)
- Now that you have experience in constructing a pier, how does the cross-section area of a column affect the amount of load it can carry? (Answer: The area of a pier is critical to the amount of load it can carry. If a certain area is calculated for a certain load and the actual constructed area is less than that area, the column may not be able to support the full force and it might fail.)
- Can you relate the importance of providing adequate cross-section area to actual construction? (Answer: In the real world — such as on a construction site — it can be challenging to get measurements exactly correct, so that they precisely meet the engineering plans [specifications]. So, engineers take this into consideration when designing the dimensions of an object and allow for some error or "tolerance." A 1/16-inch tolerance might be impossible to achieve in some construction conditions; so, a tolerance of ½-inch might be used instead. All engineering calculations must account for any tolerance allowed.)
- Would you want to walk across a bridge made of clay, marshmallows or foam? Why or why not? And, use some engineering terminology in your answer. (Answer: You probably would not want to walk across a bridge made of clay, marshmallows or foam. The properties of these items make it a difficult material with which to design. Their low compressive and tensile strength would require very large dimensions to accommodate the same load that stronger materials could resist. It does not make sense to use these materials if stronger materials, such as concrete or steel, are available.)
Re-Engineering: Ask students how they might improve their pier design. Discuss the idea of reinforced concrete (when steel rods or mesh are embedded in the concrete to resist tensile forces). Have them sketch or test their ideas, using toothpicks to simulate steel reinforcement. With reinforced materials, how much more force can your pier resist before failure?
Troubleshooting Tips
Balancing may be tricky; it is okay to place a finger on top of book stacks (or weights) to keep them from falling over.
When loading books on top of the column, place the lightest books (or weights) first, followed by subsequently heavier books.
Be aware that not all columns work; this is primarily due to the lack of experimental analysis used to determine the compressive strength of the materials and the variability of the materials.
Activity Extensions
Designing More Members: Have students continue with their design by considering the size of a model girder (beam) for the bridge with a single load acting only in the center of the beam. Have each team calculate the required Zx of a 20-inch long rectangular clay beam with 10 lbs force pushing down mid-span. Use the following equation: Zx = (force x length) ÷ (4 x Fy). Remind students to show their work and record their answers. Answer: Zx = 10 lbs x 20 inches ÷ 4 x Fy lb/in2. Have them use the value for Fy from their column.

Then, have each team determine the cross-section dimension of "h" using: Zx = (w x h x h) ÷ 4, where w = 1 inch. Which dimension do you think has the most influence on the outcome of Zx? (Answer: The "h" term, which in this case is squared compared to "w," has the most influence. However, if a rectangular beam is turned on its side, then the "w" term would have the most influence. Therefore, in general the height of the member for a beam has the most influence on the strength of the beam.)
Real-Life Bridges: Have students investigate the condition of bridges in their community. Assign research topics and have students report their findings to the class. What type of regular maintenance is required? What are results from the most recent inspections? Investigate the causes of any known bridge failures, such as the I-35W interstate bridge in Minneapolis, MN, that collapsed into the Mississippi River on August 1, 2007, killing 13 people. Find images that show what happens to bridge members that failed.
Activity Scaling
- For lower grades, conduct the activity steps in teams, but perform all worksheet calculations together, as a class.
- For upper grades, have each team perform the activity with a different predetermined load amount (5, 6, 7, 8, 9 and 10 lbs). After each group completes their design and testing, plot the successful results on the board with force on the vertical axis and area on the horizontal axis. Expect the graph to show a straight, linear line.
Additional Multimedia Support
Watch a four-minute narrated film clip of the wind-induced 1940 collapse of the "Galloping Gertie" Tacoma Narrows Bridge in Washington four months after it was built. See http://www.youtube.com/watch?v=3mclp9QmCGs
See many aerial and ground photographs of the 2007 I-35W bridge collapse at the Minnesota Department of Transportation's website at www.dot.state.mn.us/.
Subscribe
Get the inside scoop on all things Teach Engineering such as new site features, curriculum updates, video releases, and more by signing up for our newsletter!More Curriculum Like This

Students learn about the types of possible loads, how to calculate ultimate load combinations, and investigate the different sizes for the beams (girders) and columns (piers) of simple bridge design. Additionally, they learn the steps that engineers use to design bridges.

Learn the basics of the analysis of forces engineers perform at the truss joints to calculate the strength of a truss bridge known as the “method of joints.” Find the tensions and compressions to solve systems of linear equations where the size depends on the number of elements and nodes in the trus...

Students are presented with a brief history of bridges as they learn about the three main bridge types: beam, arch and suspension. They are introduced to two natural forces — tension and compression — common to all bridges and structures.

To introduce the two types of stress that materials undergo — compression and tension — students examine compressive and tensile forces and learn about bridges and skyscrapers. They construct their own building structure using marshmallows and spaghetti to see which structure can hold the most weigh...
References
Dictionary.com. Lexico Publishing Group, LLC. Accessed October 23, 2007. (Source of some vocabulary definitions, with some adaptation) http://www.dictionary.com
Earthquake Hazards Program: Large Earthquakes in the United States. Last updated September 1, 2005. US Geological Survey. www.earthquake.usgs.gov/. Accessed October 23, 2007. (Damage photos)
Hibbeler, R.C. Mechanics of Materials, Third Edition. Prentice Hall: Upper Saddle River, NJ, 1997.
Copyright
© 2006 by Regents of the University of Colorado.Contributors
Jonathan S. Goode; Joe Friedrichsen; Natalie Mach; Denali Lander; Chris Valenti; Denise W. Carlson; Malinda Schaefer ZarskeSupporting Program
Integrated Teaching and Learning Program, College of Engineering, University of Colorado BoulderAcknowledgements
The contents of this digital library curriculum were developed under a grant from the Fund for the Improvement of Postsecondary Education (FIPSE), U.S. Department of Education and National Science Foundation GK-12 grant no. 0338326. However, these contents do not necessarily represent the policies of the Department of Education or National Science Foundation, and you should not assume endorsement by the federal government.
Last modified: January 16, 2020




User Comments & Tips