Quick Look
Grade Level: 10 (9-12)
Time Required: 2 hours
(can be split into two 60-minute sessions)
Expendable Cost/Group: US $3.00 This activity also uses some non-expendable (reusable) items such as lab supplies; see the Materials List for details.
Group Size: 3
Activity Dependency:
Subject Areas: Chemistry, Physics
NGSS Performance Expectations:

| HS-PS3-3 |
Summary
Building on an introduction to statics, dynamics free-body diagrams, combustion and thermodynamics provided by the associated lesson, students design, construct and test their own rocket engines using sugar and potassium nitrate—an opportunity to apply their knowledge of stoichiometry. This activity helps students understand that the energy required to launch a rocket comes from the chemical energy stored in the rocket fuel. The performance of each engine is tested during a rocket launch, after which students determine the reasons for the success or failure of their rockets.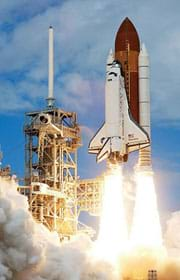
Engineering Connection
Engineers apply their understanding of science and math concepts to successfully design and launch rockets into space. Many factors figure into rocket design, including body shape, materials, weight, and fuel type and amount. Additionally, engineers are challenged to design a system based on theoretical measurements, test the design, analyze the test results and then modify the design until the system functions as intended. In this activity, students experience this process as they create and test their own rocket engines.
Learning Objectives
After this activity, students should be able to:
- Describe the steps of the engineering design process for creating any system or device.
- Build a rocket engine prototype.
- Determine the strengths and weaknesses of a design based on the success or failure of a rocket launch.
Educational Standards
Each TeachEngineering lesson or activity is correlated to one or more K-12 science,
technology, engineering or math (STEM) educational standards.
All 100,000+ K-12 STEM standards covered in TeachEngineering are collected, maintained and packaged by the Achievement Standards Network (ASN),
a project of D2L (www.achievementstandards.org).
In the ASN, standards are hierarchically structured: first by source; e.g., by state; within source by type; e.g., science or mathematics;
within type by subtype, then by grade, etc.
Each TeachEngineering lesson or activity is correlated to one or more K-12 science, technology, engineering or math (STEM) educational standards.
All 100,000+ K-12 STEM standards covered in TeachEngineering are collected, maintained and packaged by the Achievement Standards Network (ASN), a project of D2L (www.achievementstandards.org).
In the ASN, standards are hierarchically structured: first by source; e.g., by state; within source by type; e.g., science or mathematics; within type by subtype, then by grade, etc.
NGSS: Next Generation Science Standards - Science
| NGSS Performance Expectation | ||
|---|---|---|
|
HS-PS3-3. Design, build, and refine a device that works within given constraints to convert one form of energy into another form of energy. (Grades 9 - 12) Do you agree with this alignment? |
||
| Click to view other curriculum aligned to this Performance Expectation | ||
| This activity focuses on the following Three Dimensional Learning aspects of NGSS: | ||
| Science & Engineering Practices | Disciplinary Core Ideas | Crosscutting Concepts |
| Design, evaluate, and/or refine a solution to a complex real-world problem, based on scientific knowledge, student-generated sources of evidence, prioritized criteria, and tradeoff considerations. Alignment agreement: | At the macroscopic scale, energy manifests itself in multiple ways, such as in motion, sound, light, and thermal energy. Alignment agreement: Although energy cannot be destroyed, it can be converted to less useful forms—for example, to thermal energy in the surrounding environment.Alignment agreement: Criteria and constraints also include satisfying any requirements set by society, such as taking issues of risk mitigation into account, and they should be quantified to the extent possible and stated in such a way that one can tell if a given design meets them.Alignment agreement: | Energy cannot be created or destroyed—it only moves between one place and another place, between objects and/or fields, or between systems. Alignment agreement: Modern civilization depends on major technological systems. Engineers continuously modify these technological systems by applying scientific knowledge and engineering design practices to increase benefits while decreasing costs and risks.Alignment agreement: |
Common Core State Standards - Math
-
Reason abstractly and quantitatively.
(Grades
K -
12)
More Details
Do you agree with this alignment?
-
Attend to precision.
(Grades
K -
12)
More Details
Do you agree with this alignment?
-
Define appropriate quantities for the purpose of descriptive modeling.
(Grades
9 -
12)
More Details
Do you agree with this alignment?
International Technology and Engineering Educators Association - Technology
-
Students will develop an understanding of the attributes of design.
(Grades
K -
12)
More Details
Do you agree with this alignment?
-
Students will develop an understanding of engineering design.
(Grades
K -
12)
More Details
Do you agree with this alignment?
-
Students will develop abilities to apply the design process.
(Grades
K -
12)
More Details
Do you agree with this alignment?
-
Students will develop abilities to assess the impact of products and systems.
(Grades
K -
12)
More Details
Do you agree with this alignment?
State Standards
Texas - Math
-
use a problem-solving model that incorporates analyzing given information, formulating a plan or strategy, determining a solution, justifying the solution, and evaluating the problem-solving process and the reasonableness of the solution;
(Grades
9 -
12)
More Details
Do you agree with this alignment?
Texas - Science
-
demonstrate common forms of potential energy, including gravitational, elastic, and chemical, such as a ball on an inclined plane, springs, and batteries;
(Grades
9 -
10)
More Details
Do you agree with this alignment?
-
in all fields of science, analyze, evaluate, and critique scientific explanations by using empirical evidence, logical reasoning, and experimental and observational testing, including examining all sides of scientific evidence of those scientific explanations, so as to encourage critical thinking by the student;
(Grades
9 -
12)
More Details
Do you agree with this alignment?
-
use the law of conservation of mass to write and balance chemical equations; and
(Grades
10 -
12)
More Details
Do you agree with this alignment?
Materials List
Each group needs:
- clay-based, clumping cat litter
- granulated sugar
- potassium nitrate, such as found in Spectracide Stump Remover available at Lowe's
- wooden dowel, 3/8 in x 9 in (0.95 cm x 22.86 cm)
- strip of Kraft project paper, 2.5 in x 10 in (6.4 cm x 25.4 cm)
- fuse, ~12 cm long ("igniters" for model rockets)
- two 1-cm pieces of a plastic straw
- mortar and pestle (and materials to clean it between uses)
- closed 80- to 100-ml plastic or glass container
- disposable gloves, for students handling the sugar and potassium nitrate
- safety glasses, one pair per student
- We Have Liftoff Worksheet, one per student
To share with the entire class:
- balance(s)
- white glue
- scissors
- rulers
- drill bit (1/8-in or 0.3175-cm diameter) or nail
- ring stand
- skewer or ¼ inch (0.635 cm) dowel with a spike at one end
- water
- (optional) thick gloves and tongs
Worksheets and Attachments
Visit [www.teachengineering.org/activities/view/uoh_liftoff_lesson01_activity1] to print or download.Pre-Req Knowledge
Students should be able to balance chemical equations using stoichiometry.
Introduction/Motivation
Rocket science is an interdisciplinary field that requires the expertise of engineers and scientists who specialize in different topics. Rockets are an engineering marvel! The ability to move a huge piece of machinery more than 10,000 kilometers (~6,200 miles) past the Earth's atmosphere and against gravity is quite an accomplishment. Many things must be considered when building rockets, and because they are so costly, efficiency and accuracy are of the utmost importance.
For the miniature rockets you will be building, we won't be too concerned about the depth of engineering. The purpose of this activity is to give you a basic understanding of rocket design. Let's get started!
Procedure
Before the Activity
- Gather materials and make copies of the We Have Liftoff Worksheet. The instructions provided below are also on this worksheet, so students can follow along (or work on their own).
- Set out balances that are easily accessible.
- Arrange for an open and safe area to set up a rocket launch pad composed of a ring stand and skewer (or thin dowel).
With the Students
- Review with the class the steps of the engineering design process. Note how the process is cyclical: engineers create a design, test it, analyze the results, and then make changes to the design to improve it, again and again, as necessary. Define and discuss the engineering terms and concepts of design criteria and constraints. (Refer to the Vocabulary/Definitions section.)
- Divide the class into groups of three students each. Hand out the worksheets and materials for each group.
- Your engineering challenge: Use the given raw materials to successfully launch a miniature rocket.
- Emphasize to students: You are in charge of your prototype rocket designs. The worksheet instructions provide guidelines, but you are assembling the pieces. Your team's precision, or lack thereof, will affect the success of your rocket launch. Your team must figure out the fuel mixture ratio and come up with ways for determining how deep your plugs are and decide how much fuel to pack into the body.
- You will build your rocket prototypes using crafting supplies and other household items. The fuel for your rockets will be a mixture of potassium nitrate, found in stump remover and gun powder, and household sugar. The unbalanced combustion reaction equation for the fuel is:

- Make a rocket body using paper and glue to make a cylinder (from this point on, these same instructions are on the worksheet). To do this, spread white glue evenly on one side of the piece of Kraft paper. Wrap it tightly around the 3/8-in wooden dowel, so the dowel is not glued to the paper, to form the shape of a cylindrical rocket motor casing that is 6.4-cm long (see Figure 1). Remove the dowel and let the glue dry.
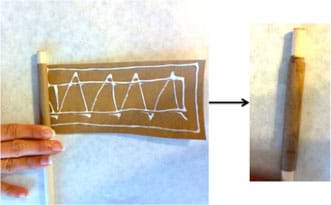
Figure 1. Wrapping and gluing a Kraft paper strip around a wooden dowel. - Using a mortar and pestle, finely grind some cat litter. When the rocket body (paper cylinder) has dried, hold it vertically with one open end on a flat surface and pour the litter into the cylinder. (It may be helpful to roll up a piece of paper to use as a funnel.) Use the dowel to pack the cat litter down into the cylinder. Make the packed litter layer about 0.85-cm thick. The layer serves as a plug at the base of the rocket body. (See Figure 2.) If the litter powder is fine enough, packing it down will, in a sense, make it into a solid. If you have trouble packing the litter, mix it with some water so that it begins to clump; then retry packing.
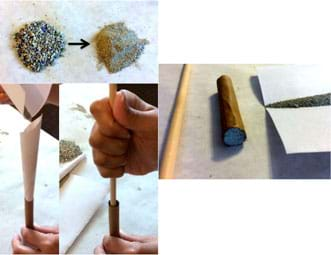
Figure 2. Ground and packed kitty litter forms the rocket body plug. - Weigh out 6 grams of sugar and pour it into the mixing container.
- Given the known amount of 6 grams of sugar, balance the combustion equation and determine the appropriate amount of KNO3 needed for the fuel. Complete the worksheet table. WAIT BEFORE CONTINUING TO THE NEXT STEP UNTIL YOU HAVE CONFIRMED YOUR ANSWERS WITH THE TEACHER. Note: The recommended amount of sugar-to-potassium nitrate is 1:2 by weight, but different answers will arise when balancing the equation. For safety, a ratio of no more than 1:2.5 is recommended.
- Weigh out the amount of KNO3 determined from your calculations. Using a CLEAN mortar and pestle, grind the crystals into a fine powder. Answer the worksheet questions.
- Add the KNO3 powder to the mixing container. Shake to create an evenly mixed powder.
- Pour the fuel powder into the open end of the rocket body (paper cylinder) and compress it with the dowel until about 1 cm of unfilled space remains at the top of the cylinder (see Figure 3).
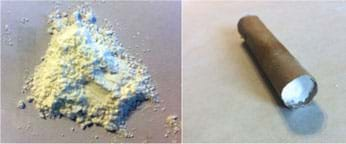
Figure 3. Add the rocket fuel to the rocket body. - Pour more cat litter into the top of the rocket body, packing it down, until the litter layer is flush with the end of the rocket body.
- Using a drill bit or nail, slowly and carefully bore a hole down the middle of the rocket body into its packed fuel contents. Be sure that the borehole does not puncture the cat litter-plug at the other end of the rocket. (See Figure 4.)
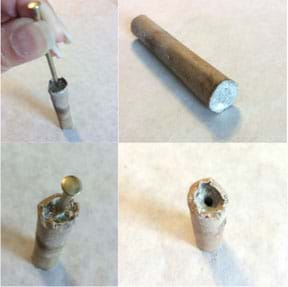
Figure 4. Creating the borehole. - Glue the two 1-cm straw pieces to the side of the rocket body in a vertical direction. During the launch, these loops will be placed over a skewer (or thin dowel) to serve as a guide. So, when gluing, make sure that the straws are aligned along the cylinder and in a straight line to each other.
- Insert the igniter fuse into the borehole. Bend the top of the fuse, if necessary, to make sure that it fits snuggly.
- Launch the rockets in an open and safe area. Using a ring stand and skewer (or thin dowel), set up a launch pad in such a way that the bottom of the rocket body rests on the stand and the straw loops along the rocket body slide over the skewer. With all students standing at least several meters away from the launch pad, have the instructor (wearing safety glasses) light the fuse and back away immediately. Note: Because these rockets do not have fins, expect them to fly in unpredictable directions.
- After all groups have launched their rocket engine prototypes, give students time to answer the results analysis questions at the end of the worksheet.
- Then lead a class discussion to share and compare results, and make some points. Refer to the post-activity questions/answers in the Assessment section.
Vocabulary/Definitions
constraints: In engineering design, the limitations and requirements that must be considered when designing a workable solution to a problem.
criteria: In engineering design, the objectives that a final design solution is required to meet.
engineering design process: A series of steps used by engineering teams to guide them as they develop new solutions, products or systems. Typically, the steps include: defining a problem, researching and generating ideas, selecting an approach, designing a model or prototype, testing and evaluating the design using specifications and refining the design.
Assessment
Pre-Activity Assessment
Discussion Questions: Before beginning the activity, ask students the following questions to verify their base knowledge of the activity topics:
- From where does the energy for launching a rocket come? (Answer: From the chemical energy stored in the rocket fuel.)
- What happens to this energy? (Answer: This energy changes to heat and work energies during the combustion-reaction.)
Activity Embedded Assessment
Design Questions: At suitable times during the activity, ask students the following questions:
- What factors must be considered in order to have a successful launch? (Answer: The overall weight of the rocket. The moisture content in the rocket and the atmosphere. The ratio of sugar to potassium nitrate in the fuel. The amount of fuel used.)
- Is it advantageous to use fine powders in the rocket fuel mixture? Why or why not? (Answer: Yes. Fine powders help you to achieve a more homogenous mixture. Additionally, fine powders ignite more readily than coarse powders.)
- What is the significance/purpose of the borehole through the rocket fuel? (Answer: The borehole enables oxygen to mix with the fuel.)
Post-Activity Assessment
Project Reflection & Discussion: After students have completed the We Have Liftoff Worksheet, including answering all questions, lead a class discussion using the following questions (which includes those on the worksheet). Students' answers reveal their depth of comprehension.
- Why was your rocket launch a success or failure? (Listen to each group's description. Possible answers: The rocket was too heavy and it did not liftoff [which can be caused by adding too much cat litter to the plugs, using too much glue while constructing the body, or over-packing all of the materials]. Not enough fuel was packed into the body, and so the rocket did not launch. We think too much residual moisture was in the clay plugs and so the fuel was unable to ignite.)
- What factors contributed to the success or failure of your prototype rocket launch? (Answer: Factors include total weight, moisture content [atmosphere and rocket], fuel composition [ratio of sugar to potassium nitrate], fuel mixture homogeneity, fuel amount.)
- If you could redesign your rocket, using the same procedure, what would you do differently to improve its flight? (Possible answers: Pack more fuel into the body. Pack the plugs better so that water is not needed to clump the clay. Use less glue. Fabricate/construct the rocket body more neatly.)
- How would changing the compactness of the powders affect how the fuel burns? (Answer: If the fuel is too compact, it will not combust due to the inability of oxygen to mix with the fuel.)
- What is the significance of the borehole through the rocket fuel? What does the hole do? (The borehole enables oxygen to mix with the fuel.)
- What could you do to make your rocket fly straight? (Possible answer: Use fins and/or nose cones.)
- What steps of the engineering design process do engineers follow when creating any system or device? Which steps did you go through in this activity? (Answer: Create a design > test it > analyze the results > make changes to the design to improve it.)
Safety Issues
- For safety, a sugar-to-potassium nitrate ratio of no more than 1:2.5 by weight is recommended.
- Have students wear gloves when handling the sugar and potassium nitrate.
- Eye protection is necessary for the person (instructor) who launches the rockets. Everyone else should stay well back from the launch pad.
Troubleshooting Tips
If a rocket does not ignite, stay away from it for five minutes. Using thick gloves or tongs, pick it up carefully with the fuse-end pointing away from you. Soak it in water until it disintegrates and discard the pieces in an outdoor trash can.
Some groups will have good rocket engines and fly, others will have good engines and not fly, and some will be duds. This provides hands-on experience for a participatory discussion about the many contributing factors.
Activity Extensions
Make available additional materials and time so each group can build another rocket prototype that incorporates what they learned with the first one, to see if students can improve its flight performance. As in real-world engineering, it usually takes many iterations (re-designs, modifications) to improve initial designs to achieve acceptable results.
As part of their redesign efforts, have students also add additional design elements to their rocket prototypes, such as fins, noses, nozzles, etc., to improve the flight direction and height.
Subscribe
Get the inside scoop on all things TeachEngineering such as new site features, curriculum updates, video releases, and more by signing up for our newsletter!More Curriculum Like This

Students are introduced to statics and dynamics, free-body diagrams, combustion and thermodynamics to gain an understanding of the forces needed to lift rockets off the ground. They learn that thrust force is needed to launch rockets into space and the energy for thrust is stored as chemical energy ...
References
Gurstelle, William. September 10, 2013. Homemade Sugar Rocket: Cook up a solid-fuel rocket engine and let it fly. Make: Projects, MakeZine. Accessed November 29, 2014. (activity inspiration) http://makezine.com/projects/make-35/homemade-sugar-rocket/
Copyright
© 2015 by Regents of the University of Colorado; original © 2014 University of HoustonContributors
Taylor Dizon-Kelly, Robert PardueSupporting Program
National Science Foundation GK-12 and Research Experience for Teachers (RET) Programs, University of HoustonAcknowledgements
This digital library content was developed by the University of Houston's College of Engineering, based upon work supported by the National Science Foundation under GK-12 grant no. DGE 0840889. Any opinions, findings and conclusions or recommendations expressed in this material are those of the authors and do not necessarily reflect the views of the National Science Foundation.
Last modified: February 9, 2024


User Comments & Tips