Quick Look
Grade Level: 11 (10-12)
Time Required: 30 minutes
Expendable Cost/Group: US $3.00
Group Size: 4
Activity Dependency:
Subject Areas: Chemistry, Physics, Science and Technology
Summary
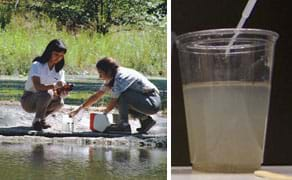
Prior to reaching households, water is exposed to a variety of treatments designed to render it fit for human consumption and use. One of the first treatment steps is the removal of suspended solids using chemical additives called flocculants. In this activity, students learn about two commonly used flocculants and clean water collected from a local pond or river. They experiment with flocculant, stirring and pH variables.Engineering Connection
Engineers employ basic scientific principles to design flocculants that remove suspended solids from dirty water. As a result, many flocculants are commercially available and are commonly used in water treatment facilities. Ongoing research is developing new, more efficient flocculants. In addition, engineers around the world are studying the use of natural flocculants that have the potential to greatly aid developing countries by providing a method of water purification.
Learning Objectives
After this activity, students should be able to:
- Describe the effectiveness of flocculants in purifying water.
- Explain whether adding mechanical kinetic energy (stirring) helps flocculants work better, and why.
- Determine whether the type of flocculant affects how clean the water is.
- Determine whether or not the addition of lemon juice (which creates an acidic environment) affects how a flocculant works.
Educational Standards
Each Teach Engineering lesson or activity is correlated to one or more K-12 science,
technology, engineering or math (STEM) educational standards.
All 100,000+ K-12 STEM standards covered in Teach Engineering are collected, maintained and packaged by the Achievement Standards Network (ASN),
a project of D2L (www.achievementstandards.org).
In the ASN, standards are hierarchically structured: first by source; e.g., by state; within source by type; e.g., science or mathematics;
within type by subtype, then by grade, etc.
Each Teach Engineering lesson or activity is correlated to one or more K-12 science, technology, engineering or math (STEM) educational standards.
All 100,000+ K-12 STEM standards covered in Teach Engineering are collected, maintained and packaged by the Achievement Standards Network (ASN), a project of D2L (www.achievementstandards.org).
In the ASN, standards are hierarchically structured: first by source; e.g., by state; within source by type; e.g., science or mathematics; within type by subtype, then by grade, etc.
International Technology and Engineering Educators Association - Technology
-
Explain how knowledge gained from other content areas affects the development of technological products and systems.
(Grades
6 -
8)
More Details
Do you agree with this alignment?
-
Analyze how an invention or innovation was influenced by its historical context.
(Grades
6 -
8)
More Details
Do you agree with this alignment?
State Standards
Florida - Science
-
Science and Society
(Grade
8)
More Details
Do you agree with this alignment?
-
Understand that scientific investigations involve the collection of relevant empirical evidence, the use of logical reasoning, and the application of imagination in devising hypotheses, predictions, explanations and models to make sense of the collected evidence.
(Grade
8)
More Details
Do you agree with this alignment?
Materials List
Each group needs:
- test water with suspended solids, ~1 liter in a container with a lid
- 7 clear plastic cups
- aluminum sulfate solution, ~3 ml (prepared by teacher)
- polymer flocculant solution, ~3 ml (prepared by teacher)
- 4 plastic spoons or craft sticks, for stirring
- marker, able to mark on the plastic cups
- lemon juice, ~2 ml
- volumetric measuring tool(s), for measuring 1 ml of additives (such as pipettes; clean between use)
- lab journals, or paper and pencil, to record lab notes and observations
- (optional) pH paper
For materials preparation (done by students or prepared by teacher in advance):
- Containers in which to collect "dirty water" from a nearby river or pond; enough to collect ~ 1 liter per group; make sure to scoop up some riverbed silt and dirt during collection
- 2 containers with lids for the aluminum sulfate solution and polymer flocculant solution
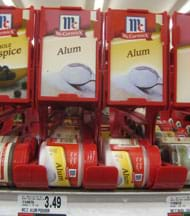
- aluminum sulfate (aka alum; purpose: flocculant), a small amount, about the size of a quarter; available at grocery stores in the spice aisle, for example, McCormick's 1.9 oz [53 g] jar for $3.49
- Super Blue concentrated pool water clarifier (purpose: polymer flocculant), a small amount, ~1 ml per 50 ml of water; available at pool supply stores or on the Internet for $13 per quart
- tap water, ~10 ml per student group (purpose: flocculant suspension/dilution)
- tape and marker, to label the containers
Pre-Req Knowledge
Students should have a general understanding of basic chemistry, specifically the concepts of attraction and repulsion of electrically charged objects. This activity should also be conducted after the associated lesson, Flocculants: The First Step to Cleaner Water!
Introduction/Motivation
Have you ever wondered: Where does the water that comes out of our faucets come from? And, what makes it safe to drink? If you guessed that it comes from a water treatment plant you would be right! If you guessed that it came from a lake, river or underground reservoir you would also be right, but you would be missing an important step. When water is removed from the source it can contain dirt, salt and living organisms such as bacteria, all of which can be dangerous to our health. Before coming to us, water is treated in water treatment plants to remove all of these things, making it safe for us to drink.
Can you think of a few ways that engineers clean water? Sometimes we use filters to remove things from water, but if we only filtered we would spend a lot of money changing out filters when they get too much stuff on them and get clogged. To avoid this, engineers started using flocculants. Flocculants are chemicals that can help remove suspended solids (such as dirt and clay particles) from water. This helps prevent clogging in the rest of the water treatment system parts, such as the filters and pipes. Flocculants are one of the first steps used to clean water when it arrives at a treatment plant.
In this activity, you will discover how useful flocculants can be and how much of an impact they can have on water cleansing.
Procedure
Background
Refer to the Lesson Background section in the associated lesson, Flocculants: The First Step to Cleaner Water!
Note: If enough materials are available, have each student group perform the following procedure. If materials are limited, solicit help from students to carry out the procedure, once, as a class.
Before the Activity
- Collect a small supply of "dirty water" from a nearby river, lake or pond. If possible, have students participate in the water collection so they see the source and realize that the water they are cleaning is obtained directly from the natural world. While collecting the water, be sure to scoop into the water supply's sand and soil so that the settling solids (those large enough to settle without the aid of a flocculant) can be observed during the activity.
- Gather materials.
- If activity time with students is limited, complete the Materials Preparation in advance of the student investigation.
With the Students—Materials Preparation
- Make the aluminum sulfate solution: In a container with a lid, dissolve a small amount (approximately the size of a dime) of aluminum sulfate (alum) in 10 ml of tap water. Shake to make sure that dissolution occurs. Label the container.
- Make the polymer flocculant solution: In a separate container, dilute approximately 0.5 ml of the super blue clarifier in 10 ml of tap water. Turn the container several times to evenly mix the liquids. Label the container.
- On each of the seven cups, draw a line ¾ of the way up the side, to ensure that the same amount of water is added to each cup to be treated.
- Label the cups 1–7 and have students record in their journals the following corresponding information regarding cup content:
- Cup 1 = control; no treatment (no flocculant)
- Cup 2 = aluminum sulfate, not stirred
- Cup 3 = aluminum sulfate, stirred
- Cup 4 = polymer, not stirred
- Cup 5 = polymer, stirred
- Cup 6 = aluminum sulfate with lemon juice
- Cup 7 = polymer with lemon juice
With the Students—Part 1
During Part 1, students study the differences in solids removal using the aluminum sulfate and polymer flocculants. They also see the effects of stirring on the outcome of the flocculant addition.
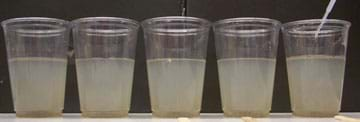
- Invert the container holding the collected "dirty water" to re-suspend any solids that settled out during the course of the activity preparation. Immediately after shaking, fill cups 1-5 with water up to the pre-drawn line (see Figure 1).
- Observe the cups after the water is poured in and have students observe and record what is occurring.
- Once the heavier solids have settled to the bottom of the cups, add the following components to the respective cups:
- Cup 1: Add nothing to this cup (this is the control)
- Cup 2: Add 1 ml of the aluminum sulfate solution
- Cup 3: Add 1 ml of the aluminum sulfate solution
- Cup 4: Add 1 ml of the polymer flocculant solution
- Cup 5: Add 1 ml of the polymer flocculant solution
- Using a plastic spoon or craft stick, stir Cups 3 and 5 only. Be sure to use different spoons/sticks to prevent undesired mixing of flocculants.
- Watch the cups for 5 minutes and have students record their observations during this time.
- Once the reaction is complete, have students discuss within their groups and determine whether stirring increased or decreased the efficiency of each flocculant. Be sure to have them compare the treated water (Cups 2-5) to the control (Cup 1). If nothing is observed looking at the sides of the cups containing the polymer flocculant, have students hold the cups up and observe the larger particles on the bottoms. Have teams decide which is most efficient (most likely the stirred cups) and proceed with this knowledge to Part 2. See the Assessment section for more information about observations and conclusions at this point.
With the Students—Part 2
During Part 2, lemon juice is added as a means of reducing the water pH prior to flocculant addition. Have students recognize that because stirring provided desirable outcomes in Part 1, they should stir the remaining two cups upon flocculant addition. Mention that the practice of choosing the best scenario and continuing testing is common procedure in scientific and engineering research.
- Once again, shake and invert the container holding the collected "dirty water." Fill Cups 6 and 7 to the pre-drawn lines.
- Add 1 ml of lemon juice to each cup and stir with a plastic spoon or craft stick.
- Add 1 ml of alum solution to Cup 6 and 1 ml of the polymer solution to Cup 7. Stir both cups. Make sure to avoid the undesired mixing of flocculants by using different spoons/sticks for each cup.
- Study the cups for 15 minutes and have students record their observations.
- Discuss and compare the results observed when lemon juice was added to the water.
- As a class, discuss the factors that affected the removal of the suspended solids in the water. Compare all treated water to the untreated control. Also, compare the flocculants with each other. See the Summary Explanations section (next) and the Assessment section for more information about observations and conclusions at activity end.
Summary Explanations
Through this activity, we observe how the flocculation (the solid clumping resulting from the addition of a flocculant) of suspended particles in water changes depending on the way that the flocculant is added, the type of flocculant, and water conditions (such as pH). Have students contrast their observations with the following ideas regarding suspended solid removal with a flocculant.
After shaking and pouring the dirty water into the cups, observe some solid particles settling to the cup bottoms. These solids are the largest solids in the water and can overcome the Brownian motion occurring in the water and thus, settle out. The movement of the heavier particles to the bottom of the container is due to the gravitational force. After these solids have settled and the flocculants are added (Part 1), observe the following in each cup:
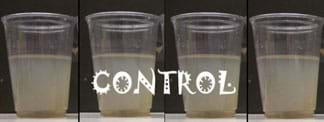
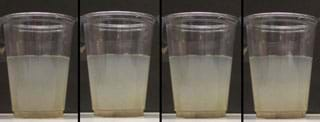
Cup 1: Control: no treatment (no flocculant)—After the settling of the heavier solids, nothing else occurs in this cup. This cup is included solely as a controlled representation of what would happen if nothing was added to the water. Over the time of the experiment, the control looks like Figure 2 (from 0-3 minutes, left to right).
Cup 2: Aluminum sulfate, not stirred—In this cup, very little is observed over a short time. In a three-minute span (left to right, 0–3 minutes), the cup produces results that look similar to Figure 3:
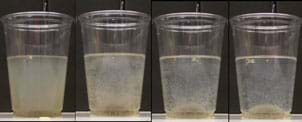
Cup 3: Aluminum sulfate, stirred—In this cup, a fast (within 3 minutes) reaction is observed with the added flocculant. The color of the water begins to decrease and small white flakes of dirt appear. After forming, these small white flakes settle to the bottom of the container (see Figure 4). This is the flocculant working to overcome the charges and size issues (discussed in the Types of Suspended Solids portion of the Background section of the associated lesson) that keep small particles suspended in water.
Cup 4: Polymer, not stirred—This cup demonstrates similar results to Cup 2 (alum, not stirred). Not much occurs during the short run of the activity.
Cup 5: Polymer, stirred—This flocculant works quite differently from the aluminum sulfate. The smaller particles may not necessarily settle out of the water and no flakes may be observed. However, have students hold this cup and the control up high and look at the bottoms of the cups to see a different clumping arrangement of the larger particles (a large amount of soil in the bottom center) indicating that the polymer is causing the larger particles to stick together.
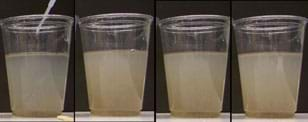
Cups 6 and 7: Lemon juice added— From observation during Part 1, students see that stirred cups settle the best. After realizing this, add the lemon juice with the flocculant and stir. At this point, expect to see very little change in Cup 6 containing the aluminum sulfate because the lemon juice lowers the pH of the water, causing the flocculant to perform less efficiently than before. Expect Cup 6, with the aluminum sulfate and lemon juice, to demonstrate results similar to Figure 5 (0–3 minutes, left to right).
Some flocculants work better under neutral pH conditions. Different from the aluminum sulfate, the polymer flocculant in Cup 7 may still be able to draw the larger particles together, because polymer flocculants do not rely as much on particle surface charge as aluminum sulfate does.
Vocabulary/Definitions
flocculant: A substance that when added to water removes suspended solids by binding them together and increasing the particles mass, so that they can be filtered out.
flocs: The clustered particles formed in the presence of a flocculant.
Assessment
Pre-Activity Assessment
Form Hypotheses: Have students form hypotheses. Ask the students
- Based on what you know about flocculants and looking at our collected water samples, do you think that the flocculants we are testing today will be able to clean the water taken directly from our outdoor water source?
- Which flocculant do you think will perform best?
- Under which conditions will the flocculants perform best (stirred, not stirred, neutral pH, more acidic)?
Activity Embedded Assessment
Observe and Relate: Have students record in their journals what is happening. After Part 1 of the activity, have teams decide which of their cups worked the best. Then lead an open class discussion to compare observations and conclusions. (Observations: In Cups 1, 2 and 4: Little to no change; in Cups 3 and 5 [the cups that were stirred after flocculant addition]: the small particles clump together and settle to the cup bottoms, then after settling, a significant solidifying and color lightening occurred. Conclusions: Expect students to come to the conclusion that stirring [that is, the addition of mechanical kinetic energy] increases the effectiveness of both flocculants), so that they can take this knowledge with them as they proceed to Part 2 of the activity. This type of assessment and continuation is important in engineering and research testing procedures!
Post-Activity Assessment
What We Saw and Why: After Part 2, have students discuss the following topics in their groups:
- Why did your results turn out the way they did? (Conclusions: The addition of flocculants helped to clean the water by increasing the mass of the particles in the water by grouping them together; stirring increased the removal because of the increased number of solid collisions).
- What effect did stirring and adding lemon juice have on the flocculant additions to the water samples? (Observations: Stirring improved the flocculant clumping ability. Lowering the water pH reduced alum's ability to flocculate particles. A difference with the poly acrylamide may also have been observed, although probably not as significantly, which shows that some flocculants are more affected by water pH conditions than others.)
Troubleshooting Tips
If nothing happens in the water, or the results are not as significant as expected, add more flocculant directly to the water for fast results.
Subscribe
Get the inside scoop on all things Teach Engineering such as new site features, curriculum updates, video releases, and more by signing up for our newsletter!More Curriculum Like This

Students experience firsthand one of the most common water treatment types in the industry today, flocculants. They learn how the amount of suspended solids in water is measured using the basic properties of matter and light. In addition, they learn about the types of solids that can be found in wat...

Students learn about the various methods developed by environmental engineers for treating drinking water in the United States.

Students gain an understanding of the parts of a plant, plant types and how they produce their own food from sunlight through photosynthesis. They learn how plants play an important part in maintaining a balanced environment in which the living organisms of the Earth survive. This lesson is part of ...
Copyright
© 2013 by Regents of the University of Colorado; original © 2011 College of Engineering, University of South FloridaContributors
Audrey Buttice; Marissa H. ForbesSupporting Program
STARS GK-12 Program, College of Engineering, University of South FloridaAcknowledgements
This curriculum was developed by the USF Students, Teachers and Resources in Sciences (STARS) Program under National Science Foundation grant numbers DGE 0139348 and DGE 0638709. However, these contents do not necessarily represent the policies of the NSF, and you should not assume endorsement by the federal government.
Last modified: May 10, 2017


User Comments & Tips