Quick Look
Grade Level: 7 (6-8)
Time Required: 1 hours 30 minutes
(two 45-minute class periods)
Expendable Cost/Group: US $10.66 This activity uses some items from previous activities in this unit, and some non-expendable items such as trowels and tubs; see the Materials List for details
Group Size: 3
Activity Dependency:
Subject Areas: Science and Technology
NGSS Performance Expectations:

| MS-ESS2-4 |
| MS-ESS3-3 |
| MS-ETS1-2 |
| MS-ETS1-3 |
Summary
Students use everyday building materials—sand, pea gravel, cement and water—to create and test pervious pavement. They learn what materials make up a traditional, impervious concrete mix and how pervious pavement mixes differ. Groups are challenged to create their own pervious pavement mixes, experimenting with material ratios to evaluate how infiltration rates change with different mix combinations.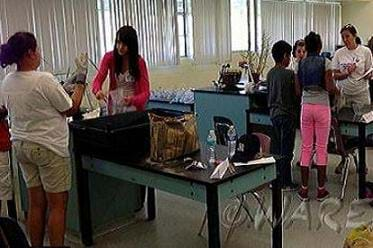
Engineering Connection
Civil engineers design the roads and bridges that we drive on. When it rains, stormwater collects on these roads and must be managed. Historically, roads have been designed with impervious materials, which means water cannot pass through them, rain and snowmelt runs off their surfaces, becoming stormwater runoff. By applying low-impact development technologies, engineers can manage this stormwater at its sources (where the precipitation falls) in innovative ways. One approach is to enable the water to infiltrate through the road surface into the underlying media layers. This requires engineers to design pavement that permits the passage of water, which is referred to as a pervious surface.
Replacing impervious surfaces with pervious surfaces such as porous concrete or asphalt enables infiltration and percolation of stormwater into the ground and provides a cleansing treatment for pollutants at the source location. This approach to stormwater management provides solutions to grand challenges for engineers and creates a more sustainable human/nature partnership.
Learning Objectives
After this activity, students should be able to:
- Explain the materials that make a traditional concrete mix and how pervious pavement differs.
- Evaluate different ratios of materials to predict how infiltration rate changes with different mix combinations.
- Use everyday building materials to create pervious pavement.
Educational Standards
Each Teach Engineering lesson or activity is correlated to one or more K-12 science,
technology, engineering or math (STEM) educational standards.
All 100,000+ K-12 STEM standards covered in Teach Engineering are collected, maintained and packaged by the Achievement Standards Network (ASN),
a project of D2L (www.achievementstandards.org).
In the ASN, standards are hierarchically structured: first by source; e.g., by state; within source by type; e.g., science or mathematics;
within type by subtype, then by grade, etc.
Each Teach Engineering lesson or activity is correlated to one or more K-12 science, technology, engineering or math (STEM) educational standards.
All 100,000+ K-12 STEM standards covered in Teach Engineering are collected, maintained and packaged by the Achievement Standards Network (ASN), a project of D2L (www.achievementstandards.org).
In the ASN, standards are hierarchically structured: first by source; e.g., by state; within source by type; e.g., science or mathematics; within type by subtype, then by grade, etc.
NGSS: Next Generation Science Standards - Science
| NGSS Performance Expectation | ||
|---|---|---|
|
MS-ESS2-4. Develop a model to describe the cycling of water through Earth's systems driven by energy from the sun and the force of gravity. (Grades 6 - 8) Do you agree with this alignment? |
||
| Click to view other curriculum aligned to this Performance Expectation | ||
| This activity focuses on the following Three Dimensional Learning aspects of NGSS: | ||
| Science & Engineering Practices | Disciplinary Core Ideas | Crosscutting Concepts |
| Develop a model to describe unobservable mechanisms. Alignment agreement: | Water continually cycles among land, ocean, and atmosphere via transpiration, evaporation, condensation and crystallization, and precipitation, as well as downhill flows on land. Alignment agreement: Global movements of water and its changes in form are propelled by sunlight and gravity.Alignment agreement: | Within a natural or designed system, the transfer of energy drives the motion and/or cycling of matter. Alignment agreement: |
| NGSS Performance Expectation | ||
|---|---|---|
|
MS-ESS3-3. Apply scientific principles to design a method for monitoring and minimizing a human impact on the environment. (Grades 6 - 8) Do you agree with this alignment? |
||
| Click to view other curriculum aligned to this Performance Expectation | ||
| This activity focuses on the following Three Dimensional Learning aspects of NGSS: | ||
| Science & Engineering Practices | Disciplinary Core Ideas | Crosscutting Concepts |
| Apply scientific principles to design an object, tool, process or system. Alignment agreement: | Human activities have significantly altered the biosphere, sometimes damaging or destroying natural habitats and causing the extinction of other species. But changes to Earth's environments can have different impacts (negative and positive) for different living things. Alignment agreement: | Relationships can be classified as causal or correlational, and correlation does not necessarily imply causation. Alignment agreement: The uses of technologies and any limitations on their use are driven by individual or societal needs, desires, and values; by the findings of scientific research; and by differences in such factors as climate, natural resources, and economic conditions. Thus technology use varies from region to region and over time.Alignment agreement: |
| NGSS Performance Expectation | ||
|---|---|---|
|
MS-ETS1-2. Evaluate competing design solutions using a systematic process to determine how well they meet the criteria and constraints of the problem. (Grades 6 - 8) Do you agree with this alignment? |
||
| Click to view other curriculum aligned to this Performance Expectation | ||
| This activity focuses on the following Three Dimensional Learning aspects of NGSS: | ||
| Science & Engineering Practices | Disciplinary Core Ideas | Crosscutting Concepts |
| Evaluate competing design solutions based on jointly developed and agreed-upon design criteria. Alignment agreement: | There are systematic processes for evaluating solutions with respect to how well they meet the criteria and constraints of a problem. Alignment agreement: | |
| NGSS Performance Expectation | ||
|---|---|---|
|
MS-ETS1-3. Analyze data from tests to determine similarities and differences among several design solutions to identify the best characteristics of each that can be combined into a new solution to better meet the criteria for success. (Grades 6 - 8) Do you agree with this alignment? |
||
| Click to view other curriculum aligned to this Performance Expectation | ||
| This activity focuses on the following Three Dimensional Learning aspects of NGSS: | ||
| Science & Engineering Practices | Disciplinary Core Ideas | Crosscutting Concepts |
| Analyze and interpret data to determine similarities and differences in findings. Alignment agreement: | There are systematic processes for evaluating solutions with respect to how well they meet the criteria and constraints of a problem. Alignment agreement: Sometimes parts of different solutions can be combined to create a solution that is better than any of its predecessors.Alignment agreement: Although one design may not perform the best across all tests, identifying the characteristics of the design that performed the best in each test can provide useful information for the redesign process—that is, some of the characteristics may be incorporated into the new design.Alignment agreement: | |
Common Core State Standards - Math
-
Understand the concept of a ratio and use ratio language to describe a ratio relationship between two quantities.
(Grade
6)
More Details
Do you agree with this alignment?
-
Use ratio and rate reasoning to solve real-world and mathematical problems, e.g., by reasoning about tables of equivalent ratios, tape diagrams, double number line diagrams, or equations.
(Grade
6)
More Details
Do you agree with this alignment?
-
Summarize numerical data sets in relation to their context, such as by:
(Grade
6)
More Details
Do you agree with this alignment?
-
Reporting the number of observations.
(Grade
6)
More Details
Do you agree with this alignment?
-
Describing the nature of the attribute under investigation, including how it was measured and its units of measurement.
(Grade
6)
More Details
Do you agree with this alignment?
-
Recognize and represent proportional relationships between quantities.
(Grade
7)
More Details
Do you agree with this alignment?
International Technology and Engineering Educators Association - Technology
-
Explain how knowledge gained from other content areas affects the development of technological products and systems.
(Grades
6 -
8)
More Details
Do you agree with this alignment?
-
Conduct research to inform intentional inventions and innovations that address specific needs and wants.
(Grades
9 -
12)
More Details
Do you agree with this alignment?
-
Analyze the stability of a technological system and how it is influenced by all the components in the system, especially those in the feedback loop.
(Grades
9 -
12)
More Details
Do you agree with this alignment?
-
Develop a solution to a technological problem that has the least negative environmental and social impact.
(Grades
9 -
12)
More Details
Do you agree with this alignment?
State Standards
Florida - Science
-
Identify the impact that humans have had on Earth, such as deforestation, urbanization, desertification, erosion, air and water quality, changing the flow of water.
(Grade
7)
More Details
Do you agree with this alignment?
-
Describe and investigate various limiting factors in the local ecosystem and their impact on native populations, including food, shelter, water, space, disease, parasitism, predation, and nesting sites.
(Grade
7)
More Details
Do you agree with this alignment?
-
Describe and investigate the process of photosynthesis, such as the roles of light, carbon dioxide, water and chlorophyll; production of food; release of oxygen.
(Grade
8)
More Details
Do you agree with this alignment?
-
Classify and compare substances on the basis of characteristic physical properties that can be demonstrated or measured; for example, density, thermal or electrical conductivity, solubility, magnetic properties, melting and boiling points, and know that these properties are independent of the amount of the sample.
(Grade
8)
More Details
Do you agree with this alignment?
Montana - Science
-
describe the water cycle, the composition and structure of the atmosphere and the impact of oceans on large-scale weather patterns
(Grades
5 -
8)
More Details
Do you agree with this alignment?
Materials List
Each group needs:
- 12-inch round, clear plastic planter liner, such as this 12.15 x 12.15 x 3.37-inch example for $1.08 at Home Depot http://www.homedepot.com/p/Vigoro-12-in-Deep-Plant-Liner-DL12HBDI/204400737
- 1-gallon native plant species
- 12-inch biodegradable coir hanging basket or planter; use the same planter filled with the media mix combination from the Does Media Matter? Infiltration Rates and Storage Capacities activity
- (2) 4-5/8" brick trowel or equivalent
- large mixing tub
- (2) measuring cups, volumetric cylinders or gallon containers
- (optional) 4 ounces liquid cement color
- stopwatch or smartphone, for measuring time
- 2 pairs latex gloves
- access to water and sink/drain
- Magic Sidewalk Worksheet, one per student
To share with the entire class:
- 50-lb. bag ¼-inch to 3/8-inch pea gravel, pond rocks, granite or limestone
- 50-lb. bag construction/playground sand
- 10-lb. bag Portland cement (do not use pre-mix cement)
Worksheets and Attachments
Visit [www.teachengineering.org/activities/view/usf_stormwater_lesson02_activity3] to print or download.Introduction/Motivation
What happens to water when it rains? When it rains hard enough, rainwater begins to collect on surfaces such as roofs, sidewalks, driveways and even within our yards. This rainwater becomes stormwater runoff as it moves into the street and travels down the street gutters into the storm drain or storm sewer. Does anyone know where stormwater goes once it enters the sewer? That's right; after entering the storm sewer, stormwater typically goes into stormwater ponds, rivers and lakes. This water is also known as surface water and eventually makes its way into the oceans. Older cities have combined storm sewer and sanitary sewer systems. In these cases, the water is first directed to a wastewater treatment plant where it is treated (cleaned) and released back into surface water ecosystems.
A lot of pollutants collect on surfaces such as roofs, sidewalks, driveways and our yards, and these pollutants are carried away with the stormwater after it rains. These pollutants make their ways into the rivers, lakes, groundwater and oceans, and can negatively impact the health of the ecosystem, fishes, wildlife and humans.
Does anyone have a better idea of how we might reduce the amount of water that makes its way to the oceans when it rains? What if, instead of creating stormwater runoff from our homes, we were able to capture and provide treatment of pollutants before they enter the traditional stormwater infrastructure? One way to do just that is to create "magic" sidewalks—or concrete that permits water to pass through it.
Would it seem like magic if water went through a sidewalk? Well, Yes! Water can pass through a sidewalk if we change the materials that we use to make a sidewalk. (You may want to write the following four items on the board as you describe them.) Traditional materials that are used to create an impervious sidewalk—or a sidewalk in which water does not pass through—are a coarse aggregate consisting of ¼-inch to 3/8-inch limestone, pebble, granite or locally sourced material; fine grain sand such as construction, playground or beach sand; Portland cement, which is made of clay and limestone fines; and water.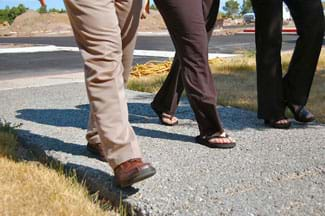
To create pervious concrete, we need to eliminate one of the four materials used to create traditional concrete and determine the best design ratio mix for those materials. In this activity, we will keep track of the types of material used, the quantity of materials and the resulting infiltration rate of the final pervious pavement mix, and compare the results.
Pervious concrete may look a little different, but it serves the same purpose and helps protect the environment from the effects of pollution.
Procedure
Background
The objective of this activity is to create a pervious pavement that is structurally sound to walk on and also allows water to pass through it. Students begin by adding small amounts of water, aggregate (pea gravel, pond rocks, granite or limestone), and Portland cement and then mixing to the appropriate consistency. Adding too much water or cement results in a material that water will NOT pass through. The teacher may want to experiment with this mix to gain familiarity with what a successful mix feels and looks like before conducting this activity with the class. Expect a pervious pavement mix combination to feel very course and just be able to stick together. See Figure 1 for the appropriate consistency. When the mix is placed in a mold, expect to be able to see openings between the aggregate, so that water will be able to pass through.
Before the Activity
- Gather all materials and set them up at group lab stations, students' desks, classroom tables, or outside, prior to students arriving for class.
- Make copies of the Magic Sidewalk Worksheet, a two-page handout; page 1 for Day 1 and page 2 for Day 2. The porous concrete mixes must dry overnight before testing continues.
- Poke holes in the bottom of the plastic planter liner to permit water drainage. Do not poke holes in the center; the plant will be placed in the center.
- Note that students will need their completed worksheets and pervious pavement mixes for the next activity in this unit.
With the Students
- Day 1: Ask the class the pre-assessment warm-up questions provided in the Assessment section. Then present the Introduction/Motivation content, having students think more deeply about some of its questions using the think-pair-share approach described in the Assessment section.
- Then divide the class into groups of two or three students each, depending on class size and the availability of resources. Hand out the worksheets.
- If conducting the experiment outside, direct students to record the date, time of day, temperature, humidity, dew point and weather conditions on the worksheet. Refer to an online weather website that provides localized weather conditions, such as Weather Underground at http://www.wunderground.com.
- Start the activity by presenting the Introduction/Motivation content, which includes asking students what happens when it rains and describing the concept of impervious and pervious surfaces. If water can go through a sidewalk, would this be magic?
- Explain that cement, sand, aggregate (such as gravel, pebbles, crushed limestone) and water are the four ingredients that make a traditional concrete sidewalk. Have students record these materials on their worksheets.
- Tell students that the materials for making a traditional sidewalk are at each group's lab station. By removing one of these materials from the mix, they can create a "magic" sidewalk, that is, concrete that lets water pass through it.
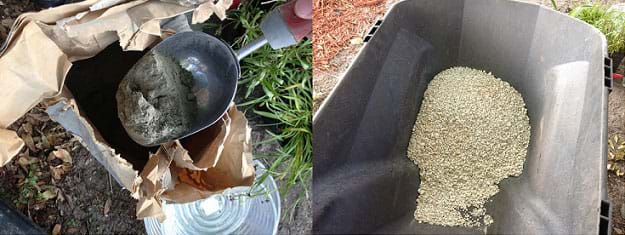
Cement (left) acts as the glue binding the materials together and the aggregate, in this case crushed limestone (right), provides structural support. - Ask students to record on their worksheets the material they think they should remove to create the magic sidewalk.
- Direct student teams to begin the challenge to create a "magic" sidewalk mix by removing one of the materials from the typical concrete sidewalk mix in their mixing tubs. To do this, groups need a measuring cup or volumetric cylinder, large mixing tub, brick trowel and mix materials. Remind students to keep track of the quantities of each ingredient in their mixes. Direct students to begin with small quantities of each material and complete several trials until they achieve a mix combination that they believe will result in a magic sidewalk.
- Upon mix completion, have students answer the questions:
- Does the magic sidewalk mix stick together?
- Does the magic sidewalk mix look magical?
- Will the mix allow water to pass through?
- Circulate through the groups and observe their mixes. Generally speaking, as they go through the trials, expect students to conclude that they must use a higher ratio of aggregate to cement and water. Keep hinting at this.
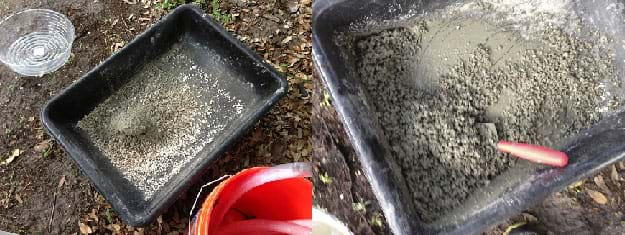
Aggregate + cement + water = magic sidewalk. What will your magic sidewalk mix look like? - Next, have students in each group place their 1-gallon native plant species container in the center of the 12-inch planter liner and fill the surrounding area with the magic sidewalk mix, approximately 2 to 3-inches deep. If liquid cement color is available, incorporate it to the mix prior to filling the planter liner. Then, let the mix in the planter liner dry over night before testing to see if it is magic and determine its infiltration rate.
- Students use the 12-inch planter liner and a 1-gallon plant container so that the magic sidewalk can be inserted into the basket/planter while allowing space for native plants to be inserted inside the opening. Prior to having students place their magic sidewalk mixes into the planter liner, poke several holes in the bottom of the liner except in the center area where the plant will be inserted. These holes allow excess water to drain from the pervious pavement mix. Hence, the plant container serves as a mold for the magic sidewalk mix and provides appropriate spacing for the plant within in the final personal rain garden assembly (created in the next associated activity, A Guide to Rain Garden Construction).
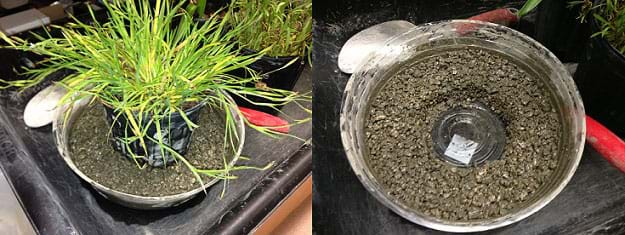
Figure 1. Use the plastic planter liner and 1-gallon plant pot to create a form to mold the concrete mix into the desired shape. - Day 2: The next day, the materials should be dry and ready to test to see if they are indeed "magic" sidewalks. Remove the magic sidewalk from the plastic liner and place it into the coir basket or planter. Use the coir basket/planter filled with the media mix combination from the Does Media Matter? Infiltration Rates and Storage Capacities activity. Place the magic sidewalk on top of the media layer in the hanging pot.
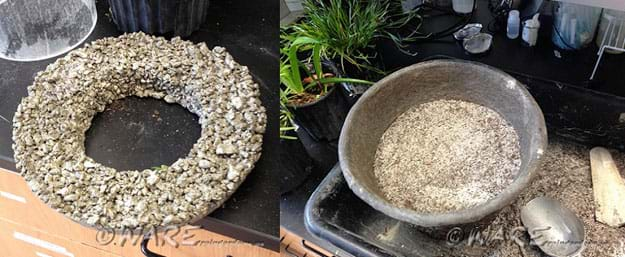
Does your magic sidewalk look like this (left)? What are some similarities and differences, and why? - Remind students to have available their worksheets from the day before, so they can record new data and observations on page 2. If conducting the experiment outside, direct students to record the date, time of day, temperature, humidity, dew point and weather conditions on the worksheet.
- Have teams test the magic sidewalks by filling a volumetric cylinder with a known volume of water and pouring the water directly over the magic sidewalk. Advise them to start with small quantities of water to ensure that all the water does infiltrate into the magic sidewalk. Have students keep track of the amount of water, the time it takes for the water to disappear from the surface of the magic sidewalk, and record on the worksheet this information and their observations. The infiltration rate is equal to the volume of water divided by the time it takes for the water to disappear from the surface.
- Conclude by leading a class discussion to share, compare and review student results and recommendations. Write on the classroom board the different mix combinations and their infiltration rates. Examine the mix ratios of the different groups. What can we conclude about the common characteristics of the mixes with higher infiltration rates? Also ask the questions provided in the Assessment section. Collect and review the worksheets.
Vocabulary/Definitions
cement: A gray powder that serves as the bonding agent when sand and course aggregate are mixed with water to create concrete. Cement is composed of clay and limestone fines.
concrete: A "rock hard" mass that is made by mixing cement, sand, course aggregate and water. The resulting material is heavy and strong, and used for road paving, and slabs for structures like homes, bridges, foundations, basements, retaining walls and sidewalks.
Assessment
Pre-Activity Assessment
Warm-Up Questions: Ask students the following questions to gauge their base level of knowledge and warm up the class to the activity topic.
- Have you ever seen a hard surface, driveway, road or sidewalk that permitted water to go through it? If so, what did it look like? If you have not seen such a surface, what do you think one would look like? (Answer: Water can go through many everyday surfaces such as grass, pavement cracks, soil, rocks and pavers. Water follows the path of least resistance and will flow through any surface that provides openings for it to move through.)
- What is the technical term for a surface in which water can pass through? (Answer: Pervious surface.)
- What is the technical term for a surface in which water can NOT pass through? (Answer: Impervious surface.)
Activity Embedded Assessment
Think-Pair-Share: As part of the Introduction/Motivation presentation, ask students to think about the following questions with a partner, and then share with the class.
- What happens to water when it rains? (Answer: When it rains hard enough, rainwater begins to collect on surfaces such as roofs, sidewalks, driveways and even within our yards. This rainwater becomes stormwater runoff as it moves into the street and travels down the street gutters into the storm drain or storm sewer.)
- Where does stormwater go once it enters a storm sewer? (Answer: After entering the storm sewer, stormwater typically goes into stormwater ponds, rivers and lakes. This water is also known as surface water and eventually makes its way into oceans. Older cities have combined storm sewer and sanitary sewer systems. In those situations, water is first directed to a wastewater treatment plant where it is treated/cleaned and released back into surface water ecosystems.)
- Does anyone have a better idea of how we can reduce the amount of stormwater that makes its way to rivers, lakes, ponds and oceans when it rains? (Answer: Low-impact development [LID] and green infrastructure (GI) technologies can be utilized to reduce stormwater runoff at its sourced to restore the hydrology and water quality of developed sites to pre-development conditions. Examples of LID or GI are rain gardens or bioretention, pervious pavement, green roofs, bioswales, rainwater harvesting, green streets and alleys, planter boxes, urban tree canopies and downspout disconnection.)
Worksheet: Have students complete the two-day Magic Sidewalk Worksheet as they conduct the activity by answering questions, recording measurements and observations, and making calculations. Review their worksheets to gauge their depth of comprehension.
Post-Activity Assessment
Wrap-Up: Lead a class discussion to share, compare and review student results and recommendations, including the worksheet questions/answers. Ask the students:
- Where might this magic sidewalk material be used in the real world and how would engineers use this information? (Answer: A magic sidewalk could be used in areas that do not see a lot of heavy traffic. This includes driveways, sidewalks, bike paths, patios, parking lots, public plazas, outdoor basketball courts, and neighborhood streets and alleys. Engineers could use the testing results from this activity to specify the mix combination to be installed at a specific project, to design a stormwater management plan for new development, or to reduce areas of localized flooding within the existing urban environment.)
- What is the difference in materials between traditional pervious pavement and traditional pavement? (Answer: By mixing specific ratios of materials together to create permanent pore spaces, pervious pavement lets water pass through. Pervious pavement uses materials that are similar to traditional pavement mix materials—small aggregate, cement and water—but differs from traditional pavement in that finer grain size particles [such as sand] are eliminated. The ratio of small aggregate, cement and water is critical; too much of one material may create an impervious surface or a surface that is not structurally sound.)
- How does pervious pavement reduce stormwater runoff and pollution from affecting downstream ecosystems? (Answer: Reducing the volume of water entering into traditional stormwater infrastructure systems limits the mass of pollutant loading entering downstream ecosystems. Pervious pavement reduces stormwater runoff at its sources by promoting infiltration of stormwater into the ground.)
Subscribe
Get the inside scoop on all things Teach Engineering such as new site features, curriculum updates, video releases, and more by signing up for our newsletter!More Curriculum Like This

Students are introduced to innovative stormwater management strategies that are being used to restore the hydrology and water quality of urbanized areas to pre-development conditions. A PowerPoint® presentation provides photographic examples, and a companion file gives students the opportunity to sk...

Students examine in detail the water cycle components and phase transitions, and then learn how water moves through the human-made urban environment. Students show their understanding of the process by writing a description of the path of a water droplet through the urban water cycle, from the dropl...

Through the two lessons in this unit, students are introduced to green infrastructure (GI) and low-impact development (LID) technologies, including green roofs and vegetative walls, bioretention or rain gardens, bioswales, planter boxes, permeable pavement, urban tree canopies, rainwater harvesting,...

Student are introduced to rivers, and to the components of the water cycle. They think about the effects of communities, sidewalks and roads on the natural flow of rainwater. Students also learn about the role of engineering in community planning and protecting our natural resources.
References
Davis, A. P. (2008). Field performance of bioretention: Hydrology impacts. Journal of Hydrologic Engineering, 13(2), 90-95. doi: 10.1061/(asce)1084-0699(2008)13:2(90)
Davis, A. P., Shokouhian, M., Sharma, H., and Minami, C. (2006). Water quality improvement through bioretention media: Nitrogen and phosphorus removal. Water Environment Research, 78(3), 284-293. doi: 10.2175/106143005x94376
Holman-Dodds, J. K., Bradley, A. A., and Potter, K. W. (2003). Evaluation of hydrologic benefits of infiltration based urban storm water management. Journal of the American Water Resources Association, 39(1), 205-215. doi: 10.1111/j.1752-1688.2003.tb01572.x
Kadlec, R. H., and Wallace, S. D. Treatment Wetlands. Boca Raton, FL: CRC Press, 2009.
Copyright
© 2014 by Regents of the University of Colorado; original © 2013 University of South FloridaContributors
Ryan Locicero, Maya Trotz, Krysta Porteus, Jennifer Butler, William Zeman, Brigith SotoSupporting Program
Water Awareness Research and Education (WARE) Research Experience for Teachers (RET), University of South Florida, TampaAcknowledgements
This curriculum was developed by Water Awareness Research and Education (WARE) Research Experience for Teachers (RET) at the University of South Florida, funded by National Science Foundation grant number EEC 1200682. However, the contents do not necessarily represent the policies of the NSF, and should not be assumed an endorsement by the federal government.
Last modified: August 29, 2018


User Comments & Tips