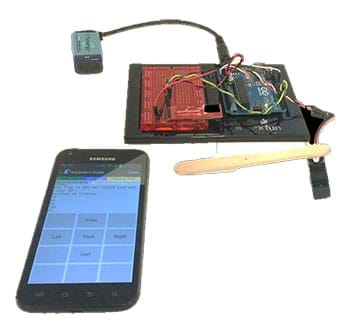
Quick Look
Grade Level: High school; also scalable for middle school
Time Required: 1 hour (wild guess!)
(Longer if students configure their own Bluetooth modules)
Subject Areas: Computer Science, Physical Science, Physics, Problem Solving, Science and Technology

Maker Challenge Recap
Bluetooth is everywhere—from smartphones to computers to cars. Even though students are exposed to this technology, many are not aware of how they can use it themselves to wirelessly control their own creative projects! For this challenge, students work through the engineering design process, as they build on what they learned during a previous Arduino maker challenge, Make and Control a Servo Arm with Your Computer, and learn how to control a servo with an Android phone (iPhones do not work with the components used in this challenge). By the end of the exercise, expect students to be wirelessly controlling a servo with a simple phone application!
Maker Materials & Supplies
- computer, Windows or Mac
- Arduino software; download from https://www.arduino.cc/en/software
- SparkFun RedBoard or Arduino Uno microcontroller and programming cable; an Arduino Inventor’s Kit is recommended (some of its many components are the items listed below), such as at SparkFun
- breadboards
- 180-degree servos; one comes with the Arduino Inventor’s Kit recommended above—the generic sub-micro size servo from SparkFun, or obtain higher-quality servos such as the Hitec HS-422 standard size from SparkFun
- jumper wires
- 9V battery, such as at SparkFun
- 9V connector wire
- Bluetooth Mate Silver, available here
- Android phone; note: iPhones will not work with the Bluetooth Mate for this exercise
- Bluetooth SPP app, or Bluetooth SPP Pro app, by Jerry Li at the Google Play store; the specific app depends on the phone used
Worksheets and Attachments
Visit [www.teachengineering.org/makerchallenges/view/cub-2217-servo-bluetooth-phone-arduino-wireless] to print or download.Subscribe
Get the inside scoop on all things Teach Engineering such as new site features, curriculum updates, video releases, and more by signing up for our newsletter!More Curriculum Like This

Students learn how to connect Arduino microcontroller boards to computers and write basic code to blink LEDs. Provided steps guide students through the connection process, troubleshooting common pitfalls and writing their first Arduino programs. Then they independently write their own code to blink ...

Students learn how to send signals (such as from buttons or sensors) from one system to another using XBee radio communication modules. By activity end, they are able to control LEDs and motors wirelessly using Arduino microcontrollers and XBee shields. Introduces the concept of the Internet of thin...
Kickoff
In advance: Naming the Bluetooth modules takes a little time, so do this in advance. Alternatively, add an advanced concept to the activity (and ~60 minutes) by having students configure their own Bluetooth modules. Follow the Bluetooth Hookup Guide to give each Bluetooth Mate a unique name and PIN (personal identification number). Without a unique name and PIN code, it can be difficult to discern which Bluetooth Mate is which. Because it is easy to forget, attach to each Mate a small label with its name and PIN. The guide is dense with information; find instructions for naming and setting pins in the Example Code - Using the Command Mode section.
For setup only: Connect Arduino pins 2 and 3 to the TX-RX pins of your Bluetooth module. Do this only in the sketch; during the challenge exercise, students connect Arduino pins 0 and 1 to the TX-RX pins.
Student kickoff prompt: Have you been able to control a servo with your computer? Great! Now, let’s take that understanding to the next level and control the servo wirelessly! Harald Bluetooth was the legendary Scandinavian King who united Denmark with Norway. Bluetooth—the technology—unites disparate technologies together, such as connecting your cell phone to your car or computer. With a common communication link—Bluetooth—we can use serial communication to control a servo wirelessly.
Resources
- Refer to the Engineering Design Process hub on TeachEngineering to guide your students through the challenge.
- Utilize the Engineering Design Process Notebook as needed for engineering process documentation.
- Using the BlueSMiRF (a Bluetooth hookup guide) by SparkFun: https://learn.sparkfun.com/tutorials/using-the-bluesmirf?_ga=2.60964772.967609107.1499105590-1654692555.1499105590
- In the SparkFun SIK Guide, see Circuit 8 for the servo: https://cdn.sparkfun.com/datasheets/Kits/RedBoard_SIK_3.2.pdf
- To get connected with Arduino: Introduction to Arduino: Getting Connected and Blinking LEDs maker challenge
- To use sensors with Arduino: Build Your Own Night-Light with Arduino maker challenge
- To use a servo with Arduino: Make and Control a Servo Arm with Your Computer maker challenge
- Servo Library reference by Arduino: https://www.arduino.cc/en/Reference/Servo
- Hobby Servo tutorial (more detailed) by SparkFun: https://learn.sparkfun.com/tutorials/hobby-servo-tutorial?_ga=2.84742297.1452592132.1497891440-1988227511.1497891440
- Serial reference by Arduino: https://www.arduino.cc/en/Reference/Serial
- Serial tutorial by SparkFun: https://learn.sparkfun.com/tutorials/serial-communication
- Serial.setTimeout() reference by Arduino: https://www.arduino.cc/en/Serial/SetTimeout
Maker Time
This maker challenge is all about hooking up the Bluetooth modules. It is strongly recommended that you conduct and/or review the Make and Control a Servo Arm with Your Computer maker challenge before trying this challenge. Students often find that the Bluetooth aspect is relatively simple, while understanding serial is much more difficult!
The first step of this maker challenge is to load the code that controls the servo from the serial monitor on the Arduino from the previous challenge. This code, with a few important tweaks, is all that is needed to “cut the cord” from the servo control project and move to using wireless Bluetooth.
When students have the code running and controlling the servo, the next step is to connect the Bluetooth. The major hang-up on this step is that the TX goes to RX, and RX to TX. It seems a little odd at first, but the key is to think about it like a phone—your voice goes to the speaker—to help it make sense. The Vcc of the Bluetooth is connected to 5V of the Uno, and the ground of the Bluetooth needs to be connected to the ground of the Arduino. The wiring summary follows:
- TX (Bluetooth) to RX (Arduino)
- RX (Bluetooth) to TX (Arduino)
- Vcc (Bluetooth) to 5V(Arduino)
- GND(Bluetooth) to GND (Arduino)
Once the Bluetooth module is connected, the only change to the code is:
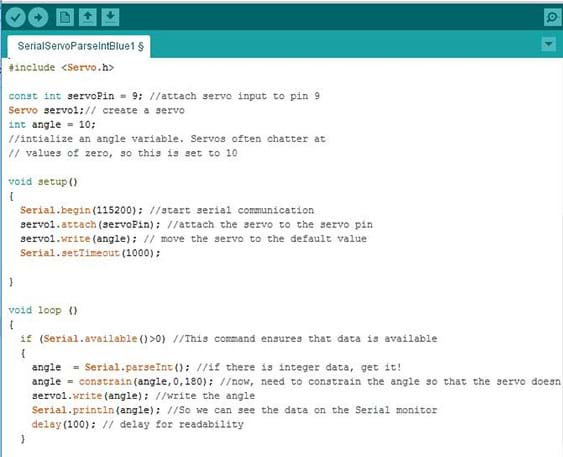
Serial.begin(9600) change to Serial.begin(115200).
Note: If students attempt to test changing the servo angle using the serial monitor from their Arduino applications after modifying the code, they need to change the baud rate on the drop down menu in the serial monitor from 9600 to 115200 as well.
BUT, if you try to upload this code with the Bluetooth attached to the Arduino pins RX and TX, the code will not upload! This is because serial communication over these pins conflicts with the serial communication from the board to the computer. To upload the sketch with the changes, the easiest solution is to unplug the TX and RX pins just before an upload and then plug them back in when the upload is complete. The code is shown in Figure 1.
Tip: If students have trouble, always check that they remembered to plug the pins back in after an upload!

Once the program is uploaded, reconnect the TX and RX, and make sure the phone is paired with the appropriate Bluetooth module. The steps to connect to an Android phone follow:
- Power up the Bluetooth module and go to settings on the Android device.
- Pair the device. On some phones, this step must be performed twice for the phone to pair. Make sure to have the PIN codes handy (the default for most Bluetooth Mates is “1234”) > turn ON the power for both devices > search for the module in the Android “Settings” app under Bluetooth > unplug the Uno from the computer > plug the Uno into the 9V battery/adapter.
- Once the device is paired to the phone, open the Bluetooth SPP app.
- Use the menu to connect to and find the correct device name.
- Open “Real Time Mode” or “Byte Stream Mode” (exact text varies by phone type).
Once the device is connected in this mode, the phone now acts like a serial monitor, enabling students to control the servo using the phone!
The hardest part of this challenge is the connection. Once the phone is connected and a servo is controlled, next-level challenges include:
- Test the module range.
- Program “keyboard mode.” Hint: Assign keyboard characters and receive those characters using the Serial.read() command.
- Change the program to turn an LED on and off. OR, change the LED intensity.
- Advanced: Create a multi-jointed finger controlled with fishing line.
Wrap Up
As a class, have students reflect on what worked and what was challenging about the activity. Did the code work right away? What were the challenges experienced while migrating from a wired to a wireless connection? If you did this activity again, what would you change? How would you improve?
How would you use this project as a springboard to control something that matters to you? Could you make a Bluetooth lock? How might you make a Bluetooth-controlled robot car? What other ideas do you have?
Tips
The Make and Control a Servo Arm with Your Computer maker challenge transitions directly to this maker challenge, so make sure that students are entirely comfortable with it before moving on to connect via Bluetooth.
If students have the servo moving under serial monitor control, but not under cell phone control:
- Make sure that the phone is paired. Often, this needs to be done twice when a phone is first paired with Bluetooth modules.
- Verify that students changed the baud rate in the Arduino code to 115200 and uploaded the code.
- Remember, the code does not upload if TX-RX are plugged in, so remove the TX-RX wires while it is uploading, and then plug those wires back in!
- Make sure that you are connected to the correct Mate. Sometimes, if this activity is performed multiple times, students mistakenly connect to a Mate across the classroom.
Despite everyone’s best intentions, students often still connect TX-TX and RX-RX. To help diagnose these issues, it is best to use two different-colored wires for the connections.
If the servo responds slowly, review the Serial.setTimeout() command reference listed in the Resources section.
Copyright
© 2017 by Regents of the University of ColoradoContributors
Daniel GodrickSupporting Program
ITL Program, College of Engineering and Applied Science, University of Colorado BoulderAcknowledgements
This activity was developed by the Integrated Teaching and Learning Program in the College of Engineering and Applied Science at the University of Colorado Boulder.
Special thanks to Jacob Segil and SparkFun Education.
Last modified: August 8, 2025


User Comments & Tips