
Wirelessly Control Lights and Motors Using XBee Communication!
 At this Nebraska reservoir, sensors and wireless communication are used to send air and water quality data to equipment miles away.Copyright 2014 Edward Pultar, Wikimedia Commons CC BY-SA 4.0 https://commons.wikimedia.org/wiki/File:Tools.Valarm.net_Remotely_Monitoring_Industrial_IoT_Sensors_for_Water_and_Air_Quality_with_Lorenzo_and_Edward.jpg
From remote-controlled cars, to sensors relaying agricultural data from a field to farmhouses miles away, wireless communication enables users to “cut the cord” for their projects. For this maker challenge, students use the engineering design process as they apply what they learned about serial communication during the previous Arduino maker challenge (Make and Control a Servo Arm with Your Computer) and learn how to send signals from one system to another using XBee radio communication modules. By activity end, expect students to be able to control LEDs and motors wirelessly using Arduino microcontrollers and XBee shields. This is a great activity for students to explore and come to understand the concept of the Internet of things.
- computer, Windows or Mac
- Arduino software; download from https://www.arduino.cc/en/software
- 2 Arduino microcontrollers and programming cables; recommended: 2 Arduino Inventor’s Kits (which include buttons and LEDs) at SparkFun
- 2 XBee Series 1 trace antennas, each at CanaKit; many different types of XBees are available and several different antenna options are available with the more expensive ones extending the range from feet to miles; the Series 1 XBee is highly recommended for this activity due to its ease of configuration and classroom range
- 2 XBee shields, each at SparkFun
- 1 header pin kit, such as the Arduino Stackable Header Kit - R3 at SparkFun
- XCTU software, for configuring the XBees; free download at Digi
- 1 XBee Explorer USB for each XBee shield, from SparkFun, to make XBee configuration much easier; 1 Explorer can configure all the XBes used in the activity
- breadboards
- jumper wires
- 9V battery
- 9V connector wire
- additional components for challenge exercises: potentiometer, touch sensor, flex sensor, motor, servo
Have you mastered the nuances of serial communication and controlled a servo remotely with your computer but now you want to operate the servo from hundreds of feet away without a cable? Maybe you want to send data from an electric fence that is miles away to alert you that something has run into it? Or perhaps you want to make your own remote-controlled vehicle? If you have an interest in wireless communication, XBee radio communication modules are for you.
So many applications are possible! Remote sensing systems are employed to determine and control all sorts of everyday items. Is someone occupying that hotel room? Is a specific cabinet or garage door open or closed? Are the lights at a distant location on or off? Typical industrial uses include remote water and air monitoring systems that use sensors and wireless communication to measure and report data about usage, levels, flow and chemical composition. All these systems are examples of the “Internet of things.”
 Copyright 2015 U.S. Federal Trade Commission, Wikimedia Commons (public domain) https://commons.wikimedia.org/wiki/File:Internet_of_Things_-_2015_report_by_the_United_States_Federal_Trade_Commission.pdf
What are XBees? XBees are radio communication modules that enable two devices to talk to each other wirelessly. Many different types of XBees are manufactured these days. Different antenna options enable ranges from feet to miles.
You will need two XBees for communication. We will start by just blinking a light. Once you have done that, you are free to move on to figure out how to control motors, servos or any device that you choose!
In advance: Configure each XBee set to pair only to each other. Since this can be confusing, have a teacher or experienced students configure the XBees before starting the activity. Alternatively, add an advanced concept to the activity (and ~60 minutes) by having students configure their own XBees.
Configuration Steps: Plug the first XBee on the XBee Explorer. Open the XCTU program and “discover” the device (the default options work well). If after selecting the “discover” button on the home page you do not see the port, refer to the Tips section for troubleshooting steps.
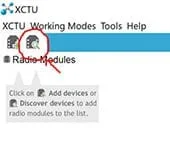 The first step to discovering your XBee in the XCTU software is to select the “discover” button on the home page.Copyright 2018 Rachel Sharpe, ITL Program, University of Colorado Boulder
Once XCTU discovers the device, drag the device from the left to the right window in order to see the radio configuration settings. Many numbers can be configured for XBees. The nice thing is that for basic configuration, only three fields are necessary. The important settings are:
- ID: the PAN ID; the network ID
- DL: the destination address; any four-digit number
- MY: this is the XBee’s address; any four-digit number
Have a pen and paper handy to record these numbers. Make the ID the same for both XBees; DL and MY can be any four-digit numbers you choose. Once you enter the numbers, save the information on the XBee using the XCTU “Write” (pencil) icon. Then “Read” from the XBee to verify that that the changes are saved.
Next, unplug the Explorer, remove the first XBee and plug in the second XBee. The configuration of the second XBee is the exact same as the first XBee, EXCEPT the numbers for DL and MY are swapped. A way to remember this is to think: I am the XBee. MY is “my” number. I am searching for the destination, DL number, of the other XBee. Said another way: The MY number for one XBee is the destination, DL, for the other XBee.
See Table 1 for example numbers for a typical installation. Be careful though! The goal of configuring XBees is to make sure that one XBee pair does not send signals to another XBee pair. An easy way to do this is to have unique ID (PAN ID) numbers for each pair. Another way to ensure that an XBee only communicates with its partner XBee is to give each pair unique DL and MY numbers.
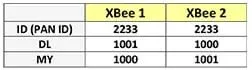 Table 1. An example typical installation.Copyright 2017 Daniel Godrick, ITL Program, College of Engineering and Applied Science, University of Colorado Boulder
Hint: Set up one XBee pair and then try the Maker Time exercise. Once you have one XBee sending button data to another XBee and blinking an LED, simply swap the XBee pair on the shields to test and ensure that the configurations for the other XBee pairs are correct!
If you have pairing and configuration issues, sometimes it makes sense to reset the XBee and start anew. XCTU makes this easy. Simply click the “Default” button with the XBee attached and discovered.
This maker challenge is all about wireless control. However, if the circuits are not working under wired control, they will not work wirelessly! The path to success requires students to:
- Get the circuits working while wired to the computer.
- Migrate the successful circuits to the XBee shields.
The activity requires each XBee to be placed on an XBee shield, and this shield needs to be placed on an Arduino. So, it works well to team up two groups for this exercise. The sender team reads a button press and sends the output state of the button (that is, whether the button is pressed or not) to the serial monitor. The receiver team receives a one or a zero from the serial monitor and uses this information to turn an LED on and off.
The KEY to coding with XBees is to make sure the switch is in DLINE when you are trying to upload code and UART when you are trying to talk between XBees. You will very likely forget to do this—so, the first thing to check when troubleshooting is the little switch on the shield!
Team 1: Send Sketch—In order to send the information from a button, have the sender team wire a button so that when the button is pressed, a zero appears on the serial monitor, and if the button is not pressed, a one appears. Buttons can be a bit tricky to wire, so be sure to follow the Figure 1 schematic diagram.
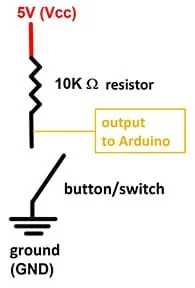 Figure 1. A schematic diagram for how to send button information.Copyright 2017 Daniel Godrick, ITL Program, College of Engineering and Applied Science, University of Colorado Boulder
The button output is an input to Arduino. It is good practice to declare a digital pin as an INPUT using the pinMode() command. Digital pins 3-13 are good for this exercise.
The reason why a “1” appears when the button is not pressed is the button is attached to a “pull-up” resistor. This “pulls-up” the value going to the Arduino (that is, makes the value HIGH or 1) until the button is pressed. When the button is pressed, the value sent to Arduino is the ground state, a “0” or LOW signal.
The code is shown in Figure 2.
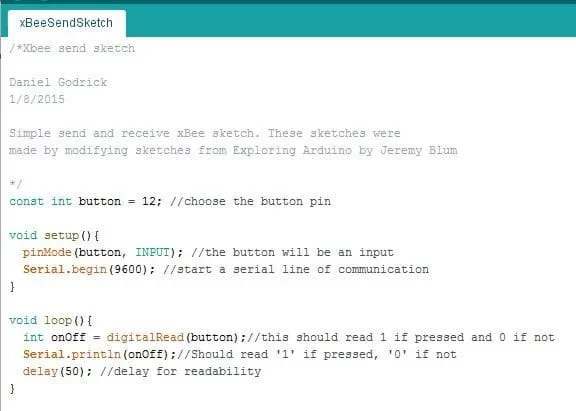 Figure 2. A simple send XBee sketch.Copyright 2015 Daniel Godrick, ITL Program, College of Engineering and Applied Science, University of Colorado Boulder
To verify that the sender code works, open the serial monitor and see the cascading 0 or 1 change when the button is pressed and released. Remember, in this particular circuit, a one is returned if the button is not pressed and a zero is returned when the button is pressed.
Advanced prompt: Can you create a circuit that returns a zero when the button is not pressed, and a one when the button is pressed? (This is known as a pull-down resistor circuit.)
Team 2: Receive Sketch—The job of the receiver team is to receive a value of “1” or “0” and turn an LED on or off accordingly. Quotation marks around a number indicate that Arduino processes the number as a character. Remember, if we type a 1 into the serial monitor text field and read it as an integer, we see the ASCII code of 49. If this does not make sense or is new to you, refer to the Make and Control a Servo Arm with Your Computer maker challenge for an explanation.
An LED circuit can be found in Circuit 1 of the SIK Guide (see the Resources section) and the code for the receiver is shown in Figure 3.
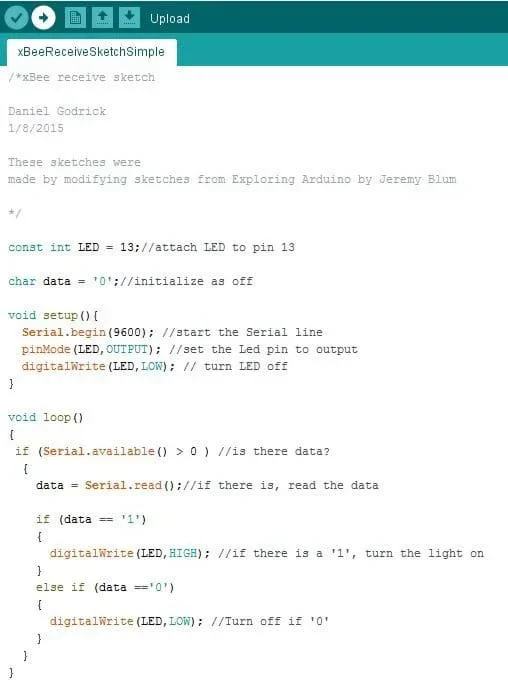 Figure 3. A simple receive XBee sketch.Copyright 2015 Daniel Godrick, ITL Program, College of Engineering and Applied Science, University of Colorado Boulder
The goal for the receiver teams is to turn an LED on and off from their computers using a wired serial monitor connection.
Combining Send and Receive, Then Using the XBees
When both teams are finished,
- IF the send sketch is sending the button state as “1” or “0” to the serial monitor, AND
- IF the receive sketch is reading a “1” or “0” typed into the serial monitor that turns on and off an LED,
- Then:
- disconnect the Arduinos from the USB,
- connect the 9V battery, and
- switch the switch to UART on both XBee shields.
Now, pressing the button on the “Send” XBee/Arduino flashes the light on the “Receive” XBee/Arduino. If this does not happen, see the Tips section.
Once students have accomplished this, suggest further challenge activities, such as:
- Test the range of the module.
- Switch the Send and Receive teams.
- Use Circuit 12 in the SIK Guide to build a motor circuit and turn a motor on and off wirelessly.
More challenge exercises follow. Tip: Expect the Serial.parseInt() command to be useful in many of these challenges!
- Servos: Send values from a potentiometer attached to one XBee/Arduino to control a servo attached to another XBee/Arduino.
- LEDs: Use a temperature sensor attached to one XBee/Arduino to control the brightness of a red LED attached to another XBee/Arduino.
- LEDs: Attach a red LED and a blue LED to the second XBee/Arduino and create a hot/cold meter.
- Motors: Use a potentiometer, flex sensor, or touch sensor attached to one XBee/Arduino to control the speed of a motor attached to another XBee/Arduino.
- Open-ended: Create an XBee project of your own!
As a class, have students reflect on what worked and what was challenging about the exercise. Did the code work right away? Did you understand how the code maps characters to numbers? What were the challenges with sending the data wirelessly? If you did this exercise again, what would you change?
With an adequate antenna, Series 1 XBees can communicate with each other a mile away. What projects might take advantage of this capability? What would you want to monitor or control from miles away?
As a general rule, it is good practice to go through the exercise prior to working with students and prepare a working example. With many places for beginners to make mistakes, seeing a working circuit helps many students get to success. Having a working example handy also enables quick and easy testing of XBee pairs. To do this, simply swap the XBee pairs on the shields and test to see if the light blinks!
Problems Discovering XBee in XCTU:
- If after selecting the “discover” button on the home page you do not see your port, try maximizing the discover window in case your COM ports are just hidden from view. To do this, select “discover,” maximize the window and see your window go from the look of Figure 4 to Figure 5.
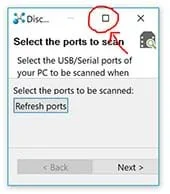 Figure 4. Make sure you are seeing all the ports by selecting the maximize button in the discover pop-up window.Copyright 2018 Rachel Sharpe, ITL Program, University of Colorado Boulder
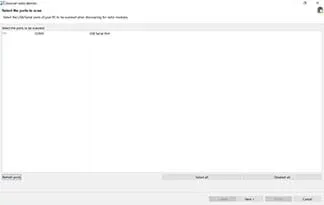 Figure 5. After maximizing the discover window, notice that the COM 5 port shows up.Copyright 2018 Rachel Sharpe, ITL Program, University of Colorado Boulder
- Verify that the XBee is correctly plugged into the XBee Explorer. Look for the two angled white lines on the XBee Explorer that suggest the orientation for the XBee (see Figure 6).
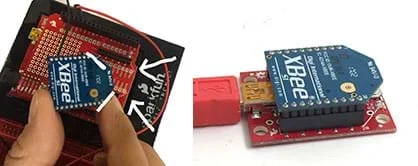 Figure 6. The correct orientation to connect the XBee and the XBee Explorer. Notice the two angled white lines on one side of the XBee Explorer that indicate the XBee orientation.Copyright 2018 Rachel Sharpe, ITL Program, University of Colorado Boulder
Problems Uploading Code: Make sure the XBee shield switch is in DLINE when trying to upload code.
Buttons/Switches:
- Students often confuse inputs and outputs, so emphasize that an output from a sensor/button is an input to the Arduino.
- If a button is always reading zero, then the Arduino analog pin is likely connected to ground instead of the resistor/button junction.
- If the sensor always reads one, the Analog pin is likely connected directly to power.
- Make sure the breadboard is connected to the Arduino. Often, students connect the button to the breadboard rails, but forget to bring these rails back to the Arduino. Remember: No connections exist between the breadboard and Arduino until you make them!
- Make sure that students declare a digital pin as an INPUT using the pinMode command. Digital pins 3-13 are good for this exercise.
XBees:
The KEY to coding with XBees is to make sure the switch is in DLINE when you are trying to upload code and UART when you are trying to talk between XBees. You will very likely forget to do this—so, when troubleshooting, first check the little switch on the shield!
If students use the serial monitor to turn on and off an LED, and the other team reads the button state with the serial monitor (that is, sees values change from 0 to 1 based on the button push/release), the issue lies with the XBee. Suggestions:
- Make sure both XBee boards have the switch in the UART position (most common).
- Make sure that all of the shield pins are plugged in appropriately. Students commonly miss that one pin did not get plugged into the Arduino.
- Check the XBee orientation. Refer to the visual guide on the shield; line up the notches on the XBee with the lines on the shield.
- Check the XBee connection. Often students place the XBee with one pin off the shield, which will not work!
Soldering Header Pins to XBee Shields:
The XBee shields do not come with header pins so you need to solder header pins to the XBee shield. See the SparkFun website for soldering tips, but take a look at Figures 7-8 for what the finished soldered shield should look like and how it fits into the Arduino.
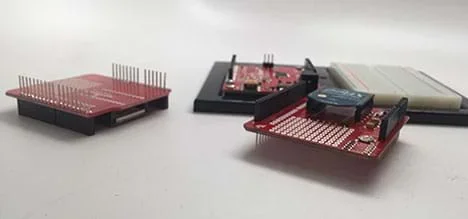 Figure 7. SparkFun shields are useful for stacking on top of Arduino boards.Copyright 2018 Rachel Sharpe, ITL Program, University of Colorado Boulder
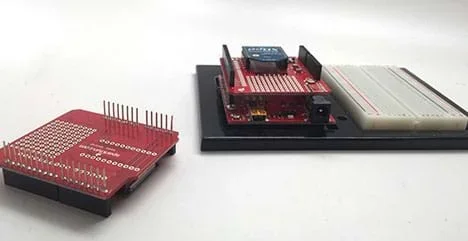 Figure 8. SparkFun shields can be pushed into Arduinos as shown. This shield is useful because it has pins for the XBee shield component to push into.Copyright 2018 Rachel Sharpe, ITL Program, University of Colorado Boulder
- Refer to the Engineering Design Process hub on Teach Engineering to guide your students through the challenge. For design process documentation, use the Engineering Design Process Notebook (PDF).
- In the SparkFun SIK Guide, see Circuit 1 for the LEDs and Circuit 12 for the motor circuit: https://cdn.sparkfun.com/datasheets/Kits/RedBoard_SIK_3.2.pdf
- To get connected with Arduino: Introduction to Arduino: Getting Connected and Blinking LEDs maker challenge
- To use motors with Arduino: Make a Sticky-Note Fan with Arduino maker challenge
- To use a servo with Arduino: Make and Control a Servo Arm with Your Computer maker challenge
- ASCII Chart reference by Arduino: https://www.arduino.cc/en/Reference/ASCIIchart
- Serial reference by Arduino: https://www.arduino.cc/en/Reference/Serial
- Serial tutorial by SparkFun: https://learn.sparkfun.com/tutorials/serial-communication
Contributors
Daniel Godrick
Supporting Program
ITL Program, College of Engineering and Applied Science, University of Colorado Boulder
Acknowledgements
This activity was developed by the Integrated Teaching and Learning Program in the College of Engineering and Applied Science at the University of Colorado Boulder.
Special thanks to Jacob Segil and SparkFun Education.
Copyright
2017 by Regents of the University of Colorado