
Paper Airplanes: Building, Testing, & Improving. Heads Up!
Students learn the different airplane parts, including wing, flap, aileron, fuselage, cockpit, propeller, spinner, engine, tail, rudder, elevator. Then they each build one of four different (provided) paper airplane (really, glider) designs with instructions, which they test in three trials, measuring flight distance and time. Then they design and build (fold, cut) a second paper airplane design of their own creation, which they also test for flight distance and time. They graph the collected class data. Analysis of these experiments with "model" airplanes and their results help them see and figure out what makes airplanes fly and what can be changed to influence the flying characteristics and performance of airplanes.
 Basic paper airplanes.Copyright Emmet O'Neal Library http://eolchildrens.blogspot.com/
Engineers often create small-size models of a new product to test its design. This is especially true with airplanes. Model testing tells engineers how a design responds to different air conditions and aircraft shapes, and lets them experiment with the control surfaces that are used to steer the aircraft. Using small models guides engineers to discard prototypes that do not work, which is a smarter option than than throwing away full-size (large and expensive to build) aircraft that do not work.
After this activity, students should be able to:
- Create a paper model of an airplane to use in experiments.
- Use their observations of paper airplane flight to explain flight.
- Find the average distance of flight trials.
- Explain how engineers often create small-size models of new products to test designs.
- 5.3.1 Visual displays are used to interpret data.
Grade 5
Do you agree with this alignment? - 4.4.1.a.iii Use the four operations to solve word problems involving distances, intervals of time, liquid volumes, masses of objects, and money, including problems involving simple fractions or decimals, and problems that require expressing measurements given in a larger unit in terms of a smaller unit.
Grade 4
Do you agree with this alignment?
- Use the particle model of matter to illustrate characteristics of different substances
Grade 6
Do you agree with this alignment?
- CCSS.Math.Content.5.MD.B Represent and interpret data.
Grade 5
Do you agree with this alignment? - CCSS.Math.Content.6.EE.C Represent and analyze quantitative relationships between dependent and independent variables.
Grade 6
Do you agree with this alignment? - CCSS.Math.Content.6.NS.B.2 Fluently divide multi-digit numbers using the standard algorithm.
Grade 6
Do you agree with this alignment?
- Make two-dimensional and three-dimensional representations of the designed solution.
Grades 6-8
Do you agree with this alignment? - STEL-7Q Apply the technology and engineering design process.
Grades 6-8
Do you agree with this alignment?
- MS-ETS1-2 Evaluate competing design solutions using a systematic process to determine how well they meet the criteria and constraints of the problem.
Grades 6-8
This resource focuses on the following Three Dimensional Learning aspects of NGSS:
Science & Engineering Practices- Evaluate competing design solutions based on jointly developed and agreed-upon design criteria.Do you agree with this alignment?
Disciplinary Core Ideas- There are systematic processes for evaluating solutions with respect to how well they meet the criteria and constraints of a problem.Do you agree with this alignment?
Do you agree with this alignment? - Evaluate competing design solutions based on jointly developed and agreed-upon design criteria.
- MS-ETS1-4 Develop a model to generate data for iterative testing and modification of a proposed object, tool, or process such that an optimal design can be achieved.
Grades 6-8
This resource focuses on the following Three Dimensional Learning aspects of NGSS:
Science & Engineering Practices- Develop a model to generate data to test ideas about designed systems, including those representing inputs and outputs.Do you agree with this alignment?
Disciplinary Core Ideas- Models of all kinds are important for testing solutions.Do you agree with this alignment?
- The iterative process of testing the most promising solutions and modifying what is proposed on the basis of the test results leads to greater refinement and ultimately to an optimal solution.Do you agree with this alignment?
Do you agree with this alignment? - Develop a model to generate data to test ideas about designed systems, including those representing inputs and outputs.
Each student needs:
- 1 of the 4 paper airplane designs in the Plane Patterns Handout (PDF) and its associated Plane Design Instructions (PDF); vary designs among students
- Flight Distances Worksheet (PDF)
- 1-2 sheets of 8.5 x 11" copy paper
- scissors
For the class to share:
- tape measure and/or meter sticks, and/or use cones to mark every five feet
- stopwatch, or a watch with a second hand
- tape
- glue
- paperclips
- completed examples of each of the 4 paper airplane designs
- overhead projector to show the Plane Overhead Transparency (PDF) and Distance/Time Table (PDF).
- (optional) calculators
Paper airplanes are gliders. They have a main body, and generally two wings. Some are more complex, with tails, rudders and flaps. The wings compress the air below the paper airplane, creating high pressure, and thus the airplane is able to "sit" and glide on the air. Moving the rudders, ailerons, or flaps up or down can change the flight path of an airplane. For example, folding down the wing flaps can result in a nosedive and folding up the flaps can point the airplane in an upward direction. (Show the class an overhead transparency of the Blank Plane Diagram (PDF) and have students come up to the board and identify/label the various parts. See Figure 1 for the answers. For younger students, you may want to list the parts nearby from which they can choose.)
Engineers start with designing and testing several different models of an airplane before they get the approval to build a real one. They typically must work under specific constraints or limits, including the purpose of the airplane. By testing different models of planes, engineers can determine which one is best for distance, speed and other factors.
Today, we are going to learn how to design some simple gliders and airplanes using paper. The class is going to design and build a few different models and determine which paper airplane is the best for distance.
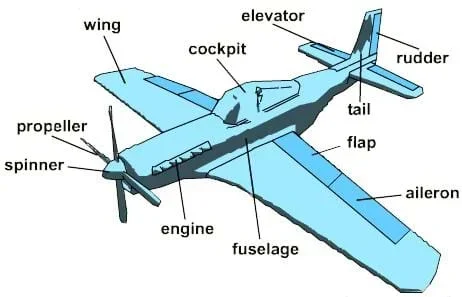 Figure 1. The main parts of an airplane.Copyright NASA http://whyfiles.larc.nasa.gov/text/kids/Problem_Board/problems/flight/parts2.html
Before the Activity
- Gather materials and make copies of the Flight Distances Worksheet (PDF).
- Make enough copies of the four different types of paper airplanes in the Plane Patterns Handout (PDF), and their instructions in the Plane Design Instructions (PDF), one design per student.
- Make a few models of the four airplane designs to get a feel for how to make them and how they fly.
- Prepare an indoor (hallway, gym) or outdoor plane testing area—an unobstructed area to throw the planes and measure flight time and distances.
- Become familiar with the activity vocabulary. List new terms, such as "aileron" and "rudder," on a chart or the classroom board.
- Prepare overhead transparencies to show the class: Blank Plane Diagram (PDF) and Distance/Time Table (PDF).
With the Students
- Conduct the pre-activity assessment brainstorming, as described in the Assessment section.
- Present the Introduction/Motivation content to the class.
- Demonstrate one or two paper airplanes. Discuss and list on the board the airplane parts they may know about, and add any terms they do not know, such as "elevator" and "rudder."
- Then list factors they may know about that would affect flight (for example, plane shape, wing shape, weight, weight at the nose, tails, flaps, rudders, etc.).
- Explain that they will get to try several designs and see how they work. Hand out a variety of plane designs and their instructions, so each table/general area has an assortment. Give students time to work on the airplanes.
- Inform students on the method to measure flight distance and flight time, such as the following:
- Set out cones every five feet and have students estimate their flight distance based on the cones.
- Have students individually measure their flight distances using tape measures or meter sticks.
- Have students use a stopwatch to time how long their planes stay in the air.
- In the plane-testing area, have students test and gather data by performing three test flights with their first plane designs. Direct students to record all three flight distances on their worksheets.
- Hand out blank paper, and let students design and test a second airplane. Inform students that this second design should be their own, original design and entirely different from the first plane design that was provided to them.
- Have students test their second designs, again recording the distances and times.
- Have students compute on their worksheets the average flight times and distances for both plane designs.
- To conclude the activity, lead a class discussion. Make an effort to use the new airplane parts terminology. Question prompts:
- What did you learn?
- What changes did you make in your second airplane design and how did those changes affect the flight distance?
- Who's plane went farther than five feet? Farther than 10 feet? The farthest of all?
- Did certain designs go farther than others? Why?
- What were your flight times? What was the longest flight time?
- Did certain designs stay aloft longer than others? Why?
- Did you notice a relationship between average distance and average time? (Expect a weak relationship between time and distance since it is possible for a plane to fly straight up for a while but only travel a few feet forward.)
- To analyze the class data, first take a poll of the class to compile data counts to complete the Distance/Time Table (PDF) as an overhead transparency. Direct students to use the larger of their two averages from design 1 or design 2.
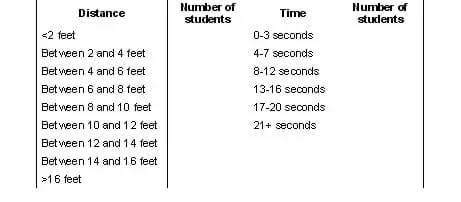 Example blank class data table.
- Using the class data, have students individually make bar graphs with number of students on the x-axis and distance on the y-axis. Which distance has the largest number of paper gliders that went that far?
- If time permits, as a class, determine who has the longest time average.
Pre-Activity Assessment
Brainstorming: Before starting the activity, have students generate a number of possible ideas about the activity topic. Encourage wild ideas and discourage criticism of any ideas. Ask:
- What are all the different ways you can design a paper airplane?
Activity Embedded Assessment
Worksheet: Have students record on the Flight Distances Worksheet (PDF) their flight distances and times for both plane designs. Review their data to assess their engagement and comprehension of the experimental testing process.
Post-Activity Assessment
Class Discussion: Ask students to list factors that they noticed affected their airplane model test flights. Record their answers on the board. Ask how they would change their designs if they had more time to work on them. Have them list some of the variables that affect flight (such as the weight of the plane's parts, wing shape, wing length, rudders, ailerons, plane length, etc.)
Pass the Buck: In groups of four, have students brainstorm ideas to design the perfect paper airplane. First, assign one student in the group to be the recorder. Then have someone toss out an idea. Next, another person in the group provides an idea that builds on the first. Go around the group in this fashion until all students have put in enough ideas to put together a design. When they are done, have them share their ideas with the class.
Provide a clear path for the airplanes to be thrown so that people are not be in the path of the paper airplanes.
Clarify to students when and where to fly the airplanes. Ideally, conduct the activity in a hallway, gym or outdoors. You may want to show them how to fold some of the trickier paper airplanes as a group before you let them try on their own.
If some students have dificulty folding the paper airplanes, ask other students who have mastered the process to help them.
Expect that some students already have experience with paper airplanes. Let them know that they will get a chance to demonstrate their favorite airplane design in a later lesson, but the purpose of this activity is to get some basic folding shapes down for the entire class. Or, ask them to do one of the provided patterns for their first trials and their own designs for the second trial. Then, have the students explain what changes were made to improve the plane for the second trial.
For extra math practice, have students create a line or bar graph of their individual plane trials.
Have students complete other challenges with their paper airplanes. Set up a mock landing pad, a target or a hoop to measure plane flight accuracy.
Check out kits for very cool paper airplanes; see https://www.amazon.com/Supercool-Paper-Airplanes-Kit-Instruction/dp/0804845727.
- For younger students, keep it simple by limiting the designs to one paper airplane prototype design. And, it may be easier if you do not introduce the concept of control surfaces such as rudders and elevators. Also, complete the bar graph as a class or in small groups.
- For older students, encourage more complex models and manipulate them more. Encourage students to come up with their own unique paper airplane designs (even for the first plane design), and have them explain their designs to the class in terms of what they changed to improve flight.
A helpful NASA diagram shows the basic ariplane parts and their functions; see https://www1.grc.nasa.gov/beginners-guide-to-aeronautics/airplane-parts-function/.
Paper Aircraft Association. Accessed 2004. http://www.topphotograph.dsl.pipex.com/paamain/index.html
- Up, Up and Away! - Airplanes
- Can You Take the Pressure?
- May the Force Be with You: Lift
- May the Force Be with You: Weight
- May the Force Be with You: Thrust
- May the Force Be with You: Drag
- Take Off with Paper Airplanes
- Paper Airplanes: Building, Testing, & Improving. Heads Up!
- Airplane Tails & Wings: Are You in Control?
- Airplanes Everywhere: Land, Water, Sky, Oh My!
- Will It Fly?
- Future Flights: Imagine Your Own Flying Machines!
Contributors
Tom Rutkowski; Alex Conner; Geoffrey Hill; Malinda Schaefer Zarske; Janet Yowell
Supporting Program
Integrated Teaching and Learning Program, College of Engineering, University of Colorado Boulder
Acknowledgements
The contents of this digital library curriculum were developed under grants from the Fund for the Improvement of Postsecondary Education (FIPSE), U.S. Department of Education and National Science Foundation (GK-12 grant no. 0338326). However, these contents do not necessarily represent the policies of the Department of Education or National Science Foundation, and you should not assume endorsement by the federal government.
Copyright
2004 by Regents of the University of Colorado