Quick Look
Grade Level: 5 (4-6)
Time Required: 30 minutes
Expendable Cost/Group: US $5.00
Group Size: 4
Activity Dependency: None
Subject Areas: Earth and Space, Physical Science, Science and Technology
NGSS Performance Expectations:

| 3-5-ETS1-1 |
| 3-5-ETS1-3 |
Summary
Students learn how the force of water helps determine the size and shape of dams. They use clay to build models of four types of dams, and observe the force of the water against each type. They conclude by deciding which type of dam they, as Splash Engineering engineers, will design for Thirsty County.
Engineering Connection
Every dam is a unique structure, and provides engineers with the opportunity for much creativity. In designing a dam, engineers consider the specific existing environmental conditions, the forces expected to act upon the dam, and the suitability of different dam design types. Their completed designs must fulfill each community's particular requirements.
Learning Objectives
After this activity, students should be able to:
- Understand the concept of a force.
- Understand that water acts as a force on a dam and that the dam must respond with an equal force to hold back the water.
- Name four different types of dams.
- List some advantages and disadvantages of the different types of dams.
Educational Standards
Each Teach Engineering lesson or activity is correlated to one or more K-12 science,
technology, engineering or math (STEM) educational standards.
All 100,000+ K-12 STEM standards covered in Teach Engineering are collected, maintained and packaged by the Achievement Standards Network (ASN),
a project of D2L (www.achievementstandards.org).
In the ASN, standards are hierarchically structured: first by source; e.g., by state; within source by type; e.g., science or mathematics;
within type by subtype, then by grade, etc.
Each Teach Engineering lesson or activity is correlated to one or more K-12 science, technology, engineering or math (STEM) educational standards.
All 100,000+ K-12 STEM standards covered in Teach Engineering are collected, maintained and packaged by the Achievement Standards Network (ASN), a project of D2L (www.achievementstandards.org).
In the ASN, standards are hierarchically structured: first by source; e.g., by state; within source by type; e.g., science or mathematics; within type by subtype, then by grade, etc.
NGSS: Next Generation Science Standards - Science
| NGSS Performance Expectation | ||
|---|---|---|
|
3-5-ETS1-1. Define a simple design problem reflecting a need or a want that includes specified criteria for success and constraints on materials, time, or cost. (Grades 3 - 5) Do you agree with this alignment? |
||
| Click to view other curriculum aligned to this Performance Expectation | ||
| This activity focuses on the following Three Dimensional Learning aspects of NGSS: | ||
| Science & Engineering Practices | Disciplinary Core Ideas | Crosscutting Concepts |
| Define a simple design problem that can be solved through the development of an object, tool, process, or system and includes several criteria for success and constraints on materials, time, or cost. Alignment agreement: | Possible solutions to a problem are limited by available materials and resources (constraints). The success of a designed solution is determined by considering the desired features of a solution (criteria). Different proposals for solutions can be compared on the basis of how well each one meets the specified criteria for success or how well each takes the constraints into account. Alignment agreement: | People's needs and wants change over time, as do their demands for new and improved technologies. Alignment agreement: |
| NGSS Performance Expectation | ||
|---|---|---|
|
3-5-ETS1-3. Plan and carry out fair tests in which variables are controlled and failure points are considered to identify aspects of a model or prototype that can be improved. (Grades 3 - 5) Do you agree with this alignment? |
||
| Click to view other curriculum aligned to this Performance Expectation | ||
| This activity focuses on the following Three Dimensional Learning aspects of NGSS: | ||
| Science & Engineering Practices | Disciplinary Core Ideas | Crosscutting Concepts |
| Plan and conduct an investigation collaboratively to produce data to serve as the basis for evidence, using fair tests in which variables are controlled and the number of trials considered. Alignment agreement: | Tests are often designed to identify failure points or difficulties, which suggest the elements of the design that need to be improved. Alignment agreement: Different solutions need to be tested in order to determine which of them best solves the problem, given the criteria and the constraints.Alignment agreement: | |
International Technology and Engineering Educators Association - Technology
-
Test and evaluate the solutions for the design problem.
(Grades
3 -
5)
More Details
Do you agree with this alignment?
-
The selection of designs for structures is based on factors such as building laws and codes, style, convenience, cost, climate, and function.
(Grades
6 -
8)
More Details
Do you agree with this alignment?
State Standards
Colorado - Math
-
Represent and interpret data.
(Grade
5)
More Details
Do you agree with this alignment?
Materials List
Each group needs:
- water, 2 gallons (7.6 liters)
- 1 large waterproof bin, to catch any spilled water
- 4 small disposable plastic containers (available at grocery stores, or cut bottoms off milk jugs/ juice cartons, or use very thin Tupperware containers from a thrift store)
- scissors and/or hacksaw, for cutting plastic containers
- Four Types of Dams Worksheet, one per person
Embankment dam materials for each group:
- course sand, 1 cup (play sand works, but tube sand or sand for concrete works best)
- plastic wrap, 1 x 12 in (2.5 x 30 cm) strip, for waterproofing; foil or paper also work
- 1 tsp (5 ml) modeling clay, for the spillway
Gravity dam materials for each group:
- 10-15 small dominoes, wood or metal blocks (blocks should be close to domino size)
- 1 tsp (5 ml) modeling clay, for the spillway, to secure blocks, and as grout between blocks; can substitute tape and plastic wrap for clay
Arch dam materials for each group:
- modeling clay, one large handful
Buttress dam materials for each group:
- modeling clay, half a handful
- 5 small (1-3 in, or 2.5-7.6 cm) dowel pieces (or straws or popsicle sticks), for dam support
Worksheets and Attachments
Visit [www.teachengineering.org/activities/view/cub_dams_lesson02_activity1] to print or download.Introduction/Motivation
How do engineers decide how large or strong to build a dam? Is the weight of the water pushing against the side of the dam important? Did you know that one cubic foot (0.29 cubic meters) of water weighs 64 pounds (29 kg)? The weight of the water actually determines how strong the dam must be. Water pushes against the side of a dam with a certain amount of force or pressure. The dam wall must push the water back with an equal amount of force, and the dam must redirect the force of the water into the ground and canyon walls without collapsing or moving downstream from the force of the water. How does a dam exert force on water? The dam must be strong and sturdy and have strong connections to the ground, in the form of foundations, to help it stand.
By researching the size and direction of all the forces acting on a dam, engineers design a structure that is able to resist all these forces. The principle force acting on a dam is the weight of the water behind the dam. Other forces include the weight of the dam itself and in some cases wave pressure and earthquake forces.
When we make engineering drawings of a dam, we indicate the direction of a force by drawing an arrow (draw an example on the board). Today, you will fill out a worksheet to show forces on the different types of dams — just like engineers do.
Let's talk about four of the most common dam types:
- The most commonly-built type of dam in the U.S. is an embankment dam made of earth (also known as an earthen dam) and/or rock, which are readily-available and inexpensive materials. Its heavy weight and large size create the force to push back against the force of the water.

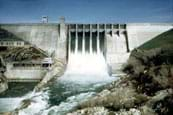
Folsom Dam, a gravity dam in Sacramento County, CA. - Gravity dams are similar to embankment dams because they also use heavy weight and large size to exert enough force on the water, but gravity dams are made of concrete and considered more secure than embankment dams since concrete holds together well. Because so much concrete is needed to exert the force, gravity dams can be expensive. Gravity dams are often used in situations when extremely large dams are required and when the additional cost (compared to a less-expensive embankment dam) is deemed necessary due to people and property below the dam.
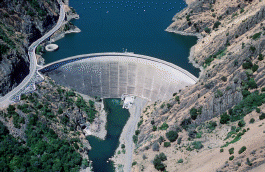
- An arch dam has a curved shape and is ideal for narrow, rocky locations. The shape of the curve takes advantage of the canyon walls. The curved dam redirects the force of the water into the canyon walls, reducing the need for heavy materials to hold back the water (as is done in gravity dams). This can make arch dams less expensive to build, but more expensive to design.

Monticello Dam, a concrete arch dam in Napa County, CA. - A buttress dam supports the force of a reservoir through its bracing supports, called buttresses. The supports are designed like beams and, because they are directly in line with the force of water, redirect the force of the water into the stream bed where they are anchored. Buttress dams use less material than gravity dams, making them less expensive to build.

Different types of dams (left to right): arch dam, embankment dam, gravity dam, and a buttress dam.
If we want to test various types of dams to see how they work when water is present, how would we do that? What engineers do is create and test models. What would a model of a dam look like? (Take suggestions from students.) A model of a dam would be a small scale version of it. By making and testing many small-size versions of dams, you learn from them without the time and expense of making full-size dams. That's what we're going to do today — just like engineers do. Let's get started!
Procedure
Before the Activity
- Gather materials and make copies of the Four Types of Dams Worksheet.
- Make four "landscape" tubs by cutting one side off each of the four tubs per team.
With the Students
- Hand out the worksheet. Review with the students some details about each type of dam (see the Introduction/Motivation and Vocabulary/Definition sections).
- Divide the class into four groups (about 3-4 students per group), and assign each team a type of dam. For larger classes, if needed, assign more than one group the same dam type.
- Have each group create a design. This should include: 1) a list of the materials they will receive, 2) a drawing of the tub and their idea for their dam, and 3) dimensions of key features (such as the tub, dam length, dam thicknesses) and 4) all group members must sign the bottom of the design write-up. The teacher should initial when all four steps are complete.
- Have each team of students use the materials provided to build their type of dam. Remember the key concepts from each dam!

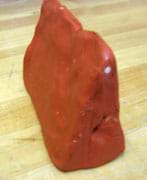
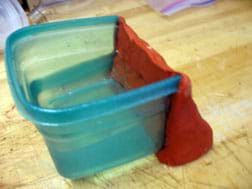
Example model gravity dam. It works! - For testing, direct students to place their entire model (plastic container and clay) into a waterproof bin so as to catch any leakage.
- Have students fill their small containers with water to test its force on their clay dam (see Figure 1). Wait one minute and record your observations. How is it working? Any leaks? Is the dam able to withstand the force of the water?
- Have students walk around the room to examine the dams created by other teams.
- Have students complete the worksheet.
- Conclude by conducting a class discussion, comparing team experiences, and how forces are kept back by the different dam types.
Vocabulary/Definitions
arch dam: A curved dam whose shape directs the force of the water into the canyon walls adjacent to the dam. This type of dam requires less material than any other type of dam and is ideally suited to narrow, rocky locations.
buttress dam: A dam braced by a series of supports, or buttresses, on the downstream side. Most buttress dams are made of reinforced concrete.
dam: A barrier to obstruct the flow of water, especially one made of earth, rock, masonry and/or concrete, built across a stream or river.
embankment dam: A dam made of earth and/or rock, relying upon its heavy weight to resist the force of water. Embankment dams include a waterproof core that prevents water from seeping through it. Embankment dams are the most commonly-built type of dam in the US.
engineer: A person who applies her/his understanding of science and mathematics to creating things for the benefit of humanity and our world.
force: An outside influence that can cause a motion or pressure. For example, to open a door, you exert a force on the door in the direction that you want to open it.
gravity dam: Massive dams that resist the thrust of water entirely by their own weight. Most gravity dams are expensive to build because they require so much concrete.
model: (verb) To simulate, make or construct something to help visualize or learn about something else (a structure, an ecosystem, a process, etc.) that would be difficult or expensive to directly create or experiment on. (noun) A simplified representation of something, sometimes on a smaller scale.
spillway: The route, channel or passageway through which surplus water escapes from a reservoir, so as to not damage the dam. A common spillway type is an overflow — a rounded crest that is somewhat lower than the top of the dam. The overflow allows water to be spilled from the reservoir before the dam overflows.
Assessment
Pre-Activity Assessment
Discussion/Brainstorming: As a class, have students engage in open discussion. Remind them that in brainstorming, no idea or suggestion is "silly." All ideas should be respectfully heard. Take an uncritical position, encourage wild ideas and discourage criticism of ideas. Have students raise their hands to respond. Record their ideas on the board. Ask the students:
- When engineers design a dam, what determines its size?
- Say you know how much water the reservoir needs to hold; now how do you determine the size of the dam?
Activity Embedded Assessment
Worksheet: Have students complete the Four Types of Dams Worksheet; review their answers to gauge their mastery of the subject.
Post-Activity Assessment
Voting: Make sure each student has individually chosen which type of dam they want to use for Thirsty County on their worksheets. Take a class vote by having students raise their hands to vote for their type of dam. Declare the majority vote as the winner — the dam type that Splash Engineering will design for Thirsty County. Review with the students the features and advantages of that type of dam. (Note: In a real engineering analysis, environmental conditions and community requirements/limitations would also be considered in the decision on what type of dam to design and construct. Example considerations include the river's geology and terrain, availability/type of dam building materials, and budget.)
Safety Issues
- Make sure students clean up any spilled water so no one slips.
- Cutting plastic may be difficult, so be careful when using the scissors. A hacksaw works well for cutting plastic tubs.
Troubleshooting Tips
Before testing with water, have students make sure the plastic walls of the small containers have tight seals into the clay.
Activity Extensions
Have students research a local dam and determine its type. Have them report the physical attributes (height, capacity, type of dam, type of spillway, year constructed, etc.) of the dam, as well as a photograph and/or drawing.
Activity Scaling
- For lower grades, provide guidance to students drawing force arrows on the worksheets.
- For upper grades, have each team make a short presentation about their type of dam, including a demonstration using their clay model.
- For upper grades, have teams include a spillway as part of their clay model.
Additional Multimedia Support
To find more examples of certain dam types, look at the "type" column in Wikipedia's list of Reservoirs and Dams in California at: http://en.wikipedia.org/wiki/List_of_reservoirs_and_dams_in_California
See an extensive description of types of dams and spillways at the Wikipedia "Dam," website at: http://en.wikipedia.org/wiki/Dam
A spillway allows water to bypass a dam when it reaches capacity by draining water from the reservoir. See photos and description of the "glory hole" spillway at Monticello Dam in California at the Fish Chris website; it is the largest funnel-type dam outlet in the world: trophybassonly
Subscribe
Get the inside scoop on all things Teach Engineering such as new site features, curriculum updates, video releases, and more by signing up for our newsletter!More Curriculum Like This

Students learn about the importance of dams by watching a video that presents historical and current information on dams, as well as descriptions of global water resources and the hydrologic cycle. Students also learn about different types of dams, all designed to resist the forces on dams.

Students learn that dams do not last forever. Similar to other human-made structures, such as roads and bridges, dams require regular maintenance and have a finite lifespan.

Students are presented with a brief history of bridges as they learn about the three main bridge types: beam, arch and suspension. They are introduced to two natural forces — tension and compression — common to all bridges and structures.
References
Building Big: Dam Basics. WGBH Educational Foundation. Accessed December 4, 2007. (Good description and photos of four dam types) http://www.pbs.org/wgbh/buildingbig/dam/basics.html
Copyright
© 2008 by Regents of the University of Colorado.Contributors
Megan Podlogar; Sara Born; Kristin Field; Denali Lander; Lauren Cooper; Timothy M. Dittrich; Denise W. CarlsonSupporting Program
Integrated Teaching and Learning Program and Laboratory, University of Colorado BoulderAcknowledgements
The contents of this digital library curriculum were developed under a grant from the Fund for the Improvement of Postsecondary Education (FIPSE), U.S. Department of Education and National Science Foundation GK-12 grant no. 0338326. However, these contents do not necessarily represent the policies of the Department of Education or National Science Foundation, and you should not assume endorsement by the federal government.
Last modified: February 25, 2020


User Comments & Tips