Quick Look
Grade Level: 3 (2-4)
Time Required: 2 hours 30 minutes
(five 30-minute class periods)
Expendable Cost/Group: US $10.00
Group Size: 3
Activity Dependency: None
Subject Areas: Earth and Space, Measurement, Physical Science, Science and Technology
NGSS Performance Expectations:

| 3-5-ETS1-1 |
| 3-5-ETS1-2 |
| 3-5-ETS1-3 |
Summary
Explore the phenomenon of the natural power of wind with students as they make sense of how engineers use alternative and renewable resources in the design of a prototype for a wind powered car. Using the engineering design process, students identify the problem, brainstorm solutions, plan a design, create and test a prototype, and make improvements to their wind powered cars.Engineering Connection
Engineers harness the power of wind as an alternative and renewable resource. There are a variety of engineers in support of successful wind engineering projects, including aerospace engineers, civil engineers, electrical engineers, environmental engineers, material engineers, mechanical engineers, and more. Understanding how to design systems to harness renewable energy is a critical component of alleviating the phenomena of climate change and global warming.
Learning Objectives
After this activity, students should be able to:
- Describe what wind is.
- Describe how wind can be used as a renewable resource.
- Know how engineers harness wind as a natural resource for engineering designs.
- Use the engineering design process to design a wind powered car prototype.
Educational Standards
Each TeachEngineering lesson or activity is correlated to one or more K-12 science,
technology, engineering or math (STEM) educational standards.
All 100,000+ K-12 STEM standards covered in TeachEngineering are collected, maintained and packaged by the Achievement Standards Network (ASN),
a project of D2L (www.achievementstandards.org).
In the ASN, standards are hierarchically structured: first by source; e.g., by state; within source by type; e.g., science or mathematics;
within type by subtype, then by grade, etc.
Each TeachEngineering lesson or activity is correlated to one or more K-12 science, technology, engineering or math (STEM) educational standards.
All 100,000+ K-12 STEM standards covered in TeachEngineering are collected, maintained and packaged by the Achievement Standards Network (ASN), a project of D2L (www.achievementstandards.org).
In the ASN, standards are hierarchically structured: first by source; e.g., by state; within source by type; e.g., science or mathematics; within type by subtype, then by grade, etc.
NGSS: Next Generation Science Standards - Science
| NGSS Performance Expectation | ||
|---|---|---|
|
3-5-ETS1-1. Define a simple design problem reflecting a need or a want that includes specified criteria for success and constraints on materials, time, or cost. (Grades 3 - 5) Do you agree with this alignment? |
||
| Click to view other curriculum aligned to this Performance Expectation | ||
| This activity focuses on the following Three Dimensional Learning aspects of NGSS: | ||
| Science & Engineering Practices | Disciplinary Core Ideas | Crosscutting Concepts |
| Define a simple design problem that can be solved through the development of an object, tool, process, or system and includes several criteria for success and constraints on materials, time, or cost. Alignment agreement: Apply scientific ideas to solve design problems.Alignment agreement: | Possible solutions to a problem are limited by available materials and resources (constraints). The success of a designed solution is determined by considering the desired features of a solution (criteria). Different proposals for solutions can be compared on the basis of how well each one meets the specified criteria for success or how well each takes the constraints into account. Alignment agreement: | People's needs and wants change over time, as do their demands for new and improved technologies. Alignment agreement: |
| NGSS Performance Expectation | ||
|---|---|---|
|
3-5-ETS1-2. Generate and compare multiple possible solutions to a problem based on how well each is likely to meet the criteria and constraints of the problem. (Grades 3 - 5) Do you agree with this alignment? |
||
| Click to view other curriculum aligned to this Performance Expectation | ||
| This activity focuses on the following Three Dimensional Learning aspects of NGSS: | ||
| Science & Engineering Practices | Disciplinary Core Ideas | Crosscutting Concepts |
| Generate and compare multiple solutions to a problem based on how well they meet the criteria and constraints of the design problem. Alignment agreement: | Research on a problem should be carried out before beginning to design a solution. Testing a solution involves investigating how well it performs under a range of likely conditions. Alignment agreement: At whatever stage, communicating with peers about proposed solutions is an important part of the design process, and shared ideas can lead to improved designs.Alignment agreement: | Engineers improve existing technologies or develop new ones to increase their benefits, to decrease known risks, and to meet societal demands. Alignment agreement: |
| NGSS Performance Expectation | ||
|---|---|---|
|
3-5-ETS1-3. Plan and carry out fair tests in which variables are controlled and failure points are considered to identify aspects of a model or prototype that can be improved. (Grades 3 - 5) Do you agree with this alignment? |
||
| Click to view other curriculum aligned to this Performance Expectation | ||
| This activity focuses on the following Three Dimensional Learning aspects of NGSS: | ||
| Science & Engineering Practices | Disciplinary Core Ideas | Crosscutting Concepts |
| Plan and conduct an investigation collaboratively to produce data to serve as the basis for evidence, using fair tests in which variables are controlled and the number of trials considered. Alignment agreement: Use a model to test interactions concerning the functioning of a natural system.Alignment agreement: | Tests are often designed to identify failure points or difficulties, which suggest the elements of the design that need to be improved. Alignment agreement: Different solutions need to be tested in order to determine which of them best solves the problem, given the criteria and the constraints.Alignment agreement: | |
Common Core State Standards - English
-
Participate in shared research and writing projects (e.g., read a number of books on a single topic to produce a report; record science observations).
(Grade
2)
More Details
Do you agree with this alignment?
International Technology and Engineering Educators Association - Technology
-
Students will develop an understanding of the characteristics and scope of technology.
(Grades
K -
12)
More Details
Do you agree with this alignment?
-
Students will develop an understanding of the core concepts of technology.
(Grades
K -
12)
More Details
Do you agree with this alignment?
-
Students will develop an understanding of the role of society in the development and use of technology.
(Grades
K -
12)
More Details
Do you agree with this alignment?
-
Students will develop an understanding of the attributes of design.
(Grades
K -
12)
More Details
Do you agree with this alignment?
-
Students will develop an understanding of engineering design.
(Grades
K -
12)
More Details
Do you agree with this alignment?
-
Students will develop an understanding of the role of troubleshooting, research and development, invention and innovation, and experimentation in problem solving.
(Grades
K -
12)
More Details
Do you agree with this alignment?
-
Students will develop abilities to apply the design process.
(Grades
K -
12)
More Details
Do you agree with this alignment?
State Standards
Florida - English
-
Participate in collaborative conversations with diverse partners about grade 2 topics and texts with peers and adults in small and larger groups.
- Follow agreed-upon rules for discussions (e.g., gaining the floor in respectful ways, listening to others with care, speaking one at a time about the topics and texts under discussion).
- Build on others' talk in conversations by linking their comments to the remarks of others.
- Ask for clarification and further explanation as needed about the topics and texts under discussion.
Do you agree with this alignment?
-
Participate in shared research and writing projects (e.g., read a number of books on a single topic to produce a report; record science observations).
(Grade
2)
More Details
Do you agree with this alignment?
Florida - Science
-
Raise questions about the natural world, investigate them in teams through free exploration and systematic observations, and generate appropriate explanations based on those explorations.
(Grade
2)
More Details
Do you agree with this alignment?
-
Compare the observations made by different groups using the same tools and seek reasons to explain the differences across groups.
(Grade
3)
More Details
Do you agree with this alignment?
-
Keep records as appropriate, such as pictorial, written, or simple charts and graphs, of investigations conducted.
(Grade
3)
More Details
Do you agree with this alignment?
-
Recognize the importance of communication among scientists.
(Grade
3)
More Details
Do you agree with this alignment?
-
Recognize that energy has the ability to cause motion or create change.
(Grade
3)
More Details
Do you agree with this alignment?
Materials List
To share with the entire class:
- chart paper or large sticky notes
- The Boy Who Harnessed the Wind: Picture Book Edition by William Kamkwamba and Bryan Mealer
- other books about cars, wind energy, wind powered objects (windmills, wind turbines, gliders, sail boats, etc. – optional)
- box fan
- wooden cars
- chenille pipe cleaners
- paper (different thickness)
- plastic material (different thicknesses)
- popsicle sticks
- hot glue gun/hot glue sticks
- toilet tissue/paper towel rolls
- different types of tape (clear, masking, duct)
- white glue and/or glue sticks
- scissors
- plain paper for drawing potential designs
Each group needs:
- meter stick (for testing and measuring distance traveled)
- Engineering Design Process Worksheet (for each student)
- Self-Evaluation Rubric (for each student)
- STEM Challenge Rubric (for each student)
- materials for final presentation:
- poster boards and markers (optional for final presentation)
- laptops or tablets with PowerPoint or AdobeSpark (optional for final presentation)
Worksheets and Attachments
Visit [www.teachengineering.org/activities/view/uof-2317-wind-powered-car-engineering-design] to print or download.Introduction/Motivation
I have a riddle for you that is adapted from Stephen Pepper’s Wind Riddles:
I’m measured on a special type of scale but I don’t weigh anything
I can’t be seen but I’m not the invisible man
I can whistle and I can blow but I have no mouth
I can knock down trees but I’m not a lumberjack
I help you fly a kite but I’m not a piece of string
What am I?
[Let students offer answers to what they think the poem is about. Answer: wind.]
Today we are going to talk about wind and how wind can be used to make power or energy. First, let’s figure out what we know about wind.
[Use chart paper, draw a t-chart and on one side create a list with students about what they already know about wind.]
What do you know about wind? [Let students offer answers.] What have you seen wind do? (Or, what is wind capable of doing?) If you can’t see wind, how do you know when it is windy? [Let students offer answers. Ask them to incorporate their senses as they think about this question. Potential answers: moving leaves, tree limbs rocking back and forth, hair blowing, flags flapping, the smell of rain if the wind is preceding a storm, other smells the wind might be blowing in their direction, warm or cool air depending on the temperature of the wind, etc.]
[Optional: If it is a windy day, the teacher can take the students outside and have them discuss their observations using their five senses. What do they observe? Potential answers: moving leaves, tree limbs rocking back and forth, hair blowing, flags flapping, the smell of rain if the wind is preceding a storm, other smells the wind might be blowing in their direction, warm or cool air depending on the temperature of the wind, etc.]
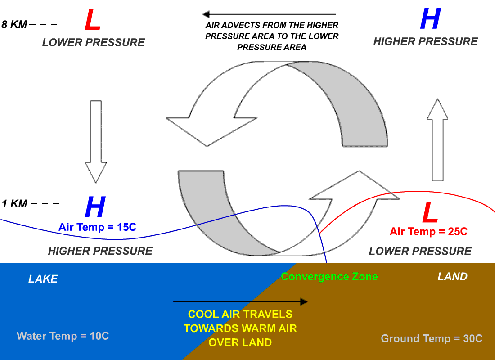
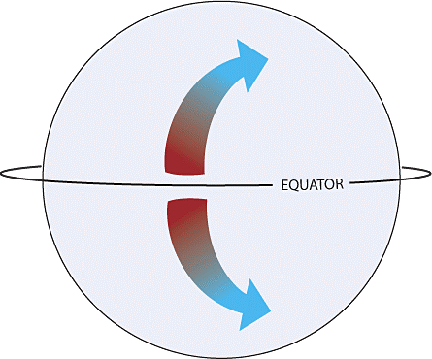
Wind is air in motion. It is caused by changes in air pressure as a result of the uneven heating of the Earth’s surface by the sun. Since the surface is made of very different types of land and water, different surfaces absorb the sun’s heat at different rates. During the day, the air above the land heats up more quickly than the air over water. The warm air over the land expands and rises, and the heavier, cooler air rushes in to take its place, creating winds. At night, the winds are reversed because the air cools more rapidly over land than over water. Large atmospheric winds also travel from the equator, toward the poles of the Earth because the air at the equator is hotter than the air at the poles of the Earth. When we talk about wind, we use two factors to describe wind: speed and direction.
Today we are going to become engineers and use wind to make a wind-powered car. Let’s get started!
Procedure
Background
Wind is air in motion. It is caused by changes in air pressure as a result of the uneven heating of the Earth’s surface by the sun. Since the surface is made of very different types of land and water, it absorbs the sun’s heat at different rates (“The Power of Wind”).
During the day, the air above the land heats up more quickly than the air over water. The warm air over the land expands and rises, and the heavier, cooler air rushes in to take its place, creating winds. At night, the winds are reversed because the air cools more rapidly over land than over water (“The Power of Wind”). See Figure 1. Large atmospheric winds also travel from the center of the Earth, the equator, toward the poles of the Earth because the air at the equator is hotter than the air at the poles of the Earth.
For more than 5,000 years, people around the world have been using sailboats to navigate the planet’s waters. The earliest sailboats have been found near ancient Egypt and the Mediterranean. These original sail boats were made from reeds or logs with sails made from animal skin or cloth. Modern sailboats are made out of fiberglass and synthetic fabrics such as nylon. There are even special sailboats designed with a blade on the hull that allows the boat to “ice skate” over frozen water!
For hundreds of years, people have also built windmills cut wood, pump water, and grind grains such as wheat. Just like sailboats, the design of windmills has been improved over time as well. The first windmills made in Persia (modern-day Iran) were made with paddle-blades. Then, engineers in Holland improved the design with propeller-type blades and sails. Now, windmills are made out of metal and carbon or glass fiber. Windmills are also being used more and more to generate clean electricity.
Wind is a renewable energy source because it will never run out. Wind will continue to blow as long as the sun is heating the Earth. Engineers are constantly researching, testing, and inventing new technology that utilizes renewable resources such as wind.
Day 1: With the Students (Introduction/Motivation)
- Go through Introduction/Motivation section with students.
- Depending on time available, chose a video to play. Have students take notes as they watch the video (if possible).
- Study Jams Air Masses and Wind (3:35) http://studyjams.scholastic.com/studyjams/jams/science/weather-and-climate/air-pressure-and-wind.htm
- Up, Up, and Away: Crash Course Kids #16.2 (3:36) https://www.youtube.com/watch?v=P-G0YkfgdbA
- On the other side of the t-chart, add what students learned about wind that they didn’t know before.
- Make the engineering connection. Tell students that engineers use wind as a resource to power inventions. Ask them: What are some inventions that you know about that use wind? (Potential answers: sail boats, windmills, gliders, wind turbines, etc.)
- Explain to students that engineers use a special process to solve problems called the Engineering Design Process. Have students take notes or provide an outline, as applicable.
- Play the video: The Engineering Process: Crash Course Kids #12.2 (5:16) https://www.youtube.com/watch?v=fxJWin195kU
- Write up on the board or on large piece of paper “The Engineering Design Process” and its steps:
- Define the problem
- Do your research
- Develop a possible solution
- Build a prototype
- Test it
- Evaluate your solutions
- Improve
Day 2: With the Students (Engineering Design Process and Growth Mindset)
- Tell the students: Let’s read about a boy who did a lot of research and taught himself how to be an engineer! As we read about William and how he harnessed the wind, pay attention to the engineering steps he followed without even knowing it!
- Read: The Boy Who Harnessed the Wind (picture book version) to the class.
- After reading, ask the students the following questions:
- What problem was William trying to solve? (Potential answers: His family was poor. There was no power where he lived. He wanted people to have better lives, etc.)
- Did he already know how to build a windmill? (Answer: No.)
- What did he do to learn how to solve his problem? (Answer: He began to research topics such as electricity and windmills and learned about ways he could solve his problem. He went to the library and read a lot of books, etc.)
- What steps did William follow that led him to eventually build a successful windmill? (Answer: He dreamed about it. Made pictures or designed it. He looked and gathered materials, etc.)
- Tell the students: Engineers follow a step-by-step process when solving a problem. This helps them come up with good solutions or ideas. Ask them: Why do you think it’s important to follow an engineering process? (Answer: The engineering design process helps guide engineers to finding solutions to their problems, especially when they run into failures where they have to learn from their mistakes.)
- Emphasize that engineers also learn from their mistakes or failures. Emphasize that mistakes are opportunities to solve new problems or to grow from. Explain that this is called a “growth mindset”. Tell that students: We as engineers need to have a growth mindset.
- Show the growth mindset video or song. (Note: I recommend staring every session of this challenge with the growth mindset song to set the tone.)
- Sesame Street & Bruno Mars music video: https://youtu.be/SnrHZ_uvtxk (Stop at 1:56 or show whole video to discuss, if time available.)
Before the Activity: Day 3 (Conducting research and develop a possible solution)
- Have the following materials available for the students to use in conducting research:
- books about cars, wind energy, wind powered objects (windmills, wind turbines, gliders)
- a computer station where students may conduct research.
- Set up a material inspection/testing station with the following:
- wooden cars
- chenille pipe cleaners
- paper (different thickness)
- plastic material (different thickness)
- popsicle sticks
- hot glue gun/hot glue sticks
- toilet tissue/paper towel rolls
- different types of tape (clear, masking, duct)
- Have plain paper available for students to sketch their ideas
- Make sure to have the worksheets ready: Engineering Design Process Worksheet, Self-Evaluation Rubric and STEM Challenge Rubric, one for each student and/or team and teacher
Day 3: With the Students (Conducting research and developing a possible solution)
- Play mission impossible music in the background as you read the challenge (1:00). (https://www.youtube.com/watch?v=dWfLThXoC8Y)
- State the problem: Can we use wind energy to power or push cars?
- Tell the students: Your challenge, if you so choose to accept it, is to design a wind powered car that can travel at least one meter. This message will self-destruct in 5 seconds.
- Hand out the Engineering Design Process Worksheet to each student and have them fill out the first step of the engineering design process.
- Engineers decide if a solution is beneficial or possible in the real world. They look at the big picture and the impact their solution has on the world.
- Ask students whether wind powered cars are beneficial or even possible. (Potential answers: Wind energy cars would save us money on gas. They wouldn’t contaminate the environment. Wind energy cars might not work in places with not enough wind.)
- Give students time to research wind powered cars by reading the books and/or doing computer research. Have them fill out their research in the Engineering Design Process Worksheet.
- Show students the materials available for making their wind-powered cars.
- Break students into groups of three and have them sketch designs for a wind-powered car in their Engineering Design Process Worksheet. Students will need to explain their design to the teacher before beginning the building phase. The teacher should check on groups that they are not skipping any steps in the engineering design process.
- (Optional) Students present their findings from their research and explain their design and use of materials, specifically:
- Why did you choose these materials?
- How does your car work?
- What did you learn from your research?
Day 4: Before the Activity (Constructing, testing and evaluating)
- Set out materials for students to use:
- wooden cars
- chenille pipe cleaners
- paper (different thickness)
- plastic material (different thicknesses)
- Popsicle sticks
- hot glue gun/hot glue sticks
- toilet tissue/paper towel rolls
- different types of tape (clear, masking, duct)
- Set up a testing center:
- box fan and meter sticks for testing and measuring distance traveled
Day 4: With the Students (Constructing, testing and evaluating)
- Have students get back into their three-person groups.
- Using their sketched plans from the previous session, students construct their wind powered car prototypes. Students need to follow their sketched designs as closely as possible.
- Once each team is done constructing their prototype, they can take their prototype to the testing center and test:
- Students place their car down on the ground at some teacher-defined distance in front of the fan (depends on how big/powerful the fan is)
- Students should place the meter stick on the ground. Note: Students need to decide if they are going to align the meter stick with the back or front of the car and then they should measure the starting and ending distance from the back or the front of the car.
- Once cars are set up, turn the fan on until the cars are done moving. When the car stops moving, students should measure and record the distance traveled in their Engineering Design Process Worksheet.
- Student teams reflect on the level of success for their design and decide if there are any modifications they can make to improve their prototype. They should record their thoughts in the Engineering Design Process Worksheet.
- (Optional; if time remains) Students redesign their prototype with their modifications and then retest the car to see if the modifications made the car go farther.
- Final evaluation:
- Explain to the students that engineers take time to think about what they have designed and how they did it. This is called self-evaluation.
- Give the students a minute to think about how they did during this challenge.
- Have students score themselves on three categories. (See Self-Evaluation Rubric.) Note: Make sure to emphasize that students should be honest in their scores and their grade/evaluation should be based on what they did during the activity, NOT on the points they score themselves. Also, emphasize that these categories will help students see where they can grow and improve their engineering skills.
Before Activity 5 (Presenting findings)
- Materials to present lessons learned and research findings (Computer for digital presentations or poster board.)
- (optional) Invite another classroom, administration and/or parents to attend the STEM convention.
Day 5: With the Students (Presenting findings at a STEM convention)
- Each group makes a poster or creates a presentation using Adobe Spark or PowerPoint on a laptop or tablet. Each presentation should include:
- What was the challenge or question?
- What solution or design did they come up with?
- What materials did they use and why?
- How did it go? Did it work or not?
- What would/did they change and why?
- Set up a classroom STEM convention.
- The convention should only last about 15 minutes. Another classroom, administration and parents can be invited to attend.
- This convention is a museum style presentation where each group will be placed around the classroom. The guests will go up to the groups or presentation area and listen to them.
- Students are not to present individually or in front of the class as an audience. (This conference style is less stressful and allows for students to practice public speaking at a smaller scale.) Each group will have a 2-3-minute presentation to “talk” about their design to guests.
- Once the students are done presenting, the guest will move along to visit the next group.
Vocabulary/Definitions
air pressure: The weight of the air above the Earth’s surface.
atmospheric winds: The large-scale movement of air.
Coriolis effect: Spinning of the Earth that makes the wind move on a curved path from west to east in the Northern Hemisphere, or east to west in the Southern Hemisphere.
downdraft: A downward movement of air.
updraft: An upward movement of air.
wind: Air in motion caused by changes in air pressure.
wind energy: The use of air passing through machines to create power.
wind engineering: Study of wind with the purpose of understanding its effects and ways it can be used for human benefit.
Assessment
Pre-Activity Assessment
KWL Chart: Pre-assessment conducted as a class in introduction with a Know/Learn T-chart.
Activity Embedded Assessment
Worksheet: Have students complete the Engineering Design Process Worksheet.
Post-Activity Assessment
Self-Evaluation Rubric: Have students complete the Self-Evaluation Rubric.
STEM Challenge Rubric: Assess student work using the STEM Challenge Rubric.
Safety Issues
Any hot glue guns should be used only by the teacher.
Activity Extensions
- Have students create windsocks that include the cardinal directions. Use a compass and determine the direction that the wind is blowing. Discuss how this is relevant to using wind propelled devices such as sail boats and/or windmills.
Subscribe
Get the inside scoop on all things Teach Engineering such as new site features, curriculum updates, video releases, and more by signing up for our newsletter!More Curriculum Like This

Through role playing and problem solving, this lesson sets the stage for a friendly competition between groups to design and build a shielding device to protect humans traveling in space. The instructor asks students—how might we design radiation shielding for space travel?

Learn the basics of the analysis of forces engineers perform at the truss joints to calculate the strength of a truss bridge known as the “method of joints.” Find the tensions and compressions to solve systems of linear equations where the size depends on the number of elements and nodes in the trus...
References
“Lesson 2: The Power of Wind.” Mpala Live! Field Guide: African Wild Dog | MpalaLive, mpalalive.org/classroom/lesson/the-power-of-wind-us.
Owen, Michael. “How Does Wind Work?” Sciencing, 24 Apr. 2017, sciencing.com/wind-work-4499.html.
Pepper, Stephen. “Wind Riddles.” Riddles For Kids, 13 Dec. 2017, riddles-for-kids.org/wind-riddles/.
“Sailboat.” How Products Are Made, www.madehow.com/Volume-6/Sailboat.html.
Walker, Kris. “Wind Turbines: How Are They Made?” AZoCleantech.com, AZoCleantech.com, 17 Dec. 2015, www.azocleantech.com/article.aspx?ArticleID=379.
“What Is a Wind Energy Engineer?” EnvironmentalScience.org, www.environmentalscience.org/career/wind-energy-engineer.
“Wind | NREL.” Research Team Engineers a Better Plastic-Degrading Enzyme | News | NREL, www.nrel.gov/workingwithus/re-wind.html.
Copyright
© 2021 by Regents of the University of Colorado; original © 2017 University of FloridaContributors
Sasha AbreuSupporting Program
Multidisciplinary Research Experiences for Teachers of Elementary Grades, Herbert Wertheim College of Engineering, University of FloridaAcknowledgements
This curriculum was based upon work supported by the National Science Foundation under RET grant no. EEC 1711543— Engineering for Biology: Multidisciplinary Research Experiences for Teachers in Elementary Grades (MRET) through the College of Engineering at the University of Florida. Any opinions, findings, and conclusions or recommendations expressed in this material are those of the authors and do not necessarily reflect the views of the National Science Foundation.
Last modified: July 7, 2021


User Comments & Tips