
Quick Look
Grade Level: 1 (K-2)
Time Required: 9 hours
(spread over 12 days, approximately 45 minutes per day)
Expendable Cost/Group: US $4.00
Group Size: 4
Activity Dependency: None
Subject Areas: Biology, Life Science, Measurement, Reasoning and Proof
NGSS Performance Expectations:

| K-2-ETS1-1 |
| K-2-ETS1-3 |
Quick Look

- Grade Level:
- 1 (K – 2)
- Time Required:
- 9 hours
(spread over 12 days, approximately 45 minutes per day)
- Group Size:
- 4
- Subject Areas:
-
Biology Life Science Measurement Reasoning and Proof -
NGSS Performance Expectations:
K-2-ETS1-1 K-2-ETS1-3
Summary
By playing the role of biochemical engineers, students investigate what causes them to become sick during the school year. Students use the engineering design process to test the classroom lab spaces for bacteria. After their tests, they develop ideas to control the spread of germs within the classroom. Finally, students develop a protocol to keep the spread of germs to a minimum for the school year.
Engineering Connection
Engineers solve problems. Biochemical engineers study the growth of different types of bacteria to determine their optimal growth environment. Using this data, biochemical engineers can employ the engineering design process to develop ideas to combat the germ growth. Biochemical engineers may also research and design methods to determine bacterial resistance to the methods used to combat them. When germs become resistant to current protocols, they can be a detriment to humans. Biochemical engineers design cleaners, medicines, and systems to fight against germs.
Learning Objectives
After this activity, students should be able to:
- Make observations of the natural world and know that they are descriptors collected using the five senses.
- Keep records as appropriate -- such as pictorial records -- of investigations conducted.
- Observe and create a visual representation of an object, which includes its major features.
- Sort objects by observable properties, such as size, shape, color, temperature (hot or cold), weight (heavy or light) and texture.
- Follow agreed-upon rules for discussions (e.g., listening to others and taking turns speaking about the topics and texts under discussion).
- Ask and answer questions in order to seek help, get information, or clarify something.
Educational Standards
Each Teach Engineering lesson or activity is correlated to one or more K-12 science,
technology, engineering or math (STEM) educational standards.
All 100,000+ K-12 STEM standards covered in Teach Engineering are collected, maintained and packaged by the Achievement Standards Network (ASN),
a project of D2L (www.achievementstandards.org).
In the ASN, standards are hierarchically structured: first by source; e.g., by state; within source by type; e.g., science or mathematics;
within type by subtype, then by grade, etc.
Each Teach Engineering lesson or activity is correlated to one or more K-12 science, technology, engineering or math (STEM) educational standards.
All 100,000+ K-12 STEM standards covered in Teach Engineering are collected, maintained and packaged by the Achievement Standards Network (ASN), a project of D2L (www.achievementstandards.org).
In the ASN, standards are hierarchically structured: first by source; e.g., by state; within source by type; e.g., science or mathematics; within type by subtype, then by grade, etc.
NGSS: Next Generation Science Standards - Science
| NGSS Performance Expectation | ||
|---|---|---|
|
K-2-ETS1-1. Ask questions, make observations, and gather information about a situation people want to change to define a simple problem that can be solved through the development of a new or improved object or tool. (Grades K - 2) Do you agree with this alignment? |
||
| Click to view other curriculum aligned to this Performance Expectation | ||
| This activity focuses on the following Three Dimensional Learning aspects of NGSS: | ||
| Science & Engineering Practices | Disciplinary Core Ideas | Crosscutting Concepts |
| Ask questions based on observations to find more information about the natural and/or designed world(s). Alignment agreement: Define a simple problem that can be solved through the development of a new or improved object or tool.Alignment agreement: | A situation that people want to change or create can be approached as a problem to be solved through engineering. Alignment agreement: Asking questions, making observations, and gathering information are helpful in thinking about problems.Alignment agreement: Before beginning to design a solution, it is important to clearly understand the problem.Alignment agreement: | |
| NGSS Performance Expectation | ||
|---|---|---|
|
K-2-ETS1-3. Analyze data from tests of two objects designed to solve the same problem to compare the strengths and weaknesses of how each performs. (Grades K - 2) Do you agree with this alignment? |
||
| Click to view other curriculum aligned to this Performance Expectation | ||
| This activity focuses on the following Three Dimensional Learning aspects of NGSS: | ||
| Science & Engineering Practices | Disciplinary Core Ideas | Crosscutting Concepts |
| Analyze data from tests of an object or tool to determine if it works as intended. Alignment agreement: | Because there is always more than one possible solution to a problem, it is useful to compare and test designs. Alignment agreement: | |
International Technology and Engineering Educators Association - Technology
-
Compare the natural world and human-made world.
(Grades
Pre-K -
2)
More Details
Do you agree with this alignment?
-
Explain the tools and techniques that people use to help them do things.
(Grades
Pre-K -
2)
More Details
Do you agree with this alignment?
-
Safely use tools to complete tasks.
(Grades
Pre-K -
2)
More Details
Do you agree with this alignment?
-
Develop a plan in order to complete a task.
(Grades
Pre-K -
2)
More Details
Do you agree with this alignment?
-
Explain that materials are selected for use because they possess desirable properties and characteristics.
(Grades
Pre-K -
2)
More Details
Do you agree with this alignment?
-
Students will develop an understanding of the characteristics and scope of technology.
(Grades
K -
12)
More Details
Do you agree with this alignment?
-
Students will develop an understanding of the core concepts of technology.
(Grades
K -
12)
More Details
Do you agree with this alignment?
-
Students will develop an understanding of the role of society in the development and use of technology.
(Grades
K -
12)
More Details
Do you agree with this alignment?
-
Students will develop an understanding of engineering design.
(Grades
K -
12)
More Details
Do you agree with this alignment?
-
Students will develop abilities to apply the design process.
(Grades
K -
12)
More Details
Do you agree with this alignment?
-
Students will develop abilities to use and maintain technological products and systems.
(Grades
K -
12)
More Details
Do you agree with this alignment?
-
Students will develop abilities to assess the impact of products and systems.
(Grades
K -
12)
More Details
Do you agree with this alignment?
State Standards
Florida - Math
-
Describe measurable attributes of objects, such as length or weight. Describe several measurable attributes of a single object.
(Grade
K)
More Details
Do you agree with this alignment?
-
Directly compare two objects with a measurable attribute in common, to see which object has "more of"/"less of" the attribute, and describe the difference.
(Grade
K)
More Details
Do you agree with this alignment?
Florida - Science
-
Collaborate with a partner to collect information.
(Grade
K)
More Details
Do you agree with this alignment?
-
Make observations of the natural world and know that they are descriptors collected using the five senses.
(Grade
K)
More Details
Do you agree with this alignment?
-
Keep records as appropriate -- such as pictorial records -- of investigations conducted.
(Grade
K)
More Details
Do you agree with this alignment?
-
Observe and create a visual representation of an object which includes its major features.
(Grade
K)
More Details
Do you agree with this alignment?
-
Recognize that learning can come from careful observation.
(Grade
K)
More Details
Do you agree with this alignment?
Materials List
Each group needs:
- gel cups, 2 per group (see materials list for making gel cups below)
- craft materials:
- construction paper (several colors, 1 per student)
- construction paper scraps
- felt (several colors, ½ sheet per student)
- feathers (1 bag from craft store for whole class)
- pipe cleaners (1 bag assorted colors for whole class)
- markers
- crayons
- scissors
- glue sticks
- liquid glue
- glitter mixture (see activity Day 3)
To make gel cups (for entire class):
- ten clear disposable plastic cups, 250 ml (~9 oz.)
- craft sticks (to stir mixture)
- unflavored gelatin, 30 ml (~1 oz.) packet or box
- sugar, 240 ml (1 cup)
- boiling water
- plastic wrap
- permanent marker
- disposable gloves (for the teacher to prepare mixture)
- refrigerator
To share with the entire class:
Note: books may be found online, or through your school library or local interlibrary loan service.
- What to Do with a Problem by Kobi Yamada
- The Bacteria Book: The Big Book of Really Tiny Microbes by Steve Mould
- A Germ’s Journey by Thom Rooke M.D.
- The Most Magnificent Thing by Ashley Spires
- chart paper
- markers
- unscented lotion, 240 ml (8 oz.) bottle
- multi-colored glitter (one small bottle)
- cotton swabs (2 per student)
- lab coats (if available)
- safety glasses
- microscope
- microscope slides (4 per group, or one per group if Day 5 is conducted as a whole-class activity)
- document camera (if microscopes are not available)
- disposable gloves
- cleaning supplies that students can use:
- hand soap
- hand sanitizer
- sanitizing wipes
- sanitizing spray
- baby wipes
- paper towels
Each student needs:
- lab notebook (composition book or spiral notebook)
- (optional) Vocabulary Cut and Paste Handout
- (optional) Gelatin Bacteria Recording Sheet (2 per student)
- Glitter Experiment Data Sheet
- (optional) Parts of a Microscope Sheet
- Engineering Design Process Cut and Paste Handout
- pencils
- crayons
- glue sticks
- scissors
Worksheets and Attachments
Visit [www.teachengineering.org/activities/view/uof-2362-bacteria-everywhere-engineering-design] to print or download.Introduction/Motivation
Why do we get sick? How can I keep myself from getting sick? These are questions we may ask ourselves when we don’t feel well. There are lots of reasons we may catch a cold or flu. We may catch it from another person who is contagious, or we may handle something that is contaminated and transmit germs to ourselves.
What are some ways we can prevent sickness? One way is to avoid contact with contagious people. Another is to wash our hands often, especially before and after eating or using the bathroom. However, sometimes we get sick in ways that are beyond our control. While there is not a way to ensure we never get sick, we can explore ways to limit the chances we do end up with a cold or flu. To do so, let’s put on our engineering hats and think about the ways we can prevent illness!
Over the next two and a half weeks, you are going to become biochemical, environmental and industrial engineers. As a biochemical engineer, you will study germs and bacteria to learn how to control their spread in the classroom lab. When you become an environmental engineer, you will search for solutions to keep the classroom lab clean. Finally, as an industrial engineer, you will build a system to maintain a clean environment from bacteria and other disease-causing microbes.
Procedure
Background
Try a “bread experiment” as an informal way to kick-off the activity several days or weeks prior. Begin by putting on a glove. Using the gloved hand, place a slice of bread in a Ziploc bag— this is the control. Next, have students go about daily activities without washing hands (about an hour or so). Give each child a slice of bread. They will press the bread between their hands and place the bread in a Ziploc bag labeled with their name. Hang the bags to a wall in the classroom with tape. Have the students observe the bags each day for germ, bacteria, or mold growth. When this experiment is complete, you can ask the following questions: How can we keep ourselves from getting sick? How can we keep our classroom lab clean? What are the best ways to keep our classroom lab clean? How will we be able to maintain the cleanliness?
Introducing the engineering design process and the types of jobs that engineers do also helps students understand the nature of the activity.
Day 1
With the Students:
- Lead a whole-class discussion to obtain students’ background knowledge.
- Create a KWL chart of what students know about germs. (A KWL chart is a graphic organizer used for documentation of what students know, what they want to learn and what they have learned in a particular lesson or unit.)
- Ask guided questions: “What are germs? Where do they live? Who has them? Are they good? Are they bad? Where do they come from?”
Day 2
Note: Depending on students’ ability, this activity day can be completed in two days instead of one.
Before the Activity:
- Create 5-6 gel cups, 1 for each group:
- Dissolve one packet of unflavored gelatin and two teaspoons of sugar in 240 ml (1 cup) of boiling water. Stir to make sure the gelatin is dissolved.
- Put on gloves to keep the cups as sterile as possible. Mark the bottom of each cup with a cross to make four quadrants.
- Label each quadrant with a number 1 through 4. Label each cup with the lab group name. Each number on the bottom will correspond to a lab member.
- Pour about 6 mm – 12 mm (1/4 in – 1/2 in) of the gelatin mixture into each cup. Be sure to make and label a control cup. This mixture will make about five gel cups. Cover with plastic wrap and place in a refrigerator for at least one hour.
- Preview The Bacteria Book: The Big Book of Really Tiny Microbes and choose portions of the book you wish to read.
With the Students:
- Read The Bacteria Book: The Big Book of Really Tiny Microbes.
- Add to KWL chart anything the lab members find interesting or false from the day before.
- Dispel the following misconceptions:
- All germs are bad
- Soap kills germs
- The 5 second rule
- Introduce vocabulary (see the Vocabulary/Definitions section) and have record their new words using the Vocabulary Cut and Paste Handout activity.
- bacteria
- contagious
- cough
- germs
- healthy
- mold
- sneeze
- virus
- Using their imagination, lab members will create a model of what they think a germ looks like if it could be seen without a microscope. Distribute craft materials to each group: construction paper, felt, feathers, pipe cleaners, markers, crayons, scissors, glue sticks, liquid glue.
- Tell students to record in their lab notebooks the name of their fictitious germ. What is its job? How does it get around?
- Give an area of the lab (a shared table space) to each lab team. Designate a section of the table area to each student.
- Moisten cotton swabs with water (one for each lab member)
- Have each lab member swab his/her table area once with a cotton swab. Students will rub each cotton swab gently over designated area of their gel cup with teacher assistance.
- Have students write down their designated gel cup area number (1-4) in their lab notebooks.
- Incubate cups in a room temperature dry place away from direct sunlight for 5-6 days.
Day 3
Before the Activity:
- Make 5-6 glitter cups, one for each group.
- Place 30 ml (~1 oz.) of unscented lotion into a plastic cup. Add 1 tablespoon of multi-colored glitter. Mix glitter into lotion with a craft stick.
With the Students:
- Have students check gel cups for growth. Tell them to record visual observations (what their cup looks like) in their lab notebooks. (Alternatively, have students cut out gel cup images from the Gelatin Bacteria Recording Sheet and draw their observations on the cutout images.)
- Read A Germ’s Journey.
- Lead students through the Glitter Experiment. Tell students that in this experiment, glitter represents germs that get on their hands.
- Have students record what their hands look like on the Glitter Experiment Data Sheet on the “before” hand then glue their recordings into their lab notebook.
- After they make their first recording, place a dime size portion of glitter-infused lotion on each lab member’s hands.
- Tell students to rub their hands gently together.
- Have students record germ evidence of the Glitter Experiment Data Sheet on the “after” hand. Allow students to use crayons to draw what the glitter looks like on their hands.
- Ask students, “How are germs getting everywhere?” Have students locate glitter accumulations around lab area. Following this exercise, the glitter may be:
- On tables, chairs and pencil boxes.
- On faces, clothing, and in the bathroom area.
- Ask students, “Now that we can see where all the glitter is located, what do we think about our lab area?”
- Tell students, “Engineers must do research to find out what the problem is to brainstorm solutions to the problem in the most effective way.” Remind students that their problem is that germs are getting spread around the room, and that they need to think like engineers to come up with a solution to keep the classroom lab clean.
Day 4
With the Students:
- Have students check gel cups for growth and record their findings in their lab notebooks.
- Remind students of the problem they are trying to solve: germs are being spread around the classroom lab.
- Students will imagine and brainstorm solutions to this problem using the information they gathered from the glitter experiment.
- Gather lab members to form their research teams of 3-4 members.
- Have materials ready for brainstorming (chart paper, markers, crayons, pencils, and students’ lab notebooks).
- Ask students questions to help them brainstorm ideas:
- What problems do we have in the lab concerning germs? (Germs are everywhere.)
- What can we do to reduce the germ accumulation in our classroom? (Wash our hands, use a tissue, sneeze in our elbow.)
- How can we reduce the number of germs we spread? (Always wash hands after sneezing or coughing into them, wash hands after using the restroom.)
- What types of cleaners can be used? (Hand sanitizer, soap and water, or disinfecting wipes.)
- What combinations can the cleaners be used in? (Hand sanitizer and soap for hands; disinfecting wipes for hard surfaces.)
- What are safe ways to use cleaners? (Cleaners are for hands or hard surfaces only.)
- Have a lab meeting with each group to discuss and record ideas and constraints. (Depending on student ability, the teacher may write down all brainstorming ideas for each group.)
- Remind students that engineers collaborate with each other to come up with possibilities and solutions.
Day 5
With the Students:
- Have students check gel cups for growth and record visual observation data in lab notebook.
- Discuss with lab members what has happened in the gel cups. Examine each cup under the microscope or document camera. If using a microscope, gently take a small sample from each section of each cup to smear on a slide. Have students complete the Parts of a Microscope Sheet to familiarize them with the microscope.
- Have students record what they see in their lab notebooks. If using a document camera, take pictures that can be used as a comparison for the next experiment. Compare and contrast the gel cups to the control. Students will notice growth in each quadrant of the cup. Some growth may look black, gray, fuzzy or slick. Have students record visual observation data in their lab notebook.
- Instruct students to plan and design a solution. Have students record their solution in their lab notebook, complete with a list of materials and an implementation plan (how they will use the materials):
- Each lab group will decide which idea is the best from the list created on Day 4.
- Ask students, “What materials are needed?”
- paper towels
- cleaners
- Ask students, “What cleaners can be used?” Discuss the function of each cleaner. Possible cleaners:
- water only (control)
- soap and water
- baby wipes
- disinfecting wipes
- disinfecting spray
- hand sanitizer
- Ask students the following questions: “How will the cleaners be used? What cleaner do you think is most effective or more effective than another? Can you use hand cleaners on the table? Can you use disinfecting wipes on your hands? Are cleaners for the lab area or yourself or both?”
Day 6
Before the Activity:
- Create 5-6 new gel cups, one for each group.
- Dissolve one packet of unflavored gelatin and two teaspoons of sugar in 240 ml (1 cup) of boiling water. Stir to make sure the gelatin is dissolved.
- Put on gloves to keep the cups as sterile as possible. Mark the bottom of each cup with a cross to make four quadrants. Label each quadrant with a number 1-4. Label each cup with the lab group name. Each number on the bottom will correspond to a lab member.
- Pour about 6 mm – 12 mm (1/4 in – 1/2 in) of the gelatin mixture into each cup. Be sure to make and label a control cup. This mixture will make about five gel cups.Cover with plastic wrap and place in refrigerator for at least one hour.
With the Students:
- Have cleaning materials available for each lab group.
- Have lab teams don appropriate personal protective equipment:
- lab coats (if available)
- safety glasses
- disposable gloves
- Have lab groups implement their plan to clean the tables, wait 15 minutes for area to dry.
- Have students take swab samples from the same area as they did before to rerun the gel experiment.
- Moisten cotton swabs with water (one for each lab member).
- Have each lab member swab his/her table area once with a cotton swab. Students will rub each cotton swab gently over designated area of their gel cup with teacher assistance.
- Place gel cups in a dry place away from direct sunlight for 5-6 days, check daily for growth.
- Have students record data in lab notebooks.
Day 7
With the Students:
- Have students check gel cups for growth and record data in lab notebook. (Alternatively, have students cut out gel cup images from the Gelatin Bacteria Recording Sheet and draw their observations on the cutout images.)
- Have students work on the Activity-Embedded Assessment. Distribute the Engineering Design Process Cut and Paste Handout, scissors, and glue to students. (If more time is needed, students may work on this cut-and-paste over the next two days.)
Day 8
With the Students:
- Have students check gel cups for growth and record data in lab notebook.
Day 9
With the Students:
- Have students check gel cups for growth and record data in lab notebook.
- Wait for results.
Day 10
With the Students:
- Have students check gel cups for growth and record their data in their lab notebooks.
- Each lab group will present the process they used to solve the cleanliness problem in our lab*.
- Tell students that engineers present their findings to fellow engineers to get feedback on their projects. They use constructive criticism to improve their designs.
- *This step may be difficult for young students. Choose students who are willing to talk in front of the class to present the lab’s results. For older grades, each group may present with more detail (see Activity Scaling).
- If skipping the optional Day 11 activity extension below, proceed to Day 12.
Day 11 (optional activity extension)**
**The redesign step is optional depending on how much time you want to spend on this activity. ** Add five days for incubation to the activity.
Before the Activity:
- Create another 5-6 gel cups.
- Dissolve one packet of unflavored gelatin and two teaspoons of sugar in a 240 ml (1 cup) of boiling water. Stir to make sure all the gelatin is dissolved.
- Put on gloves to keep the cups as sterile as possible. Mark the bottom of each cup with a cross to make four quadrants. Label each quadrant with a number 1-4. Label each cup with the lab group name. Each number on the bottom will correspond to a lab member.
- Pour about 6 mm – 12 mm (1/4 in – 1/2 in) of the gelatin mixture into each cup. Be sure to make and label a control cup. This mixture will make about five gel cups. Cover with plastic wrap and place in refrigerator for at least one hour.
With the Students:
- Have students check gel cups for growth and record data in lab notebook.
- Compare and contrast untreated gel cup pictures from previous experiment to treated gel cups under the document camera or use a microscope and slides to look at samples. Take pictures with a document camera and share with students or have them draw what is seen on the microscope. Have students record data in their lab notebook.
- Take notice of changes. Ask students the following questions and record their answers on a piece of chart paper.
- Is there more or less growth?
- Which lab group had the most successful gel cup? (Most successful means little or no bacteria growth.)
- Which lab group was least successful? Why?
- How can we improve our techniques to get less bacteria growth?
- Brainstorm and redesign: Have students brainstorm new ideas on the best way to clean their lab area based on the changes they observed. Have them record their new idea and implementation plan in their lab notebooks.
- Gather cleaning materials, have students clean their designated lab area, and wait 15 minutes to dry. Have students swab their table area with a moist cotton swab and apply the swab to the gel cup.
- Incubate gel cups 5 days. Have students take data each day in lab notebooks.
Day 12
With the Students:
- Pass out markers and pieces of chart paper. Have students write a protocol for clean hands and clean lab areas to be followed by all lab members daily.
- Tell students that engineers write protocol to be followed in their labs. This protocol is a set of directions that should be followed to keep the lab running smoothly.
- The PI, Principal Investigator (teacher) will type up the plan and post it within the classroom, or create a wall sign(s) in designated areas in the lab as reminders.
Day 13
With the Students:
- Share with administration, a behavior resource teacher or guidance counselor.
- Each lab group or students willing to share will present their lab protocol to fellow classes.


Vocabulary/Definitions
bacteria: Organism made up of one cell that can be different shapes and can appear by themselves or in chains.
contagious: To pass from one person to another through contact.
cough : Suddenly passing air from the lungs out of the mouth; usually not on purpose.
disease: To become sick from outside factors or from genetic factors.
germs : A disease producing microbe.
healthy: To be free from sickness.
microbe: Any form of disease-causing bacteria.
mold: A growth of fungi on damp surfaces resulting in a fuzzy coating.
sneeze : To breathe out air suddenly and forcibly through the mouth and nose.
virus : A very small infectious agent that invades a cell.
Assessment
Pre-Activity Assessment
KWL Chart: Lead an informal discussion of what students know about germs and how they are spread.
Activity Embedded Assessment
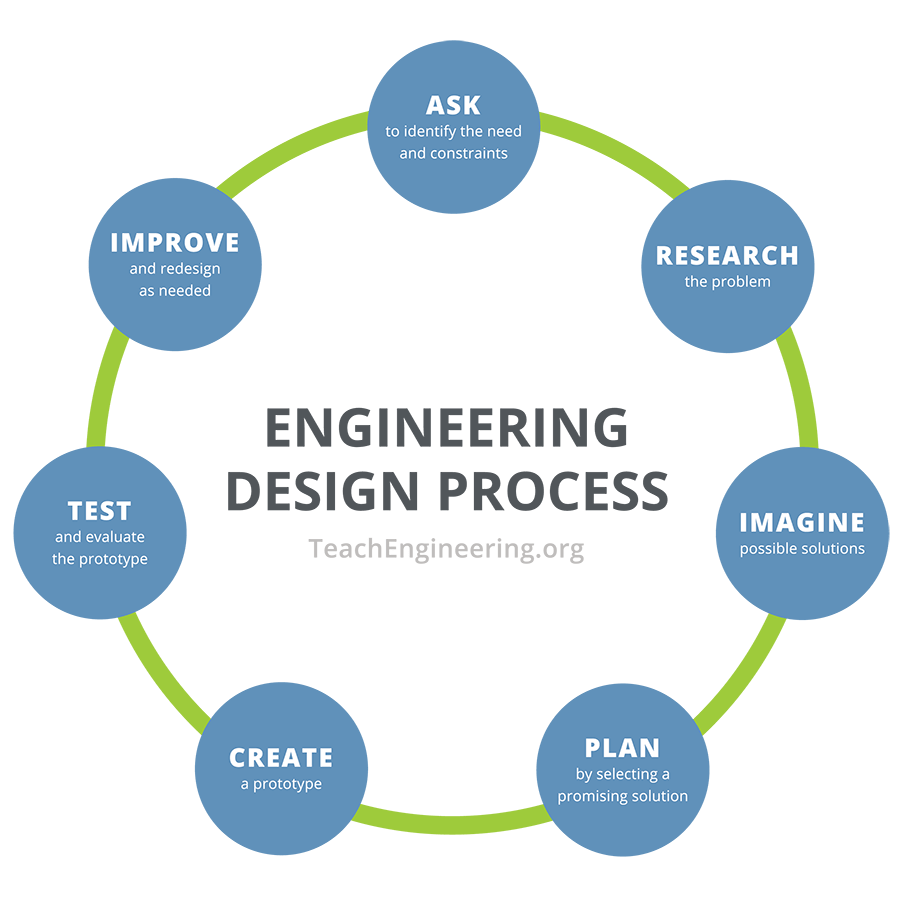
Engineering Design Process Cut and Paste: Students put the Engineering Design Process in order using the Engineering Design Process Cut and Paste Handout.
Post-Activity Assessment
Rubric: Use the Bacteria! It’s Everywhere! Rubric to assess student work.
Making Sense: Have students reflect on the science concepts they explored and/or the science and engineering skills they used by completing the Making Sense Assessment.
Safety Issues
- Be sure that lab teams know they are not to mix cleaners together for the safety of themselves and the lab.
Activity Extensions
Have students redesign their cleaning plan. Redesign instructions are given as the optional Day 11 in the Activity Procedure.
Activity Scaling
For grades 2-5, teams will prepare an answer or statement on their results of their cleaner experiment and its effectiveness (activity Day 10). They will elect a representative to give the answer or teacher calls on a student in each group.
- Use Kagan Structure-Numbered Heads to select presenters/representatives: (A simple structure for giving an answer/sharing project plans etc. where the students in each group are numbered; 1-4 for a group of 4, for example. The teacher calls out a number and that numbered student from each group presents.)
- Lab Name
- How did your lab come to a decision on which idea to choose? (Lab mate 1)
- How did you work together as a team? (Lab mate 2)
- How did your lab team put your plan into action? (Lab mate 3)
- Summarize your plan for the group? (Lab mate 4)
Subscribe
Get the inside scoop on all things Teach Engineering such as new site features, curriculum updates, video releases, and more by signing up for our newsletter!More Curriculum Like This

Students learn about the major components and functions of the immune system and the role engineers play in keeping the body healthy through the design of medical care such as vaccinations and antibiotics. They also learn how an astronaut's immune system is suppressed during spaceflight due to stres...

Copyright
© 2019 by Regents of the University of Colorado; original © 2018 University of FloridaContributors
Jennifer DavisSupporting Program
MRET Program, College of Engineering, University of FloridaAcknowledgements
This curriculum was based upon work supported by the National Science Foundation under RET grant no. EEC 1711543— Engineering for Biology: Multidisciplinary Research Experiences for Teachers in Elementary Grades (MRET) through the College of Engineering at the University of Florida. Any opinions, findings, and conclusions or recommendations expressed in this material are those of the authors and do not necessarily reflect the views of the National Science Foundation.
Last modified: October 1, 2022
User Comments & Tips