Quick Look
Grade Level: 8 (7-9)
Time Required: 10 hours
(ten 60-minute class periods)
Expendable Cost/Group: US $45.00 This activity uses non-expendable (reusable) materials; see the Materials List for details.
Group Size: 4
Activity Dependency: None
Subject Areas: Algebra, Measurement, Physics, Science and Technology
NGSS Performance Expectations:

| HS-ETS1-2 |
| MS-ETS1-1 |
| MS-ETS1-2 |
| MS-ETS1-4 |
Summary
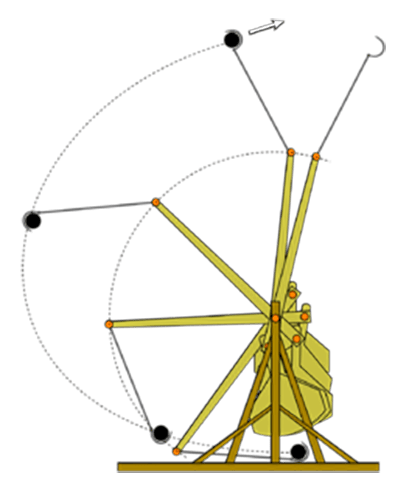
In this activity, students explore how trebuchets were used during the Middle Ages to launch projectiles over or through castle walls as well as how they are used today in events such as Punkin’ Chunkin’. Students work as teams of engineers and research how to design and build their own trebuchets from scratch while following a select number of constraints. They test their trebuchets, evaluate their results through several quantitative analyses, and present their results and design process to the class.Engineering Connection
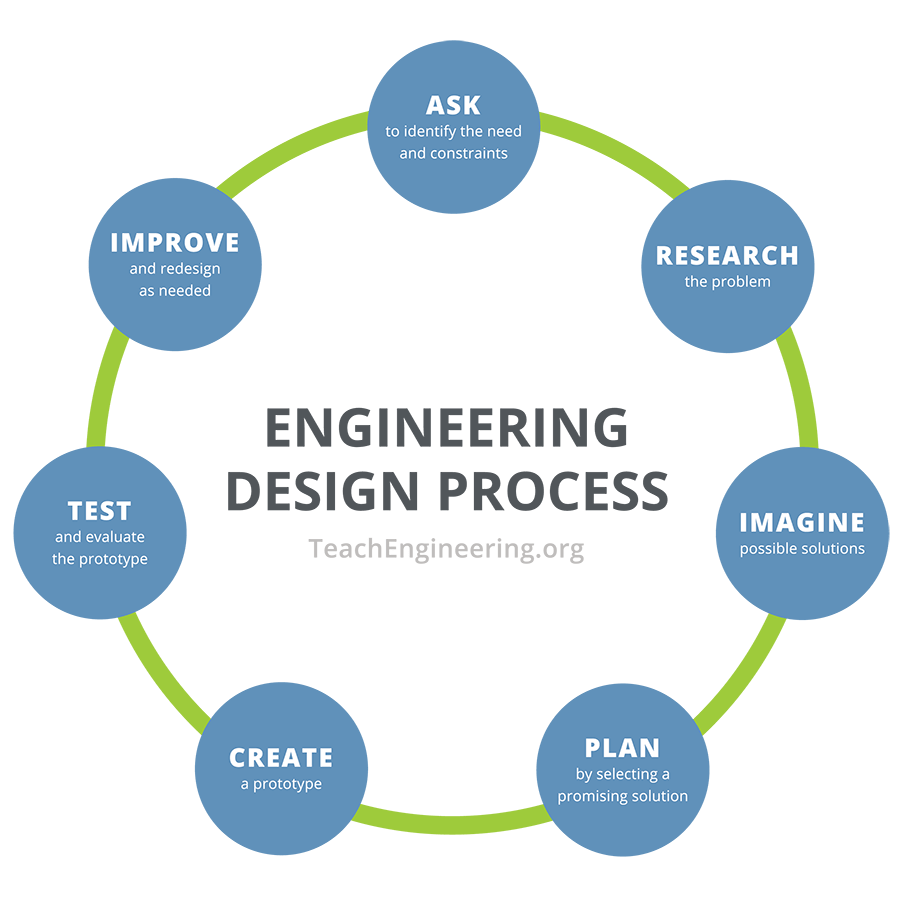
The trebuchet is a classic example of ancient engineering design. Not only is it a compound machine (a device that uses a number of simple machines), it relies on one primary simple machine, the lever, to launch a projectile. Trebuchets were engineered due to an enhanced understanding of gravity, potential energy, and acceleration—each of which is a key concept in engineering today. This design project allows students to use the engineering design process to research, design, and build a trebuchet. They also rely on their knowledge of algebra and physics to explain their results.
Learning Objectives
After this activity, students should be able to:
- Design and build a trebuchet with constraints.
- Test their designs and analyze the results of their tests.
- Communicate their design process and results.
- Create instructions on replicating their design.
Educational Standards
Each Teach Engineering lesson or activity is correlated to one or more K-12 science,
technology, engineering or math (STEM) educational standards.
All 100,000+ K-12 STEM standards covered in Teach Engineering are collected, maintained and packaged by the Achievement Standards Network (ASN),
a project of D2L (www.achievementstandards.org).
In the ASN, standards are hierarchically structured: first by source; e.g., by state; within source by type; e.g., science or mathematics;
within type by subtype, then by grade, etc.
Each Teach Engineering lesson or activity is correlated to one or more K-12 science, technology, engineering or math (STEM) educational standards.
All 100,000+ K-12 STEM standards covered in Teach Engineering are collected, maintained and packaged by the Achievement Standards Network (ASN), a project of D2L (www.achievementstandards.org).
In the ASN, standards are hierarchically structured: first by source; e.g., by state; within source by type; e.g., science or mathematics; within type by subtype, then by grade, etc.
NGSS: Next Generation Science Standards - Science
| NGSS Performance Expectation | ||
|---|---|---|
|
HS-ETS1-2. Design a solution to a complex real-world problem by breaking it down into smaller, more manageable problems that can be solved through engineering. (Grades 9 - 12) Do you agree with this alignment? |
||
| Click to view other curriculum aligned to this Performance Expectation | ||
| This activity focuses on the following Three Dimensional Learning aspects of NGSS: | ||
| Science & Engineering Practices | Disciplinary Core Ideas | Crosscutting Concepts |
| Design a solution to a complex real-world problem, based on scientific knowledge, student-generated sources of evidence, prioritized criteria, and tradeoff considerations. Alignment agreement: | Criteria may need to be broken down into simpler ones that can be approached systematically, and decisions about the priority of certain criteria over others (trade-offs) may be needed. Alignment agreement: | |
| NGSS Performance Expectation | ||
|---|---|---|
|
MS-ETS1-1. Define the criteria and constraints of a design problem with sufficient precision to ensure a successful solution, taking into account relevant scientific principles and potential impacts on people and the natural environment that may limit possible solutions. (Grades 6 - 8) Do you agree with this alignment? |
||
| Click to view other curriculum aligned to this Performance Expectation | ||
| This activity focuses on the following Three Dimensional Learning aspects of NGSS: | ||
| Science & Engineering Practices | Disciplinary Core Ideas | Crosscutting Concepts |
| Define a design problem that can be solved through the development of an object, tool, process or system and includes multiple criteria and constraints, including scientific knowledge that may limit possible solutions. Alignment agreement: | The more precisely a design task's criteria and constraints can be defined, the more likely it is that the designed solution will be successful. Specification of constraints includes consideration of scientific principles and other relevant knowledge that is likely to limit possible solutions. Alignment agreement: | All human activity draws on natural resources and has both short and long-term consequences, positive as well as negative, for the health of people and the natural environment. Alignment agreement: The uses of technologies and any limitations on their use are driven by individual or societal needs, desires, and values; by the findings of scientific research; and by differences in such factors as climate, natural resources, and economic conditions.Alignment agreement: |
| NGSS Performance Expectation | ||
|---|---|---|
|
MS-ETS1-2. Evaluate competing design solutions using a systematic process to determine how well they meet the criteria and constraints of the problem. (Grades 6 - 8) Do you agree with this alignment? |
||
| Click to view other curriculum aligned to this Performance Expectation | ||
| This activity focuses on the following Three Dimensional Learning aspects of NGSS: | ||
| Science & Engineering Practices | Disciplinary Core Ideas | Crosscutting Concepts |
| Evaluate competing design solutions based on jointly developed and agreed-upon design criteria. Alignment agreement: | There are systematic processes for evaluating solutions with respect to how well they meet the criteria and constraints of a problem. Alignment agreement: | |
| NGSS Performance Expectation | ||
|---|---|---|
|
MS-ETS1-4. Develop a model to generate data for iterative testing and modification of a proposed object, tool, or process such that an optimal design can be achieved. (Grades 6 - 8) Do you agree with this alignment? |
||
| Click to view other curriculum aligned to this Performance Expectation | ||
| This activity focuses on the following Three Dimensional Learning aspects of NGSS: | ||
| Science & Engineering Practices | Disciplinary Core Ideas | Crosscutting Concepts |
| Develop a model to generate data to test ideas about designed systems, including those representing inputs and outputs. Alignment agreement: | Models of all kinds are important for testing solutions. Alignment agreement: The iterative process of testing the most promising solutions and modifying what is proposed on the basis of the test results leads to greater refinement and ultimately to an optimal solution.Alignment agreement: | |
Common Core State Standards - Math
-
Model with mathematics.
(Grades
K -
12)
More Details
Do you agree with this alignment?
-
Construct and interpret scatter plots for bivariate measurement data to investigate patterns of association between two quantities. Describe patterns such as clustering, outliers, positive or negative association, linear association, and nonlinear association.
(Grade
8)
More Details
Do you agree with this alignment?
-
Interpret functions that arise in applications in terms of the context
(Grades
9 -
12)
More Details
Do you agree with this alignment?
-
Represent data on two quantitative variables on a scatter plot, and describe how the variables are related.
(Grades
9 -
12)
More Details
Do you agree with this alignment?
International Technology and Engineering Educators Association - Technology
-
Students will develop an understanding of the attributes of design.
(Grades
K -
12)
More Details
Do you agree with this alignment?
-
Students will develop an understanding of the characteristics and scope of technology.
(Grades
K -
12)
More Details
Do you agree with this alignment?
-
Students will develop an understanding of engineering design.
(Grades
K -
12)
More Details
Do you agree with this alignment?
-
Students will develop abilities to apply the design process.
(Grades
K -
12)
More Details
Do you agree with this alignment?
State Standards
Texas - Career Education
-
make measurements and specify tolerances with minimum necessary accuracy and precision;
(Grades
11 -
12)
More Details
Do you agree with this alignment?
-
organize information for visual display and analysis using appropriate formats for various audiences, including, but not limited to, graphs and tables;
(Grades
11 -
12)
More Details
Do you agree with this alignment?
-
defend a design solution in a presentation.
(Grades
11 -
12)
More Details
Do you agree with this alignment?
-
formulate goals, objectives, and requirements to solve an engineering problem;
(Grades
11 -
12)
More Details
Do you agree with this alignment?
-
test and evaluate proposed solutions using methods such as models, prototypes, mock-ups, simulations, critical design review, statistical analysis, or experiments;
(Grades
11 -
12)
More Details
Do you agree with this alignment?
-
prepare a project report that clearly documents the designs, decisions, and activities during each phase of the engineering design process.
(Grades
11 -
12)
More Details
Do you agree with this alignment?
-
work in teams and share responsibilities, acknowledging, encouraging, and valuing contributions of all team members;
(Grades
11 -
12)
More Details
Do you agree with this alignment?
Texas - Math
-
graph quadratic functions on the coordinate plane and use the graph to identify key attributes, if possible, including x-intercept, y-intercept, zeros, maximum value, minimum values, vertex, and the equation of the axis of symmetry;
(Grade
9)
More Details
Do you agree with this alignment?
-
write, using technology, quadratic functions that provide a reasonable fit to data to estimate solutions and make predictions for real-world problems.
(Grade
9)
More Details
Do you agree with this alignment?
-
communicate mathematical ideas, reasoning, and their implications using multiple representations, including symbols, diagrams, graphs, and language as appropriate;
(Grade
9)
More Details
Do you agree with this alignment?
Texas - Science
-
demonstrate the use of course apparatus, equipment, techniques, and procedures, including multimeters (current, voltage, resistance), triple beam balances, batteries, clamps, dynamics demonstration equipment, collision apparatus, data acquisition probes, discharge tubes with power supply (H, He, Ne, Ar), hand-held visual spectroscopes, hot plates, slotted and hooked lab masses, bar magnets, horseshoe magnets, plane mirrors, convex lenses, pendulum support, power supply, ring clamps, ring stands, stopwatches, trajectory apparatus, tuning forks, carbon paper, graph paper, magnetic compasses, polarized film, prisms, protractors, resistors, friction blocks, mini lamps (bulbs) and sockets, electrostatics kits, 90-degree rod clamps, metric rulers, spring scales, knife blade switches, Celsius thermometers, meter sticks, scientific calculators, graphing technology, computers, cathode ray tubes with horseshoe magnets, ballistic carts or equivalent, resonance tubes, spools of nylon thread or string, containers of iron filings, rolls of white craft paper, copper wire, Periodic Table, electromagnetic spectrum charts, slinky springs, wave motion ropes, and laser pointers;
(Grades
9 -
12)
More Details
Do you agree with this alignment?
-
communicate valid conclusions supported by the data through various methods such as lab reports, labeled drawings, graphic organizers, journals, summaries, oral reports, and technology-based reports; and
(Grades
9 -
12)
More Details
Do you agree with this alignment?
-
express and manipulate relationships among physical variables quantitatively, including the use of graphs, charts, and equations.
(Grades
9 -
12)
More Details
Do you agree with this alignment?
Texas - Technology
-
Creativity and innovation. The student demonstrates creative thinking, constructs knowledge, and develops innovative products and processes using technology. The student is expected to:
(Grades
9 -
12)
More Details
Do you agree with this alignment?
-
Research and information fluency. The student applies digital tools to gather, evaluate, and use information. The student uses a variety of strategies to acquire information from electronic resources, with appropriate supervision. The student is expected to:
(Grades
9 -
12)
More Details
Do you agree with this alignment?
-
Critical thinking, problem solving, and decision making. The student uses critical-thinking skills to plan and conduct research, manage projects, solve problems, and make informed decisions using appropriate digital tools and resources. The student is expected to:
(Grades
9 -
12)
More Details
Do you agree with this alignment?
Materials List
Each group needs:
- activity worksheets:
- Trebuchet Supply Order
- Instruction Manual Rubric
- Trebuchet and Quadratics Data Collection Sheet
- PowerPoint Presentation Rubric
- $45 to purchase materials from a hardware store
- safety goggles, one per student
- camera or smartphone with slow-motion video capability (most iPhone and Android phones come with this feature)
- large graph paper pad, available online
- computer with Google SketchUp software; free download at https://www.sketchup.com/
- tennis ball
- cardboard box used to hold copy paper, usually 38 cm x 30 cm x 25 cm (15 in. x 12 in. x 10 in.)
- use this box as packaging for trebuchet pieces
To share with the entire class:
- Punkin’ Chunkin’ competition videos (there are a number of free videos available to watch on YouTube that show completed versions of various types of siege engines)
- rulers
- building tools and access to a hacksaw, drill, and miter saw
- Note: there are “how-to” videos on YouTube that you can use to help teach yourself and your students how to use the hacksaw, drill, or miter saw; or consult with your industrial arts or shop class program
Worksheets and Attachments
Visit [www.teachengineering.org/activities/view/uot-1536-trebuchet-design-build-engineering-challenge] to print or download.Pre-Req Knowledge
Students should have an understanding of the key concepts of quadratic equations, including vertices, minimum and maximum, and zeros; and how to use Google SketchUp (see Additional Multimedia Resources for a link to a tutorial on this software).
Introduction/Motivation
In order to understand how modern engineers design, build, and test their projects, let’s take a step back in history. Has anyone ever heard of a trebuchet? (Field answers from the students.) Ok, has anyone ever heard of a catapult? (Again, field answers from the students; this term is probably more familiar.) A trebuchet is an ancient type catapult that uses a swinging arm to throw a projectile. Trebuchets are examples of compound machines, which are made up of two of more simple machines to operate. A simple machine is a mechanical device that changes the direction of a force, and you’ve probably heard of these classical types: level, wheel and axle, pulley, inclined plane, wedge, and screw.
A trebuchet uses a lever for its throwing arm, which is attached to a sturdy base by an axle. Trebuchets throw projectiles (these usually sit inside a sling at one end of the throwing arm) by quickly rotating the arm along its axle. Since the sling is attached to the longer end of the arm and opposite to where the force is applied at the fulcrum of the lever, the trebuchet takes advantage of leverage—also called mechanical advantage—to throw a projectile.
Along with using simple machines, trebuchets rely on gravity, potential energy, and rotational acceleration to loosen projectiles from a sling. To see these concepts in action, let’s watch a few videos that can help us visualize how a trebuchet operates.
(Show a Punkin’ Chunkin’ video from one of the links below or from YouTube and ask students to pay close attention to the different types of machines used to launch the pumpkins.)
The World Championship Punkin’ Chunkin’ Association (WCPCA) hosts a signature pumpkin launching event each year, fueling innovative engineering and science-based ideas that draw spectators from all over. (www.punkinchunkin.com/) Punkin’ Chunkin’ cultivates the odd, challenging, and competitive quest for distance that inspires creativity, ingenuity, teamwork, and passion.
- You can have students watch Physics of “Punkin Chunkin” (3:46 long). Also, show some other videos of Punkin’ Chunkin’ launches on YouTube. For example: Punkin Chunkin Trebuchet // Homemade Science with Bruce Yeany (4:25 long) or Punkin Chunkin' Festival 2015 (3:17 long).
- Ask students to compare and contrast the different launch engines they observed in the video.
- How is a trebuchet different from the other siege engines?
- Sample answer: Uses a counterweight, works by gravity instead of tension.
- Are there any benefits to building a trebuchet over the other machines?
- Sample answer: More powerful, more accurate, etc.
- How could trebuchets and quadratic functions be related?
- Sample answer: Kinematic equations that describe motion of a projectile is a quadratic equation; you can use quadratic equation to predict the motion of objects launched from a trebuchet.
For homework (or in class) do independent research on different trebuchet designs. You should come to class with a rough sketch that includes key parts of the trebuchet: frame, pivot beam, counterweight, and sling. You should also have an idea of what types of materials you would use to build your trebuchet. Remember to cite the sources of the websites you visit in your research!
Procedure
Before the Activity
- Access the Punkin’ Chunkin’ All-Stars episode on Science Channel’s webpage or bring up the free alternative video Physics of Punkin' Chunkin' and a few extra videos of the event.
- Make copies of worksheets, one per group: Trebuchet Supply Order, Instruction Manual Rubric, Trebuchet and Quadratics Data Collection Sheet, PowerPoint Presentation Rubric.
With the Students
Day 1: Introduction and Exploration
- Present the Introduction/Motivation section to students, including the Punkin’ Chunkin’ video(s).
- Assign students to research (either as homework or in class) as detailed in the Introduction/Motivation section.
- This research should include design elements of a trebuchet as well as common materials used to build one.
Day 2: Research and Design
- Divide students into groups of 3-4.
- Give students time to review their research as a group and discuss the merit of each of their designs. Discuss how materials can affect design and build time.
- Give students the constraints for the project.
- Provide more time for group research, if necessary.
Group Constraints:
- The base of your trebuchet can be no more than 1 m x 1 m (about 3 ft. x 3 ft.).
- The height of your trebuchet can be no more than 1.2 m tall (about 4 ft.).
- Final product must collapse to fit a 38 cm x 30 cm x 25 cm (15 in. x 12 in. x 10 in.) cardboard box. This can adjusted based on any available cardboard box.
- You must not spend more than $45 on supplies at a hardware store.
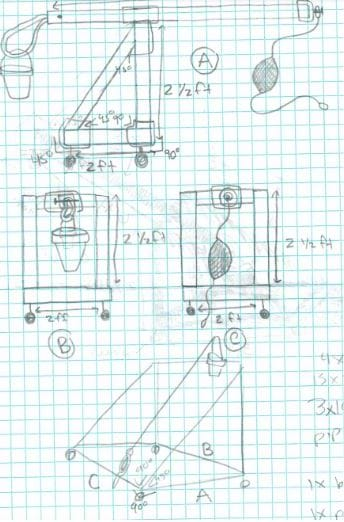
- Have students begin the first iteration of their group design on graph paper based on the above constraints. Their schematic should include:
- Side view, front view, and rear view
- Measurements in meters (they may also include feet and inches)
- Initial materials list
- Have students test their design on Virtual Trebuchet 2.0, (http://www.virtualtrebuchet.com/), a free web-based simulator.
- Circulate during this time answering student questions, offering suggestions, and helping students stay within the constraints provided.
Day 3: Design and Order
- Instruct groups to assign team members to complete different duties.
- Google Sketchup Team
- Materials Team
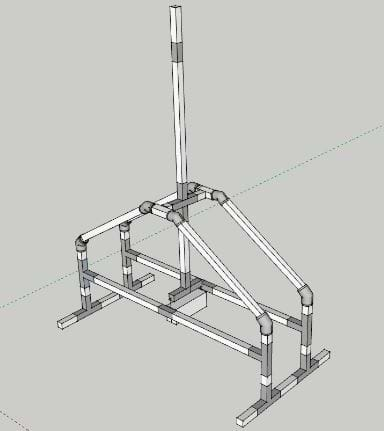
- Have one or two team members use Google SketchUp to create their first design.
- The design should include a side view, front view, rear view with measurements.
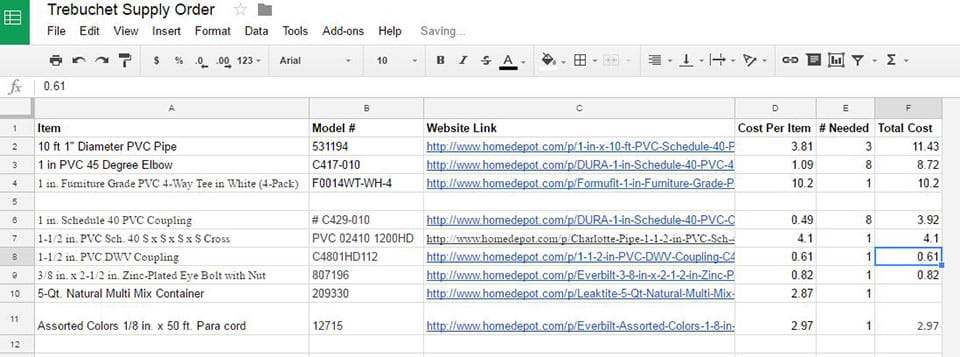
- Have one or two team members research materials online (such as on a hardware store website) and create an order list based on their design iteration. Have students complete the Trebuchet Supply Order with their list. Note: the teacher can pick up supplies from a local hardware store or have them shipped to the school.
- A sample list may look like this:
- 7 buckets with lids, 3.78 L (~1 gallon)
- 42 m of PVC pipe, 2.5 cm (~1 inch) in diameter
- 70 PVC 45° connectors, 2.5 cm (~1 inch) in diameter
- 70 PVC three-way corner connectors, 2.5 cm (~1 inch) in diameter
- 7 PVC four-way connectors, 3.8 cm (~1.5 inch) in diameter
- 14 PVC endcaps, 2.5 cm (~1 inch) in diameter
- 10 boxes
- 1 multi-material screw
- duct tape, 5 rolls
- mason twine, 5 rolls, 76 m (250 ft.) in length, neon color
- Use the preceding list as a guide only! Students should come up with creative solutions of how to build trebuchets with hardware store materials on their own.
Days 4 and 5: Build and Create Instructions
- Once the materials arrive, students can begin cutting and assembling their trebuchets according to their designs. Remind students to document any changes to their original design and provide a justification for those changes.
- Ask students the following key questions:
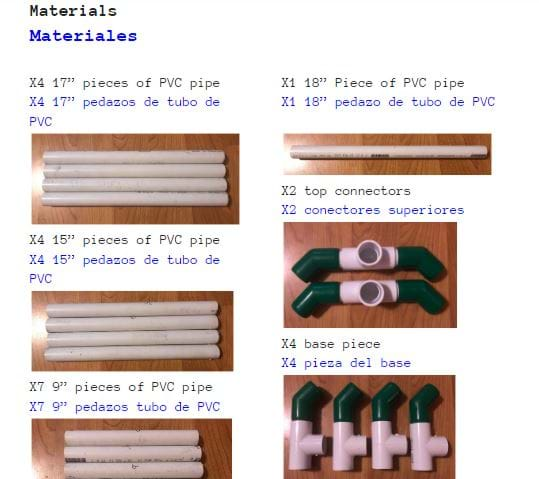
- Did you create a detailed step-by-step process for constructing the trebuchet?
- Did you include pictures for each assembly step?
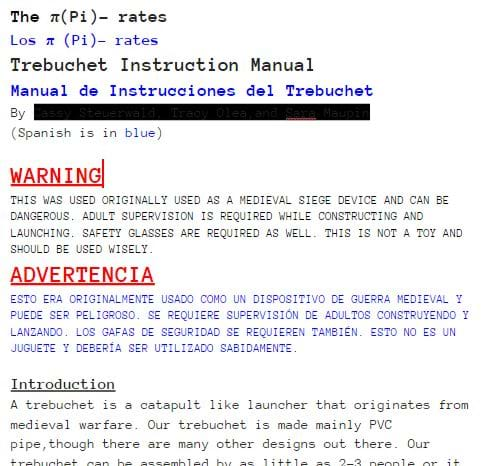
- Once students have assembled their trebuchets, have them begin creating an instruction manual for assembly following the Instruction Manual Rubric. Students will iterate on their instruction manuals as they test their trebuchet and make adjustments to their design.
- Optional: If you want the manuals to be more accessible and realistic, require students to have warnings and parts labeled in English and Spanish. This is an especially good task if the classroom has a number of ESL (English as a Second Language) students.
- See the Instruction Manual Rubric for grading.
- If the students get stuck on how to write instructions, allow more time for students to research different types of schematics online. The furniture retailer IKEA has lots of simple instructions that show how to build their products, many of which could be adapted for this activity.
Days 6 and 7: Test & Refine Design
- Students will begin testing their trebuchets. Use the Trebuchet and Quadratics Data Collection Sheet to record data.
- Remind them of safety procedures when launching their payload.
- Where should they stand and why?
- Students should stand to the left or right of the trebuchet, never in the front or back.
- Did they clear their line of sight?
- Make sure no one is standing behind or in front of the trebuchet, up to 50 feet cleared distance to the front and back.
- Is everyone wearing safety goggles?
- Wearing safety goggles is a best practice during many kinds of product tests.
- Circulate during this time answering questions and offering suggestions. Ask the Key Questions:
- How do you determine the trebuchet’s effectiveness?
- What were the variables of your experiment? How did changing them change your results?
- Is your explanation detailed and clear, showing complete understanding of the mathematical, science, and engineering concepts used to solve the problem(s)?
- Did you include error analysis in your results?
- How did your initial testing of the trebuchet change the original design?
- Have students document each attempted launch and discuss the successes and failures. They may want to record each launch in slow motion video so they can make some visual analyses after each attempt. Students will need at least two launch videos for the Day 8 graphing activity.
- As students adjust or change their designs, ask them how that affects their launch.
- Remind students that changes must be reflected in their instruction manual.
Day 8: Graph Your Trebuchet Launch
- ·Groups will decide on two of their best launches to graph.
- Each group will get one (1) sheet of large graph paper.
- Teacher will project the video of each launch onto the board or wall.
- Tape the graph paper to the wall or board using blue tape.
- Adjust the size of the projected video to fit the graph paper.
- Students will create an x- and y-axis using the trebuchet at the point of origin.
- Play the video and stop it at key points to allow the students to plot the path of the tennis ball.
- Turn over the graph paper and repeat the process for the second launch.
- Students will use their collected data from each launch in order to set the scale of their x- and y-axis.
- Students will label key attributes of each parabola: x-intercept, vertex, axis of symmetry.
- Have students discuss the differences in each graph and how it relates to the two launches.
Days 9 and 10: Prepare and Present Findings
- Have student groups prepare and present their findings in a PowerPoint presentation. Provide them with a copy of the PowerPoint Presentation Rubric. You may also show students the Trebuchet Example Presentation to give students an idea of how to set up their presentation.
- Students may also write an individual reflection on their experiences during this project. See the Student Reflection Example for reference.
Vocabulary/Definitions
axle: A central shaft for a rotating wheel or gear.
compound machine: A machine formed from a set of simple machines connected in series with the output force of one providing the input force to the next
fulcrum : The support about which a lever pivots.
lever: A simple machine consisting of a beam or rigid rod pivoted at a fixed hinge, or fulcrum.
leverage: A measure of the force amplification achieved by using a tool, mechanical device or machine system; also known as mechanical advantage.
potential energy: Energy held by an object because of its position relative to other objects, stresses within itself, its electric charge, or other factors.
rotational acceleration: The time rate of change of angular velocity, or how fast and object rotates relative to another point.
simple machine: A mechanical device that changes the direction or magnitude of a force.
sling: A projectile weapon typically used to throw a blunt projectile such as a stone, clay, or lead.
trebuchet: A common and powerful type of siege engine which uses a swinging arm to throw a projectile.
Assessment
Pre-Activity Assessment
Research: Students engage in research on how to build a trebuchet; they also learn how to document their research using a bibliography.
Activity Embedded Assessment
Google SketchUp: Students create a Google SketchUp design of their trebuchet that includes a front, side, back view, and accurate measurements.
Instruction Manual: Students write an instruction manual for the assembly of their trebuchet. See Instruction Manual Rubric.
Post-Activity Assessment
Presentations: Student groups will present their designs in a PowerPoint Presentation, detailing their success/failures during the testing phase, and discussing the connection to quadratics. See the PowerPoint Presentation Rubric.
Reflection: Students will write an individual reflection on their experiences during this project. See an example here: Student Reflection Example.
Investigating Questions
- What is a trebuchet?
- Example answer: A mechanical structure designed in ancient times that uses gravitational force to throw an object.
- When was a catapult used and for what purpose?
- Example answer: Yes, used in medieval times to storm castles.
- How would a trebuchet and catapult be related?
- Example answer: Both used to throw objects far distances.
- How is a trebuchet different from the other siege engines?
- Example answer: Unlike other siege engines that use tension force, trebuchets use gravitational force to move their objects to be thrown.
- Are there any benefits to building a trebuchet over the other machines?
- Example answer: More control over the force of the throw (can control mass of counterweight).
- How could a trebuchet and quadratic functions be related?
- Example answer: A quadratic equation can be used to predict the path of an object thrown using a trebuchet.
- What are the parts of a trebuchet? How do they work?
- Example answer: Parts include the frame, pivot beam, counterweight, and sling. The counterweight gets pulled down by gravity, causing the object to get pulled up and thrown.
- What kind of materials can I use to build my trebuchet?
- Example answer: Wood, plastics, etc.
- How do you determine the trebuchet’s effectiveness?
- Example answer: The trebuchet is effective if it can throw an object the same distance for each test throw.
- What were the variables of your experiment?
- Example answer: The mass of the counterweight, the length of the sling, etc.
- How did changing each variable change your results?
- Example answer: Increasing the counterweight caused the tennis ball to be thrown farther.
- Did you include error analysis in your results?
- Example answer: Yes, we compared the distances the tennis ball was predicted to be thrown using the quadratic equation and the actual distance traveled.
Safety Issues
- Digital safety: since this is a research-intense project, discuss digital footprints and information gathering that happen when students perform searches online. Resources at Common Sense Media: https://www.commonsense.org/education/digital-citizenship
- Adhere to safety protocols when using shop equipment.
- Discuss proper trebuchet testing procedures including, where to stand, ensuring a clear line of sight, and using proper safety equipment.
Troubleshooting Tips
- Ask your school librarian to discuss possible internet sites that can help with research and review common research techniques.
- Ask for help from parents with expertise in using the tools required for this project.
- Allow flexibility for time extensions for groups that struggle based on constraints and materials chosen.
- If there are many groups, consider imposing a time limit on the PowerPoint presentations so all groups can present on Day 10 (within a 60-minute class period).
Activity Extensions
For math or science teachers, create a lesson plan that would help a teacher use this trebuchet in an elementary classroom.
How could you make the instructions more user-friendly? Create translations in another language for your instructions.
Additional Multimedia Support
Google SketchUp: watch the following video for a tutorial: https://youtu.be/ST-ay0TwH_4
Virtual Trebuchet 2.0, http://www.virtualtrebuchet.com/
Subscribe
Get the inside scoop on all things Teach Engineering such as new site features, curriculum updates, video releases, and more by signing up for our newsletter!More Curriculum Like This

Students are introduced to three of the six simple machines used by many engineers: lever, pulley, and wheel-and-axle. In general, engineers use the lever to magnify the force applied to an object, the pulley to lift heavy loads over a vertical path, and the wheel-and-axle to magnify the torque appl...
Copyright
© 2019 by Regents of the University of Colorado; original © 2017 University of TexasContributors
Kimberly CollinsSupporting Program
NASCENT (Nanomanufacturing Systems for Mobile Computing and Mobile Energy Technologies) Engineering Research Center , Research Experiences for Teachers Program, University of Texas at AustinAcknowledgements
This material is based upon work supported by the National Science Foundation under grant no. EEC-1160494—a Research Experience for Teachers program titled “Nanomanufacturing Systems for Mobile Computing and Mobile Energy Technologies, or NASCENT.” Any opinions, findings and conclusions or recommendations expressed in this material are those of the author(s) and do not necessarily reflect the views of the National Science Foundation.
Last modified: February 13, 2024


User Comments & Tips