Quick Look
Grade Level: 10 (8-10)
Time Required: 1 hours 45 minutes
(2 class sessions: ~60 min. on Day 1; ~45 min. on Day 2)
Expendable Cost/Group: US $3.00 This activity also uses some non-expendable (reusable) items such as beakers; see the Materials List for details.
Group Size: 2
Activity Dependency: None
Subject Areas: Biology, Life Science, Science and Technology
Summary
Students learn that engineers develop different polymers to serve various functions and are introduced to selectively permeable membranes. In a warm-up activity, they construct models of selectively permeable membranes using common household materials, and are reminded about simple diffusion and passive transport. In the main activity, student pairs test and compare the selective permeability of everyday polymer materials engineered for food storage (including plastic grocery bags, zipper sandwich bags, and plastic wrap) with various in-solution molecules (iodine, corn starch, food coloring, marker dye), assess how the polymer’s permeability relates to its function/purpose, and compare that to the permeability of dialysis tubing (which simulates a cell membrane).
Engineering Connection
Polymers are used all the time in daily life, and engineers design polymers with a particular structure to support the polymer’s function. For example, a plastic grocery store bag needs to be light and easily packaged as well as sturdy and waterproof to handle your groceries As another example, various forms of zipper plastic bags have been designed for specific purposes, such as for freezer storage (to prevent freezer burn on food) and for refrigerator storage (more permeable). Engineers keep these functional requirements in mind as they design!
Learning Objectives
After this activity, students should be able to:
- Discuss the process of diffusion and the components needed to make it successful, including a concentration gradient and appropriate molecule size.
- Describe how engineers develop and design different polymers to satisfy desired functions.
Educational Standards
Each Teach Engineering lesson or activity is correlated to one or more K-12 science,
technology, engineering or math (STEM) educational standards.
All 100,000+ K-12 STEM standards covered in Teach Engineering are collected, maintained and packaged by the Achievement Standards Network (ASN),
a project of D2L (www.achievementstandards.org).
In the ASN, standards are hierarchically structured: first by source; e.g., by state; within source by type; e.g., science or mathematics;
within type by subtype, then by grade, etc.
Each Teach Engineering lesson or activity is correlated to one or more K-12 science, technology, engineering or math (STEM) educational standards.
All 100,000+ K-12 STEM standards covered in Teach Engineering are collected, maintained and packaged by the Achievement Standards Network (ASN), a project of D2L (www.achievementstandards.org).
In the ASN, standards are hierarchically structured: first by source; e.g., by state; within source by type; e.g., science or mathematics; within type by subtype, then by grade, etc.
NGSS: Next Generation Science Standards - Science
-
Conduct an investigation to produce data to serve as the basis for evidence that meet the goals of an investigation.
(Grades 6 - 8)
More Details
Do you agree with this alignment?
International Technology and Engineering Educators Association - Technology
-
Students will develop an understanding of the relationships among technologies and the connections between technology and other fields of study.
(Grades
K -
12)
More Details
Do you agree with this alignment?
-
Students will develop an understanding of the role of troubleshooting, research and development, invention and innovation, and experimentation in problem solving.
(Grades
K -
12)
More Details
Do you agree with this alignment?
-
Students will develop abilities to apply the design process.
(Grades
K -
12)
More Details
Do you agree with this alignment?
State Standards
Mississippi - Science
-
Analyze and explain the structures and function of the levels of biological organization.
(Grades
9 -
12)
More Details
Do you agree with this alignment?
Materials List
Each group needs:
- (optional, for the Introduction/Motivation activity) ~8 beads of three various sizes (total number of beads can vary)
- 250-ml beaker
- Observation Handout, one per student or per group
- Data Collection Handout, one per student or per group
- colored pencils or markers, for sketching observations
Depending on the group assignment card and class size:
- 4 groups each need 1 strip of dialysis tubing*, ~10 cm (teacher to pre-cut and pre-soak in water for 15 minutes so that students are able to open it to load with testing molecules), pipette, and 1 piece of 10-cm long embroidery thread, string or yarn
- 4 groups each need 1 zipper sandwich bag
- 4 groups each need a 30 x 30 cm piece of plastic wrap
- 4 groups each need a plastic grocery store bag (with no holes)
*One source of dialysis tubing is Fisher Scientific’s 10-ft (~3-m) roll of size MC-18 seamless cellulose dialysis tubing, which is 25 mm flat width x 16 mm open diameter for $11.50 at https://www.fishersci.com/shop/products/seamless-cellulose-dialysis-tubing-16/s25645.
To share with the entire class:
- (optional) various household items to use as building supplies for the Introduction/Motivation activity construction of “selectively permeable membrane” models, such as boxes of various sizes (such as cereal boxes and other assorted food boxes from home), cardstock, plastic grocery store bags, tape, rubber bands, funnels, paperclips, disposable plates and cups, etc.
- scissors
- 6 1,000-ml beakers, for preparing and storing the following solutions:
- iodine solution: 500 ml of water with 10-20 drops of iodine
- corn starch solution: 500 ml of water with 3 grams of corn starch
- food coloring solution: 500 ml of water with 5-10 drops of food coloring
- blue marker dye solution: 500 ml of water with 7-10 blue markers (such as Crayola Washable Markers) turned upside down in the water
- yellow marker dye solution: 500 ml of water with 7-10 yellow markers (such as Crayola Washable Markers) turned upside down in the water; note: if the class size is 24 or fewer students, the yellow marker dye solution is not needed (thus, groups 13-16 cards and lab procedures are not needed)
- 1,000 ml of tap water
- Assignment Cards, one printout to be cut apart into 16 cards (one card per group)
- Testing the Selectivity of Common Polymers Lab Procedures, one printout to be cut apart into 16 separate half-page instructions (one section per group)
Worksheets and Attachments
Visit [www.teachengineering.org/activities/view/usm_membranes_activity1] to print or download.Pre-Req Knowledge
Students should have basic understanding of the cell membrane and passive transport/simple diffusion.
Introduction/Motivation

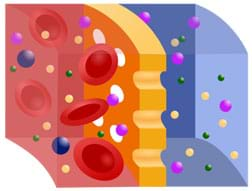
Engineers are working to create selectively permeable membranes for gas separations. What exactly does that mean? Well, let’s find out! Gas separation—specifically the separation of carbon dioxide from other gases—is very important because it is used to treat industrial gas waste. This process can help to reduce the amount of pollutants in the environment and recover gas that would be expelled as waste to, instead, sell it for profit. Gas separation membranes are useful in purifying natural gas (removing the unwanted materials from natural gas intended for energy use). Therefore, gas separation networks that efficiently and selectively separate CO2 from other gases have commercial applications in areas such as industrial exhaust gas treatment and natural gas purification. Many membranes used in such processes must be highly permeable to CO2 (to permit the gas to move through it) and highly selective for CO2 (to only permit CO2 permeability, NOT other gases). Chemical engineers and polymer scientists design and test gas separation membranes.
Let’s do a warm-up activity to experience firsthand what we mean by selectively permeable membranes.
(Note: This introductory activity is optional and you can vary the length of this warm-up, depending on the time available. For example, simply use it as a quick 15-minute hypothetical brainstorming session to get students thinking about selectively permeable membranes, or extend it into a full 60- to 90-minute session. Alternatively, make your own selectively permeable membrane model in advance and then simply show it to the class.)
(Divide the class into groups of two students each and give each group approximately eight beads of three various sizes.) In this introductory activity, these beads represent gases. It is your goal to create a separation apparatus that can effectively separate the smallest bead from the other beads, like a selectively permeable membrane. You will be given time to brainstorm with your partner, and access to the following materials (show students an assortment of model building supplies such as those suggested in the Materials List, and scissors) Your engineering challenge: It is important that your separation apparatus only permits the smallest beads to pass through!
(After the teams brainstorm and make their plans, direct them to begin to construct their “selectively permeable membranes.” As they carry out their construction, have students create a list of instructions describing how they assembled their membranes, dimensions, a list of items used, any problems they encountered, and solutions to overcoming any problems. Consider designating time for students to share their ideas, get feedback from others, find solutions to obstacles, and then use this information to adjust the design of their own selectively permeable membranes. When teams are done, assess each group’s final product.)

If I have 10 molecules inside the membrane and five molecules outside the membrane, in which direction will the molecules move? (Answer: The molecules move from inside the membrane to outside the membrane; in diffusion, molecules move from high concentration to low concentration.) For diffusion to occur across a membrane, what must be present? (Answer: A concentration gradient must be present, which is a difference between the inside and outside concentrations.) What is not needed for diffusion to occur? (Answer: No energy is needed from the cell because diffusion is a type of passive transport.)
Engineers also design selectively permeable membranes for food storage applications. Next, we will test the selectivity of some common polymers that were engineered for food storage. We will compare their selectivities by also testing dialysis tubing to simulate a cell membrane.
Procedure
Before the Activity
- Gather materials and make copies of the Observation Handout and Data Collection Handout, one each per student or per group (teacher’s choice). Also make one copy each of the Assignment Cards and Testing the Selectivity of Common Polymers Lab Procedures. Cut apart the assignment card sheet into 16 cards. Cut apart the eight-page lab procedure into 16 separate sections (half-sheets). Each group gets one card and its corresponding lab procedure section.
- As described in the Materials List, prepare the six class “solutions”: 1) iodine, 2) corn starch, 3) food coloring, 4) blue marker dye, 5) yellow marker dye (the latter only for classes with more than 24 students), and 6) water.
- Pre-cut the dialysis tubing, string, and plastic wrap.
- Just before the start of class, soak the pre-cut dialysis tubing in tap water for 15 minutes so that it will open up for loading the testing solution.
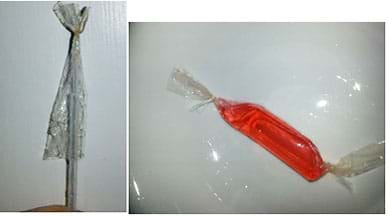
- After the pre-soak, the ends of the dialysis tubing are able to be manipulated and opened. During the activity, direct students to secure one opened end of the dialysis tubing by twisting it shut and tying it with a double-knotted string. Then have them use a pipette to add the test molecule solution. Then twist the other opened end shut and secure it with a double-knotted string. Refer to Figure 1. Tip: It helps to have students practice loading the dialysis tubing with tap water and securing it shut with string; doing this saves time later during the activity and demonstrates (in advance of using the real solutions) the importance of really securing the dialysis tubing with string to prevent leaks.

With the Students—Day 1: Introduction and Setting up the Polymer Test
- Present students with the Introduction/Motivation content, including conducting the (optional) quick model-building warm-up activity. See the note in the Introduction/Motivation section for details.
- If not already done during the warm-up activity, divide the class into groups of two students each.
- Assign or have each group select an assignment card. Pass out the observation handouts.
- Direct students to hypothesize the selectivity of their polymers with the assigned testing solution by writing it on the corresponding section of the observation handout. (Example hypothesis statement: The zipper bag will not be permeable to food coloring. Food coloring will not move from inside the bag to outside the bag.)
- Distribute to each group the lab procedure section that corresponds to its assignment card number. Direct the teams to follow the procedure outlined on their lab procedures sections, preparing the assigned polymer and testing solutions.
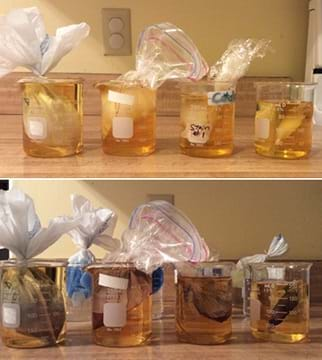
- Have students complete the appropriate section of the observation handout by illustrating their setups and answering the questions. Have students use colored pencils/markers to sketch their observations in order to document good visuals of what the setups look like before the experiment runs.
- Let the polymers sit overnight. Place the beakers out of the way so they will not get knocked over or disturbed, and away from windows to prevent evaporation.
With the Students—Day 2: Share Findings and Conclusion
- Have students answer the four functional requirements questions on the data collection handout. These questions are intended to get students to think about the functions and purposes the tested polymers (plastic grocery store bag, plastic bag, zipper bag) serve in everyday life.
- Have students document their observations on the observation handout and finish the questions that pertain to their experiments. Have students use colored pencils or markers to sketch their observations in order to document a good visual of the changes that occurred or did not occur.
- Direct students to fill in their team’s section of the table on the data collection handout.
- Using the round-robin group share technique, have students collect observations/data from all groups. To do this, students move clockwise every 3-5 minutes when given a signal by the teacher, collecting information as they go. Have one member of each team stay with its experimental setup while the other partner circulates around the room collecting observations/data. The student who stays with the lab setup explains its group findings, hypothesis, and whether or not its findings supports its hypothesis.
- As the students move clockwise, move counterclockwise to assess everyone’s understanding and monitor student participation. Example questions to ask the students as you circulate:
- (For starch and iodine) Where did a major change/reaction occur? (Answer: Inside the polymer.) How do you know? (Answer: Because that is where a major color changed occurred. It turned dark purple on the inside.)
- (For starch and iodine) Did the starch go through the polymer? (No) How do you know? (Answer: Because no color change occurred on the outside of the polymer. Starch was on the inside, so starch did not move through the polymer.) What would have happened outside the polymer? (Answer: If the starch moved, it would have to go outside the polymer, causing a color change on the outside, but the reaction occurred on the inside of the polymer.)
- (For starch and iodine) Is the polymer completely solid? (No) How do you know? (Answer: Because the iodine moved through. If it was completely solid, nothing would have moved through the polymer.)
- (For food coloring and marker dye with the dialysis tubing) Is the dialysis tubing (“cell membrane”) completely solid? (No) How do you know? (Answer: Because a color change occurred outside the dialysis tubing/cell membrane, so the food coloring moved through the dialysis tubing.)
-
After students circulate around the classroom, direct them to return to their original partners and debrief them on their observations and findings. Give students time to fill in the remaining sections of their handouts.
-
Have students complete the concluding questions on the bottom of the data collection handout and explain how the polymer’s selectivity relates to its function. For example: The zipper bag, plastic grocery store bag, and plastic wrap were only permeable to iodine (which is a smaller molecule), but were not permeable to large molecules (such as marker dyes, food coloring, and starch). This is important because these polymers serve as protective covers to keep their contents dry and clean.
-
Lastly, call students’ attention to the iodine and starch setups as a model from which they can explain the process of simple diffusion. For example: The iodine moved from the outside of the polymers to the inside, moving from an area of high concentration to low concentration. No energy was put into the system, so this is an example of passive transport.
Vocabulary/Definitions
polymer: A chemical compound made of small molecules arranged in a simple repeating structure to form a larger molecule. Polymers have a broad range of properties. Both natural and synthetic polymers are common in everyday life, such as common synthetic plastics, neoprene, vinyl, silicone, and DNA, proteins, silk and rubber.
selectively permeable membrane: A polymeric membrane that permits certain molecules to pass through it by diffusion. Also called semipermeable membrane, differentially permeable membrane or partially permeable membrane.
Assessment
Pre-Activity Assessment
Quick Build: During the (optional) warm-up activity described in the Introduction/Motivation section, student pairs are asked to build their own separation apparatus models. Students’ creations demonstrate whether or not they understand the concept of selectively permeable membranes, as well as give them practice experiencing a mini engineering challenge.
Hypothesis: Students develop hypotheses based on what they think the selectivity is for their group’s assigned polymer membrane, stating it at the top of the Observation Handout, and returning to it later, after data collection and analysis.
Activity Embedded Assessment
Questions: Students complete the before and after observations and associated questions on the activity handouts: Observation Handout and Data Collection Handout. Review their answers to gauge their level of understanding.
Class Results Presentations: After completing the experiment, have teams share and collect observations and data using the round-robin group share technique described in the Procedure section. As the students move clockwise, move counterclockwise to assess everyone’s understanding and monitor student participation. Refer to the suggested assessment questions provided in the Procedure section.
Post-Activity Assessment
Concluding Questions: Using the Data Collection Handout, students examine the collected data, answer the concluding questions and express their understanding of selectivity characteristics versus polymer function. Review their answers to assess their depth of comprehension.
Troubleshooting Tips
To eliminate unwanted leaking, walk students through preparing the dialysis tubing and the other polymers. If a major leak occurs, lift the polymer (bag) out of the solution beaker and put it in an empty beaker so students can see that it has a leak, rather than concluding that the testing molecule is diffusing through.
Obtain a large quantity of plastic grocery store bags and have students check them for holes. It is better to have too many than not enough!
Activity Extensions
Building off the last question on the Data Collection Handout—What is the largest and smallest testing molecule?—extend the activity by having students run tests using various hole size dialysis tubing to determine the order of size for each the molecules in order to differentiate between the middle two molecules (food coloring and marker dye). (Answer: Expect the food coloring molecules to be smaller than those of the marker dye.)
Activity Scaling
For lower grades, simplify the activity by having students work only with the zipper bag, testing iodine, starch, and food coloring.
Subscribe
Get the inside scoop on all things Teach Engineering such as new site features, curriculum updates, video releases, and more by signing up for our newsletter!More Curriculum Like This

Students learn about the different structures that comprise cell membranes, fulfilling part of the Research and Revise stages of the legacy cycle. They view online animations of cell membrane dynamics (links provided).

Students explore the chemical identities of polymeric materials frequently used in their everyday lives. They learn how chemical composition affects the physical properties of the materials that they encounter and use frequently, as well as how cross-linking affects the properties of polymeric mater...
References
Kwisnek, Luke, Goetz, James, Meyers, Kevin P., Heinz, Stephen R., Wiggins, Jeffrey S. and Nazarenko, Sergie. (Published May 9, 2014) “PEG Containing Thiol-Ene Network Membranes for CO2 Separation: Effects of Cross-Linking on Thermal, Mechanical, and Gas Transport Properties.” Macromolecules. American Chemical Society. Vol. 47, No 10, pp. 3243-3253. http://pubs.acs.org/doi/abs/10.1021/ma5005327
Miller, Joe and Levine, Joe. Biology Foundation Edition. Upper Saddle River, NJ: Pearson Prentice Hall, 2010.
Copyright
© 2016 by Regents of the University of Colorado; original © 2015 University of Southern MississippiContributors
Eric Shows, Jones County Junior College, Ellisville, MS; Jamie Sorrell, Sumrall High School, Sumrall, MSSupporting Program
Research Experience for Teachers Program, School of Polymers and High Performance Materials, University of Southern MississippiAcknowledgements
This activity was developed under the Research Experiences for Teachers (RET) in Engineering and Computer Science Site for Sustainable Polymer Engineering Research program in the University of Southern Mississippi’s School of Polymers and High Performance Materials, funded by National Science Foundation RET grant no. EEC 1406753. However, these contents do not necessarily represent the policies of the NSF, and you should not assume endorsement by the federal government.
Last modified: February 15, 2020


User Comments & Tips