
Quick Look
Grade Level: 6 (5-7)
Time Required: 45 minutes
Expendable Cost/Group: US $1.00
Group Size: 2
Activity Dependency: None
Subject Areas: Physical Science
NGSS Performance Expectations:

| 3-5-ETS1-2 |
| MS-ETS1-2 |
Quick Look

- Grade Level:
- 6 (5 – 7)
- Time Required:
- 45 minutes
- Group Size:
- 2
- Subject Areas:
-
Physical Science -
NGSS Performance Expectations:
3-5-ETS1-2 MS-ETS1-2
Summary
Students dream up and draw their own designs for futuristic and fanciful flying machines. They learn that doodling, sketching and brainstorming are related to the invention process, and about the early inventions that contributed to the history of flight and the state of modern aircraft. For brainstorming practice, they generate ideas for creative alternate uses for every day objects. Then, guided by a worksheet, they use their imaginations and apply their knowledge of aircraft design and the forces acting on them (gained from the previous lessons in the Airplanes unit) to design and create their own innovative flying machine models made from classroom construction and recycled materials.
Engineering Connection
The key to successful engineering is to bring together science knowledge, creative ideas, productive brainstorms, design/test/build cycles and scientific testing. When all these elements come together, engineers are likely to come up with successful designs. So, even though engineers need to know a lot about airplanes to design new ones, teamwork, communication and testing are required for new aircraft designs to be successful.
Learning Objectives
After this activity, students should be able to:
- Work in a group to brainstorm a flying machine design.
- Incorporate the principles of geometry (including surface area, shape and symmetry) in their designs.
- Apply the forces of flight to a model design and justify the design in terms of those factors.
- Share their designs with the class and explain the important features to their peers.
- Understand the steps of the engineering design process.
Educational Standards
Each Teach Engineering lesson or activity is correlated to one or more K-12 science,
technology, engineering or math (STEM) educational standards.
All 100,000+ K-12 STEM standards covered in Teach Engineering are collected, maintained and packaged by the Achievement Standards Network (ASN),
a project of D2L (www.achievementstandards.org).
In the ASN, standards are hierarchically structured: first by source; e.g., by state; within source by type; e.g., science or mathematics;
within type by subtype, then by grade, etc.
Each Teach Engineering lesson or activity is correlated to one or more K-12 science, technology, engineering or math (STEM) educational standards.
All 100,000+ K-12 STEM standards covered in Teach Engineering are collected, maintained and packaged by the Achievement Standards Network (ASN), a project of D2L (www.achievementstandards.org).
In the ASN, standards are hierarchically structured: first by source; e.g., by state; within source by type; e.g., science or mathematics; within type by subtype, then by grade, etc.
NGSS: Next Generation Science Standards - Science
| NGSS Performance Expectation | ||
|---|---|---|
|
3-5-ETS1-2. Generate and compare multiple possible solutions to a problem based on how well each is likely to meet the criteria and constraints of the problem. (Grades 3 - 5) Do you agree with this alignment? |
||
| Click to view other curriculum aligned to this Performance Expectation | ||
| This activity focuses on the following Three Dimensional Learning aspects of NGSS: | ||
| Science & Engineering Practices | Disciplinary Core Ideas | Crosscutting Concepts |
| Generate and compare multiple solutions to a problem based on how well they meet the criteria and constraints of the design problem. Alignment agreement: | Research on a problem should be carried out before beginning to design a solution. Testing a solution involves investigating how well it performs under a range of likely conditions. Alignment agreement: At whatever stage, communicating with peers about proposed solutions is an important part of the design process, and shared ideas can lead to improved designs.Alignment agreement: | Engineers improve existing technologies or develop new ones to increase their benefits, to decrease known risks, and to meet societal demands. Alignment agreement: |
| NGSS Performance Expectation | ||
|---|---|---|
|
MS-ETS1-2. Evaluate competing design solutions using a systematic process to determine how well they meet the criteria and constraints of the problem. (Grades 6 - 8) Do you agree with this alignment? |
||
| Click to view other curriculum aligned to this Performance Expectation | ||
| This activity focuses on the following Three Dimensional Learning aspects of NGSS: | ||
| Science & Engineering Practices | Disciplinary Core Ideas | Crosscutting Concepts |
| Evaluate competing design solutions based on jointly developed and agreed-upon design criteria. Alignment agreement: | There are systematic processes for evaluating solutions with respect to how well they meet the criteria and constraints of a problem. Alignment agreement: | |
International Technology and Engineering Educators Association - Technology
-
Students will develop an understanding of the attributes of design.
(Grades
K -
12)
More Details
Do you agree with this alignment?
-
Students will develop an understanding of engineering design.
(Grades
K -
12)
More Details
Do you agree with this alignment?
-
Brainstorming is a group problem-solving design process in which each person in the group presents his or her ideas in an open forum.
(Grades
6 -
8)
More Details
Do you agree with this alignment?
-
Make two-dimensional and three-dimensional representations of the designed solution.
(Grades
6 -
8)
More Details
Do you agree with this alignment?
State Standards
Colorado - Math
-
Draw construct, and describe geometrical figures and describe the relationships between them.
(Grade
7)
More Details
Do you agree with this alignment?
Colorado - Science
-
Use the particle model of matter to illustrate characteristics of different substances
(Grade
6)
More Details
Do you agree with this alignment?
Materials List
Each group needs:
- 1-2 sheets of construction paper per student
- a variety of drawing media: crayons, colored pencils, markers, etc.
- 4 or 5 kitchen or household utensils; "odd" shapes if possible, such as a whisk, pastry cutter, wire coat hanger and tongs
- brown paper bag
- assorted craft construction or recycled materials
- (optional) protractor, ruler or compass, if desired
- Flying Machine Worksheet, one per student
To share with the entire class:
- capability to show the class the Brainstorming Guidelines Overhead
Worksheets and Attachments
Visit [www.teachengineering.org/activities/view/cub_airplanes_lesson10_activity1] to print or download.Introduction/Motivation
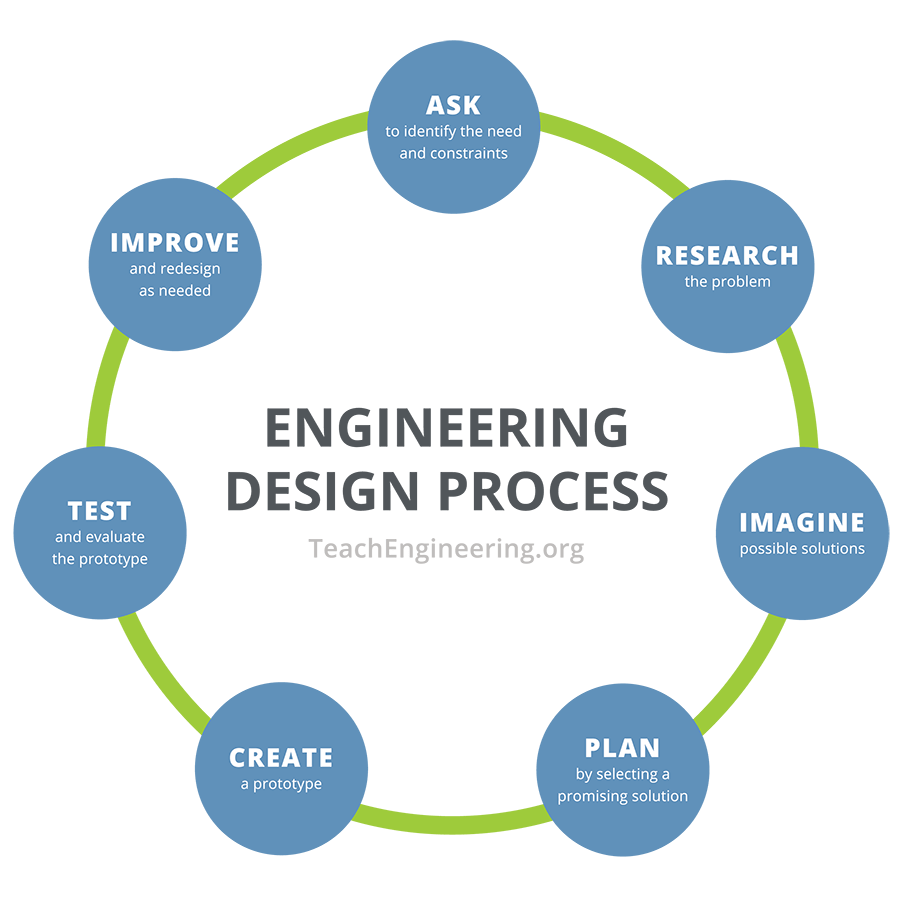
How many of you like to doodle? Many inventions were "doodles" before they became reality. Leonardo da Vinci (1452-1519) was famous for his notebook doodles and sketches of ideas for "futuristic" things that today are realities, such as helicopters, parachutes and airplanes. When you doodle an idea on a piece of paper, you are really starting one of the steps of the engineering design process—generating ideas.
Brainstorming is another way of coming up with ideas and is the third step of the engineering design process: imagine possible solutions. It is when a group of people get together and try to answer a problem by thinking of ideas—even wild ideas!—and building upon them as a team. Have you ever heard the phrase, "Two minds are better than one?" This is true because each person has a different and unique way of answering a question, and sometimes when you are stuck on a question or problem, a little help from a friend or neighbor can make it easier to develop solutions. Brainstorming generally occurs in the early part of the engineering design process, which involves the generation of ideas, selection of one idea, the design, build and redesign of a product.
Procedure
Before the Activity
- Gather materials and household objects. Put several kitchen/household objects in a brown paper bag, and do the same for the number of groups in the class.
- If time allows, come up with an example futuristic invention (such as a rocket ship powered by water) to give students a model of what they will be doing.
- Make copies of the Flying Machine Worksheet.
- Prepare to show the class the Brainstorming Guidelines Overhead.
With the Students
- Ask students what inventions they think were important in the history of flight. Some examples in addition to da Vinci's sketches from the 1480s: Sir George Cayley invented a glider in 1804. The Wright brothers invented the first powered airplane in 1903. Seaplanes were invented in 1912, and in 1933, the Boeing Company designed the first modern airliner, the Boeing 247. The jet engine was patented in 1930 by Frank Whittle in Britain. Later, in 1983, the stealth fighters—planes that are difficult to detect using radar—were made public.
- Display the brainstorming guidelines go through them with the class. Explain SCAMPER as a way to think differently about objects. (Example: The first step is to substitute: can you substitute another shape or material for a coat hanger?) Describe brainstorming as a component to the inventing process and bring up the point that engineers invent all the time.
- Show the engineering design steps in the Brainstorming Guidelines Overhead or write out the seven steps on the board. Ask students if they have ever used the EDP. (Elicit student responses.) Explain that engineers use the EDP to design the processes, products, and systems we see all around us.
- Hold up a paper bag and ask students to guess what it contains. Let them take a few guesses and shake the bag once or twice. Then, pull out one item and ask students to try out the third step of the engineering design process for themselves and imagine other uses for the object. List ideas on the board. Then give each group one brown bag and have them pull out ONE item. Have them brainstorm uses of that particular object. When the students' ideas are exhausted, have each table share with the class a few of the more creative ideas.
- Explain that now each group will use the fourth, fifth, and sixth steps of the EDP to design a flying machine. They need to incorporate the ideas and concepts covered in all the previous lessons of the Airplanes unit, especially drag, thrust, lift and weight. Make a word web on the board, with "flying machine" in the center, and the four forces of flight as branches around the outside. Have the class brainstorm ways to incorporate those concepts into their flying machine designs. Add students' ideas under each component on the web. Then add "fuel" and "materials" to the web. Ask them what types of fuel might be used in the future. Also, discuss materials that students have learned about in the unit and might use to design their flying machines. Suggest that they refer back to the web as they work.
- Have students dump their bags onto their desks or tables and begin to brainstorm ideas for their new flying machines. Remind them of the brainstorming guidelines and that they are in the third EDP step: Imagine. Roam around the groups to help them with brainstorming and listen to their creative ideas. Note: Let students know that their flying machines do not have to really work!
- Explain that engineers use many geometric ideas when they design planes. Airplane wings can move at different angles, some shapes are more aerodynamic than others (thus reducing drag), and a rocket ship or airplane usually has a symmetrical design.
- Encourage students to complete a rough draft in pencil. Once a student has decided on a plane design, encourage them work with their team to plan (EDP step 4) their final design by selecting the most promising solution. Ask them to use a variety of materials for the final design.
- Pass out any extra art materials and paper, and let the students move to the fifth step of the EDP as they create their flying machines.
- Have students complete the worksheet. (Note: Some shapes have several lines of symmetry. Encourage students to find as many as they can for each shape.)
Assessment
Pre-Activity Assessment
Discussion Question: Solicit, integrate, and summarize student responses. Ask students: What inventions may have helped with the development of modern flight and airplanes?
Activity-Embedded Assessment
Brainstorming: Have students generate a number of possible ideas about uses of an object pulled from their brown paper bags. Encourage wild ideas and discourage criticism of any ideas.
Word Web: Make a word web on the classroom board, with "flying machine" in the center, and drag, thrust, lift and weight as branches off the center, around the outside. Have the class brainstorm ways to incorporate the four forces of flight into their flying machine designs. Add student ideas under each component on the web. Then add "fuel" and "materials" as branches to the web. Ask them what types of fuel might be used in the future.
Post-Activity Assessment
Show and Tell: Have groups show off their futuristic flying machine to the rest of the class. Have team members explain how they considered the four forces of flight (drag, thrust, lift and weight) in their designs. Then have teams explain the best part of their designs and what could possibly go wrong with it (that is, what could be fixed in future models of their flying machines). Remind students that engineers go through the deign-build-redesign process many times before they get to an acceptable finished product. Have other student groups write down one thing that they like about the presenters' flying machine; share these with the class.
Troubleshooting Tips
Some students love to create and will want to start before you are ready or before you have even finished explaining the instructions. Other students will complain that they cannot think of anything to draw. They may need to start with your model, or a basic airplane, and add unusual components, or may need to make a web with their ideas to help their creativity. If needed, suggest that students to refer to the web made in class.
It may be helpful to put tubs with the art media at each table with various pencils, crayons and markers in them so that each team has ready access to art supplies.
Activity Extensions
Hang the flying machines in the classroom or a hallway for display.
Have students continue with paper airplane design and inventing new prototypes.
If students develop an interest in inventions that relate to flight, or inventions in general, have them dig deeper and conduct further research.
Activity Scaling
- Younger students may need more support to get started in being creative and inventive. Suggest that they look at the class webs or brainstorm before getting started. Also, it may help to narrow the assignment a little, such as identifying a specific type of fuel to incorporate into their designs.
- To challenge more advanced students, have them draw additional views of their crafts, such as from the top or a different side, and/or add another dimention to their work by using glue, colored paper, textured paper, etc., to add collage-type effects to their crafts.
Subscribe
Get the inside scoop on all things Teach Engineering such as new site features, curriculum updates, video releases, and more by signing up for our newsletter!Copyright
© 2004 by Regents of the University of ColoradoContributors
Tom Rutkowski; Alex Conner; Geoffrey Hill; Malinda Schaefer Zarske; Janet YowellSupporting Program
Integrated Teaching and Learning Program, College of Engineering, University of Colorado BoulderAcknowledgements
The contents of this digital library curriculum were developed under grants from the Fund for the Improvement of Postsecondary Education (FIPSE), U.S. Department of Education and National Science Foundation (GK-12 grant no. 0338326). However, these contents do not necessarily represent the policies of the Department of Education or National Science Foundation, and you should not assume endorsement by the federal government.
Last modified: April 1, 2022
User Comments & Tips