
Quick Look
Grade Level: 8 (6-8)
Time Required: 1 hours 45 minutes
(two 50-minute class periods)
Expendable Cost/Group: US $4.00
Group Size: 3
Activity Dependency: None
Subject Areas: Earth and Space, Life Science, Physical Science, Reasoning and Proof, Science and Technology
NGSS Performance Expectations:

| MS-ETS1-1 |
Quick Look

- Grade Level:
- 8 (6 – 8)
- Time Required:
- 1 hours 45 minutes
(two 50-minute class periods)
- Group Size:
- 3
- Subject Areas:
-
Earth and Space Life Science Physical Science Reasoning and Proof Science and Technology -
NGSS Performance Expectations:
MS-ETS1-1
Summary
Students design and build their own model levees. Acting as engineers for their city, teams create sturdy barriers to prevent water from flooding a city in the event of a hurricane.
Engineering Connection
Civil engineers design projects to support the needs of people living together. Without civil engineers, we would not have roads and bridges to drive on, water systems to bring us fresh water for drinking and bathing, or sewage systems for carrying away our waste. In coastal regions, these engineers play an essential role in protecting people from natural disasters, such as hurricanes. To prevent flooding from hurricanes, they design and build levees, flood walls, pump systems and canals. When these designs fail, engineers are called back in to evaluate what happened and why, as well as to make improvements and redesign.
Learning Objectives
After this activity, students should be able to:
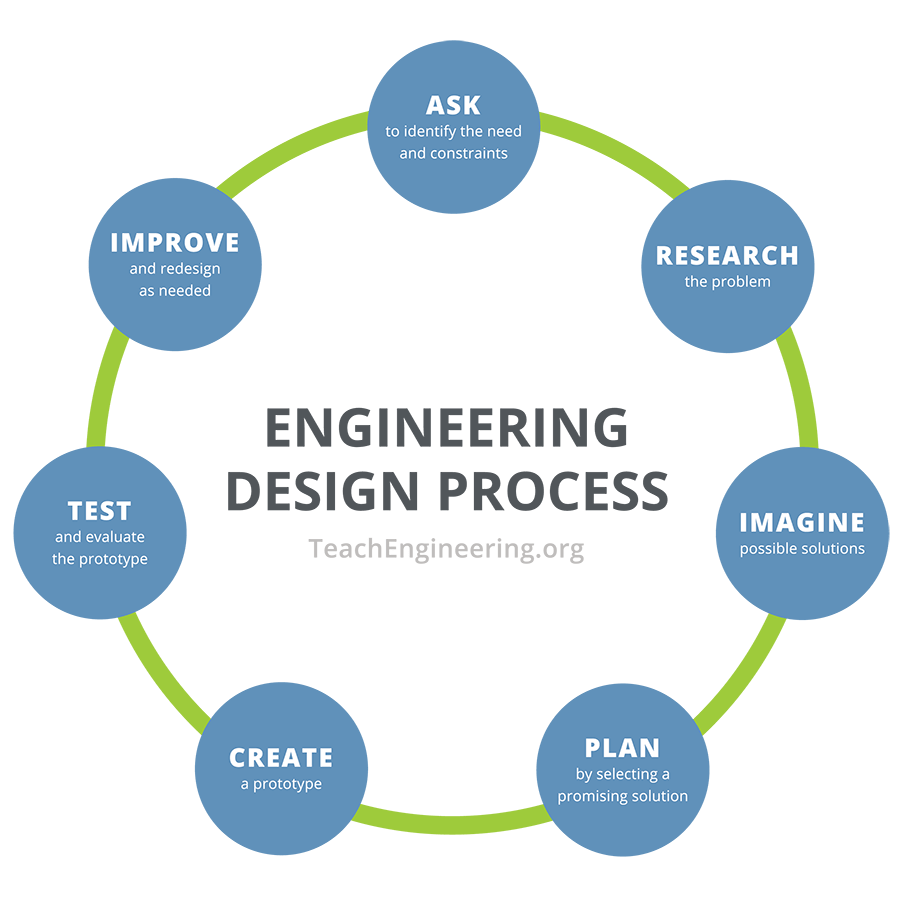
- List the steps of the engineering design process.
- Describe a scale drawing and what units should be used.
- Describe the features of a successful levee.
- Understand what a natural disaster is.
Educational Standards
Each Teach Engineering lesson or activity is correlated to one or more K-12 science,
technology, engineering or math (STEM) educational standards.
All 100,000+ K-12 STEM standards covered in Teach Engineering are collected, maintained and packaged by the Achievement Standards Network (ASN),
a project of D2L (www.achievementstandards.org).
In the ASN, standards are hierarchically structured: first by source; e.g., by state; within source by type; e.g., science or mathematics;
within type by subtype, then by grade, etc.
Each Teach Engineering lesson or activity is correlated to one or more K-12 science, technology, engineering or math (STEM) educational standards.
All 100,000+ K-12 STEM standards covered in Teach Engineering are collected, maintained and packaged by the Achievement Standards Network (ASN), a project of D2L (www.achievementstandards.org).
In the ASN, standards are hierarchically structured: first by source; e.g., by state; within source by type; e.g., science or mathematics; within type by subtype, then by grade, etc.
NGSS: Next Generation Science Standards - Science
| NGSS Performance Expectation | ||
|---|---|---|
|
MS-ETS1-1. Define the criteria and constraints of a design problem with sufficient precision to ensure a successful solution, taking into account relevant scientific principles and potential impacts on people and the natural environment that may limit possible solutions. (Grades 6 - 8) Do you agree with this alignment? |
||
| Click to view other curriculum aligned to this Performance Expectation | ||
| This activity focuses on the following Three Dimensional Learning aspects of NGSS: | ||
| Science & Engineering Practices | Disciplinary Core Ideas | Crosscutting Concepts |
| Define a design problem that can be solved through the development of an object, tool, process or system and includes multiple criteria and constraints, including scientific knowledge that may limit possible solutions. Alignment agreement: | The more precisely a design task's criteria and constraints can be defined, the more likely it is that the designed solution will be successful. Specification of constraints includes consideration of scientific principles and other relevant knowledge that is likely to limit possible solutions. Alignment agreement: | All human activity draws on natural resources and has both short and long-term consequences, positive as well as negative, for the health of people and the natural environment. Alignment agreement: The uses of technologies and any limitations on their use are driven by individual or societal needs, desires, and values; by the findings of scientific research; and by differences in such factors as climate, natural resources, and economic conditions.Alignment agreement: |
Common Core State Standards - Math
-
Solve unit rate problems including those involving unit pricing and constant speed.
(Grade
6)
More Details
Do you agree with this alignment?
-
Fluently add, subtract, multiply, and divide multi-digit decimals using the standard algorithm for each operation.
(Grade
6)
More Details
Do you agree with this alignment?
International Technology and Engineering Educators Association - Technology
-
Students will develop an understanding of the attributes of design.
(Grades
K -
12)
More Details
Do you agree with this alignment?
-
Students will develop an understanding of engineering design.
(Grades
K -
12)
More Details
Do you agree with this alignment?
-
Apply the technology and engineering design process.
(Grades
6 -
8)
More Details
Do you agree with this alignment?
-
Devise strategies for reducing, reusing, and recycling waste caused from the creation and use of technology.
(Grades
6 -
8)
More Details
Do you agree with this alignment?
-
Refine design solutions to address criteria and constraints.
(Grades
6 -
8)
More Details
Do you agree with this alignment?
State Standards
Colorado - Math
-
Solve unit rate problems including those involving unit pricing and constant speed.
(Grade
6)
More Details
Do you agree with this alignment?
-
Fluently add, subtract, multiply, and divide multidigit decimals using standard algorithms for each operation.
(Grade
6)
More Details
Do you agree with this alignment?
Colorado - Science
-
Differentiate between basic and severe weather conditions, and develop an appropriate action plan for personal safety and the safety of others
(Grade
8)
More Details
Do you agree with this alignment?
-
Use models to develop and communicate a weather prediction
(Grade
8)
More Details
Do you agree with this alignment?
Materials List
Each group needs:
- Levee Design Worksheet
- rectangular plastic container or tub
- scissors, to poke holes in cups
- $10 worth of fun money; such as strips of paper that each represent one dollar or Monopoly® money
- levee building materials:
- sand or gravel, about 2 cups
- duct tape, about 1 ft
- 8-10 cotton balls
- 1 plastic sandwich bag or square of Saran® wrap
- 1 sponge
- 8-10 Popsicle sticks
- 8-10 plastic drinking straws
- paperboard, 1 sheet, such as from a cereal box
- small paper cups (note: remember to update the Levee Design Worksheet with any changes made)
- access to water to test the levees
Worksheets and Attachments
Visit [www.teachengineering.org/activities/view/cub_weather_lesson05_activity1] to print or download.Introduction/Motivation
Natural disasters cause destruction all over the world. Does anyone know what a natural disaster is? (Elicit student responses). A natural disaster is a natural event such as a flood, earthquake, or hurricane that causes great damage or loss of life. In 2005, Hurricane Katrina caused immense human suffering for the people of New Orleans. Many factors led to people being stranded for hours or days, going without food and water for many days, and even dying. However, the flooding that occurred after the storm could have been prevented if the levees that surround the city had not broken in the first place. Civil engineers have the enormous responsibility of building projects that enable people to live together in communities. The people of New Orleans depend on engineers to build strong levees to protect their city from the ocean waters that surround it. In this activity, you will use the engineering design process to design a prototype (a small model) of a new levee to protect your city from future flooding.
Just like real engineers, brainstorm and draw out your design before you start to build. After your design has been approved by your teacher, you purchase your materials from the store (your teacher or a helper) and make sure that you stay within budget. Then build and test your design. The team whose levee holds back the most water wins. I cannot wait to see your ideas! You have the opportunity to make a real difference in your community!
Procedure
Background
The basic principle of the levee design is to split the plastic dish into two parts: half that represents a lake or river, and half that is the town, which we want to stay dry! On the first day of the activity, students design their levees, and on the second day, they build and test them.

Before the Activity
- Gather materials.
- Make copies of the Levee Design Worksheet, one per group.
With the Students
- Divide the class into groups of three students each. Gve each group a worksheet.
- Have students design and build their levees by completing the design steps described on the worksheet. Go through each step together as a class, giving teams 5-10 minutes for each step.
Design Process Steps
EDP Step 1: Ask to Identify the Need and Constraints (5 min)
Read this step out loud to students so that everyone is clear on the objective: Once the designs are completed, each group fills one side of the plastic container with water to represent the lake or river. Successful levees keep the water from flooding the town. (It may be helpful to show Figure 3 as an example of a student prototype levee.)
EDP Step 2: Research the Problem (20 min)
Provide resources that students can use to do research on levee design. Have them look up information on the internet, or the teacher can do this in advance, and print out relevant articles for them to read. After they have researched background information, have students conduct a simple experiment. Using two materials of their choice from the list provided, have them determine how well each stops or slows down the flow of water. NOTE: Skip this step if not enough time.
EDP Step 3: Imagine Possible Solutions (5 min)
Remind students that in brainstorming, no idea or suggestion is "silly." All ideas should be respectfully heard. Take an uncritical position, encourage wild ideas and discourage criticism of ideas.
EDP Step 4: Plan by Selecting the Most Promising Solution (10 min)
Students should converge on an idea, and determine which materials they will use as their budget allows. This step completes the initial design, and is a good stopping point for the first day. Collect the worksheets so you can give students feedback before they build the next day.
EDP Step 5 & 6: Create and Test the Prototype (20-30 min)
Have students "buy" their materials with their fun money. Give them plenty of time to build their levees. When they are ready, have them bring their plastic containers to a sink. Fill it with water, and help them observe how well the levee prevents the water from flooding to the other side of the container (see Figure 3). Determine which group was able to retain water the most effectively. Offering small prizes for best levee or most creative design can add some fun to the activity.
EDP Step 6 continued: Evaluate the Prototype (5 min)
Have students reflect on what they learned from the design process by answering the questions on the worksheet.
EDP Step 7: Redesign and Retest (time varies)
This step is not on the worksheet. If groups finish early, ask them to redesign their levees to get better results, and then retest them.
Vocabulary/Definitions
hurricane: A tropical storm with winds of 39 mph (63 kph) or higher and occurring in the north Atlantic Ocean.
levee: A human-made barrier of earth intended to hold back water.
Assessment
Pre-Activity Assessment
Think/Pair/Share: Ask students to each write down what steps they think an engineers take to design new products. After a minute or two, have students talk briefly to a partner in order to expand their lists. Then have the pairs share their responses with the rest of the class. Group responses on the board in a way that roughly resembles the engineering design process (refer to the Levee Design Worksheet). Pass out the worksheets and point out how many steps of the design process they came up with on their own.
Activity Embedded Assessment
Design Worksheet: Have each group fill out a Levee Design Worksheet, which leads them through the designing of their levees following the steps of the engineering design process.
Post-Activity Assessment
Share with Class: Have students share some of the steps they took in designing their levee. Ask for groups to share brainstorming ideas and ask how they reached their final design. Make a list on the board of the characteristics of a successful levees. Some of these might include, height, seal, durability. If students used materials such as a sponge or cotton balls that kept the town dry temporarily, ask why the floodwaters eventually broke through. Explain that soil engineers would be involved in measuring the capacity of earthen levees to make sure that water would not eventually leak through. Once the sponge or cotton balls were saturated, water started to leak through. This would be the same with sand or soil.
Troubleshooting Tips
Plastic dishes often have grooves along the outside that can add an extra challenge to the design, as these grooves are difficult to fill in. These can be compared to real-world conditions such as tree roots or weak layers of soil where water travels more easily.
It is fun to make the levee testing into a bit of a show for all students to watch, though if they want to redesign, it may be easier to let groups test and redesign as they are ready.
Material prices can be changed and available materials added or deleted as desired.
Activity Extensions
Though real levees are not constructed with duct tape and cotton balls, these items represent ideas or materials that might be used in real life. Write a list that compares the materials used in your levee to materials or concepts used in actual levee design.
Have students find out what types of construction methods have been used in real levees. See if they can find any details on how these design ideas were reached.
Activity Scaling
- For lower grades, have students color and decorate their design sheets. Also, skip the "gather information" design step.
- For upper grades, have students draw their design drawings to scale.
- For high school students, increase the challenge by testing the levees in a much larger/deeper bucket, which requires students to design much stronger levees that can withstand the increased force of the water. To support this, open up the materials list to include more options, such as natural materials (rocks, clay, soil) and human-made materials (Popsicle sticks, toothpicks, plastic wrap, plastic bags, duct tape) and require teams to creatively incorporate some mixture of natural and human-made materials in their designs, similar to how engineers reinforce concrete with the addition of plastic, glass and/or steel fibers.
Subscribe
Get the inside scoop on all things Teach Engineering such as new site features, curriculum updates, video releases, and more by signing up for our newsletter!More Curriculum Like This

Students learn what causes hurricanes and what engineers do to help protect people from destruction caused by hurricane winds and rain.

Students learn about floods, discovering that different types of floods occur from different water sources, but primarily from heavy rainfall. Students learn what makes floods dangerous and what engineers design to predict, control and survive floods.

Students are introduced to natural disasters and learn the difference between natural hazards and natural disasters.

Students create and analyze composite materials with the intent of using the materials to construct a structure with optimal strength and minimal density. The composite materials are made of puffed rice cereal, marshmallows and chocolate chips. They determine the material density and test its compre...

Copyright
© 2009 by Regents of the University of ColoradoContributors
Katherine Beggs; Brian Kay; Abigail Watrous; Karen King; Denise W. Carlson; Janet YowellSupporting Program
Integrated Teaching and Learning Program, College of Engineering, University of Colorado BoulderAcknowledgements
The contents of this digital library curriculum were developed under grants from the Fund for the Improvement of Postsecondary Education (FIPSE), U.S. Department of Education and National Science Foundation (GK-12 grant no. 0338326). However, these contents do not necessarily represent the policies of the Department of Education or National Science Foundation, and you should not assume endorsement by the federal government.
Last modified: March 14, 2023
User Comments & Tips