Quick Look
Grade Level: 9 (9-12)
Time Required: 7 hours 30 minutes
(ten 45-minute class periods or five 90-minute blocks)
Expendable Cost/Group: US $0.00
Group Size: 2
Activity Dependency: None
Subject Areas: Physical Science, Physics, Problem Solving, Science and Technology
NGSS Performance Expectations:

| HS-ETS1-2 |

Summary
Students design, build, and test mousetrap cars as they apply the Engineering Design Process (EDP) in this individual engineering design challenge. After researching design ideas, students build and test their mousetrap car prototypes (first model). Students then iterate (modify) their design and make any necessary modifications. While students work individually to make their mousetrap cars, they should collaborate with their peers to share information and make suggestions on how to improve and/or fix each other’s initial constructions. Students test their cars in a friendly class Mousetrap Car Competition to determine which car design travels the farthest distance (Note: students can also test which car travels a set distance the fastest).Engineering Connection
Automotive engineering is a branch of engineering concerned with all aspects of automobile development. Automotive engineers design and build vehicles to meet desired specifications and cost constraints. Specifications may include lightweight, high engine power rating, large acceleration and top speed, high fuel efficiency, exceptional safety characteristics, and low cost – goals that may not ALL be achievable at the same time. Careful design trade-offs must usually be made. As part of the engineering design process, safety tests are often performed, such as tests in which vehicle prototypes collide with a target in a controlled fashion. Acceleration sensors aboard the vehicle measure the magnitude of impact forces. A safe vehicle effectively dampens the force of impact, as evidenced by low accelerometer readings, so passengers in real accidents are not subjected to excessive and dangerous forces.
Learning Objectives
After this activity, students should be able to:
- Understand and apply the Engineering Design Process (EDP).
- Describe how the EDP is used at each step of the mousetrap car design challenge.
- Explain how their mousetrap car functions.
- Improve on the mousetrap car design by iterating the EDP.
Educational Standards
Each TeachEngineering lesson or activity is correlated to one or more K-12 science,
technology, engineering or math (STEM) educational standards.
All 100,000+ K-12 STEM standards covered in TeachEngineering are collected, maintained and packaged by the Achievement Standards Network (ASN),
a project of D2L (www.achievementstandards.org).
In the ASN, standards are hierarchically structured: first by source; e.g., by state; within source by type; e.g., science or mathematics;
within type by subtype, then by grade, etc.
Each TeachEngineering lesson or activity is correlated to one or more K-12 science, technology, engineering or math (STEM) educational standards.
All 100,000+ K-12 STEM standards covered in TeachEngineering are collected, maintained and packaged by the Achievement Standards Network (ASN), a project of D2L (www.achievementstandards.org).
In the ASN, standards are hierarchically structured: first by source; e.g., by state; within source by type; e.g., science or mathematics; within type by subtype, then by grade, etc.
NGSS: Next Generation Science Standards - Science
| NGSS Performance Expectation | ||
|---|---|---|
|
HS-ETS1-2. Design a solution to a complex real-world problem by breaking it down into smaller, more manageable problems that can be solved through engineering. (Grades 9 - 12) Do you agree with this alignment? |
||
| Click to view other curriculum aligned to this Performance Expectation | ||
| This activity focuses on the following Three Dimensional Learning aspects of NGSS: | ||
| Science & Engineering Practices | Disciplinary Core Ideas | Crosscutting Concepts |
| Design a solution to a complex real-world problem, based on scientific knowledge, student-generated sources of evidence, prioritized criteria, and tradeoff considerations. Alignment agreement: | Criteria may need to be broken down into simpler ones that can be approached systematically, and decisions about the priority of certain criteria over others (trade-offs) may be needed. Alignment agreement: | |
Materials List
For each student pair:
- 1 mousetrap
- 10 craft sticks
- 36” fishing line, string or heavy thread
- 2 sticks hot glue
- 2 BBQ skewers
- 2 straws
- Unlimited cardboard
- Unlimited duct tape
Materials for wheels that can be provided in class or provided by students:
- Bottle tops
- Small plastic plates
- Toilet or paper towel roll
- CDs
- Film canisters
- Jar lids, etc.
Optional materials for car body:
- Wood
- Boxes
- Plastic bottles or containers, etc.
Worksheets and Attachments
Visit [www.teachengineering.org/activities/view/ced-2705-mouse-trap-cars-engineering-design] to print or download.Introduction/Motivation
Today we will begin our next design challenge making sure we perform each step of the EDP. For our next design challenge, you are going to design and build a car powered solely by a standard mousetrap.
The purpose of the design challenge is that the final car for each person will travel as far as it can. To get there, however, this project will undergo several iterations – the first build will not be the final project. We will start with prototypes, and then experiment with various modifications before deciding on a final design and materials.
Also, the car itself will only represent a small portion of the mark – so there is nothing to lose by taking risks. What really counts is what you learn from the processes of design, construction, analysis, problem-solving, and so on. The car will be designed and built by each of you, and each student will submit their analysis report when the final results are in. We will have class time dedicated to car builds, but you may need some time outside class as well.
Materials:
The car may be of any size and made of any material, but no pre-fabricated car parts may be used. You may not use prefabricated wheels or tires. Some suggested materials are CDs, metal rods, wooden dowels, balsa wood, and rigid plastic tubing. The wooden stir sticks from a paint store are good as well. Glue, nails, screws, staples, etc are acceptable as fasteners. The mousetrap may be attached to the car in any position and by any means desired.
Some materials will be provided - mousetraps, hot glue, craft sticks, BBQ skewers, straws, cardboard, duct tape, and fishing line/string. It’s not possible to anticipate everyone's needs on this open design challenge, plus storage is limited. As such, you will be required to gather some of the project materials yourself, which are open-ended for the most part.
Power:
The car is powered by the mousetrap. No other electrical, mechanical, or chemical energy may be used to power the vehicle. You may use elastic bands if you wish, but they may NOT be stretched at the start of the run. The car will be started from a standstill by gently setting off the trap (so the trap must be left intact!). An initial push is not permitted. As a car, forward motion is generated by powered wheels that push against the floor - the car may not push off any other object or surface.
Procedure
Background
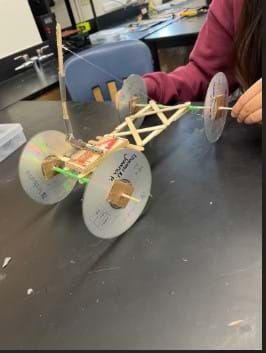
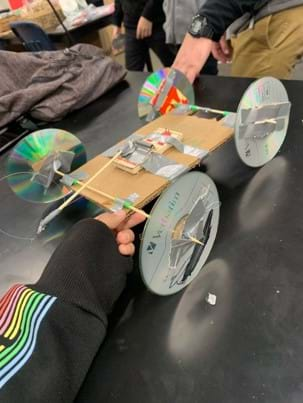
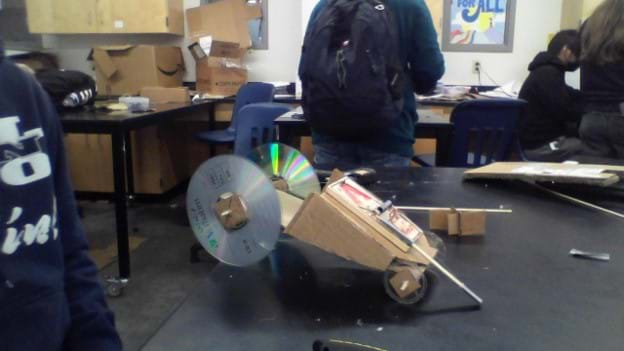
A mousetrap car is a model car made from simple materials that is powered by a mousetrap. Mousetrap cars can be made from cardboard or balsa wood with CDs for wheels and axles of wood or brass tubing. Power to drive the wheels is provided by a mousetrap to which a wand and string are attached to the snap arm. Winding the string around the axle pulls back the snap arm and releasing the snap arm pulls the string, turning the wheels. Because of their simplicity, low cost, and nearly endless variation of ways to build a mousetrap car, they are a great project to help students learn about the engineering design process and conduct investigations to test designs. This activity provides the opportunity for students to participate in a design-build-race contest to test their different model car designs to engage with and learn from their peers.
Design considerations:
The basic concept is fairly simple. The classic design is an axle fixed to one or two wheels, and a string is wound around the axle and tied to the mousetrap. When the trap is released the spring pulls the trap arm forward, which turns the axle and drives the wheels.
- A small axle and large wheels will help maximize distance, with lower acceleration.
- Extending the length of the arm has a similar effect to widening the wheels – increased distance.
- An intermediate gear or pulley between the trap and the axle can also increase the distance/decrease the driving force.
- If the total drive ratio (wheel rotation distance to trap swing distance) is too large, the car may not be able to overcome the resting friction.
- Greater acceleration means more chance of spinning the wheels.
- The more mass the car has the more traction it will have and the more momentum it will have, but more mass also means lower acceleration and lower top speed.
- The more moving parts your car has the more energy will be lost to friction.
A variety of online resources are provided to help you in the design and construction of your mousetrap car.

Test Races:
The cars will be run indoors on a smooth hard surface, such as the floor in the classroom, gym, or auditorium. This decreases the rolling friction, allowing for a greater distance, but can also lead to the cars spinning their wheels. This should be considered during the design process. All cars must be ready to run on the designated days. Students will record the average distance traveled for their initial and iterated mousetrap car designs, as directed by the teacher.
Before the Activity
- Gather materials and create copies of the worksheet for the students.
- Set up an area in the classroom or school to test how far the mousetrap cars can travel
- Create a way to record students’ average distance traveled for both the initial and iterated mousetrap car design.
With the Students
Day 1
- Warm Up: Show the short video of a mousetrap car. Ask students to share what they observed. Ask them to explain how they think a mousetrap car moves.
- Read the Introduction/Motivation section and review the Materials section with the class.
- (Ask) Introduce and then have students fill out the Ask section (part 1) of the worksheet.
- After everyone has written down the problem/goal of the activity and what the project constraints are, have a short class discussion focused on the student learning objectives concerning the activity goal and the constraints (limits) they need to work within to complete solve the problem/reach the goal.
Day 2
- (Research) Using the internet (Google, YouTube, etc.), students individually research design ideas for a mousetrap car, cite references and complete the Research section (part 2) of the worksheet.
- Reflection: Ask students to share tips they learned from their mousetrap car research.
Day 3
- Warm Up: In pairs, have students share their Research section (part 2) findings of their mousetrap car design ideas with their partner. Guide student pairs in sharing their ideas by asking: What mousetrap car design ideas do students have that are the same/different, what designs do they think will be the most/least successful and why, how will they will use the EDP to adapt existing designs to make their unique design for a mousetrap car, etc.
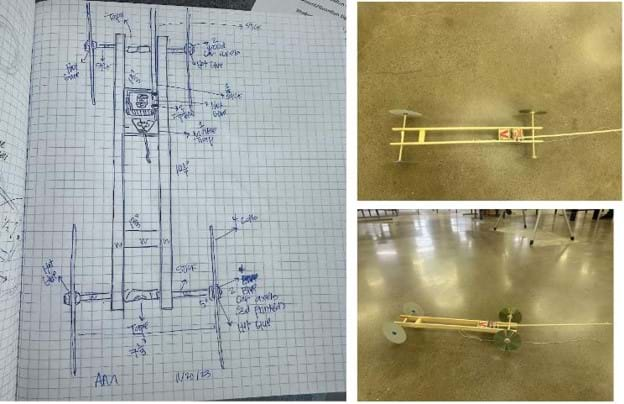
- After student pairs have individually brainstormed design ideas, pairs work together to agree on a consensus for their final design plan. Next, teams sketch for their mousetrap car design, including dimensions and materials used, and present their final design to the teacher. Once their design is approved, teams receive materials to build their mousetrap cars.
- (Brainstorm) Next, students complete the Brainstorm section (part 3), independently and quickly sketch at least 2 potential mousetrap car designs. Have students self-assess and then select a final design idea for their mousetrap car.
Day 4
- (Plan) Students then fill out the Plan section (part 4) of the worksheet. This includes materials they will use for the car body, axle, and wheel components how to attach these to the car body, and how the energy from the mousetrap will make the wheels spin.
- (Plan) Before students start building, have students decide on a sketch of a diagram of their car design and explain to the teacher how the mousetrap car will be built and how their design will get the wheels to turn.
- (Create) If time allows, students start to build their cars with the materials they have chosen.
- Reflection: Ask for a couple of students to share their final design choices for their mousetrap car.

Days 5-6
- Warm-Up: Review materials and options for materials for students to use in building their mousetrap cars.
- (Create) Students build their cars with the materials they have chosen. They should fill in the Create section (part 5) of the worksheet as they build their design.
- (Test) If time allows, review the mousetrap car testing protocol. Explain the set-up of the testing track distance with single or multiple lanes, have students test in pairs—one student releases their car and the other marks where the car stopped, record distance in cm or m using a tape measure or meter sticks, then switch roles and repeat.
- Reflection: Have a short Q&A session on design-build issues and suggestions.

- Warm Up: Do a quick check-in with students to confirm if all cars are built and offer support, as needed. Review the mousetrap car testing protocol.
- (Test) Once students have built their initial prototype, they should test it three times and fill out the Test section (part 6) of the worksheet. Have students record their average distance traveled on the class data sheet (posted in an online doc or written on the whiteboard or a large Post-it in the classroom)
- (Improve) If time allows, have students start improving (iterating) on their initial mousetrap car design, but do not retest yet.
- Reflection: Ask students to share and record their average distance traveled for their initial mousetrap car design.

Day 8
- (Improve) Have students complete the Improve section (part 7) of the worksheet as they redesign (iterate) and retest their mousetrap car improvements.
- Have each student informally present their reflections and results of the individual mousetrap car design challenge. Have each student share their highest average distance traveled and indicate if it was their initial or iterated design that traveled the farthest. To keep students engaged, have a deliverable expectation during presentations (e.g., peer review rubric, contribute to Q&A, etc.)
- Reflection: Provide an anonymous Exit Ticket asking students to share their thoughts and experiences on what they learned, found challenging, suggestions for improvement, and what they enjoyed in applying the EDP via the mousetrap car design project.
Days 9-10
- Mousetrap Car Design Student Presentation. Each student prepares a short 2-3-minute presentation explaining their mousetrap car design, materials selected, achievements and challenges of the build, iteration pros and cons, the furthest average distance traveled, and ideas for further iterations and improvements.
Vocabulary/Definitions
design thinking: A solutions-focused, human-centered way to creatively problem solve and innovate throughout the engineering design process.
engineering design process: A series of steps that guides engineering teams to solve engineering problems.
iteration: The repetition of a process towards improvement.
prototype: First model.
Assessment
Post-Activity (Summative) Assessment
Making Sense Assessment: Have students reflect on the science concepts they explored and/or the science and engineering skills they used completing the Making Sense Assessment.
Troubleshooting Tips
- There is a plethora of information about building mousetrap cars on the internet, watch Mark Rober's YouTube video "1st Place Mousetrap Car Ideas" for inspiration!
Activity Extensions
- Option to run this as an individual student design project.
Subscribe
Get the inside scoop on all things Teach Engineering such as new site features, curriculum updates, video releases, and more by signing up for our newsletter!Copyright
© 2022 by Regents of the University of Colorado BoulderContributors
Jennifer Taylor; Ellen ParrishSupporting Program
Integrated Teaching and Learning Program, College of Engineering, University of Colorado BoulderAcknowledgements
This curriculum was developed under National Science Foundation grant numbers 1941524 and 1941701. Any opinions, findings, and conclusions, or recommendations expressed in this material are those of the authors and do not necessarily reflect the views of the National Science Foundation.
Last modified: October 14, 2024


User Comments & Tips