
Quick Look
Grade Level: 10 (9-11)
Time Required: 3 hours
(two 90-minute periods (not including minimum 24 hour dry time if filling molds))
Expendable Cost/Group: US $5.00
Group Size: 1
Activity Dependency: None
Subject Areas: Geometry, Measurement, Science and Technology
NGSS Performance Expectations:

| HS-ETS1-2 |
Quick Look

- Grade Level:
- 10 (9 – 11)
- Time Required:
- 3 hours
(two 90-minute periods (not including minimum 24 hour dry time if filling molds))
- Group Size:
- 1
- Subject Areas:
-
Geometry Measurement Science and Technology -
NGSS Performance Expectations:
HS-ETS1-2

Summary
In this prototyping activity students design a (or a set of) paperweights and look for affordable hardware items to make the molds. They practice the classic approach of preparing hand-drawn sketches and templates to design hand-crafted molds of parts to their object, opposed to using CAD or 3D printing hardware. Simplicity proceeds complexity in the design process. Students learn how molds of shapes are useful because they reproduce duplicate items for models and prototypes. The overall goal is to investigate how to use the engineering design process to design an object with geometric modeling. They learn that volume and surface area are important considerations when designing a mold for an object.Engineering Connection
An important concept in science and engineering is that structure determines function and how something can function is dependent on its structure. This concept spans a wide spectrum, from engineering nanotechnology to designing bridges. Regardless of scale, all objects are composed of parts. Materials for these parts are not randomly chosen. These parts are made of materials that have composition and shapes that are picked and then tested to provide the best function.
Learning Objectives
After this activity, students should be able to:
- Prepare sketches and paper templates into a leak-proof custom-made plastic container.
- Design parts that work together for a common purpose.
- Manufacture reusable molds which helps to make reproducible parts.
- Calculate volume and surface areas of geometrical shapes.
- Recognize the difference between engineering a model and a prototype.
- Recognize engineering materials for models and prototypes can be found in craft and grocery stores.
Educational Standards
Each Teach Engineering lesson or activity is correlated to one or more K-12 science,
technology, engineering or math (STEM) educational standards.
All 100,000+ K-12 STEM standards covered in Teach Engineering are collected, maintained and packaged by the Achievement Standards Network (ASN),
a project of D2L (www.achievementstandards.org).
In the ASN, standards are hierarchically structured: first by source; e.g., by state; within source by type; e.g., science or mathematics;
within type by subtype, then by grade, etc.
Each Teach Engineering lesson or activity is correlated to one or more K-12 science, technology, engineering or math (STEM) educational standards.
All 100,000+ K-12 STEM standards covered in Teach Engineering are collected, maintained and packaged by the Achievement Standards Network (ASN), a project of D2L (www.achievementstandards.org).
In the ASN, standards are hierarchically structured: first by source; e.g., by state; within source by type; e.g., science or mathematics; within type by subtype, then by grade, etc.
NGSS: Next Generation Science Standards - Science
| NGSS Performance Expectation | ||
|---|---|---|
|
HS-ETS1-2. Design a solution to a complex real-world problem by breaking it down into smaller, more manageable problems that can be solved through engineering. (Grades 9 - 12) Do you agree with this alignment? |
||
| Click to view other curriculum aligned to this Performance Expectation | ||
| This activity focuses on the following Three Dimensional Learning aspects of NGSS: | ||
| Science & Engineering Practices | Disciplinary Core Ideas | Crosscutting Concepts |
| Design a solution to a complex real-world problem, based on scientific knowledge, student-generated sources of evidence, prioritized criteria, and tradeoff considerations. Alignment agreement: Use mathematical representations of phenomena or design solutions to describe and/or support claims and/or explanations.Alignment agreement: | Criteria may need to be broken down into simpler ones that can be approached systematically, and decisions about the priority of certain criteria over others (trade-offs) may be needed. Alignment agreement: | Investigating or designing new systems or structures requires a detailed examination of the properties of different materials, the structures of different components, and connections of components to reveal its function and/or solve a problem. Alignment agreement: |
Common Core State Standards - Math
-
Model with mathematics.
(Grades
K -
12)
More Details
Do you agree with this alignment?
-
Reason abstractly and quantitatively.
(Grades
K -
12)
More Details
Do you agree with this alignment?
-
Use geometric descriptions of rigid motions to transform figures and to predict the effect of a given rigid motion on a given figure; given two figures, use the definition of congruence in terms of rigid motions to decide if they are congruent.
(Grades
9 -
12)
More Details
Do you agree with this alignment?
-
Give an informal argument for the formulas for the circumference of a circle, area of a circle, volume of a cylinder, pyramid, and cone.
(Grades
9 -
12)
More Details
Do you agree with this alignment?
-
Use geometric shapes, their measures, and their properties to describe objects (e.g., modeling a tree trunk or a human torso as a cylinder).
(Grades
9 -
12)
More Details
Do you agree with this alignment?
International Technology and Engineering Educators Association - Technology
-
Students will develop an understanding of the attributes of design.
(Grades
K -
12)
More Details
Do you agree with this alignment?
-
Students will develop an understanding of engineering design.
(Grades
K -
12)
More Details
Do you agree with this alignment?
State Standards
Texas - Math
-
identify the shapes of two-dimensional cross-sections of prisms, pyramids, cylinders, cones, and spheres and identify three-dimensional objects generated by rotations of two-dimensional shapes; and
(Grades
9 -
12)
More Details
Do you agree with this alignment?
-
determine and describe how changes in the linear dimensions of a shape affect its perimeter, area, surface area, or volume, including proportional and non-proportional dimensional change.
(Grades
9 -
12)
More Details
Do you agree with this alignment?
-
apply the formulas for the volume of three-dimensional figures, including prisms, pyramids, cones, cylinders, spheres, and composite figures, to solve problems using appropriate units of measure.
(Grades
9 -
12)
More Details
Do you agree with this alignment?
Texas - Science
-
analyze physical and chemical properties of elements and compounds such as color, density, viscosity, buoyancy, boiling point, freezing point, conductivity, and reactivity;
(Grades
9 -
10)
More Details
Do you agree with this alignment?
-
in all fields of science, analyze, evaluate, and critique scientific explanations by using empirical evidence, logical reasoning, and experimental and observational testing, including examining all sides of scientific evidence of those scientific explanations, so as to encourage critical thinking by the student;
(Grades
10 -
12)
More Details
Do you agree with this alignment?
-
know specific hazards of chemical substances such as flammability, corrosiveness, and radioactivity as summarized on the Material Safety Data Sheets (MSDS); and
(Grades
10 -
12)
More Details
Do you agree with this alignment?
-
demonstrate an understanding of the use and conservation of resources and the proper disposal or recycling of materials.
(Grades
10 -
12)
More Details
Do you agree with this alignment?
Materials List
Each group needs:
- graph paper
- pencil
- scissors
- protractor (for advanced shapes)
- gloves
- plastic sign (for example “House for Sale” or “No Trespassing”; these will provide the basis for the mold, so any similar material will also work)
- glue gun
- cellophane tape
- disposable bowl
- tray
- ruler
For each student:
- copies of the following worksheets:
For the entire class to share:
- quick-set cement or resin (two-part clear coating & casting resin)
- water
- variety of craft items such as pipe cleaners, popsicle sticks, pom-poms, etc. (these can be as minimal or as creative as desired)
Worksheets and Attachments
Visit [www.teachengineering.org/activities/view/rice2-2510-handcrafted-cement-shape-engineering-activity] to print or download.Pre-Req Knowledge
Students should have basic knowledge of geometric shapes, calculating volume and surface area, and solving algebraic equations.
Introduction/Motivation
Students design and create a reproducible concrete product: a functional and aesthetically pleasing paperweight, with the overall goal of investigating how to use the engineering design process to design an object based on geometric modeling. They use crafting supplies to decorate the top of their own unique design. They then ask questions to reflect on their paperweights and the design process:
- How do the calculated surface area and volume compare to the actual measurements of their objects?
- How does the shape of their paperweight relate to its reproducibility?
- Is it aesthetically pleasing?
- Does the paperweight fit onto its intended location, such as on top of a pile of papers on a desk?
The final product must meet the design criteria as a functioning, high-fidelity prototype of a paperweight. If the students are willing to part with their creation, this activity is suited for producing a gift.
This Engineering Design Project allows all students to have prior “real world” and supports learning for all genders and can be modified to teach STEM strategies to diverse learners including English-language learners and special education students. This activity helps students gain confidence so they might explore completing other engineering design projects. Students engineer a prototype into a product that can be someday be manufactured at scale.
Procedure
Background
Innovations start with an idea (a function) that can be made into objects (structures). What objects do your students imagine that they can make? Making an original model or prototype does not initially require expensive computer software programs, high-tech machinery or a 3D printer. Students can use common hardware and household items to create their prototypes. The parts and objects need to be reproduced even if they are improved with each production. Therefore, students learn about the significance of making molds for their model and prototypes that allow for reproducibility.
The first way for students to share the idea of their design is to draw a quick sketch called a thumbnail (a small, doodle-like sketch) or demo. Shapes used in a design engineering are not random. Physical performance of parts and structures are dependent on the geometry of its components. In other words, different shapes have different capabilities. For example, 3D hexagons are the often used in engineering and architecture to support heavy weight due to the ability to withstand changes in their configuration. Other shapes such as 3D cross shapes resist perpendicular crushing forces, while the stable pyramidal shapes resist shearing forces. Combined in a repeating pattern, these crosses and pyramids can withstand forces from all directions making these shapes ideal for structural materials. The geometry, dimensions and materials in a 3D component dictates the stiffness and flexibility of structural materials.
Size and measurements of a 3D shape sometimes need modification during the design, which is one of the reasons making a mold helps in designing components. Design engineers need the information to calculate volume and total surface area. Volume provides information about the interior, whereas total surface area provides information about the exterior. Volume is an inherent characteristic of a 3D object that specifies the amount of space that a substance such as a solid, liquid or gas can occupy. Volume is dependent upon the measurement of a three-dimensional shape that is enclosed by a closed surface. In this activity, the shape’s interior is filled with a volume of liquid in a process called casting. The liquid in the mold solidifies into the shape of the mold. The solidified part is then removed from the mold. The total surface area of the solid indicates how much of the shaped object will be interacting with the surrounding environment. In addition, the surface area provides information such as how much material is needed during manufacturing or construction and how much material such as paint is needed to cover the area.
The sequence of manufacturing a part involves sketching a representative 2D and 3D view, selecting shapes for templates, preparing molds that have the required size and then casting material into the molds. Molds are designed based on the structure and function needed. Molds and material used are based on the tolerance. Tolerance is the allowable variation for any given size in order to achieve a proper function. Molds are useful in re-creating similar parts. Molds can be reusable; however, occasionally molds are damaged during the manufacturing process and need to be recreated from templates. They also learn that materials such as cement recedes from the walls of molds; thereby, producing a smaller sized product. What begins with an idea turns a lesson in geometry into a design that helps engineer a product.
Before the Activity
- Gather materials and make copies of the worksheets, enough for one per student.
- Optional: A few days before the activity, prepare an example paperweight to show students.
With the Students
Day 1
- Introduce students to their design challenge: How do you make a mold to reproduce a part for a model or prototype? Ensure that students know about the engineering design process and introduce the idea that models and prototypes are different: Models help to convey the exterior of the product; whereas operational prototypes help prove that the concept is useable.
- Pass out copies of the Design Engineering Student Worksheet and the Casting Word-Find to jumpstart the activity.
- Tell students that they will be creating a model of a simple paperweight by drawing a template to scale, and then they’ll use that template to create a mold that can made many prototypes of their paperweights.
- Explain that before there was CAD or 3D printers, hand-drawn templates and simple molds were used to create 3D objects for mass production.
- Decide on a paperweight design with a geometric shape that has a calculable volume and surface area.
- Have students sketch a demo of how the 3D mold will look. Distribute materials including the various craft objects, so that students can incorporate these components into their sketches.
- Use graph paper to draw a 3D template to scale for the mold of the geometric shape such that there are sides, a bottom or a floor or base, and a top or ceiling.
- Cut out template into separate pieces.
- Trace the template onto the back side (the side without any letters) of a plastic sign and carefully cut out the template pieces.
- Glue these pieces together to form the exterior of the shape’s sides and bottom while leaving an open top.
- Attach cellophane tape along seams of exterior of shape.
- Fill the 3D-shape with water to check for any leaks (make sure students do this over a bowl to ensure that water is not spilled everywhere). If leaking occurs, have students remove the water and tape, re-glue, and then re-tape their models. Tell students that this step is to make sure that no leaking occurs when the molds are filled with the quick-dry cement and two-part clear coating & casting resin.
- After ensuring there are no leaks, fill the 3-D mold with fast-drying cement or 2-cast resin. If students are attaching craft supplies like pipe cleaners or pom poms, have them carefully place them on the open top of their molds into the cement or resin. Place molds on a tray and allow time to dry. If allowing the designs to dry overnight, distribute copies of the Scavenger Hunt for homework. Alternatively, assign the scavenger hunt for use in school on Day 2.
Day 2
- Distribute copies of the Surface Area Worksheet and Volume Worksheet. In these, students practice calculating the surface area and volume of various geometric shapes.
- Use the original shapes drawn to scale on graph paper to calculate the surface area and volume of their paperweights.
- Once their objects are dry, have students carefully extract them from the mold. Students measure their finished designs to calculate the actual surface area and volume and compare these values with the ones calculated from the graph paper designs.
- Lead students through the post-activity assessment. Have students reflect on their calculations by writing a paragraph explaining the ways that the measurements can be improved to reduce differences.

Vocabulary/Definitions
casting: Manufacturing process in which a liquid is poured into a hollow center of a desired geometrical shape and cooled to form a solid shape.
circle: A round, two-dimensional shape; each point on the edge are at same distance from center (the radii).
corners: Where two sides meet; or the vertices.
cube: A three-dimensional solid, symmetrical shape with six equal squares.
cuboid: A three-dimensional box-shaped object; it has six rectangular faces at right angles to each other; sometimes called a rectangular prism because it has the same cross-section along a length.
cylinder: A three-dimensional solid; it has two equivalent round shapes at either end and two parallel lines connecting the round ends; has one curved side but no corners.
function: Specific process, action or task that an object or system is able to perform.
lateral surface area: Surface area for all sides of a three-dimensional object excluding the base and top sides; part of prism that are not the bases; units are squared (x2).
model: A simplified representation of a system that explores size, shape, form and appearance.
prism: A three-dimensional solid; same shape at beginning and end (ex. rectangle or triangle) with each end referred to as bases; bases are separated by a height.
prototype: Early functional sample of a product built to test a concept or process; ranges in complexity from low fidelity to high fidelity.
rectangle : A two-dimensional flat, plane figure with four straight sides and four right angles with unequal adjacent sides, in contrast to a square’s equal sides.
square: A two-dimensional shape that is flat, plane figure with four equal straight sides and four right angles.
structure: Arrangement of and relations between parts of something complex.
template: Thin piece of material cut into a particular shape; helps cut other materials accurately to reproduce the same shape.
three-dimensional (3D) : A solid object with dimensions of width (x), height (y) and depth (z).
total surface area: Measure of the total area that the surface of a three-dimensional object occupies; units are squared (x^2).
triangle: A two-dimensional, closed plane figure with three straight sides and three angles.
two-dimensional (2D): A flat object having the dimensions of width (x) and height (y) only.
volume: Measures how much space a three-dimensional object can hold; how much space is on the inside of the object; units are cubed (x^3).
Assessment
Pre-Activity Assessment
Analyzing Real-World Objects: Have students explore models, prototypes, materials, shapes, and functions of various real-world objects by completing the Design Engineering Student Worksheet.
Vocabulary Word Search: Get students thinking about the various vocabulary terms in this activity by completing a Word Search using the Casting Word-Find.
Activity Embedded (Formative) Assessment
Surface Area Calculations: Students practice calculating the surface area of geometric shapes using the Surface Area Worksheet.
Volume Calculations: Students practice calculating the volume of geometric shapes using the Volume Worksheet.
Scavenger Hunt: Students complete a Scavenger Hunt for various objects. The teacher may assign this assessment for homework while the molds are drying.
Post-Activity (Summative) Assessment
Comparing Volumes and Surface Areas: Tell the students to analyze the appearance of their final products. Are the volume and surface area of the final product correctly predicted by the calculations using the template or plastic molds? If not, students usually speculate on preparation actions affecting the volume, such as the cutting of the plastic for the template, the pieces were not correctly aligned or hot glue is on the inside of the mold. Some students may notice that the material changing from liquid to solid reduces its volumes as water evaporates and that there are air pockets in the cement. The teacher should point out that the thickness of the mold’s walls also affects the dimensions of the final product.
Investigating Questions
Discuss what types of objects engineers design and fabricate. (Possible objects: cars, water treatment plants, computer software, etc.)
Safety Issues
Check color coding. Follow safety instructions on quick-dry cement and two-part clear coating & casting resin.
Troubleshooting Tips
Cover the top of the shape to reduce air exposure. Align sides and corners to the edge; otherwise, your expected and measured products volume and total surface area will vary.
Hot glue thoroughly along exterior edges in thin layer such that it does not go underneath mold; otherwise, the product may not be level.
Activity Extensions
Gather various art supplies (paint, brushes, markers, etc.) and have students decorate their paperweights. Remind students that when designing a new product, manufacturers and engineers make it aesthetically pleasing so that consumers will purchase the product. Encourage student creativity while prompting them to think of real-world implications of their decorating (i.e., How easy would it be to mass produce a paperweight with this kind of decorative design?).
Activity Scaling
- For middle and high school, students need a basic knowledge of geometric shapes and solving algebraic equations. Assist younger students in cutting out their template pieces.
- Advanced students can make a Triangular Prism for their mold.
- Activity can be modified for in-school only, virtual learning only or a hybrid setting of both in-class and virtual learning.
Additional Multimedia Support
How I Became a Design Engineer
https://www.youtube.com/watch?v=dv9t3bWb5FQ
MoldMaking Matters: MoldMaking Your Road to Success
https://www.youtube.com/watch?v=gi-XcsNM0AE
Prototyping and Model Making - Students of Product Design Episode 6
Subscribe
Get the inside scoop on all things Teach Engineering such as new site features, curriculum updates, video releases, and more by signing up for our newsletter!More Curriculum Like This

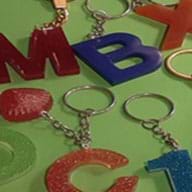
Using the engineering design process as a problem-solving tool, students fabricate keychains made out of resin. Since these keychains are prepared from resin, students learn about the history and thermoplastic nature of resins. Students use a silicone mold to temper the thermoplastic resin from its ...
Students learn about nondestructive testing, the use of the finite element method (systems of equations) and real-world impacts, and then conduct mini-activities to apply Maxwell’s equations, generate currents, create magnetic fields and solve a system of equations. They see the value of NDE and FEM...
Students are introduced to various types of energy with a focus on thermal energy and types of heat transfer as they are challenged to design a better travel thermos that is cost efficient, aesthetically pleasing and meets the design objective of keeping liquids hot.

Copyright
© 2021 by Regents of the University of Colorado; original © 2020 University of Rice UniversityContributors
Jodie PolanSupporting Program
Engineering Research Center for Nanotechnology Enabled Water Treatment Systems (NEWT) RET, Rice UniversityAcknowledgements
This material was developed based upon work supported by the National Science Foundation under grant no. EEC 1406885—the Nanotechnology Research Experience for Teachers at the Rice University School Science and Technology in Houston, TX. Any opinions, findings and conclusions or recommendations expressed in this material are those of the authors and do not necessarily reflect the views of the National Science Foundation.
This activity was inspired by a second summer (2019) in the laboratory of Jeffrey Hartgerink, PhD (Depts Biomedical Engineering and Chemistry, Rice University). I appreciate the time spent learning from Dr. Hartgerink’s graduate students - Claudia Leyva Aranda, Cheuk Sun Edwin Lai, Nicole Carrejo, Doug Walker, and Tania Lopez-Silva. Special thanks to Isaias Cerdas, Christina Crawford & Carolyn Nichol, PhD for administrating the Rice RET-STEM program.
Last modified: February 24, 2021
User Comments & Tips