
Quick Look
Grade Level: 3 (2-4)
Time Required: 2 hours 45 minutes
(can be split into three different sessions. See Procedure for timing details)
Expendable Cost/Group: US $1.00
Group Size: 2
Activity Dependency: None
Subject Areas: Measurement, Problem Solving, Science and Technology
NGSS Performance Expectations:

| 3-5-ETS1-1 |
| 3-5-ETS1-2 |
| K-2-ETS1-2 |
Quick Look

- Grade Level:
- 3 (2 – 4)
- Time Required:
- 2 hours 45 minutes
(can be split into three different sessions. See Procedure for timing details)
- Group Size:
- 2
- Subject Areas:
-
Measurement Problem Solving Science and Technology -
NGSS Performance Expectations:
3-5-ETS1-1 3-5-ETS1-2 K-2-ETS1-2
Summary
Students learn about civil engineers and work through each step of the engineering design process in two mini-activities that prepare them for a culminating challenge to design and build the tallest straw tower possible, given limited time and resources. First they examine the profiles of the tallest 20 towers in the world. Then in the first mini-activity (one-straw tall tower), student pairs each design a way to keep one straw upright with the least amount of tape and fewest additional straws. In the second mini-activity (no "fishing pole"), the pairs determine the most number of straws possible to construct a vertical straw tower before it bends at 45 degrees—resembling a fishing pole shape. Students learn that the taller a structure, the more tendency it has to topple over. In the culminating challenge (tallest straw tower), student pairs apply what they have learned and follow the steps of the engineering design process to create the tallest possible model tower within time, material and building constraints, mirroring the real-world engineering experience of designing solutions within constraints. Three worksheets are provided, for each of two levels, grades K-2 and grades 3-5. The activity scales up to school-wide, district or regional competition scale.
Engineering Connection
Engineers apply science and mathematics concepts to solve problems that improve the built world, including the design of buildings, bridges, and other structures. As civil engineers design structures, they work through a seven step cyclical process called the engineering design process to ensure that the structures are well-tested and designed within given constraints (such as a budget, limited construction materials, and deadlines) and meet the specifications (such as size, weight, length, strength and environmental considerations). During this activity, student teams act as civil engineers to design and build model straw towers, taking into consideration limited materials, time, and rules as they brainstorm, design, build, and improve their structures.
Learning Objectives
After this activity, students should be able to:
- List two engineering limits/constraints faced during the activity.
- Draw/describe two or three examples of structures designed by civil engineers.
Educational Standards
Each Teach Engineering lesson or activity is correlated to one or more K-12 science,
technology, engineering or math (STEM) educational standards.
All 100,000+ K-12 STEM standards covered in Teach Engineering are collected, maintained and packaged by the Achievement Standards Network (ASN),
a project of D2L (www.achievementstandards.org).
In the ASN, standards are hierarchically structured: first by source; e.g., by state; within source by type; e.g., science or mathematics;
within type by subtype, then by grade, etc.
Each Teach Engineering lesson or activity is correlated to one or more K-12 science, technology, engineering or math (STEM) educational standards.
All 100,000+ K-12 STEM standards covered in Teach Engineering are collected, maintained and packaged by the Achievement Standards Network (ASN), a project of D2L (www.achievementstandards.org).
In the ASN, standards are hierarchically structured: first by source; e.g., by state; within source by type; e.g., science or mathematics; within type by subtype, then by grade, etc.
NGSS: Next Generation Science Standards - Science
| NGSS Performance Expectation | ||
|---|---|---|
|
3-5-ETS1-1. Define a simple design problem reflecting a need or a want that includes specified criteria for success and constraints on materials, time, or cost. (Grades 3 - 5) Do you agree with this alignment? |
||
| Click to view other curriculum aligned to this Performance Expectation | ||
| This activity focuses on the following Three Dimensional Learning aspects of NGSS: | ||
| Science & Engineering Practices | Disciplinary Core Ideas | Crosscutting Concepts |
| Define a simple design problem that can be solved through the development of an object, tool, process, or system and includes several criteria for success and constraints on materials, time, or cost. Alignment agreement: | Possible solutions to a problem are limited by available materials and resources (constraints). The success of a designed solution is determined by considering the desired features of a solution (criteria). Different proposals for solutions can be compared on the basis of how well each one meets the specified criteria for success or how well each takes the constraints into account. Alignment agreement: | |
| NGSS Performance Expectation | ||
|---|---|---|
|
3-5-ETS1-2. Generate and compare multiple possible solutions to a problem based on how well each is likely to meet the criteria and constraints of the problem. (Grades 3 - 5) Do you agree with this alignment? |
||
| Click to view other curriculum aligned to this Performance Expectation | ||
| This activity focuses on the following Three Dimensional Learning aspects of NGSS: | ||
| Science & Engineering Practices | Disciplinary Core Ideas | Crosscutting Concepts |
| Generate and compare multiple solutions to a problem based on how well they meet the criteria and constraints of the design problem. Alignment agreement: | Research on a problem should be carried out before beginning to design a solution. Testing a solution involves investigating how well it performs under a range of likely conditions. Alignment agreement: At whatever stage, communicating with peers about proposed solutions is an important part of the design process, and shared ideas can lead to improved designs.Alignment agreement: | Engineers improve existing technologies or develop new ones to increase their benefits, to decrease known risks, and to meet societal demands. Alignment agreement: |
| NGSS Performance Expectation | ||
|---|---|---|
|
K-2-ETS1-2. Develop a simple sketch, drawing, or physical model to illustrate how the shape of an object helps it function as needed to solve a given problem. (Grades K - 2) Do you agree with this alignment? |
||
| Click to view other curriculum aligned to this Performance Expectation | ||
| This activity focuses on the following Three Dimensional Learning aspects of NGSS: | ||
| Science & Engineering Practices | Disciplinary Core Ideas | Crosscutting Concepts |
| Develop a simple model based on evidence to represent a proposed object or tool. Alignment agreement: | Designs can be conveyed through sketches, drawings, or physical models. These representations are useful in communicating ideas for a problem's solutions to other people. Alignment agreement: | The shape and stability of structures of natural and designed objects are related to their function(s). Alignment agreement: |
Common Core State Standards - Math
-
Classify objects and count the number of objects in each category.
(Grade
K)
More Details
Do you agree with this alignment?
-
Count to answer "how many?" questions about as many as 20 things arranged in a line, a rectangular array, or a circle, or as many as 10 things in a scattered configuration; given a number from 1—20, count out that many objects.
(Grade
K)
More Details
Do you agree with this alignment?
-
Measure the length of an object by selecting and using appropriate tools such as rulers, yardsticks, meter sticks, and measuring tapes.
(Grade
2)
More Details
Do you agree with this alignment?
International Technology and Engineering Educators Association - Technology
-
Apply design concepts, principles, and processes through play and exploration.
(Grades
Pre-K -
2)
More Details
Do you agree with this alignment?
-
Explain that design is a response to wants and needs.
(Grades
Pre-K -
2)
More Details
Do you agree with this alignment?
-
Illustrate that there are different solutions to a design and that none are perfect.
(Grades
Pre-K -
2)
More Details
Do you agree with this alignment?
-
Apply skills necessary for making in design.
(Grades
Pre-K -
2)
More Details
Do you agree with this alignment?
-
Students will develop an understanding of engineering design.
(Grades
K -
12)
More Details
Do you agree with this alignment?
-
Students will develop an understanding of the attributes of design.
(Grades
K -
12)
More Details
Do you agree with this alignment?
-
Students will develop an understanding of the role of troubleshooting, research and development, invention and innovation, and experimentation in problem solving.
(Grades
K -
12)
More Details
Do you agree with this alignment?
-
Invention and innovation are creative ways to turn ideas into real things.
(Grades
3 -
5)
More Details
Do you agree with this alignment?
-
Apply the technology and engineering design process.
(Grades
3 -
5)
More Details
Do you agree with this alignment?
-
Evaluate designs based on criteria, constraints, and standards.
(Grades
3 -
5)
More Details
Do you agree with this alignment?
-
Evaluate the strengths and weaknesses of existing design solutions, including their own solutions.
(Grades
3 -
5)
More Details
Do you agree with this alignment?
State Standards
California - Math
-
Count to answer "how many?" questions about as many as 20 things arranged in a line, a rectangular array, or a circle, or as many as 10 things in a scattered configuration; given a number from 1—20, count out that many objects.
(Grade
K)
More Details
Do you agree with this alignment?
-
Classify objects and count the number of objects in each category.
(Grade
K)
More Details
Do you agree with this alignment?
-
Measure the length of an object by selecting and using appropriate tools such as rulers, yardsticks, meter sticks, and measuring tapes.
(Grade
2)
More Details
Do you agree with this alignment?
California - Science
-
Develop a simple sketch, drawing, or physical model to illustrate how the shape of an object helps it function as needed to solve a given problem.
(Grades
K -
2)
More Details
Do you agree with this alignment?
-
Define a simple design problem reflecting a need or a want that includes specified criteria for success and constraints on materials, time, or cost.
(Grades
3 -
5)
More Details
Do you agree with this alignment?
-
Generate and compare multiple possible solutions to a problem based on how well each is likely to meet the criteria and constraints of the problem.
(Grades
3 -
5)
More Details
Do you agree with this alignment?
Materials List
Each group needs:
- 50 non-bendable plastic drinking straws; note: students use various quantities of straws for the first two mini-activities and the culminating activity, never to exceed 50 total straws per group; have students re-use their straws for the various parts of the activity
- 2.05 m masking tape, measured and cut into three lengths: 1 m, 0.5 m and 5 cm, plus an additional 0.5 meter of tape for the final redesign effort
- scissors (for grades K-2 worksheet only)
- tape or glue/paste, to adhere cut paper onto worksheets (for grades K-2 worksheet only)
- Tower Masters Research Worksheet (Gr3-5), Straw Tower Mini-Activities 1 & 2 Worksheet (Gr3-5) and Tower to the Moon Main Activity Worksheet (Gr3-5), one each per student; for younger students, use the grades K-2 versions of these three worksheets, provided in the Attachment section
- Competition Rules, one per group
To share with the entire class:
- visual aid of the Tallest 20 in 2020 poster, to show students comparative profile images of tall towers, available at http://s3.amazonaws.com/wbez-assets/curiouscity/CTBUH_Tallest20in2020_Poster.jpg; either make one large class poster or group handouts, or project the image in the classroom
- measurement tools, such as rulers, measuring tape, meter/yard sticks
- timer or clock
Worksheets and Attachments
Visit [www.teachengineering.org/activities/view/ucd_straw_tower_activity1] to print or download.Pre-Req Knowledge
Basic knowledge of the engineering design process and how to use a ruler or tape measure.
Introduction/Motivation
Who designs buildings such as our classroom building? What do we call the people who use what they know about science and math to create something to solve a problem that benefits everyone—such as buildings for people to live in or bridges so people can get from one place to another? (Listen to student ideas.)
These people are called engineers! Engineers are people who help make our world better by using their understanding of science and math to design things like skyscrapers, bridges, dams, highways, cars, computers, and much more. Different types of engineers design solutions for different types of problems. Do you know any types of engineers? (For younger students, ask them for examples of things that could be designed by engineers. Then respond to their answers with the type of engineers that likely designed those items, such as lighting and electricity by electrical engineers, bicycles and appliances by mechanical and materials engineers, shampoos by chemical engineers, replacement limbs by biomedical and biotechnical engineers, airplanes and spacecraft by aerospace engineers, digital devices and apps by computer and software engineers, subways and highways by transportation engineers.)
Engineers who are called civil engineers are the people who design structures, including major public works such as bridges, buildings, dams, tunnels and even the twin skyscrapers in Kuala Lumpur, Malaysia, known as the Petronas Towers, which reach up so high towards the moon in the night sky. (Show students Figure 1 or any other photograph of the Petronas Towers in Malaysia.)
Does anyone know who helped to design our classroom buildings? (Wait for raised hands.) Yes, civil engineers! Civil engineers help design our school buildings and many other structures. (Mention some local bridge, highway and building landmarks as examples.)
Do engineers build the first things that pop into their minds? Do you think civil engineers immediately built the Petronas Towers once the idea popped in to their minds? Raise your hands, if you think "Yes, engineers build the first thing that pops into their minds!" (Wait for raised hands.) Well, usually we draft and then check our work many times before we finally get a good final version. Engineers do the same; they draft and then carefully re-examine their work before they are able to finally solve important problems. Engineers are also concerned about quality and safety. Would you take the elevator up into the Petronas Towers if it did not seem like it was well-built—which means it was not drafted, tested and checked many times? Of course not! Engineers do not just build the first things that pop into their minds. They work through a cyclical process called the engineering design process to make sure they create well-tested structures that meet all their needs and constraints.
What do we mean by "constraints"? (See if any students know.) Constraints are limitations and restrictions. For example, you may want or need more of something but you do not have it. (Provide some age-relevant constraint examples.) For example, a constraint might be a time limit such as getting something done before bed time. Or, a constraint could be limited materials such as having one cake for the entire class. Also, a constraint might be limited money such as your parent letting you buy as many toys as you want for a total cost of no more than $20.)
A constraint is a limit of something that affects the solution to a problem or challenge. What are some constraints that civil engineers may have faced when designing and building the Petronas Towers? (Possible answers: Limits on budget/funding/money, materials and time.) Constraints also include other project requirements determined by the people who hire engineers to create buildings. What might those be for a big structure like the Petronas Towers? (Possible examples: It must fit on a certain area of land, hold a certain number of people and parking spaces, provide elevators, provide heating and cooling, include antennas on top, be a certain height.)
Today, you will act as if you are civil engineers with an important mission. You will work through the steps of the engineering design process with constraints—just like the civil engineers who designed the Petronas Towers! Your challenge is to build the tallest straw tower possible using only 50 straws and one meter of tape in 30 minutes. But first, let's practice using the engineering design process with two mini-activities to get us ready for the big challenge.
The problems you will face in this activity are like the real-world challenges that civil engineers and other engineers face. You have a goal with certain requirements and constraints, just like engineers have limited money, construction materials and deadlines. An engineering team that can achieve its goal with as little material and money by the deadline is favored over other teams. When you and your partner are brainstorming your straw tower design, think about these requirements and constraints. Think about real buildings, towers, bridges and skyscrapers—what shapes are they? What are their bases like? How are they connected?
Procedure
Before the Activity
- Gather materials and make copies of the Tower Masters Research Worksheet (Gr3-5), Straw Tower Mini-Activities 1 & 2 Worksheet (Gr3-5) and Tower to the Moon Main Activity Worksheet (Gr3-5), one each per student. For younger students, use the grades K-2 versions of these worksheets, provided in the Attachment section.
- Make copies of the Competition Rules, one per team.
- Decide how to best make available the Tallest 20 in 2020 poster so students can compare the profile images of tall towers—a large poster, smaller handouts or projected in the classroom.
- For each group, prepare two piles of straws, one with 15 straws and one with 35 straws, for a total of 50 straws.
- For each group, measure and cut three lengths of masking tape—1 m, 0.5 m and 5 cm—for a total of 1.55 meters.
With the Students—Introduction and Research (30 minutes)
Recap: Begin by informing students about engineers, civil engineers, and the engineering design process. Then student pairs conduct research by examining a poster showing 20 of the tallest buildings in the world and share their observations with the class. Then students learn the seven steps of the engineering design process before moving on to the mini-activities.
- Conduct the pre-activity assessment activities, as described in the Assessment section.
- Present to the class the Introduction/Motivation content.
- Hand out the research worksheets, one per student. Review the following information with students while they complete the worksheets (by cutting and pasting on the grades K-2 worksheet or by answering questions on the grades 3-5 worksheet).
- Explain to the class: In order to complete your engineering challenge to design and construct the tallest tower possible using only 50 disposable drinking straws and 1 meter of tape in 30 minutes, you need some knowledge and tools! In the real-world, engineers apply their understanding of math and science to create things to help solve problems that benefit people and our world. In particular, it is civil engineers who design our buildings as well as bridges, dams and other public structures.
- Tell the students: Now that you know a little about engineers and, specifically, civil engineers, you are going to work with a partner and put on your civil engineering caps to investigate and identify the common design features found in the world's tallest towers.
- Divide the class into groups of two students each. Provide the class with a visual of the CTBUH's Tallest 20 in 2020 poster, which includes side-view drawings and information about 20 "supertall" and "megatall" buildings located in 15 cities around the world.
- Give teams three minutes to examine the poster, discuss and jot down their observations of the common design features of the tallest towers. What features might make it possible for them to stand without falling over?
- For five minutes, have students share their ideas with the class. (Example observations: The tallest towers are larger at the base than at the top. They often have antennas and spires at the top. They are narrower at the top. They are usually shaped more like triangles than rectangles.)

Comparing the tallest buildings in the world, what features do they have in common? - Tell the students: Now you have some knowledge about features to consider when you design your straw towers, but remember that engineers do not just build the first thing they think of, or else it would waste materials, time and money! Engineers use the engineering design process to help them design their structures so they achieve successful solutions.
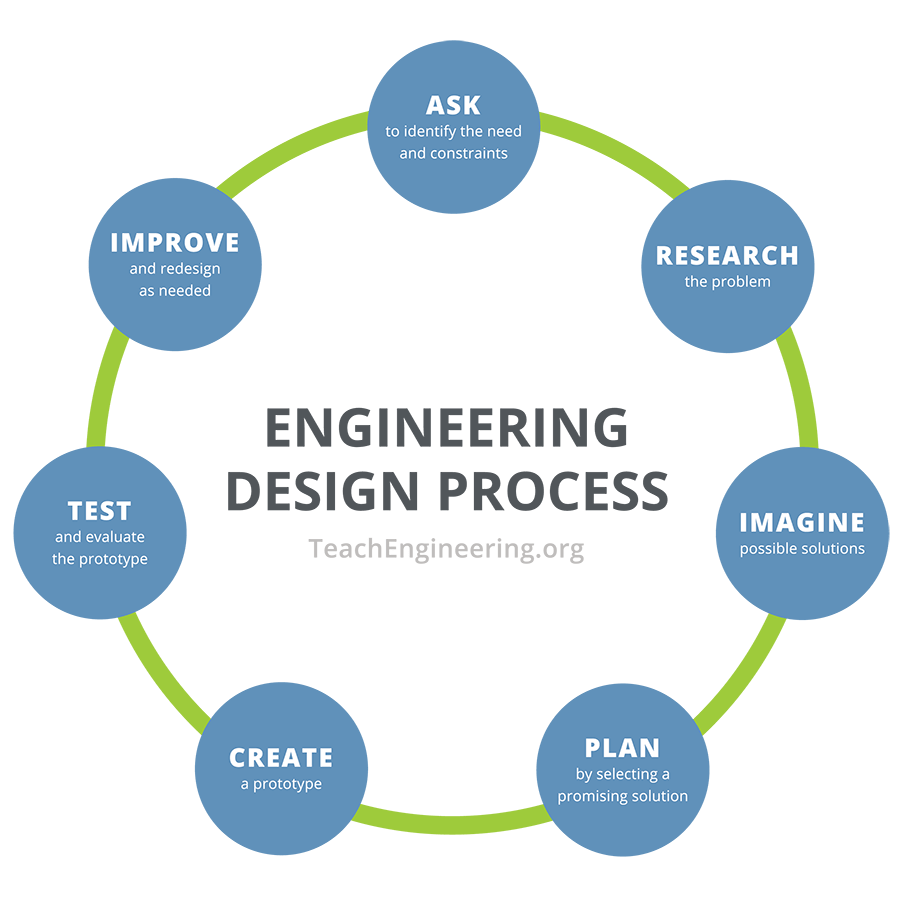
- As a class, go over each step of the engineering design process as listed on the research worksheet. Write each step on the classroom board so that students can follow along (by either cutting and pasting/taping or writing the steps on their worksheet circle diagrams. The basic steps are: 1) ask: identify needs and constraints, 2) research the problem, 3) imagine: develop possible solutions, 4) plan: select a promising solution, 5) create: build a prototype, 6) test and evaluate prototype, 7) improve: redesign as needed.
With the Students—Mini-Activity 1: One-Straw Tall Tower (35 minutes)
- Hand out the mini-activities worksheets, one per student. (Note: The grades K-2 version of the worksheet is simplified by reducing the steps of the engineering design process to: imagine, plan and improve, so combine or eliminate some of the steps below to match.)
- Explain to the class: Let's put this process into action with a mini-activity. You will work through the steps of the engineering design process in this mini-activity called "one-straw tall tower. As you work through the mini-activity, follow along on your worksheets, filling them out as you go.
- Tell the students: In this mini-activity, you and your partner need to design a way to keep one straw upright by using the fewest number of additional straws and no more than 5 cm of tape.
- Tell the students: Remind me again, what is the first step of the engineering design process? (Answer: Ask: Identify needs and constraints.) Yes, so what are our needs and constraints for this engineering challenge? Remember, these are limited factors that affect the solution to a problem. (Answer: We need to design and build a straw tower that is one straw tall and our constraints are a limited amount of tape and the fewest straws possible.)
- Ask: "What is the next step in the engineering design process?" (Answer: Research the problem.) We have already done some research to compare and contrast features between tall and shorter towers.
- Ask: What is the third step in the engineering design process?" (Answer: Imagine: Develop possible solutions.) For a few minutes, you are going to individually brainstorm solutions to this mini engineering challenge to keep one straw upright with the fewest number of additional straws and up to 5 cm of tape. Draw and label your ideas, indicating how many additional straws you need.
- Give students five minutes to brainstorm. Make sure each group has 15 straws and 5 cm of tape.
- After five minutes, tell the students: Before you touch the materials, tell me the next step in the engineering design process. (Answer: Plan: Select a promising solution.) That's right. Before you touch the materials, discuss and decide with your partner the most promising plan to build. On your worksheets, indicate which plan you are selecting, and then built it!
- Give students five minutes to build.
- Ask a few groups to show and share their completed straw towers with the class, explaining their design concepts and approach and any special techniques. Encourage each group to reflect on how its design compared to their classmates' designs. (Have younger students discuss with their partners; have older students individually write their own reflections and then discuss what they wrote with their partners.)
- Give groups an opportunity to brainstorm a new and improved design ideas based on their results, observations and reflection. Then have student groups build their revised designs.
- Wrap up by asking students to reflect on the steps of the engineering design process they just completed: create: build a prototype, test and evaluate the prototype; improve: redesign as needed.
With the Students—Mini-Activity 2: No "Fishing Pole" (20 minutes)
- Make sure students still have their mini-activities worksheets. Give each group 15 straws.
- Tell the class: Now you have some knowledge about common tall tower features and you have constructed a one-straw tower following the steps of the engineering design process. Why can't we just build a really tall straw pole as a straw tower? What do you think will happen if we made the one-straw tall towers taller—just a straight tall rectangle tower? (Answer: The structure would be at great risk for collapse. If students are unable to answer the question, use the following prompts/hints.
- What can happen to tall trees on a windy day?
- Why does a Jenga® structure fall over? (Answer: A Jenga® structure eventually falls over because it keeps getting taller without more support ever being added to the structure's base/foundation.)
- Why can't you stack ice cream scoops directly one on top another?" (Answer: Because little support exists to hold up the scoops placed on top of the pile.)
- Tell the students: Since you are working on an important challenge to build the tallest tower, you need to do some hands-on research to find out how many straws high you can build before a straw pole looks less like a tower and more like a fishing pole when held upright, bending at about 45 degrees. Let's take a few minutes for you and your partner to make the tallest straw pole possible by experimenting with your 15 straws. (Not all 15 straws need be used.) Then write on your worksheet the number of straws you were able to use to make a straw pole before it started to bend and look like a "fishing pole."
- Give students five minutes to experiment and build. Remind them to follow along on the worksheets, filling them out as they go. Direct the students to discuss with their partners why they think the straws create a "fishing pole" with X+ straws (expect the number of straws to vary, depending on the exact straw type used).
- Then ask a few groups to share with the class the number of straws it took for their straw poles to become "fishing poles." (Answer: The numbers of straws varies, depending on the exact type of straw used.)
- Encourage students to discuss as a class why they think the straw pole started to look like a "fishing pole" when more straws were added and how one can build and maintain a tall, stable structure. Write down answers together as a class.
- Start a class discussion: Everyone built straw poles with about the same number of straws before the straw poles became more like fishing poles. Why do you think the straw poles started to bend when you added more straws? (Answer: The straw poles started bending when more straws were added because they did not have enough support to prevent them from toppling over.)
- Continue to explain: The straw poles started to look like "fishing poles" because as more straws are added, the pole gets taller and needs more support. With a tall pole and little support, the pole topples over more easily. So how can you make a taller straw pole without it becoming like a "fishing pole"? Think about when we examined the profiles of towers of different heights, specifically the design features of the tallest towers that make it possible for them to stand so tall without falling over. (Answer: You can make a taller straw pole and prevent it from bending like a "fishing pole" by adding a wider base to provide more support. In order to maintain a tall, stable tower a "triangle" shape is helpful, hence the straw pole needs a wider base to keep it from bending.)
With the Students—Tower to the Moon Main Activity (75 minutes)
- Hand out the main activity worksheets, one per student. Give each group 50 straws, 1 meter of masking tape and a competition rules handout. (Note: The grades K-2 version of the worksheet is simplified by reducing the steps of the engineering design process to: imagine, plan and improve, so combine or eliminate some of the steps below to match.)
- Reintroduce the culminating activity: Now it's time to put everything together! After these two mini-activities, you know all about successful tall tower design features and how to use the engineering design process to design and redesign to achieve the tallest straw tower to complete your challenge! Remember, your goal is to build the tallest tower possible; maybe your tower will even reach the moon! You are going to design and construct a model tower that represents your tower to the moon. Your team will be given limited supplies and time: 50 plastic drinking straws, 1 meter of masking tape and 30 minutes. Build the tallest tower that you can using only the provided materials.
- Clarify some new building constraints, as described in the competition rules handout: In addition, your tower must be free-standing, which means that it can only touch the flat surface that you build it on. Any straw touching the flat surface may be taped to the surface, but the tape may not be used as "rope" or to reinforce the straws outside of any straw-straw joints. Another restriction is that the straws may not be cut. You may bend the straws or fit them inside each other, but they may not be cut! You are not required to use all 50 straws. In fact, if two towers tie for the highest height, the one using the fewest straws is the winner—so keep that in mind!
- Ask: Before we start the timer, let's review our activity's needs and constraints. What is our need (requirement) for this design challenge? (Answer: To build the tallest straw tower.) What are our constraints?" (Answer: Materials and time in the form of 50 straws, 1 meter of tape and 30 minutes, and the competition rules.) Now take a few minutes individually draw and label how you plan to construct your straw towers.
- For five minutes, let students individually design and draw their plans on their worksheets.
- Give teams 30 minutes to discuss, select and build their best structure designs.
- Tell the students: Before you and your partner touch the materials, listen to these instructions. You have 30 minutes to discuss and select the best plan, noting it on your worksheets and then constructing that design. During these 30 minutes, you may redesign or change your straw tower as you see fit to improve it. I will give you 15-, 10-, 5-, 3-, and 1-minute warnings so you always know how much more time you have. You may start discussing and building now!
- While students are building, encourage them to critically evaluate their completed towers and rethink ways to improve the height as they rebuild the towers. As necessary, remind them of the following considerations:
- With a wider base, you might be able to build a taller tower.
- Think about how the tall towers are more triangular shaped.
- Some of the towers we compared and contrasted had an antenna or spire on the top!
- After 30 minutes, measure and record the height of each group's tower and determine which is the tallest. Measure tower height vertically from the flat surface to the highest part of the straw tower. For younger students, measure and record the height of each group's tower as a class and write the measurements on the classroom board. For older students, let them measure and record the heights of each group's tower on their worksheets either with their partners or as a class.
- After students have measured and recorded the heights of all the towers, give them 15 minutes to redesign and construct improved towers, incorporating what they learned from their own towers and observations of other groups' towers. Since some masking tape will be reusable, only provide each pair with an additional 0.5 meter of tape.
- Make final measurements and announce the group with the tallest tower. In case of a tie, the tower that used the fewest number of straws wins.
- Conclude with the post-assessment activities, as described in the Assessment section.
Vocabulary/Definitions
civil engineer: A person who designs structures of all kinds, including public works such as bridges, tunnels, highways, dams, skyscrapers and all sorts of buildings.
constraint: In engineering design, the limitations and requirements/needs that must be considered when designing a workable solution to a problem or challenge.
design: To form or conceive an idea, new product or improved process. To make drawings, sketches or plans for the work.
engineer: A person who applies his or her understanding of science and mathematics to creating things to solve problems that benefit humanity and our world.
model: A representation of something, sometimes on a smaller scale. To make or construct something to help visualize or learn about something else.
Assessment
Pre-Activity Assessment
Discussion Questions: What are engineers? What are civil engineers? (Example answers: An engineer is a person who applies his or her understanding of science and mathematics to create something that solves a problem that helps people and benefits our world. A civil engineer is a person who designs structures of all kinds, including buildings and public structures such as bridges, dams, tunnels and highways.)
Constraint List: List two engineering constraints that you think your group will face during this activity. (Answer: Generally, time and resources; specifically, a time limit, and straws and masking tape.)
Structures Drawing/List: Draw or list two or three examples from your life of the types of structures civil engineers design. (Example answer: Civil engineers designed the school gym where I play volleyball and the bridge my parents drive over to get to work.)
Activity Embedded Assessment
Research Worksheet: During the introduction and research portion of the activity, have students individually complete the Tower Masters Research Worksheet (Gr3-5) as they learn background information about engineers, civil engineers and the engineering design process, and look for common features of skyscrapers. Review their answers to gauge their engagement and comprehension. For younger students, use the grades K-2 version of this worksheet, provided in the Attachments section.
Activity Worksheets: Have students individually complete the Straw Tower Mini-Activities 1 & 2 Worksheet (Gr3-5) and Tower to the Moon Main Activity Worksheet (Gr3-5). Review their answers along the way to gauge their depth of comprehension. For younger students, use the grades K-2 versions of these worksheets, provided in the Attachments section.
Re-Engineering: On their main activity worksheets, have students draw and label improvements they intend to make to their straw tower designs (or could make, in the case of younger students using the grades K-2 version of the worksheet).
Post-Activity Assessment
Constraint List: Have students list at least two engineering constraints and restrictions that they faced during the activity. (Possible answers: Time limit, materials limitation on straws and tape, plus the building constraints/competition rules that the tower be free-standing, only touching the flat base where taped, not using tape as rope or to reinforce straw joints, and not cutting straws.)
Structures Drawing/List: Draw or list two or three examples from your life of the types of structures civil engineers design. (Example answer: Civil engineers designed the movie theater building and the underground subway/metro we take into the city.)
Activity Extensions
Have students research or read more about the Petronas Towers.
Have students research examples of tall towers and skyscrapers in their own cities and states.
Activity Scaling
The two sets of provided worksheet versions provide scaling for kindergarten to second grade, and third to fifth grade, respectively.
For higher grades, incorporate explanations about how the shift in the center of mass causes the taller straw towers to topple over more easily. As a tower gets taller, its center of mass moves farther from the base, so it has less support and topples over more easily if it is not built with sound engineering design!
Additional Multimedia Support
During the Introduction/Motivation section, show students a photograph of the Petronas Towers at https://pixabay.com/photos/light-moon-kuala-lumpur-klcc-tower-169704/ (same as Figure 1).
During the Procedure section of the activity, make available for student examination the Council on Tall Buildings and Urban Habitat's Tallest 20 in 2020 poster so they can compare images of tall towers from around the world; available at https://store.ctbuh.org/p-91-future-tallest-20-in-2020.aspx or http://s3.amazonaws.com/wbez-assets/curiouscity/CTBUH_Tallest20in2020_Poster.jpg
Subscribe
Get the inside scoop on all things Teach Engineering such as new site features, curriculum updates, video releases, and more by signing up for our newsletter!More Curriculum Like This

Students learn about the history of the world's tallest free standing structures and the basic design principles behind their success. They build their own newspaper skyscrapers with limited materials and time, trying to achieve a maximum height and the ability to withstand a "hurricane wind" force...

To introduce the two types of stress that materials undergo — compression and tension — students examine compressive and tensile forces and learn about bridges and skyscrapers. They construct their own building structure using marshmallows and spaghetti to see which structure can hold the most weigh...

Copyright
© 2015 by Regents of the University of Colorado; original © 2015 University of California DavisContributors
Tiffany TuSupporting Program
RESOURCE GK-12 Program, College of Engineering, University of California DavisAcknowledgements
The contents of this digital library curriculum were developed by the Renewable Energy Systems Opportunity for Unified Research Collaboration and Education (RESOURCE) project in the College of Engineering under National Science Foundation GK-12 grant no. DGE 0948021. However, these contents do not necessarily represent the policies of the National Science Foundation, and you should not assume endorsement by the federal government.
Many thanks to Jean Vandergheynst, Alisa Lee, Travis Smith, and all the University of California Davis RESOURCE Fellows and activity reviewers for providing feedback, support and guidance to make this activity possible.
Last modified: March 30, 2021
User Comments & Tips