
Quick Look
Grade Level: 2 (1-3)
Time Required: 1 hour
(two 30-minute classes for activity; Approximately two weeks for plant growth and data collection)
Expendable Cost/Group: US $0.00
Group Size: 1
Activity Dependency: None
Subject Areas: Life Science, Measurement, Problem Solving, Reasoning and Proof, Science and Technology
NGSS Performance Expectations:

| 2-LS2-1 |
| K-2-ETS1-1 |
Quick Look

- Grade Level:
- 2 (1 – 3)
- Time Required:
- 1 hour
(two 30-minute classes for activity; Approximately two weeks for plant growth and data collection)
- Group Size:
- 1
- Subject Areas:
-
Life Science Measurement Problem Solving Reasoning and Proof Science and Technology -
NGSS Performance Expectations:
2-LS2-1 K-2-ETS1-1

Summary
Students explore the properties of different soil types to better understand how soil can also have an impact on plant life. As they learn about the different properties of soil, they will be able to create an environment using recycled materials to sprout a radish seed.Engineering Connection
Environmental engineers use the principles of engineering and soil science to develop solutions to environmental problems. Environmental engineers also work closely with environmental sciences to address environmental problems. Soil studies and understanding the properties of soil are important because it allows environmental engineers and scientists to address global issues such as environmental sustainability. Another consideration to the environment is improving recycling to improve waste management.
Learning Objectives
After this activity, students should be able to:
- Look at different types of biome pictures and describe what they see and offer explanations for the differences.
- Identify the needs of plants.
- Describe soil types (using texture, color, and ability to hold water) and classify.
- Measure and chart growth of plants over a given period of time.
- Take the identified needs of plants to create an environment with appropriate soil, light, and water source.
Educational Standards
Each Teach Engineering lesson or activity is correlated to one or more K-12 science,
technology, engineering or math (STEM) educational standards.
All 100,000+ K-12 STEM standards covered in Teach Engineering are collected, maintained and packaged by the Achievement Standards Network (ASN),
a project of D2L (www.achievementstandards.org).
In the ASN, standards are hierarchically structured: first by source; e.g., by state; within source by type; e.g., science or mathematics;
within type by subtype, then by grade, etc.
Each Teach Engineering lesson or activity is correlated to one or more K-12 science, technology, engineering or math (STEM) educational standards.
All 100,000+ K-12 STEM standards covered in Teach Engineering are collected, maintained and packaged by the Achievement Standards Network (ASN), a project of D2L (www.achievementstandards.org).
In the ASN, standards are hierarchically structured: first by source; e.g., by state; within source by type; e.g., science or mathematics; within type by subtype, then by grade, etc.
NGSS: Next Generation Science Standards - Science
| NGSS Performance Expectation | ||
|---|---|---|
|
2-LS2-1. Plan and conduct an investigation to determine if plants need sunlight and water to grow. (Grade 2) Do you agree with this alignment? |
||
| Click to view other curriculum aligned to this Performance Expectation | ||
| This activity focuses on the following Three Dimensional Learning aspects of NGSS: | ||
| Science & Engineering Practices | Disciplinary Core Ideas | Crosscutting Concepts |
| Plan and conduct an investigation collaboratively to produce data to serve as the basis for evidence to answer a question. Alignment agreement: | Plants depend on water and light to grow. Alignment agreement: | Events have causes that generate observable patterns. Alignment agreement: The shape and stability of structures of natural and designed objects are related to their function(s).Alignment agreement: |
| NGSS Performance Expectation | ||
|---|---|---|
|
K-2-ETS1-1. Ask questions, make observations, and gather information about a situation people want to change to define a simple problem that can be solved through the development of a new or improved object or tool. (Grades K - 2) Do you agree with this alignment? |
||
| Click to view other curriculum aligned to this Performance Expectation | ||
| This activity focuses on the following Three Dimensional Learning aspects of NGSS: | ||
| Science & Engineering Practices | Disciplinary Core Ideas | Crosscutting Concepts |
| Ask questions based on observations to find more information about the natural and/or designed world(s). Alignment agreement: Define a simple problem that can be solved through the development of a new or improved object or tool.Alignment agreement: | A situation that people want to change or create can be approached as a problem to be solved through engineering. Alignment agreement: Asking questions, making observations, and gathering information are helpful in thinking about problems.Alignment agreement: Before beginning to design a solution, it is important to clearly understand the problem.Alignment agreement: | |
Common Core State Standards - Math
-
Measure the length of an object by selecting and using appropriate tools such as rulers, yardsticks, meter sticks, and measuring tapes.
(Grade
2)
More Details
Do you agree with this alignment?
-
Generate measurement data by measuring lengths of several objects to the nearest whole unit, or by making repeated measurements of the same object. Show the measurements by making a line plot, where the horizontal scale is marked off in whole-number units.
(Grade
2)
More Details
Do you agree with this alignment?
State Standards
Florida - Math
-
Generate measurement data by measuring lengths of several objects to the nearest whole unit, or by making repeated measurements of the same object. Show the measurements by making a line plot, where the horizontal scale is marked off in whole-number units.
(Grade
2)
More Details
Do you agree with this alignment?
-
Measure the length of an object to the nearest inch, foot, centimeter, or meter by selecting and using appropriate tools such as rulers, yardsticks, meter sticks, and measuring tapes.
(Grade
2)
More Details
Do you agree with this alignment?
Florida - Science
-
Classify soil types based on color, texture (size of particles), the ability to retain water, and the ability to support the growth of plants.
(Grade
2)
More Details
Do you agree with this alignment?
-
Raise questions about the natural world, investigate them in teams through free exploration and systematic observations, and generate appropriate explanations based on those explorations.
(Grade
2)
More Details
Do you agree with this alignment?
Materials List
Each student needs:
- A plastic bottle
- 1 cup of their desired soil type
- 3 radish seeds
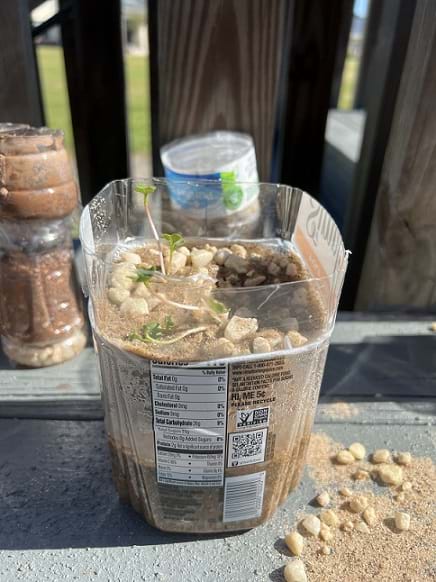
- ½ cup of rocks
- 5ft of string
- Soil Observation Worksheet
- Growth Chart
- Planning Worksheet
Each pair needs:
- A plastic bag with potting mix
- A plastic bag with sand
- A plastic bag with clay
For the entire class to share:
- Scissors
- Water
- Glue
- Newspapers, magazines, construction paper
- Thermometers
- Measuring cups
- 1-hole punch
Worksheets and Attachments
Visit [www.teachengineering.org/activities/view/uof-2723-environment-plants-soil-properties-activity] to print or download.Pre-Req Knowledge
Students should have a basic understanding of the needs of living things. They should know what plants need to grow.
Introduction/Motivation
Look at the images presented on the board (Provided in the A (Rad)ish Home PowerPoint Presentation). Discuss with your partners what you see in each picture and if there are any similarities and/or differences. What do living things need to grow? Look at the flora (plant life) in these pictures and talk about why they are different. What makes different types of plants grow? (Allow students up to three-minutes to discuss with their partner, making sure to walk around while students are discussing to help facilitate struggling students). Engineers work every day on solving problems. Environmental engineers study places like these pictures to identify any problems in the soil that may impact plant growth. One of the things that they study is the soil that the plants are growing in to see if there are any contaminants (things harmful to the plants) in the soil. These soil studies are important because they help scientists and engineers come up with solutions that keep plants growing at a healthy rate to create a sustainable future.
We will be using hands-on exploration with sand, potting soil, and clay to explore the different properties (what makes up) of these soils. Understanding soil will be important because you will have the opportunity to create a container and fill it with the soil of your choice to grow a plant.
Procedure
Background
In this activity, students will be using hands-on exploration to discover and identify three different types of soil. Soil makes up the top layer of Earth’s surface, and is made from small, broken-down pieces of rocks and once living things. The different amounts of these things are what makes soils have different properties. The different types of soil will vary in color, texture, and water retention properties, affecting its ability to grow plants.
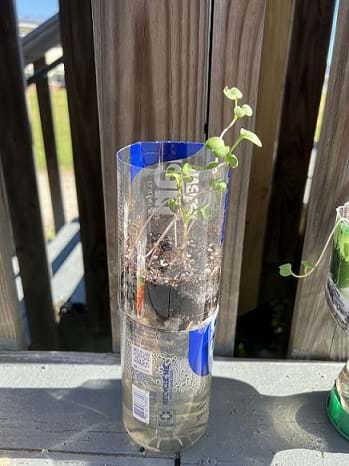
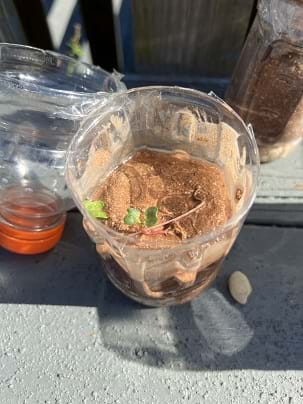
For the activity, students will be working with three different types of soil (sand, potting mix and clay) and will make observations based on their properties (color, texture, and water retention). After exploring the soil types, they will independently come up with which type of soil they believe will be best for growing a radish seed. They will make their own growing containers out of materials that can be easily found at home.
Before the Activity
- Gather the materials and make copies of the Soil Observation Worksheet, Growth Chart and Planning Worksheet.
- Pull up the A (Rad)ish Home PowerPoint Presentation.
- Place students in groups of two and have them sitting next to each other.
- Open video “What’s the Dirt on…. Dirt?”
With the Students
Day 1
- Present students with the “Spot the Difference” slide and talk through the Introduction/Motivation section. Students will have three to five minutes for image discussion.
- Play video “What’s the Dirt on…. Dirt?” and then return to the images; asking students to take note of the soil in the pictures and guess what kind of soil is in each image.
- After students have discussed the images and soil, give each pair a handful of dirt, sand, and clay in labeled plastic bags. Each student will also receive a Soil Observation Worksheet.
- Walk students through the worksheet and make sure they understand how to fill out the Growth Chart. Explain “water retention” and have students think about how to do this step.
- Model how to use measuring cups to measure water retention of soil using 100 mL of water.
- Give students 15 minutes to explore the different soil types and facilitate as needed in the discovery of the soil properties.
- Have students discuss their findings with the class. Clean up and have students wash their hands thoroughly.

Performing the water retention test with sand.

Day 2
- Starting on Slide 5 “Alert, Alert!” present students with the problem. As environmental engineers, they will have to create a solution to this scenario.
- Read the requirements of the Radish seeds (found on backside of seed packet) so students understand the needs of the plant.
- Present students with the materials that they will have available.
- Each student will get to choose one type of soil to grow their seeds in. * To save on materials and space, after students have chosen soil types, they can be partnered up to create one container in groups of 2.
- The containers must be hangable to stay out of reach.
- Have students use the Planning Worksheet to plan their design.
- Give students the remainder of class to build their plant containers.
- As plant containers are completed, find a location to place them.
- Clean-up workstations and have students wash their hands thoroughly.
Vocabulary/Definitions
biomes: Large regions of Earth that has a certain climate and certain types of living things.
contaminants : Things that are harmful to plants.
flora: Plants.
germinate: When a seed begins to grow.
observation: Carefully watching something.
retention: The keeping of something, such as water.
soil: The top layer of the earth in which plants grow.
texture: The way something feels when you touch it, for example, how smooth or rough it is.
Assessment
Pre-Activity Assessment
Open Discussion: Beginning with their shoulder-partner, have students discuss the pictures presented. Remind students to think about what they know about plant growth and what living things need.
Activity Embedded (Formative) Assessment
Worksheet: Have students work in pairs or in small groups to discuss the properties of the three different types of soil. Students will write their findings on the Soil Observations Worksheet.
Problem-Solve: Present students with the problem and the seed they are going to have to grow. Have students individually pick which soil they would like to use for the seed. Students will also be discussing what items could be readily available for them at home to create an environment for their seed to grow in.
Post-Activity (Summative) Assessment
Observations: Students will record observations about plant growth for the initial 6-10 days of germination on the Soil Observation Worksheet. After 10 days, have students note whether their plant sprouted and hypothesize why it did or did not germinate.
Data Collection: Students whose seeds did not germinate will partner with a student who had plant germination. Either individually or in pairs, students will record growth for 7 days using rulers. They will record growth using the Growth Chart.
Debrief: After 7 days of data collection, have students discuss if everyone’s plants grew at the same rate or the same size. Come up with theories as to why some plants did or did not grow, and the differences in plant growth. Ask students how they would make their environment differently if given another chance.
Safety Issues
- Soil bacteria is generally harmless, but students should wash their hands after handling soil and seeds.
Activity Extensions
After students complete the activity, they will be monitoring their plants for two weeks to allow enough time for germination. Student’s will take a few minutes daily to care for their plants, and as seeds start to sprout, students will be measuring growth and charting results. For students whose seeds do not grow, have them brainstorm why. Additionally, during this process students can learn about plant life cycles and discuss plant characteristics as they watch their plants grow.
This could also turn into a semester project to allow for iterations of plant containers. Students who did not see growth, what could they do differently? Allow them to build a new container, or perhaps pick a new soil type. Students who did see growth, but maybe not significant, how could they make their plant grow more efficiently?
Activity Scaling
- For more advanced students, have them monitor the temperature inside their container as their plant grows. Use this data to create a chart comparing growth and the temperature of the plant.
- For younger students, allow them to draw pictures for their observations, rather than writing or creating graphs.
Additional Multimedia Support
Optional / Additional Videos:
- BrainPop Jr. – Soil
- BrainPop Jr. – Plant Life Cycle (Part of Extension)
Subscribe
Get the inside scoop on all things Teach Engineering such as new site features, curriculum updates, video releases, and more by signing up for our newsletter!References
Alex2564. (2013). Emergency Light. Retrieved from https://commons.wikimedia.org/wiki/File:Emergency_Light.gif.
AlphaZeta. (2011). Magnifying glass icon mgx2. WikiMedia Commons. Retrieved from https://commons.wikimedia.org/wiki/File:Magnifying_glass_icon_mgx2.svg.
Argenberg, V. (2007). Wadi Rum Dry Desert, Jordan. WikiMedia Commons. Retrieved from https://commons.wikimedia.org/wiki/File:Wadi_Rum_Dry_Desert,_Jordan.jpg.
Collinsdictionary.com. Accessed June 28, 2022. (Source of some vocabulary definitions, with some adaption) https://www.collinsdictionary.com/us/
Cowboy, C. (2017). Radishes. WikiMedia Commons. Retrieved from https://commons.wikimedia.org/wiki/File:Radishes.svg.
Gyorgyfalvy, R. (2005). Sparks Meadow in July 2. WikiMedia Commons. Retrieved from https://commons.wikimedia.org/wiki/File:Sparks_Meadow_in_July2.jpeg.
U.S. Bureau of Labor Statistics. (2022, April 18). Environmental engineers: Occupational outlook handbook. U.S. Bureau of Labor Statistics. Retrieved June 29, 2022, from https://www.bls.gov/ooh/architecture-and-engineering/environmental-engineers.htm#tab-2
Copyright
© 2023 by Regents of the University of Colorado; original © 2022 University of FloridaContributors
Ana MattosSupporting Program
Multidisciplinary Research Experiences for Teachers of Elementary Grades, Herbert Wertheim College of Engineering, University of FloridaAcknowledgements
This curriculum was based upon work supported by the National Science Foundation under RET grant no. EEC 1711543— Engineering for Biology: Multidisciplinary Research Experiences for Teachers in Elementary Grades (MRET) through the College of Engineering at the University of Florida. Any opinions, findings, and conclusions or recommendations expressed in this material are those of the authors and do not necessarily reflect the views of the National Science Foundation.
Last modified: August 15, 2023
User Comments & Tips