Quick Look
Grade Level: 7 (6-8)
Time Required: 3 hours
(two 90-minute classes)
Expendable Cost/Group: US $10.00 This activity uses several specialized, laboratory-specific, non-expendable materials including a micro-centrifuge, a tabletop shaker, 1000 µL micropipettes, test tube racks; and a 250 mL beaker. See Materials List for details.
Group Size: 4
Activity Dependency: None
Subject Areas: Biology, Chemistry, Life Science, Science and Technology
NGSS Performance Expectations:

| MS-LS1-5 |
Summary
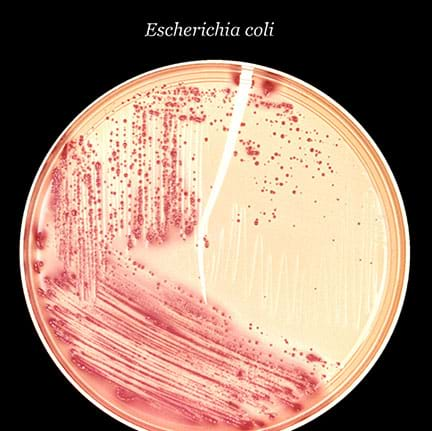
Students explore adaptations by researching how animals, plants, and bacteria change based on their environment. They grow bacterial colonies in various environments and hypothesize how each environment will affect the cell culture size and color. After a day of pre-growth, the culture is spun down in a centrifuge and the cell pellet is analyzed. Finally, students research bacteria adaptations that allow them to survive in extreme environments then brainstorm how the beneficial genes can be useful for genetic engineering of GMOs in the future.Engineering Connection
Genetic, biomedical, and biological engineering strives to benefit our world in a variety of way, such as creating crops that can better resist climate change to increasing the amount of light a plant can absorb. Like engineers, students will brainstorm ways to use the genes developed inside bacterial forms that have adapted to specific environments for beneficial purposes.
Learning Objectives
After this activity, students should be able to:
- Describe various types of adaptations in plants, animals and bacteria that allow them to thrive in their specific environments.
- Compare aerobic and anaerobic respiration.
- Give a brief overview of genetic engineering.
- Explain some ways bacterial genes may be beneficial for genetic engineering.
Educational Standards
Each TeachEngineering lesson or activity is correlated to one or more K-12 science,
technology, engineering or math (STEM) educational standards.
All 100,000+ K-12 STEM standards covered in TeachEngineering are collected, maintained and packaged by the Achievement Standards Network (ASN),
a project of D2L (www.achievementstandards.org).
In the ASN, standards are hierarchically structured: first by source; e.g., by state; within source by type; e.g., science or mathematics;
within type by subtype, then by grade, etc.
Each TeachEngineering lesson or activity is correlated to one or more K-12 science, technology, engineering or math (STEM) educational standards.
All 100,000+ K-12 STEM standards covered in TeachEngineering are collected, maintained and packaged by the Achievement Standards Network (ASN), a project of D2L (www.achievementstandards.org).
In the ASN, standards are hierarchically structured: first by source; e.g., by state; within source by type; e.g., science or mathematics; within type by subtype, then by grade, etc.
NGSS: Next Generation Science Standards - Science
| NGSS Performance Expectation | ||
|---|---|---|
|
MS-LS1-5. Construct a scientific explanation based on evidence for how environmental and genetic factors influence the growth of organisms. (Grades 6 - 8) Do you agree with this alignment? |
||
| Click to view other curriculum aligned to this Performance Expectation | ||
| This activity focuses on the following Three Dimensional Learning aspects of NGSS: | ||
| Science & Engineering Practices | Disciplinary Core Ideas | Crosscutting Concepts |
| Construct a scientific explanation based on valid and reliable evidence obtained from sources (including the students' own experiments) and the assumption that theories and laws that describe the natural world operate today as they did in the past and will continue to do so in the future. Alignment agreement: | Genetic factors as well as local conditions affect the growth of the adult plant. Alignment agreement: | Phenomena may have more than one cause, and some cause and effect relationships in systems can only be described using probability. Alignment agreement: |
International Technology and Engineering Educators Association - Technology
-
Students will develop an understanding of the characteristics and scope of technology.
(Grades
K -
12)
More Details
Do you agree with this alignment?
-
Students will develop an understanding of the relationships among technologies and the connections between technology and other fields of study.
(Grades
K -
12)
More Details
Do you agree with this alignment?
-
Genetic engineering involves modifying the structure of DNA to produce novel genetic make-ups.
(Grades
6 -
8)
More Details
Do you agree with this alignment?
State Standards
Texas - Science
-
use appropriate tools to collect, record, and analyze information, including life science models, hand lens, stereoscopes, microscopes, beakers, Petri dishes, microscope slides, graduated cylinders, test tubes, meter sticks, metric rulers, metric tape measures, timing devices, hot plates, balances, thermometers, calculators, water test kits, computers, temperature and pH probes, collecting nets, insect traps, globes, digital cameras, journals/notebooks, and other equipment as needed to teach the curriculum; and
(Grade
7)
More Details
Do you agree with this alignment?
-
investigate and explain how internal structures of organisms have adaptations that allow specific functions such as gills in fish, hollow bones in birds, or xylem in plants;
(Grade
7)
More Details
Do you agree with this alignment?
-
recognize that inherited traits of individuals are governed in the genetic material found in the genes within chromosomes in the nucleus.
(Grade
7)
More Details
Do you agree with this alignment?
Materials List
Day 1
Each group needs:
- 1000 µL micropipette, available online individually or in a set of three
- 1000 µLmicropipette tip, available in a box of 100 or a box of 1000
- 15 ml culture tubes, available online
- 1 µL tip inoculating loops, available online (two per group)
- test tube rack
- Student Lab Sheet Part 1 (one per student)
To share with the entire class:
- petri dish of E. coli (to be shared among three groups), available online
- 30 ml of LB Broth bacteria growth medium, available online
- 1000 ml jar with re-sealable lid
- 250 ml beaker (or similar container to hold anaerobic culture tubes upright in the re-sealable jar)
- test tube rack secured onto a tabletop shaker (to hold the aerobic tubes)
- tabletop shaker (capable of 200 rpm), available online
- electric tape
- tea candle
- one bottle of bleach disinfectant (to spray materials when finished)
- multipurpose lighter
- lab coats, goggles, and disposable gloves for each student
Day 2
Each group needs:
- 1000 µL micropipette
- two 1000 µL micropipettes micropipette tips
- ultrafine point marker
- two 1.5 ml micro-centrifuge tubes, available online
- micro-tube or test tube rack
- bottle of bleach disinfectant (to spray materials when finished)
- lab coats, goggles, and disposable gloves for each student
- Student Lab Sheet Part 2 (one per student)
- poster paper (one sheet for every 2 students)
- Student Rubric Part 3 (one per every 2 students)
To share with the entire class:
- micro-centrifuge (capable of 6000 rcf and hold at least 16 micro-tubes)
- bottle of bleach disinfectant (to spray materials when finished)
- markers and/or color pencils
- sticky notes
- internet-capable devices
Worksheets and Attachments
Visit [www.teachengineering.org/activities/view/uot-2407-bacterial-adaptations-application-genetic-engineering] to print or download.Pre-Req Knowledge
- A familiarization with DNA as the genetic material responsible for inherited traits.
- The role mutations play in genetic variations.
- Definitions of adaptations.
- An understanding of the components of an atom and how electron transfer.
Introduction/Motivation
Bacteria make up almost two-thirds of all living things, and new bacteria species are still being discovered today. They exist in such diversity and in such numerous and variable environments, in spite of their anatomical simplicity. These bacteria are so well adapted to their environments that they have thrived for billions of years. Bacteria live in many different types of environments and can even thrive in habitats that are hostile or even lethal to other organisms. Some bacteria are referred to as extremophiles because they inhabit areas with extreme environments and are classified based on where they grow.
Most bacteria are incredibly helpful. These microscopic organisms play an enormous role in our everyday lives, from helping us in our digestion of food to recycling nutrients back into the environment. Many bacteria are even utilized by scientists to improve our lives in an assortment of ways, including the production of inorganic materials, like nanomaterials. Another avenue of bacterial application that is currently being explored is genetic engineering, which we will explore in this activity.
Genetic engineering is the deliberate modification of the characteristics of an organism by manipulating its genetic material. It involves the group of techniques used to cut up and join together genetic material, like DNA, from different biological species, and to introduce the resulting hybrid DNA into an organism in order to form new combinations of heritable genetic material. The process of genetic engineering is used to create genetically modified organisms (or GMOs). To get a better understanding of genetic engineering, let’s read two articles on how it has been used in agriculture:
“Tiny Bacteria Provide Genetics to Save Food” in Scientific American
“Bacteria gene may help crops soak up more sun” in Cosmos Magazine
“Bacterial genes could put plants on Mars” in New Scientist
Procedure
Background
All material used in this lab that comes into contact with the bacteria must be disposed of carefully. This includes tubes, pipette tips, inoculating loops, gloves, and so on. Set out several disposal bins for groups to share and clearly explain where items should go. Have students write down their observations before or after, not while working with the bacteria. Use a bleach disinfecting solution to spray down all waste before disposal and any material that comes into contact with bacteria.
Sterile materials (pipette tips, inoculating loops, tubes) should be treated carefully to prevent contamination. Students should never touch the sterile items with hands or to other surfaces.
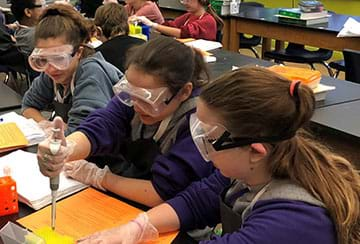
Demonstrate how to properly use the micropipettes. Set them to the desired amount before students begin using them. Once a sterile tip is attached to the micropipette, do not allow them to touch anything else. To draw a liquid, push the plunger gently but firmly down to the first stop. To release the liquid, push down to the second stop. In order to remove the pipette tip, hover the micropipette over a disposal bin and push the ejector button with your thumb; do not remove the pipette with your hands. Watch “How to pipette correctly” by Eppendorf on YouTube for a visual procedure of best practices.
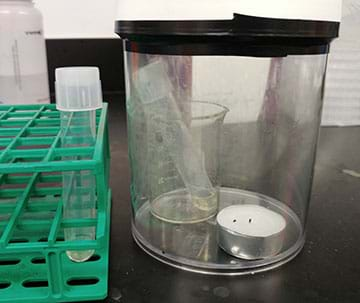
The bacteria will grow to desirable sizes at room temperature after one night. If you have an incubator, they can be grown overnight at 37°C. To grow the bacteria anaerobically, place the culture tubes (with lids loosely attached) into the large jar with a tea candle. Light the tea candle and seal the jar by screwing the lid on and wrapping it with electrical tape. To grow the bacteria aerobically, secure the culture tubes n a tabletop shaker set to at least 200 rpm. This agitation will ensure oxygen from the air is mixing with the solution and is accessible to the bacteria.
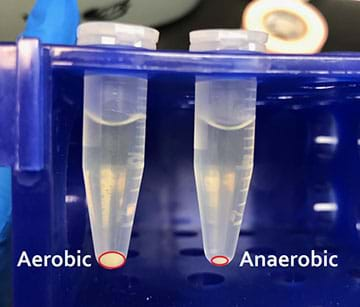
The aerobic culture cells should grow and reproduce more than the anaerobic ones (less oxygen = less growth) so the anaerobic cell pellets should be smaller than the aerobic ones when they are spun down in the centrifuge.
After you are finished, disinfected all material that comes into contact with the bacteria with bleach.
Review general safety procedures when working in lab as well as safety procedures when working with bacteria. (See Safety Issues below.)
Before the Activity
For Day 1
- Acquire one petri dish of E. coli bacteria.
- Prepare 30 ml of LB Broth by following directions on the container.
- This should be divided into 8 containers (with lids to prevent contamination) of around 3.5 ml, one for each group (groups will need 2 ml, but make more than you need).
- Any unused LB Broth can be disposed of in the sink.
- Make copies of the Student Lab Sheet Part 1, Student Lab Sheet Part 2, and Student Rubric Part 3
For Day 2
- Ensure you have enough internet-connected devices for students to use in pairs.
- Locate and print several articles showcasing GMO examples to help students brainstorm. Here are a few examples.
- “Tiny Bacteria Provide Genetics to Save Food” in Scientific American
- “Bacteria gene may help crops soak up more sun” in Cosmos Magazine
- "Bacterial genes could put plants on Mars” in New Scientist
With the Students
Day 1
Part 1 – Cell Pre-Growth Set Up
- Ask students to brainstorm the following with their partners and write their ideas down on a sheet of scratch paper: List three adaptations found in animals, two in plants and one in bacteria and explain how they help each organism survive. After a few minutes of collaboration, have students share and discuss their responses with another group.
- Animal adaptations examples: camouflage helps organisms hide, wings help birds, insects, or bats move quickly and cover larger distances, gills help fish breathe underwater, and blubber helps marine mammals stay warm.
- Plant adaptation examples: large leaves in rainforest plants help absorb more amounts of sun, waxy cuticle on succulents help prevent water loss, mangrove plants survive in salt water by removing 90% of salt through glands in leaves.
- Bacteria adaptations examples: E. coli from human intestines survive in changing conditions as people don’t eat on strict schedules, many bacteria can survive without oxygen.
- Show the Day 1: Part 1 PowerPoint to briefly review bacteria (slides 2-4), respiration (slides 5-7), and E. coli (slides 8-9).
- Divide the class into groups of 4.
- Explain that each group will grow two different cultures of the same bacteria.
- Each group will get two colonies of bacteria that were grown on the same petri dish from one initial colony that reproduced asexually (creating genetically identical offspring) so all the bacteria should be the same.
- Both colonies will be cultivated overnight in the same nutrient-rich medium for microorganisms (LB Broth), but one colony will be grown aerobically (in the presence of oxygen) and the other anaerobically (without any oxygen).
- Give students copies of the Student Lab Sheet Part 1 and have them write down a hypothesis explaining what they think will happen to the bacteria in the two different cultures. They should be detailed and should state whether they think the bacteria will grow the same or differently in the two different environments.
- Example: The lack of oxygen in the anaerobic cell culture will prevent the E. coli cells from reproducing as quickly as they normally do in the presence of oxygen, so there will be less cells than in the aerobic cell culture.
- Have students put on their protective equipment.
- Ask students to discuss with their groups and think of what bacteria need to survive and thrive. Have students share their ideas with other groups.
- Give each student a test tube rack with two culture tubes and a container holding about 3.5 ml of LB Broth.
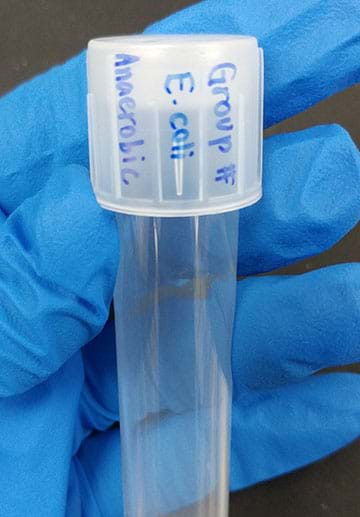
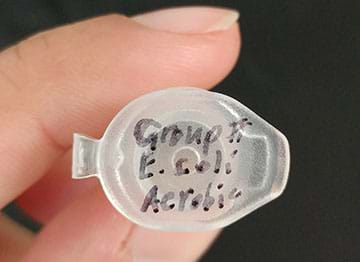
- Have students label the tubes: Group # E. coli Aerobic and Group # E. coli Anaerobic (see Figure 1).
- Students should transfer 1000 µL of the LB broth into the aerobic culture tube using the micropipette. They should be careful not to touch the inside of the tube with anything other than the pipette tip. If the tip touches another surface, have the students dispose of it and use a new one.
- Using the same tip, have students transfer 1000 µL of the LB broth into the anaerobic culture tube. Dispose of the tip when done.
- Once the tubes are ready, they should use one inoculating loop to transfer a single colony from the petri dish to the aerobic tube (see Figure 2). Swirl the tip around in the liquid and dispose of it when finished.
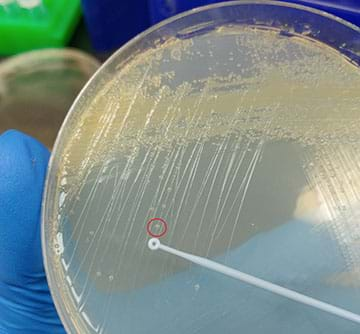
- Repeat the previous step with the anaerobic tube and another colony.
- Have students swirl both cultures briskly to mix all contents, while carefully avoiding spills.
- Have students place the labeled aerobic tubes in a test tube rack (which will be left out and exposed to the air) and the anaerobic tubes in the beaker in the anaerobic jar.
- Once all groups are done, light the tea candle and seal the jar using lid and electrical tape. See Figure 3.
- The candle will burn the remaining oxygen in the jar and create an anaerobic environment for the bacteria.
- Place the jar with the anaerobic cultures off to the side where they will not be disturbed and leave to grow at room temperature for one day.
- Place the rack with the culture tubes so it is secured onto the tabletop shaker. The shaker should be set to a speed of at least 200 rpm and should shake continuously until the next day.
- Have students write their observations on their sheet and clean up.
- All contents that came into contact with the bacteria (micropipette tips, inoculating loops, etc.) should be sprayed with the bleach disinfectant and disposed in the trash.
Day 2
Part 2 – Cell Pelleting and Analysis
- Remind students of safety procedures and have them get into their groups. Have students put on their protective equipment. Distribute copies of the Student Lab Sheet Part 2.
- Have students pick up their two culture tubes in a test tube rack and discuss their observations of the cell cultures after one day.
- Have students pick up a micro-tube rack with two micro-centrifuge tubes.
- Have students label the tubes “Group # E. coli Aerobic” and “Group # E. coli Anaerobic” using the fine-tipped markers. See Figure 4.
- Using the micropipettes, have students draw up all 1000 µL of the aerobic culture and transfer it to a microtube. Dispose of the tip to prevent contamination.
- Using a new tip, repeat the previous step with the anaerobic culture.
- Place the two tubes from each group into the centrifuge, ensuring that they are directly opposite each other to maintain the balance and spin for 5 minutes at a speed of around 6000 rcf.
- After the spin, have students pick up their tubes and analyze their cell pellet.
- The aerobic one should be larger than the anaerobic one (see Figure 5)
- Have students write down extensive observations, drawings, and their conclusion on their Student Lab Sheet Part 2.
Part 3 – Student Exploration
- Show the Day 2: Part 3 PowerPoint to briefly review genetic engineering (slides 2-3) and GMOs (slide 4).
- Pass out the Student Rubric Part 3.
- Using a device with access to the internet, have students work with partners to research different types of adaptations found in organisms in all kingdoms, specifically those living in extreme environments.
- Have students brainstorm imaginative ways that we could incorporate some of those adaptations to create genetically engineered organisms that would benefit humanity (now or in the future). Students can focus on medical, space, technology, etc.
- Have students create a poster creatively illustrating and explaining of their ideas in detail and hang them up around room or hallway.
- Give all students Post-it notes and as they look at the posters have them write down one question they have about the ideas shown and one thing they like from each poster.
Vocabulary/Definitions
adaptation: Characteristic an organism is born with that allows it to survive in its specific environment.
aerobic: Requiring the presence of oxygen.
anaerobic : Requiring the absence of oxygen.
cellular respiration: Process occurring in all organisms that creates energy by using oxygen to break down glucose and releases carbon dioxide and water as a waste.
gene: A small section of DNA.
genetic engineering: Process through which genes are manipulated to purposefully modify the genetic material.
genetically modified organism: An organism that has had its DNA altered or modified in some way through genetic engineering.
Assessment
Activity Embedded Assessment
Lab write up: Have students document their hypothesis, observations and conclusion statements from the experiment (Part 1 & 2) using the Student Lab Sheet Part 1 and the Student Lab Sheet Part 2.
Post-Activity Assessment
Poster: Examine student learning using the ideas and explanations showcased on student posters from Part 3 of the activity. Use the Student Rubric Part 3 for instructions and as grading rubric.
Investigating Questions
- Why do some organisms share similar adaptations?
- Various answers: they are related (they developed the adaptation before they became different species); they live in similar type of environments (sharks and dolphins aren’t related but have fins because they both live in the ocean).
- Why is it important to treat sterile material carefully when growing bacteria?
- There are many different types of bacteria all around us and it is easy to contaminate our samples with other bacteria, which can throw off our results.
- Why did the anaerobic culture not grow as large as the aerobic one?
- It is harder to respirate anaerobically than it is aerobically, so cells cannot expend as much energy on reproduction as they can when they breathe oxygen.
- What are some pros and cons to genetic engineering?
- Pros: humans can tackle many problems like food shortages or genetic diseases, can lead to creation of beneficial organisms that may not occur naturally for years (or possibly ever).
- Cons: takes time to see the effects of genetic engineering, susceptible to ethical questioning, could have unforeseen negative consequences.
Safety Issues
- Use eye protection, gloves, and lab coat during Parts 1 & 2. Ensure students are wearing long pants and closed-toed shoes. Students should tie back long-hair.
- Use caution when growing and handling bacteria. Students should not taste anything used in lab or touch their face while working, and should only smell by wafting.
- All material and waste used must be disinfected with a bleach solution or in an autoclave before disposal or clean up.
- Students should be extremely careful when handling bacteria and must wash their hands after the activity. Demonstrate how to remove gloves. Watch this video for tips.
Subscribe
Get the inside scoop on all things Teach Engineering such as new site features, curriculum updates, video releases, and more by signing up for our newsletter!More Curriculum Like This

Students learn how engineers apply their understanding of DNA to manipulate specific genes to produce desired traits, and how engineers have used this practice to address current problems facing humanity. Students fill out a flow chart to list the methods to modify genes to create GMOs and example a...

Students learn about mutations to both DNA and chromosomes, and uncontrolled changes to the genetic code. They are introduced to small-scale mutations (substitutions, deletions and insertions) and large-scale mutations (deletion duplications, inversions, insertions, translocations and nondisjunction...

As a class, students work through an example showing how DNA provides the "recipe" for making human body proteins. They see how the pattern of nucleotide bases (adenine, thymine, guanine, cytosine) forms the double helix ladder shape of DNA, and serves as the code for the steps required to make gene...

After watching video clips from the Harry Potter and the Goblet of Fire movie, students explore the use of Punnett squares to predict genetic trait inheritance. The objective of this lesson is to articulate concepts related to genetics through direct immersive interaction based on the theme, The Sci...
Copyright
© 2019 by Regents of the University of Colorado; original © 2019 University of Texas at AustinContributors
Erika Peña; Austin J. GrahamSupporting Program
NASCENT (Nanomanufacturing Systems for Mobile Computing and Mobile Energy Technologies) Engineering Research Center, Research Experiences for Teachers Program, University of Texas at AustinAcknowledgements
This material is based upon work supported by the National Science Foundation under grant no. EEC-1160494—a Research Experience for Teachers program titled “Nanomanufacturing Systems for Mobile Computing and Mobile Energy Technologies, or NASCENT.” Any opinions, findings and conclusions or recommendations expressed in this material are those of the author(s) and do not necessarily reflect the views of the National Science Foundation.
Last modified: January 18, 2022


User Comments & Tips