Summary
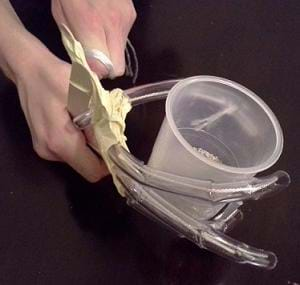
Students learn about how biomedical engineers create assistive devices for persons with fine motor skill disabilities. They learn about types of forces, balanced and unbalanced forces, and the relationship between form and function, as well as the structure of the hand. They do this by designing, building and testing their own hand "gripper" prototypes that are able to grasp and lift a 200 ml cup of sand.
Engineering Connection
Biomedical engineers use their knowledge of biology, physics, math and technology to create biomechanical devices. Biomedical engineers create assistive hand devices by researching the anatomy, form and function of the hand and the necessary responses and movement required for performing basic and advanced functions (such as rotating the hand vs. the gripping of an object). In considering the qualities of the materials that can be used for the specified functions, students subsequently practice the skill of designing and testing prototypes within constraints—all essential aspects of engineering.
Learning Objectives
After this activity, students should be able to:
- Explain how the engineering design process steps are conducted during each class.
- Generate questions for client/user to focus on a problem statement.
- Describe the interaction of forces acting on the prototype during testing periods.
- Apply the EDP in creating prototype devices to aid children in holding a cup of sand, and test them for strength.
Educational Standards
Each Teach Engineering lesson or activity is correlated to one or more K-12 science,
technology, engineering or math (STEM) educational standards.
All 100,000+ K-12 STEM standards covered in Teach Engineering are collected, maintained and packaged by the Achievement Standards Network (ASN),
a project of D2L (www.achievementstandards.org).
In the ASN, standards are hierarchically structured: first by source; e.g., by state; within source by type; e.g., science or mathematics;
within type by subtype, then by grade, etc.
Each Teach Engineering lesson or activity is correlated to one or more K-12 science, technology, engineering or math (STEM) educational standards.
All 100,000+ K-12 STEM standards covered in Teach Engineering are collected, maintained and packaged by the Achievement Standards Network (ASN), a project of D2L (www.achievementstandards.org).
In the ASN, standards are hierarchically structured: first by source; e.g., by state; within source by type; e.g., science or mathematics; within type by subtype, then by grade, etc.
NGSS: Next Generation Science Standards - Science
| NGSS Performance Expectation | ||
|---|---|---|
|
MS-ETS1-1. Define the criteria and constraints of a design problem with sufficient precision to ensure a successful solution, taking into account relevant scientific principles and potential impacts on people and the natural environment that may limit possible solutions. (Grades 6 - 8) Do you agree with this alignment? |
||
| Click to view other curriculum aligned to this Performance Expectation | ||
| This activity focuses on the following Three Dimensional Learning aspects of NGSS: | ||
| Science & Engineering Practices | Disciplinary Core Ideas | Crosscutting Concepts |
| Define a design problem that can be solved through the development of an object, tool, process or system and includes multiple criteria and constraints, including scientific knowledge that may limit possible solutions. Alignment agreement: | The more precisely a design task's criteria and constraints can be defined, the more likely it is that the designed solution will be successful. Specification of constraints includes consideration of scientific principles and other relevant knowledge that is likely to limit possible solutions. Alignment agreement: | All human activity draws on natural resources and has both short and long-term consequences, positive as well as negative, for the health of people and the natural environment. Alignment agreement: The uses of technologies and any limitations on their use are driven by individual or societal needs, desires, and values; by the findings of scientific research; and by differences in such factors as climate, natural resources, and economic conditions.Alignment agreement: |
| NGSS Performance Expectation | ||
|---|---|---|
|
MS-ETS1-2. Evaluate competing design solutions using a systematic process to determine how well they meet the criteria and constraints of the problem. (Grades 6 - 8) Do you agree with this alignment? |
||
| Click to view other curriculum aligned to this Performance Expectation | ||
| This activity focuses on the following Three Dimensional Learning aspects of NGSS: | ||
| Science & Engineering Practices | Disciplinary Core Ideas | Crosscutting Concepts |
| Evaluate competing design solutions based on jointly developed and agreed-upon design criteria. Alignment agreement: | There are systematic processes for evaluating solutions with respect to how well they meet the criteria and constraints of a problem. Alignment agreement: | |
| NGSS Performance Expectation | ||
|---|---|---|
|
MS-ETS1-4. Develop a model to generate data for iterative testing and modification of a proposed object, tool, or process such that an optimal design can be achieved. (Grades 6 - 8) Do you agree with this alignment? |
||
| Click to view other curriculum aligned to this Performance Expectation | ||
| This activity focuses on the following Three Dimensional Learning aspects of NGSS: | ||
| Science & Engineering Practices | Disciplinary Core Ideas | Crosscutting Concepts |
| Develop a model to generate data to test ideas about designed systems, including those representing inputs and outputs. Alignment agreement: | Models of all kinds are important for testing solutions. Alignment agreement: The iterative process of testing the most promising solutions and modifying what is proposed on the basis of the test results leads to greater refinement and ultimately to an optimal solution.Alignment agreement: | |
| NGSS Performance Expectation | ||
|---|---|---|
|
MS-PS2-2. Plan an investigation to provide evidence that the change in an object's motion depends on the sum of the forces on the object and the mass of the object. (Grades 6 - 8) Do you agree with this alignment? |
||
| Click to view other curriculum aligned to this Performance Expectation | ||
| This activity focuses on the following Three Dimensional Learning aspects of NGSS: | ||
| Science & Engineering Practices | Disciplinary Core Ideas | Crosscutting Concepts |
| Plan an investigation individually and collaboratively, and in the design: identify independent and dependent variables and controls, what tools are needed to do the gathering, how measurements will be recorded, and how many data are needed to support a claim. Alignment agreement: Science knowledge is based upon logical and conceptual connections between evidence and explanations.Alignment agreement: | The motion of an object is determined by the sum of the forces acting on it; if the total force on the object is not zero, its motion will change. The greater the mass of the object, the greater the force needed to achieve the same change in motion. For any given object, a larger force causes a larger change in motion. Alignment agreement: All positions of objects and the directions of forces and motions must be described in an arbitrarily chosen reference frame and arbitrarily chosen units of size. In order to share information with other people, these choices must also be shared.Alignment agreement: | Explanations of stability and change in natural or designed systems can be constructed by examining the changes over time and forces at different scales. Alignment agreement: |
Common Core State Standards - Math
-
Fluently add, subtract, multiply, and divide multi-digit decimals using the standard algorithm for each operation.
(Grade
6)
More Details
Do you agree with this alignment?
International Technology and Engineering Educators Association - Technology
-
Students will develop an understanding of the attributes of design.
(Grades
K -
12)
More Details
Do you agree with this alignment?
-
Students will develop an understanding of engineering design.
(Grades
K -
12)
More Details
Do you agree with this alignment?
-
Students will develop an understanding of the role of troubleshooting, research and development, invention and innovation, and experimentation in problem solving.
(Grades
K -
12)
More Details
Do you agree with this alignment?
-
Students will develop abilities to apply the design process.
(Grades
K -
12)
More Details
Do you agree with this alignment?
-
Students will develop an understanding of the relationships among technologies and the connections between technology and other fields of study.
(Grades
K -
12)
More Details
Do you agree with this alignment?
-
Develop innovative products and systems that solve problems and extend capabilities based on individual or collective needs and wants.
(Grades
6 -
8)
More Details
Do you agree with this alignment?
State Standards
Massachusetts - Math
-
Fluently add, subtract, multiply, and divide multi-digit decimals using the standard algorithm for each operation.
(Grade
6)
More Details
Do you agree with this alignment?
Massachusetts - Science
-
Define the criteria and constraints of a design problem with sufficient precision to ensure a successful solution. Include potential impacts on people and the natural environment that may limit possible solutions.
(Grade
6)
More Details
Do you agree with this alignment?
-
Communicate a design solution to an intended user, including design features and limitations of the solution.
(Grade
6)
More Details
Do you agree with this alignment?
-
Generate and analyze data from iterative testing and modification of a proposed object, tool, or process to optimize the object, tool, or process for its intended purpose.
(Grade
7)
More Details
Do you agree with this alignment?
-
Construct a prototype of a solution to a given design problem.
(Grade
7)
More Details
Do you agree with this alignment?
Materials List
For the teacher's introductory presentation:
- EDP Assistive Hand Device Presentation
- projecting capability
Each group needs:
- 3 pairs scissors
- computer with access to the Internet (for research)
- Problem Statement Worksheet (one per student)
- List the Client's Criteria Worksheet (one per student)
- Materials Cost Table & Budget Sheet (one per student)
- Reflecting on the Engineering Design Process Worksheet (one per student)
- paper and pencils/pen (for each student)
For the entire class to share:
- ~100 feet clear vinyl tubing (preferably ½" outer diameter, 3/8" inner diameter)
- 1 box regular-sized craft sticks
- 1 box jumbo-sized craft sticks
- 1 roll duct tape
- 1 roll masking tape
- 10-lb. bag play sand
- ~1,000 feet polyester string
- 4-10 electronic scales or triple beam balances
- 4-10 force meters or spring scales
- 4-10 100-ml graduated cylinders
- 4-5 6-8 oz. clear plastic cups
- (optional) 4-5 tube cutters
- (optional) dynamometer
- computer and projector, to show the class the PowerPoint® presentation
Worksheets and Attachments
Visit [www.teachengineering.org/activities/view/wpi_lending_hand_activity1] to print or download.Pre-Req Knowledge
A basic understanding of types of forces, Newton's second law, and knowledge of drawing free body diagrams and the engineering design process (EDP). See the Fairly Fundamental Facts about Forces and Structures lesson.
Introduction/Motivation
If a person has trouble seeing, what is used to help them see? (Glasses) If a person has trouble hearing, what is used to help them hear? (Hearing aid) If a person has trouble walking, what is used to help them walk? (Cane or crutch) A pair of glasses, a hearing aid, a cane or a crutch—what do these objects have in common? They are all assistive devices, a product that helps someone perform a function that could not be done without that piece of technology.
Technologies like these are developed by biomedical engineers who integrate their STEM (science, technology, engineering and mathematics) knowledge, including the field of medicine, to create products and processes that improve the health and quality of human lives.
In this project, you play the role of biomedical engineers to design and test an assistive hand device that helps someone with cerebral palsy grip a cup that varies in weight.
Procedure
Background
Students should have read the Fairly Fundamental Facts About Forces and Structures lesson, which provides all necessary background information for this activity.
Before the Activity
- Gather materials and make copies of the Problem Statement Worksheet, List the Client's Criteria Worksheet, Materials Cost Table & Budget Sheet, and Assistive Hand Device Pre-Activity Quiz, one each per student.
- Use the 28-slide EDP Assistive Hand Device Presentation, a PowerPoint® file, to teach and conduct the activity. Set up a computer/projector to show the presentation to the class.
With the Students
Day 1 – Introduce the EDP and Assistive Hand Device Challenge
- (slides 2-12) Instruct students to record notes from the presentation. These slides includes key vocabulary terms, the steps of the design process, and the criteria and constraints for the design challenge.
- Give students the Problem Statement Worksheet and, from the client statement, have students individually compose brief problem statements of essential information. Lead a class discussion to make sure all significant information has been identified.
- Hand out the List the Client's Criteria Worksheet, and have students identify the prototype requirements. Lead a class discussion to make sure all significant information has been identified.
Day 2 – Conducting Research
- (slides 13-19) Instruct students to record notes, including key vocabulary terms, the purpose of reverse engineering, and the expected structure of T-chart. (On the classroom board, demonstrate to students the intended structure and purpose of a T-chart. This information is not provided in the presentation.)
- Provide students with the Materials Cost Table & Budget Sheet so they are aware of the materials they are permitted to use in constructing the prototypes.
- Assign each student five vocabulary terms for which to record definitions and other relevant information. They submit this information to the teacher, who compiles it for sharing in a class discussion.
- Have students research the structure of the human hand as well as assistive hand device technologies. Direct students to make T-charts of the pros and cons of these technologies in consideration of the specified criteria and constraints. Require students' charts to include information about the structures and functions of existing designs. Students submit their information to the teacher for later use during a class discussion.
Day 3 – Budgeting, Brainstorming and Building
- (slides 20-22) Instruct students to record notes, including the key vocabulary term "budget" (slide 20) and the definition and guidelines for brainstorming (slides 21-22). Explain the requirements for purchasing materials—that students must fill out the materials for purchase on their budget sheets, so the teacher can sign off on the budget calculations before handing out materials.
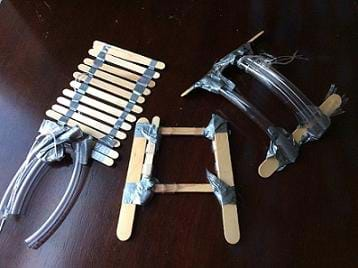
- Assign students to groups of 3-4 students each. Direct the groups to brainstorm among themselves hand device designs (refer to Figures 1-3 for examples created by other student groups).
- Once teams have an idea of viable designs, they create at least three sketches, labeling the parts and materials to be used for each structure in the design.
- Groups who complete the minimum three sketches must reach agreement between all members to begin with one of the three sketches. These groups fill out their budget sheet and begin building.

Figure 1. Three examples of student-created hand device prototypes.
Day 4 – Prototype Construction
- If groups did not start building by now, then it is time to select one sketch to start building the prototype today.
- Have groups fill out their materials budget sheet, obtain materials and construct prototypes.

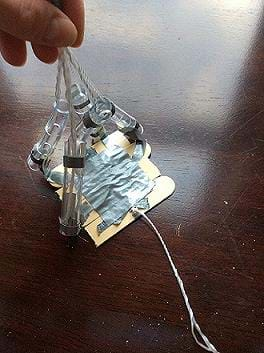
Figure 2. The fingers (clear plastic tubing) of a student's prototype are pulled by threaded strings.
Day 5 – Prototype Building, Testing, Communication and Redesign
- Have students record notes from (slides 23-28) the presentation, which includes key vocabulary and the EDP steps 4-8.
- Give each group 1 cup filled with 200 ml sand, and a second, empty cup. Each group tests its prototype by gripping the empty cup. Once they have succeeded in lifting the empty cup, they slowly pour the sand from the filled cup into the empty cup. Explain to students that this test is not exactly the same between groups, since the rate of sand being poured per second will differ between groups.
- Instruct students to communicate within their groups as to how the prototype performed, using key vocabulary terms (physics-based). Then students create new sketches that incorporate improvements to their design prototypes.
- Groups continue to build second prototypes, completing their budget sheets and obtaining materials as needed.

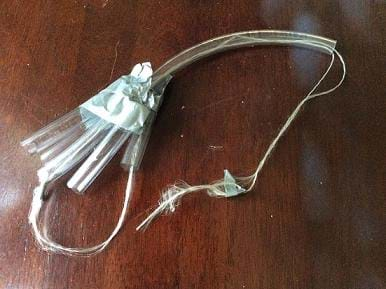
Figure 3. A student's hand device prototype, designed to pull a string to tighten the grip around a cup.
Day 6 – Reflection
- Give each student the Reflecting on the Engineering Design Process Worksheet. Describe what is expected in filling out each part of this assignment.
- Give teams time to make final alterations to their prototypes. Walk around to each group and have them perform a final test. Have students to discuss within their groups how their prototype performed, discussing forces and using other key vocabulary terms.
- In groups, have students complete the rest of the EDP worksheet.
Vocabulary/Definitions
air resistance: Type of frictional force that slows down objects as they travel through air.
applied force: Force applied to (exerted on) an object by another object.
assistive device: A product that helps someone perform a function that could not be done without that piece of technology.
bending: An added force (not directly across from support forces) that causes compression on one side and tension on the other.
biomechanics: The study of the motions of a human body, especially of the forces exerted by bones and muscles.
biomedical engineer: An engineer who uses STEM and medical knowledge to create solutions that improve the health and quality of life for human beings.
client: Person who communicates to an engineer the criteria of a design challenge.
compression: Two pushing forces, directly opposing each other that squeeze an object to try to squash (or compress) it.
constraint: A limitation or restriction.
criteria: Standards against which something must be judged; minimum expectations assigned for a design.
engineering design process, or EDP: A series of steps used by engineering teams to guide them as they develop new solutions, products or systems. The process is cyclical and iterative.
friction: A slowing-down force; exerted by a surface as an object moves across it.
gravity: A force that pulls objects towards the center of the Earth; force that pulls objects towards some massively large object.
inertia: State of being at a constant speed in the same direction.
iterative: Being or becoming repetitive.
Newton's first law : An object at rest stays at rest, until acted upon by an unbalanced force. An object in motion stays in motion, until acted upon by an unbalanced force.
Newton's third law: For every action, there is an equal and opposite action.
normal: Support force; exerted perpendicular to the surface of a stable object.
reverse engineering: The process of conducting research on how some solution (object or process) works; to understand what works well and what doesn't work well.
shear: Two pushing (or pulling) forces opposing each other, but not directly across from each other.
tension: Two forces pulling in opposite directions; the force used to stretch an object by pulling it apart.
unbalanced force: Force acting on an object in one direction that is greater/smaller in magnitude than opposing forces.
Assessment
Pre-Activity Assessment
Pre-Quiz: Have students complete the Assistive Hand Device Pre-Activity Quiz, which has students describe prior knowledge on the structure and function of the human hand, define and describe Newton's three laws of motion as observed in the motions of the human hand and identify the definition of nine forces. Use this as a formal or informal assessment.
Activity Embedded Assessment
Problem Statement: Individually, have students write brief problem statements, given the client's communicated need. Review written answers for information that is essential and ensure that unnecessary details have been excluded from their statements.
Post-Activity Assessment
Worksheet: In design groups, assign students to complete the Reflecting on the Engineering Design Process Worksheet. Review their answers for correct use of vocabulary in written explanations. Also review their answers for the corerct application of physics concepts, as students are asked to describe the forces acting on their prototypes during the final test.
Safety Issues
Instruct students on how to use safely use the tube cutters (or scissors). Observe students while cutting tubes.
Troubleshooting Tips
As students conduct the iterative process of building, testing and redesigning, advise them to consider reusing as many materials as possible. Remind students that they do not get a budget increase for each prototype; they must make do with the overall designated budget.
Activity Extensions
- Have students apply their knowledge of forces to draw free body diagrams of their prototypes' performances in the final test.
- Have students explore marketing by assigning criteria for visual appeal. Have students make 1-2 minute commercials. Follow this with a vote by instructors or students from another class.
Activity Scaling
- For lower grades, do not permit them to use the tube cutter.
- For higher grades, require design teams to communicate in writing the strengths and weaknesses of their design sketches, before giving out materials. Provide loans with interest, for extra money in the budget.
Subscribe
Get the inside scoop on all things Teach Engineering such as new site features, curriculum updates, video releases, and more by signing up for our newsletter!More Curriculum Like This

Students learn about the function and components of the human nervous system, which helps them understand the purpose of our brains, spinal cords, nerves and five senses. In addition, how the nervous system is affected during spaceflight is also discussed.

Students examine the structure and function of the human eye, learning some amazing features about our eyes, which provide us with sight and an understanding of our surroundings. Students also learn about some common eye problems and the biomedical devices and medical procedures that resolve or help...

Students are introduced to various types of hearing impairments and the types of biomedical devices that engineers have designed to aid people with this physical disability. Students learn about the hearing process and ways in which hearing can be lost.
Copyright
© 2015 by Regents of the University of Colorado; original © 2015 Worcester Polytechnic InstituteContributors
Kelly Cox, Kristen Billiar, Terri Camesano, Jeanne HubelbankSupporting Program
Inquiry-Based Bioengineering Research and Design Experiences for Middle-School Teachers RET Program, Department of Biomedical Engineering, Worcester Polytechnic InstituteAcknowledgements
This activity was developed under National Science Foundation grant no. EEC 1132628. However, these contents do not necessarily represent the policies of the National Science Foundation, and you should not assume endorsement by the federal government.
Last modified: May 9, 2020


User Comments & Tips