Quick Look
Grade Level: 4 (3-5)
Time Required: 2 hours 30 minutes
(three 50-minute class periods)
Expendable Cost/Group: US $0.25
Group Size: 1
Activity Dependency: None
Subject Areas: Physical Science, Science and Technology
NGSS Performance Expectations:

| 3-5-ETS1-3 |
Summary
Students learn about wind energy by making a pinwheel to model a wind turbine. Just like engineers, they decide where and how their turbine works best by testing it in different areas of the playground.
Engineering Connection
Engineers use their understanding of natural forces to obtain energy from renewable resources such as the sun, wind, rivers and organic matter. For example, regions with forceful and steady wind are suitable for wind farms. Engineers design wind turbines to produce electricity from the force of the wind. Turbines look like pinwheels with angled blades connected to a gear box, which is connected to a generator. Engineers collect and analyze wind data to continually improve turbine technology and wind farm design.
Learning Objectives
After this activity, students should be able to:
- Understand different sources of energy and that wind is a renewable energy source.
- Understand how a wind turbine works.
- Understand how engineers work to monitor wind and design technology to capitalize on wind energy.
- Understand how to use angles and which angles are best for wind turbines.
Educational Standards
Each TeachEngineering lesson or activity is correlated to one or more K-12 science,
technology, engineering or math (STEM) educational standards.
All 100,000+ K-12 STEM standards covered in TeachEngineering are collected, maintained and packaged by the Achievement Standards Network (ASN),
a project of D2L (www.achievementstandards.org).
In the ASN, standards are hierarchically structured: first by source; e.g., by state; within source by type; e.g., science or mathematics;
within type by subtype, then by grade, etc.
Each TeachEngineering lesson or activity is correlated to one or more K-12 science, technology, engineering or math (STEM) educational standards.
All 100,000+ K-12 STEM standards covered in TeachEngineering are collected, maintained and packaged by the Achievement Standards Network (ASN), a project of D2L (www.achievementstandards.org).
In the ASN, standards are hierarchically structured: first by source; e.g., by state; within source by type; e.g., science or mathematics; within type by subtype, then by grade, etc.
NGSS: Next Generation Science Standards - Science
| NGSS Performance Expectation | ||
|---|---|---|
|
3-5-ETS1-3. Plan and carry out fair tests in which variables are controlled and failure points are considered to identify aspects of a model or prototype that can be improved. (Grades 3 - 5) Do you agree with this alignment? |
||
| Click to view other curriculum aligned to this Performance Expectation | ||
| This activity focuses on the following Three Dimensional Learning aspects of NGSS: | ||
| Science & Engineering Practices | Disciplinary Core Ideas | Crosscutting Concepts |
| Plan and conduct an investigation collaboratively to produce data to serve as the basis for evidence, using fair tests in which variables are controlled and the number of trials considered. Alignment agreement: | Tests are often designed to identify failure points or difficulties, which suggest the elements of the design that need to be improved. Alignment agreement: Different solutions need to be tested in order to determine which of them best solves the problem, given the criteria and the constraints.Alignment agreement: | |
Common Core State Standards - Math
-
Represent and interpret data.
(Grade
4)
More Details
Do you agree with this alignment?
International Technology and Engineering Educators Association - Technology
-
Energy comes in different forms.
(Grades
3 -
5)
More Details
Do you agree with this alignment?
-
Test and evaluate the solutions for the design problem.
(Grades
3 -
5)
More Details
Do you agree with this alignment?
State Standards
Colorado - Math
-
Represent and interpret data.
(Grade
5)
More Details
Do you agree with this alignment?
Materials List
Each student should have:
- 2 longer-length pencil (with an intact eraser) or 2 Popsicle®/craft sticks
- 2 straight pin
- scissors
- several different sizes of paper
- glue or tape (only if Popsicle®/craft sticks are used)
- 1 copy of the KWL Chart (attached)
- 1 copy of the Pinwheel Worksheet (attached)
- 1 copy of the Pinwheel Template (attached)
Worksheets and Attachments
Visit [www.teachengineering.org/activities/view/cub_earth_lesson04_activity2] to print or download.Introduction/Motivation
Engineers study the processes of the Earth to figure out how we can get energy to light up and heat our homes. Wind is a powerful force that can be used to produce energy. It is a renewable energy source, which means it can be used again and again without ever using it up. Another great thing about wind is that it does not emit any pollutants like fossil fuels emit. So, in essence, wind is Earth friendly!
How do engineers harness the wind? Have you ever seen a windmill? What does it look like? Well, engineers design machines called wind turbines that look a little like a windmill.
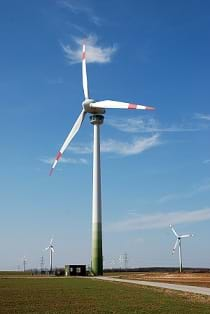
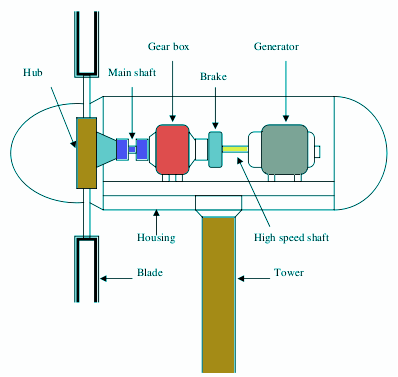
You may have seen wind farms or wind turbines in open fields or in bodies of water. They most often resemble tall, white pinwheels on a stick. A turbine has several parts (see Figure 1), the blades are connected to a gear box, which makes it spin faster and is connected to the generator. As the wind blows, the blades of the turbines spin, which turns a generator that creates electricity for our use. A turbine also has a brake in case the wind starts blowing too fast. Water turbines work in a similar way, except they use water instead of wind.

Today, we are going explore a pinwheel to model a wind turbine. We are going to make a part of a wind turbine (the blades). When the blades of a turbine turn in the wind, they make the generator turn, which then creates electricity. Once we have the general knowledge of how a pinwheel works, we will design our own!
Procedure
Before the Activity
- Gather activity materials.
- Make an overhead of the wind turbine diagram (Figure 1).
- Make enough copies of the Wind Energy KWL Chart, the Pinwheel Worksheet and the Pinwheel Template (attached) for each to student to have one.
- Make a sample wind turbine/pinwheel to show the students.
With the Students
Day One
- Pass out the Wind Energy KWL Chart. Ask students to write down in the "Know" column what they already know about energy created by wind. Hint: Think windmills.
- Discuss with students the ways in which we get energy. (Answers: the Sun, the wind, water, fossil fuels and nuclear power plants)
- Explain to students that they will be exploring a pinwheel to model a wind turbine. Ask the students if they have ever seen a wind turbine (tell them they are similar to windmills).
- Explain to students what a wind turbine is, how it works and why we use it. Tell them that they will be making part of a wind turbine (the blades). Explain to students that when the blades turn in the wind, they make the generator turn, which then creates electricity.
Making the Turbine
- Pass out the materials to build the wind turbine/pinwheel. Students should work individually (or may work in pairs if desired).
- For the pinwheel handle, students may use a pencil or glue (or tape) two Popsicle®/craft sticks together end to end. If using Popsicle®/craft sticks, set aside to dry.
- Pass out the Pinwheel Template. Students should follow the directions listed in the Instructions.
- If time permits, students can color their pinwheels. Explain that they will be folding the corners over, so both sides of the paper will be seen.
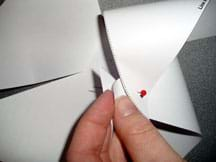
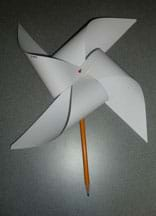
- Have students poke their straight pin through all four corners of the paper (in order of lowest to highest number) and then through the center of the paper (position #5). Then, affix the paper blades — with the straight pin poked into the #5 position on the blades — to the eraser of the pencil or to one end of the Popsicle®/craft sticks.

Day Two
Testing the Wind Turbine/Pinwheel

- Discuss with the students that engineers create prototypes and test everything they build to determine how well it works. Now the students will test the conditions in which their wind turbine will work the best. Discuss the factors that effect how well the turbine works. (Answers: the strength of the wind, direction of the wind and actual construction quality of the wind turbine.) Ask them where they think the wind is the strongest. (Answer: low to the ground or high up) Ask the students in what direction they should point their pinwheel. (Answer: into the wind, at an angle to the wind or away from the wind)
- Have students record what they would like to know about how their wind turbine will work under the "Want to Know" column of the KWL chart. (They can use the questions discussed above.)
- Pass out a Pinwheel Worksheet to each student.
- Take the students outside with their pinwheels and worksheets, and have the students face their pinwheels into the wind. What happens? (The pinwheels should turn.) What happens if the students turn their pinwheels at different angles to the wind? Have them turn 90 degrees and 180 degrees. Have students record their findings on their worksheets.
- Have students test the pinwheel low to the ground, then try somewhere higher (a hill near the school or a playground structure), and record their findings.
Day 3
Designing your own Wind Turbine/Pinwheel
- Regroup and have students complete the remaining worksheet questions on page one.
- Next, have them record what they have learned from their first prototype under the "Learned" column of their KWL charts. What would they change anything on their wind turbine if they were to build it again? Can they think of anything that would improve the design of their wind turbines? Solicit responses, clarify, and record answers on the board.
- Remind students that engineers go through the engineering design process, an iterative series of steps to uncover new design possibilities and find the best solution. Explain that they will use what they learned with the prototype to come up with a better design.
- Distribute the rest of the materials (several different sizes of paper, scissors, pencil/popsicle sticks, pins, etc.) to pairs of students.
- Encourage students to work together to figure out what features are important for a wind turbine. Have students sketch new designs in part 3a of the Pinwheel Worksheet.
- Have students build and test their new prototype with the same procedure as before. Have them record the changes they made in part 3b on the worksheet.
- Remind students that one very important task of engineers is to record their designs so that they may be duplicated. Have students write up the experiment in step 4 of the worksheet. Be sure they include everything they need and everything they did. They should clearly write down each step in simple sentences so that others may understand their directions/steps.
Assessment
Pre-Activity Assessment
KWL Chart: Pass out the Wind Energy KWL Chart. Ask students to write down in the "Know" column what they already know about energy created by wind. Hint: Think windmills.
Activity Embedded Assessment
KWL Chart: Have students record what they would like to know about how their wind turbine will work under the "Want to Know" column of the KWL chart. Solicit student responses.
Worksheet: Have students complete the Pinwheel Worksheet (attached).
Post Activity Assessment
KWL Chart: Have students record what they have learned under the "Learned" column of their KWL charts. Would they change anything on their wind turbine if they built it again? Solicit responses, clarify, and record answers on the board.
Communicating Directions: One very important task of engineers is to record their designs so that they may be duplicated. Have students write up the experiment. Be sure they include everything they need and everything they did. They should clearly write down each step in simple sentences — in a logical sequential order — so that others may understand their directions/steps.
Have the student read through their directions exactly as they have written them. (You can also have the students trade their directions with their neighbor and read each other's for understanding.) Do they find any mistakes or vague steps? Can they complete the task from what is written down? Or you can take one or two of the sets of directions as examples and demonstrate them in front of the class. Make sure the students do exactly what they have written down. Often students skip steps when writing down directions and the desired action cannot be completed. This is good for stressing the importance of precise procedures in engineering and science design and experimentation.
Safety Issues
Remind students that thumb tacks are sharp, and they should only press their tacks into their pinwheel handles (not into the furniture or, especially, into each other!).
Troubleshooting Tips
This activity should be done on a windy/breezy day. If the weather is not cooperating and the day is still, students can blow at their pinwheel, turning it at the different angles.
If their pinwheels do not turn very well, try using store bought pinwheels for the testing portion.
Activity Extensions
How does the size of a blade on a wind turbine affect its performance? Students can explore this topic by varying the sizes of paper that they use to create their pinwheels. Try creating pinwheels out of three different sized squares and have the class calculate the area of each square of paper before building their wind turbines. With the class, discuss how different sizes perform!
Subscribe
Get the inside scoop on all things Teach Engineering such as new site features, curriculum updates, video releases, and more by signing up for our newsletter!More Curriculum Like This

Students learn how engineers harness the energy of the wind to produce power by following the engineering design process as they prototype two types of wind turbines and test to see which works best. Students also learn how engineers decide where to place wind turbines, and the advantages and disadv...

Students learn about wind as a source of renewable energy and explore the advantages and disadvantages wind turbines and wind farms. They also learn about the effectiveness of wind turbines in varying weather conditions and how engineers work to create wind power that is cheaper, more reliable and s...

Students get introduced to the real-world technical tool of a wind turbine propeller attachment. It’s a device that efficiently harvests wind energy, and in this activity they’ll build one of their own using a LEGO wind turbine, fan, and energy meter.

Students learn and discuss the advantages and disadvantages of renewable and non-renewable energy sources. They also learn about our nation's electric power grid and what it means for a residential home to be "off the grid."
References
Originally found at http://www.windpower.org/
Originally found at http://www.energyquest.ca.gov/story/chapter16.html
https://www.energy.gov/eere/wind/advantages-and-challenges-wind-energy
Copyright
© 2004 by Regents of the University of ColoradoContributors
Jessica Todd; Melissa Straten; Malinda Schaefer Zarske; Janet YowellSupporting Program
Integrated Teaching and Learning Program, College of Engineering, University of Colorado BoulderAcknowledgements
The contents of this digital library curriculum were developed under a grant from the Fund for the Improvement of Postsecondary Education (FIPSE), U.S. Department of Education and National Science Foundation GK-12 grant no. 0338326. However, these contents do not necessarily represent the policies of the Department of Education or National Science Foundation, and you should not assume endorsement by the federal government.
Last modified: January 15, 2021


User Comments & Tips