
Quick Look
Grade Level: 9 (8-10)
Time Required: 1 hour
Lesson Dependency: None
Subject Areas: Geometry

Summary
Students take a close look at truss structures, the geometric shapes that compose them, and the many variations seen in bridge designs in use every day. Through a guided worksheet, students draw assorted 2D and 3D polygon shapes and think through their forms and interior angles (mental “testing”) before and after load conditions are applied. They see how engineers add structural members to polygon shapes to support them under compression and tension, and how triangles provide the strongest elemental shape. A PowerPoint® presentation is provided. This lesson prepares students for two associated activities that continue the series on polygons and trusses.Engineering Connection
Civil engineers design buildings, roads, bridges and dams and work in arenas such as transportation, water resources, surveying and construction. Much of their work involves the design of strong and safe structures, often employing creative truss designs that are original compositions of geometric forms. Like engineers, students explore the importance of testing—a key step in the engineering design process. The exploration of how trusses contribute to strong bridges illustrates how geometry figures into engineering designs that account for the anticipated loads from traffic, weather conditions and materials weight.
Learning Objectives
After this lesson, students should be able to:
- Identify trusses in a bridge structure.
- Describe the different shapes that form truss structures.
- Record measurements of interior and exterior angles.
- Discuss how polygon shapes are used and analyzed in engineering
Educational Standards
Each Teach Engineering lesson or activity is correlated to one or more K-12 science,
technology, engineering or math (STEM) educational standards.
All 100,000+ K-12 STEM standards covered in Teach Engineering are collected, maintained and packaged by the Achievement Standards Network (ASN),
a project of D2L (www.achievementstandards.org).
In the ASN, standards are hierarchically structured: first by source; e.g., by state; within source by type; e.g., science or mathematics;
within type by subtype, then by grade, etc.
Each Teach Engineering lesson or activity is correlated to one or more K-12 science, technology, engineering or math (STEM) educational standards.
All 100,000+ K-12 STEM standards covered in Teach Engineering are collected, maintained and packaged by the Achievement Standards Network (ASN), a project of D2L (www.achievementstandards.org).
In the ASN, standards are hierarchically structured: first by source; e.g., by state; within source by type; e.g., science or mathematics; within type by subtype, then by grade, etc.
Common Core State Standards - Math
-
Use geometric shapes, their measures, and their properties to describe objects (e.g., modeling a tree trunk or a human torso as a cylinder).
(Grades
9 -
12)
More Details
Do you agree with this alignment?
International Technology and Engineering Educators Association - Technology
-
Infrastructure is the underlying base or basic framework of a system.
(Grades
9 -
12)
More Details
Do you agree with this alignment?
State Standards
Colorado - Math
-
Use geometric shapes, their measures, and their properties to describe objects.
(Grades
9 -
12)
More Details
Do you agree with this alignment?
-
Concepts of similarity are foundational to geometry and its applications.
(Grades
9 -
12)
More Details
Do you agree with this alignment?
Worksheets and Attachments
Visit [www.teachengineering.org/lessons/view/cub_polygons_angles_trusses_lesson01] to print or download.Pre-Req Knowledge
Students should have an understanding of interior and exterior angles and be able to locate them inside and outside of triangles.
Introduction/Motivation
(Be ready to show the class slides 1-14 of the Introduction to Trusses Presentation, a PowerPoint® file, as you present the content provided below. Also, make copies of the Lesson Worksheet, one per student. Begin with the pre-assessment question, as provided in the Assessment section. Students need pencils, rulers and protractors.)
(Slide 1) To start this lesson, let’s take a look at some bridges and trusses to see what geometric shapes compose them. Let’s see how geometry figures into engineers’ real-world designs.
(Slides 2-3): What is a truss? (See if students have any ideas.) A truss is a structural unit made from straight bars that form triangles or other stable, rigid shapes. The simplest form of a truss is one single triangle. Most trusses are based on the geometric rigidity of the triangle shape.
(Slide 4) Here are a few examples of trusses used for construction purposes. Wooden trusses are often used for peaked roof construction. And notice the trusses in this church ceiling.
(Slide 5) Tell me an example of a truss you have seen. (Listen to some student volunteers, perhaps bridges or houses under construction. Ask them to explain in their own words the purpose of a truss. Get them to the idea that individual parts [structural members] are joined to make a stronger part.)
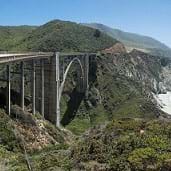
(Slides 6-7) What makes up a truss? A truss is a series of straight steel bars that form triangles or other stable, rigid shapes. A truss is composed of structural members, joints (also called nodes), angles and polygons. A node (joint) is a place where two or more structural truss pieces meet. Trusses create strong frameworks that distribute the weight of bridges and their loads from single points over wider areas. Due to their geometry and rigidity, trusses can transform a simple beam bridge (a beam with two supports) into a much stronger and stable bridge.
(Slides 8-9) Many varieties of truss bridges have been designed and implemented, such as planar and space trusses. Planar (simple) trusses consist of members and nodes in the two-dimensional plane, such as bicycle frames. They support loads in the 2D plane. Space trusses consist of members and nodes in the 3D plane, such as bridges that support loads from all directions,
(Slide 10) Look at these two bridges. Which is an example of a planar truss and which is an example of a space truss? (Answer: The left photo shows a planar truss; the right photo shows a space truss.)
(Slide 11) Remember that many variations of truss bridges have been designed and implemented. Take a look at a few more truss designs. Point out the shapes you recognize—triangles, arches, squares, rectangles, other regular polygons, etc. Truss bridges give engineers great opportunities to express their creativity while building strong and sturdy bridges.
(Slide 12) Engineers have several terms that they use when designing, building and testing structures such as trusses. First, they refer to the weight of something that is applied to the top, sides or floors of a structure as a “load.” For example, the cars that drive over a bridge apply a load to the bridge and the wind that blows sideways across a bridge applies a load to the sides of the bridge. Next, engineers make trusses and other structures stronger by reinforcing the designs with additional “members,” which are physical pieces of a larger complex system. For example, steel beams can be structural members added to truss designs to reinforce how much load the truss can hold.
(Slides 13-14) We can classify the load that acts on a bridge as either a compression or tension force. Compression is pushing things together, like pushing a spring (so that releasing it causes it to return to its original position). Tension is pulling things apart, like pulling on opposite ends of a rope. Different parts of trusses address either compression or tension, as shown by the color-coded members on this diagram of a truss bridge. (End of the slides for this lesson; show the remaining slides during the second associated activity Polygons and Popsicle Trusses.)
(Hand out the worksheets. As a class, guide students through the worksheet questions.) Today, we will think like civil engineers and apply our knowledge of geometric shapes to the design of trusses. First, start by identifying the three polygons in question 1. (Answers: Square, pentagon and hexagon.) Now imagine standing these polygons upright and placing weight on top of them. Do you think any part of these shapes would collapse with this weight/force/load on them? Where would they collapse? (Give students time to think about these questions and draw/write their answers on their worksheets. Possible answers: They are likely to collapse inwards due to the load, with the center of collapse around where the force/weight is applied.) Use stars to mark on your papers where the collapses would happen. Use dashed lines to mark the new locations of the deformed members.
Now, if you were going to add supports to these shapes to keep them from collapsing, where would you put those? (Possible answer: In places to prevent the predicted collapses.) Use dotted lines to draw them on your paper.
Next, let’s act as engineers and test how these shapes would change under a load in three-dimensional space instead of two-dimensional space. This is similar to how engineers design planar and space trusses. Following your worksheet, work through the questions about how a square and a triangular prism would deform under a load. If you were to add supports to those shapes, where would you put them? (Give students time to think, draw and write their answers. Possible answers: Add an inner triangle to the cube to prevent deformation through its center; add members to the center of the triangular prism to support its middle area.) (Let students work through the rest of the worksheet questions. When students are finished with all questions, lead a class discussion so they can share and compare their answers and conclusions.)
Engineers learn about how to analyze shapes in structures and apply that knowledge to many of the buildings and products that we use every day. We just discussed how different polygons deform under applied loads. Now, take a few minutes to individually write down as many objects in the human-built world that also contain familiar polygons, such as triangles. (After a few minutes, create a class list compiled from student suggestions. See the real-world connections in the Assessment section for a list of examples.)
Lesson Background and Concepts for Teachers
Background information about trusses is provided in the Introduction to Trusses Presentation. In general, a truss is a structure made from individual structural members that form triangles or other stable, rigid shapes. Trusses distribute the forces (its load, which is the weight and forces applied to a structure’s top, sides and floor) applied to a structure from single points to more surface area, which increases bridge safety. The many different kinds of trusses include planar (simple) and space trusses. Planar trusses are distinguished by being in the two-dimensional plane, such as is seen in bike frames and roofing rafters. Space trusses operate in the three-dimensional plane, such as many bridges and towers. While many different truss designs have been designed and constructed (see slide 11), all are built to withstand the anticipated forces of compression and tension.
The force of compression pushes inward on structural members; examples include the forces of the ground pushing on the member and the weight of other members. The force of tension pulls outwards on structural members; examples include the forces of the ground pulling on the members that compose a bridge’s bottom base. See slide 14 for a color-coded diagram that shows compression and tension on truss members.
When designing structural supports through the use of trusses, engineers take compression and tension into account. They add members and use various polygon shapes to increase the strength of their designs. It is important that students explore the strength of different polygons subjected to a load before they begin the associated activities (Refer to Triangles Everywhere: Sum of Angles in Polygons for more instructions), which culminates with the construction of their own model bridges.
Associated Activities
- Triangles Everywhere: Sum of Angles in Polygons - Students study polygons and measure angles to explore how the geometry of shapes and their angles affects truss design and stability. They divide regular polygons into triangles, enabling them to calculate the sums of angles in polygons. They learn the equations to find the sum of interior angles in a regular polygon, and to find the measure of each angle in a regular n-gon.
- Polygons and Popsicle Trusses - Students apply their knowledge of polygons and angles to design strong and unique truss structures for a hypothetical real-world engineering challenge. Teams use hot glue and Popsicle sticks to build small-size truss prototypes and then load test them, while collecting before/after angle measurements to analyze the deformation of shapes.
Lesson Closure
Today we looked at many polygons and how they behave when we put weight on them. This is important for civil engineers to understand when designing trusses. Why do you think civil engineers choose one shape for a truss over another? (Answer: Some shapes deform a lot when weight is put on them. Some, like triangles, do not deform as much. Engineers use strong shapes so that bridges and other structures are safe and won’t fail when they are being used by people). Now let’s move to the next step—exploring the angles of different polygons and relating that to truss design and stability.
Vocabulary/Definitions
civil engineer : A type of engineer who design and plan structures and systems in the human-built world. This might include essential infrastructure such as buildings, roads, tunnels, bridges, towers, factories, water distribution, and waste collection and treatment, which are essential infrastructure for people today.
compression : A force that pushes inwards on a structural member.
joint: A place where two or more structural truss pieces meet. Also called a node.
planar truss: A truss with its structural members and nodes in a single plane (2D). One example of a planar truss is a single triangle, which is called a simple truss.
space truss: A truss with its members and nodes composing a three-dimensional (3D) framework.
structural load: Forces that apply to a structure, such as the weight of something applied to the top, sides and/or floors of a structure.
structural member: A support added to polygon-composed trusses to increase structural stability.
tension : A force that pulls outwards on a structural member.
truss: A structural form made from the joining of individual structural members that form triangles or other stable, rigid shapes. Due to its geometric rigidity, a truss distributes weight from a single point over a wider area.
Assessment
Pre-Lesson Assessment
Opening Question: Ask students: What regular geometric shape is the strongest—triangle, square, circle, pentagon, hexagon, etc.? And why? (Tell students that they will find out more about this in the lesson to come. Possible student answers: The triangle is the strongest shape because it has a strong base, I see triangles in a lot of structures so they must be strong, and it distributes weight better than other polygons.)
Post-Introduction Assessment
Practice: As students complete the Lesson Worksheet, they identify various 2D and 3D polygons and consider how the shapes perform when weight is applied, and what can be done to keep the original polygon shapes from collapsing. They find the sums of angles in various shapes, before and after deformation. Discuss the worksheet answers as a class, and review students’ individual worksheet answers to gauge their depth of comprehension and readiness to move on to the first associated activity, Triangles Everywhere: Sum of Angles in Polygons.
Lesson Summary Assessment
Real-World Connections: Ask students to individually list on paper the places, objects, structures and products in which they have seen triangles functioning as structural shapes. After five minutes, go around the class and have all students contribute examples from their lists while you compile a master list on the classroom board. (Possible answers: Bicycle frames, bridges, peaked roof supports, highway ramps, buildings, corbels, chairs and tables, shelf brackets, step ladders, railings and gates, highway ramps, radio towers, cranes, etc.)
Lesson Extension Activities
Consider conducting the Trusses & Triangles lesson and/or its associated activity, Truss Destruction, during which students learn about the fundamental strength of different shapes (especially triangles) and then construct trusses (using Popsicle sticks and hot glue), testing them to failure as they evaluate the relative strength of different truss configurations and construction styles.
Subscribe
Get the inside scoop on all things Teach Engineering such as new site features, curriculum updates, video releases, and more by signing up for our newsletter!More Curriculum Like This

Students learn about regular polygons and the common characteristics of regular polygons. Through a guided worksheet and teamwork, students explore the idea of dividing regular polygons into triangles, calculating the sums of angles in polygons using triangles, and identifying angles in shapes using...

Learn the basics of the analysis of forces engineers perform at the truss joints to calculate the strength of a truss bridge known as the “method of joints.” Find the tensions and compressions to solve systems of linear equations where the size depends on the number of elements and nodes in the trus...
Simulating a real-world civil engineering challenge, student teams are tasked to create strong and unique truss structures for a local bridge. They design to address project constraints, including the requirement to incorporate three different polygon shapes, and follow the steps of the engineering ...

Students learn about the fundamental strength of different shapes, illustrating why structural engineers continue to use the triangle as the structural shape of choice.

Copyright
© 2016 by Regents of the University of ColoradoContributors
Maia Vadeen; Malinda Zarske; Nathan Coyle; Ryan Sullivan; Andi Vicksman; Russell Anderson; Sabina SchillSupporting Program
CU Teach Engineering (a STEM licensure pathway), Engineering Plus Degree Program, University of Colorado BoulderAcknowledgements
This activity was developed by CU Teach Engineering, a pathway to STEM licensure through the Engineering Plus degree program in the College of Engineering and Applied Science at the University of Colorado Boulder.
Last modified: June 30, 2019
User Comments & Tips