Quick Look
Grade Level: 7 (7-9)
Time Required: 5 hours 45 minutes
(seven 50-minute class periods)
Expendable Cost/Group: US $0.30 Students use online web quest (free), 3D modeling app (free) and a 3D printer (or modeling clay) to design and create prototypes.
Group Size: 3
Activity Dependency:
Subject Areas: Life Science, Physical Science, Science and Technology
NGSS Performance Expectations:

| MS-ETS1-1 |
| MS-ETS1-2 |

Summary
Acting as if they are biomedical engineers, students design and print 3D prototypes of pressure sensors that measure the pressure of the eyes of people diagnosed with glaucoma. After completing the tasks within the associated lesson, students conduct research on pressure gauges, apply their understanding of radio-frequency identification (RFID) technology and its components, iterate their designs to make improvements, and use 3D software to design and print 3D prototypes. After successful 3D printing, teams present their models to their peers. If a 3D printer is not available, use alternate fabrication materials such as modeling clay, or end the activity once the designs are complete.Engineering Connection
Biomedical engineers rely on modeling to design and create prototypes for devices that may not yet be approved for testing. In order to prepare for the cost of manufacturing a device, careful consideration goes into the potential constraints of that device. Using various software programs, engineers design and visualize the device they wish to create in order to determine whether the future device is worth the effort, time and expense. Mirroring real-world engineers, in this activity, students play the role of engineers challenged to create intraocular pressure sensor prototypes to measure pressure within the eyes of people with glaucoma.
Learning Objectives
After this activity, students should be able to:
- Design and 3D print an at-scale prototype of a pressure sensor.
- Apply an understanding of radio-frequency identification (RFID) to the design of prototype pressure sensors.
- Explain how their prototype devices use RFID technology to provide a tool to help people with glaucoma.
Educational Standards
Each TeachEngineering lesson or activity is correlated to one or more K-12 science,
technology, engineering or math (STEM) educational standards.
All 100,000+ K-12 STEM standards covered in TeachEngineering are collected, maintained and packaged by the Achievement Standards Network (ASN),
a project of D2L (www.achievementstandards.org).
In the ASN, standards are hierarchically structured: first by source; e.g., by state; within source by type; e.g., science or mathematics;
within type by subtype, then by grade, etc.
Each TeachEngineering lesson or activity is correlated to one or more K-12 science, technology, engineering or math (STEM) educational standards.
All 100,000+ K-12 STEM standards covered in TeachEngineering are collected, maintained and packaged by the Achievement Standards Network (ASN), a project of D2L (www.achievementstandards.org).
In the ASN, standards are hierarchically structured: first by source; e.g., by state; within source by type; e.g., science or mathematics; within type by subtype, then by grade, etc.
NGSS: Next Generation Science Standards - Science
| NGSS Performance Expectation | ||
|---|---|---|
|
MS-ETS1-1. Define the criteria and constraints of a design problem with sufficient precision to ensure a successful solution, taking into account relevant scientific principles and potential impacts on people and the natural environment that may limit possible solutions. (Grades 6 - 8) Do you agree with this alignment? |
||
| Click to view other curriculum aligned to this Performance Expectation | ||
| This activity focuses on the following Three Dimensional Learning aspects of NGSS: | ||
| Science & Engineering Practices | Disciplinary Core Ideas | Crosscutting Concepts |
| Define a design problem that can be solved through the development of an object, tool, process or system and includes multiple criteria and constraints, including scientific knowledge that may limit possible solutions. Alignment agreement: | The more precisely a design task's criteria and constraints can be defined, the more likely it is that the designed solution will be successful. Specification of constraints includes consideration of scientific principles and other relevant knowledge that is likely to limit possible solutions. Alignment agreement: | All human activity draws on natural resources and has both short and long-term consequences, positive as well as negative, for the health of people and the natural environment. Alignment agreement: The uses of technologies and any limitations on their use are driven by individual or societal needs, desires, and values; by the findings of scientific research; and by differences in such factors as climate, natural resources, and economic conditions.Alignment agreement: |
| NGSS Performance Expectation | ||
|---|---|---|
|
MS-ETS1-2. Evaluate competing design solutions using a systematic process to determine how well they meet the criteria and constraints of the problem. (Grades 6 - 8) Do you agree with this alignment? |
||
| Click to view other curriculum aligned to this Performance Expectation | ||
| This activity focuses on the following Three Dimensional Learning aspects of NGSS: | ||
| Science & Engineering Practices | Disciplinary Core Ideas | Crosscutting Concepts |
| Evaluate competing design solutions based on jointly developed and agreed-upon design criteria. Alignment agreement: | There are systematic processes for evaluating solutions with respect to how well they meet the criteria and constraints of a problem. Alignment agreement: | |
Common Core State Standards - Math
-
Reason abstractly and quantitatively.
(Grades
K -
12)
More Details
Do you agree with this alignment?
-
Use appropriate tools strategically.
(Grades
K -
12)
More Details
Do you agree with this alignment?
-
Solve problems involving scale drawings of geometric figures, including computing actual lengths and areas from a scale drawing and reproducing a scale drawing at a different scale.
(Grade
7)
More Details
Do you agree with this alignment?
-
Solve real-life and mathematical problems involving angle measure, area, surface area, and volume.
(Grade
7)
More Details
Do you agree with this alignment?
International Technology and Engineering Educators Association - Technology
-
Students will develop an understanding of the attributes of design.
(Grades
K -
12)
More Details
Do you agree with this alignment?
-
Students will develop an understanding of engineering design.
(Grades
K -
12)
More Details
Do you agree with this alignment?
-
Modeling, testing, evaluating, and modifying are used to transform ideas into practical solutions.
(Grades
6 -
8)
More Details
Do you agree with this alignment?
-
Develop innovative products and systems that solve problems and extend capabilities based on individual or collective needs and wants.
(Grades
6 -
8)
More Details
Do you agree with this alignment?
-
Refine design solutions to address criteria and constraints.
(Grades
6 -
8)
More Details
Do you agree with this alignment?
-
Create solutions to problems by identifying and applying human factors in design.
(Grades
6 -
8)
More Details
Do you agree with this alignment?
-
Critue whether existing and proposed technologies use resources sustainably.
(Grades
9 -
12)
More Details
Do you agree with this alignment?
State Standards
Michigan - Math
-
Reason abstractly and quantitatively.
(Grades
K -
12)
More Details
Do you agree with this alignment?
-
Use appropriate tools strategically.
(Grades
K -
12)
More Details
Do you agree with this alignment?
-
Solve problems involving scale drawings of geometric figures, including computing actual lengths and areas from a scale drawing and reproducing a scale drawing at a different scale.
(Grade
7)
More Details
Do you agree with this alignment?
-
Solve real-life and mathematical problems involving angle measure, area, surface area, and volume.
(Grade
7)
More Details
Do you agree with this alignment?
Michigan - Science
-
Design solutions to problems using technology.
(Grade
7)
More Details
Do you agree with this alignment?
Materials List
Each group needs:
- graph paper and pencils
- access to a computer or laptop with Internet access
- tinkercad 3D design tool, a free and easy-to-learn online app available at https://www.tinkercad.com/; requires an email address to open a free account; must be 13 years of age or older
- Overcoming Glaucoma: Dennis Howard's Story Handout, one per person
- Under Pressure WebQuest Worksheet, one per person
- homework from the associated lesson; these are students' own designs for pressure sensor devices that measure eye pressure for people with glaucoma in the form of graph paper sketches with labeled components and structures (RFID reader, RFID tag, antenna), including brief function descriptions, one per person
- Peer Evaluation: Evaluating Preliminary Designs Checklist, one per person
- Peer Evaluation: THE TEST? Will It Fit?, one per group
- Teacher Evaluation: Under Pressure Prototype Presentation Grading Rubric, one per group
- Peer Evaluation: Potential Projects to Fund Analysis, one per person
- presentation method or materials, such as PowerPoint®, Prezi and/or poster board
To share with the entire class:
- 3D printer; alternatively, if 3D printing is not available, use modeling clay
- 1 spool of 3D printer filament, such as FLASHFORGE PLA filament for $29 at https://flashforge-usa.com/products/pla-filament-for-creator-and-creator-pro?variant=5344971456550; 1 spool of filament makes ~140 prototype devices based on the design constraints within this activity
Worksheets and Attachments
Visit [www.teachengineering.org/activities/view/mis_eyes_lesson01_activity1] to print or download.Pre-Req Knowledge
Ability to calculate the volume of a given object. It is strongly recommended that students complete the These Eyes! Technologies to Measure Eye Pressure associated lesson prior to beginning this activity.
Introduction/Motivation
You previously read about a boy named Christopher who has glaucoma. We discussed what causes glaucoma and how glaucoma can cause irreparable vision loss. To help us further understand the damage that can be caused by increased pressure in the eyes of people diagnosed with glaucoma, let's watch a short video report about Dennis Howard, an avid sailor. As you are watching, answer the questions on the handout. (Pass out the Overcoming Glaucoma: Dennis Howard's Story Handout and show on online video at http://www.cbsnews.com/videos/overcoming-glaucoma-dennis-howards-story. If necessary, play the video twice so students can check their answers. Then assign one person in each partnership as Partner A and the other as Partner B. Then continue.)
As you watched Dennis's personal story, you came to understand the impact glaucoma has on an individual's eyesight. You also learned what he has done to save the remaining eyesight. Partner As, I would like you to read to Partner B your answer to question 3. Partner Bs be prepared to report your partner's responses to the rest of the class. (Pause for student exchange and then call on a few of the Partner B students to share their partners' responses with the rest of the class).
Now, Partner Bs please tell Partner A your answer to question 5. Partner As be prepared to report your partner's responses to the rest of the class. (Pause for student exchange and then call on a few of the Partner A students to share their partners' responses with the rest of the class).
In your last responses, you told us that the pressure in Dennis's eyes had to be reduced through surgery. Raise your hand if you believe that knowing the pressure in his eyes would be helpful to him. (Pause to note the raised hands.) Raise your hand if you believe that knowing the pressure in Christopher's (the boy from the lesson's article) eyes would be helpful to him. (Pause to note the raised hands.) I see many of you believe this would be helpful. I agree with you because if Dennis and Christopher were able to identify pressure changes, they could quickly get medical help to reduce the pressure.
(Present to students the following hypothetical scenario for the engineering design challenge. The story is fictional, but gives students an opportunity to imagine what it might be like to be to be engineers involved in the research and design of medical devices.) Now, you will act as if you are biomedical engineers challenged to create prototypes of a sensor that can help Dennis and Christopher identify pressure changes in their eyes. Once you have designed and 3D-printed your prototype, you will present it to representatives from the Glaucoma Research Foundation, who are ready to award funding for progressive glaucoma research. (Students' class peers will act as foundation representatives.)
We have spent time understanding how radio-frequency identification (RFID) can support us in creating a wireless device that transmits information about pressure in the eyes. Now, we must consider the way the device will measure pressure, since this is what Christopher and Dennis would like to be able to do. In our previous discussions, you mentioned some things that we need to consider when developing a device that could measure pressure. Let's list these features and capabilities because they are our design requirements. (On the classroom board or other classroom projecting device, begin to create a list of design constraints, building off the discussion in the associated lesson. See Figure 1 for an example.)
Remember, when biomedical engineers design medical devices, they determine and define what is needed for a successful solution. Engineers call these requirements and features "criteria and constraints of the design problem." They take into consideration the relevant scientific principles, technologies and impacts on people and the natural environment.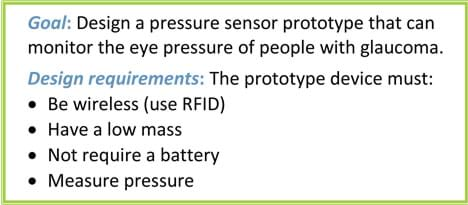
Based on this information, we have worked together to learn about the components of RFID technology, so that we can design a wireless device that requires no batteries. Based on our current list, we still have a few more criteria that we need to meet. Let's start with the "measure pressure" requirement.
In order to understand how our device will measure pressure, we need to investigate various pressure gauges used in our everyday lives. As you are conducting this research, consider which pressure gauge would be most effective for your prototype pressure sensor design. Remember: This pressure sensor must measure the pressure in the eyes, so it must fit in the eyes! Before you begin, let's add these requirements to our list (Figure 2). As you are conducting your research, refer back to this list.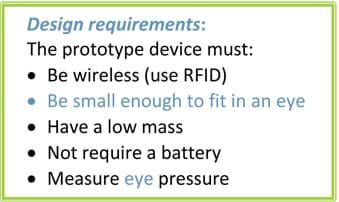
(Guided by the Under Pressure WebQuest Worksheet, direct student pairs to conduct research by completing the Pressure WebQuest found at http://underpressurewebquest.weebly.com/, which supports their research and prepares them for the next task.)
Now that you have had time to research pressure gauges, take out your homework from last night (from the associated lesson). Work with your partner (or small group) to evaluate each other's designs. Use the Peer Evaluation: Evaluating Preliminary Designs Checklist to guide you through this process. 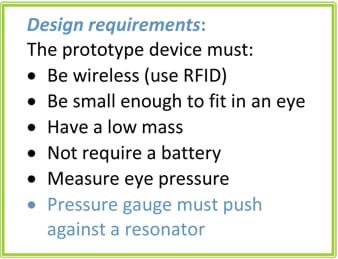
As you are working, notice that the checklist has you check for the design requirements that we have developed as a class. At the end of the web quest you were introduced to new requirements. Let's add these to our original list (see Figure 3). Please refer back to this list as you are working throughout the activity.
Procedure
Before the Activity
- Gather materials and make copies of Overcoming Glaucoma: Dennis Howard's Story Handout, Under Pressure WebQuest Worksheet, Peer Evaluation: Evaluating Preliminary Designs Checklist, Peer Evaluation: THE TEST? Will It Fit?, Teacher Evaluation: Under Pressure Prototype Presentation Grading Rubric, Peer Evaluation: Potential Projects to Fund Analysis.
- For Day 1, be prepared to show the class a four-minute online CBS news video, Overcoming Glaucoma: Dennis Howard's Story. Also consider how you will group students for the introduction when they work in pairs to discuss a short video clip and conduct research. To complete the introduction, assign one person in the partnership as Partner A and the other as Partner B. Also make available laptops or computers for students to conduct an Internet web quest. See the video and web quest links in the Additional Multimedia Support section.
- For Day 2, practice using tinkercad.com and your 3D printer to make a prototype of an RFID reader (see Figure 4) that all students will reference in their presentations. Also determine the prototype size limitations from the 3D printer because prototype volumes must be less than or equal to the maximum printing volume. The limitation depends on the amount (volume) of filament the teacher decides to provide for each group. For example, when this activity was classroom-tested, the printing volume constraint was 22.5 cubic centimeters (cm3) per device, so students had to estimate their devices' volumes and adjust their designs to make sure they did not exceed that constraint.
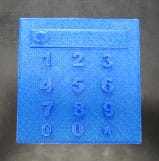
Figure 4. An example 3D print of an RFID reader prototype. - For Day 4, decide on presentation materials and/or format to make available or assign student teams to use, such as. PowerPoint®, Prezi and/or poster board.
With the Students—Day 1
Student goal: Determine an appropriate pressure gauge for an intraocular pressure sensor.
With the class, present the Introduction/Motivation content during which students:
- Complete a handout while watching a short video and then work in pairs to discuss what they learned.
- Are introduced to the engineering design challenge and a hypothetical scenario in which they act as biomedical engineers designing prototype devices.
- Are guided in developing a list of design requirements (constraints) for the design project.
- Working in pairs, complete an Internet web quest to learn about pressure gauges and determine one that is suitable for their pressure sensor prototypes.
- Peer-evaluate each other's prototype designs (the homework assignment from the associated lesson) using a checklist (see Figure 5) to guide their evaluations to determine the strengths and weaknesses of the designs.
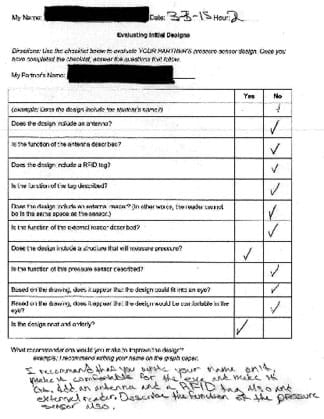
Figure 5. Example completed student peer-evaluation document for an initial design.
With the Students—Day 2
Student goal: Design an intraocular pressure sensor prototype that meets design constraints and utilizes RFID technology.
- Show students the 3D-printed RFID reader (created by the teacher prior to the activity). Tell them that this is the reader that all student will use in their designs. Student designs must show the other components, including the antenna, resonator and selected pressure gauge.
- Based on the peer evaluations completed on Day 1, the research collected during the web quest and their preliminary designs, direct students to work in groups to brainstorm ideas for a new prototype. Their new ideas should come from the feedback and work already completed.
- Have students draw new diagrams on graph paper of the group design. Require the diagrams to include top and side views of the prototypes (see Figure 6).
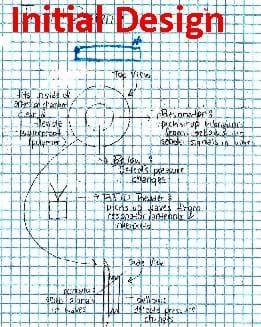
Figure 6. Example student initial intraocular pressure device design, including top and side views identifying structures and functions. - Once teams have new designs, direct them to decide on the size of their prototypes and then document those measurements on the side and top views in their diagrams.
- Inform students of the measurement and volume constraints (determined in advance by the teacher, based on the 3D printers and filament limitation). Have students estimate the volumes of their designs; calculations will vary by design. For example, if a team creates a spherical-like design, then the equation used to calculate volume (v = 4/3πr3) is different than if the design is rectangular (v = l x w x h). If a group's design size and volume estimate exceeds that of the assigned printing constraints, advise students to change one variable (length, width or height) and then recalculate the volume.
With the Students—Day 3
Student goal: Respond to peer feedback as part of designing an intraocular pressure sensor prototype.
- Once group prototype designs are finalized, they are evaluated by their peers using the Peer Evaluation: THE TEST? Will It Fit? Partner each team with another and direct them to exchange diagrams of their prototypes. Each group uses the evaluation sheet to review its assigned team design, providing a review of the overall design feasibility and compliance with size limitations. Once the evaluation document is completed, students return it and the diagram to the team. If 3D printing is not available, stop the activity here and the evaluation sheet serves as the post-activity assessment.
- Student groups revise their designs based on feedback on the peer-evaluation sheet.
- Next, teams sign up for accounts at tinkercad.com. Working as a group, students complete the beginning tutorials before inputting the team design.
With the Students—Days 4, 5 and 6
Student goal: Design and 3D print an intraocular pressure sensor prototype.
- Student groups work together to transfer their hand-drawn designs to a 3D representation using tinkercad.com. Once designs are completed, save them and give them to the teacher. Tinkercad permits users to save designs to a flash drive. Make sure to save the designs in the document format that is compatible with the teacher's 3D printer. The teacher may need to make minor adjustments (such as the infill) to student designs prior to printing.
- Direct teams to begin to prepare their presentations. Give each group a Teacher Evaluation: Under Pressure Prototype Presentation Grading Rubric to guide them through the process. Inform them of their presentation materials/format options.
- While students work, support each student group in the printing of their prototype designs.
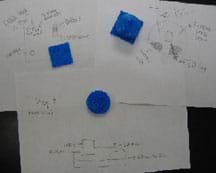
Figure 7. Three examples of student-created 3D-printed intraocular pressure sensor prototype devices with their design sketches.
With the Students—Day 7
Student goal: Present prototypes to an audience, explaining how the devices use radio-frequency identification (RFID) to help people who are diagnosed with glaucoma.
- The rest of the class serve as members of the (hypothetical) grant approval team from the Glaucoma Research Foundation. Their task is to evaluate potential projects with the intent of providing funding for one project team to develop its ideas beyond the prototype stage. Doing this requires the audience students to pay close attention to each presentation in order to complete the Peer-Evaluation: Potential Projects to Fund Analysis table and make sound final recommendations.
- The teacher evaluates team presentation components using the grading rubric.
Vocabulary/Definitions
centimeter: 1/100th of a meter.
constraint: A limitation or restriction. For engineers, constraints are the limitations and requirements that must be considered when designing a workable solution to a problem.
criteria: In engineering design, the objectives and requirements that a final design solution is required to meet.
electrical resonance: Within an electrical system, the sound or vibration produced in one object that is caused by the sound or vibration produced in another.
glaucoma: A disease that causes damage to the optic nerve, often due to an increased amount of pressure within the eye(s); can lead to vision loss.
intraocular: In the eye.
micrometer or micron: 1/1000000th of a meter; 10,000 microns in a centimeter; 1,000 microns in a millimeter.
model: (noun) A representation of something for imitation, comparison or analysis, sometimes on a different scale. (verb) To make something to help learn about something else that cannot be directly observed or experimented upon.
optic nerve: A nerve that transmits visual information (impulses) to the brain from the retina at the back of the eye.
pressure: The weight or force that is produced when something presses or pushes against something else.
pressure gauge: An instrument that measures pressure.
pressure sensor: A device that measures the amount of pressure; may include many components.
prototype: A first attempt or early model of a new product or creation. May be revised many times.
resonator: Either a device that resonates sound waves, or exhibits electrical resonance (typical with detection of radio waves).
RFID: Acronym for radio-frequency identification. RFID technology is the use of radio waves to identify and track tags, with no battery or physical contact necessary.
sound wave: A wave of compression and rarefaction, by which sound is propagated in a medium, such as air.
Assessment
Pre-Activity Assessment
Evaluating Preliminary Designs: Students peer-evaluate the first designs for the intraocular pressure sensor devices using the Peer Evaluation: Evaluating Preliminary Designs Checklist. The questions also serve to guide students throughout the activity.
Activity Embedded Assessment
Design Review: Peer groups evaluate each other's revised designs using the Peer Evaluation: THE TEST? Will It Fit? guidance. This design review provides a final check to verify that team designs meet the overall design constraints, including 3D printer size limitations.
Post-Activity Assessment
Presentations: During the team presentations to the class, have students individually complete a Peer Evaluation: Potential Projects to Fund Analysis as a "listening guide" to help them comparatively analyze all team prototypes, while the instructor completes a Teacher Evaluation: Under Pressure Prototype Presentation Grading Rubric for each team to formally assess student work. Review both documents to assess the depth of student comprehension in order to determine whether students have met the activity learning objectives.
Safety Issues
Consult your 3D printer user's manual for safety precautions.
Activity Scaling
- For lower grades, permit larger dimensions for the 3D prototypes, loosen the constraints and/or omit the scaling of the model.
- For higher grades, have students work individually rather than in groups, adjust the dimensions to require conversions be made, intensify the constraints to require more accuracy within the connection between the antenna and the resonator (that is, the creation of a transmission delay line or impedance matching network), and/or require students to calculate an at-scale prototype.
Additional Multimedia Support
During the Introduction/Motivation section, show students the online four-minute CBS News video, "Overcoming Glaucoma: Dennis Howard's Story," reported by Jeff Glor on August 9, 2011, to establish the human need behind the hypothetical design project challenge. Dennis Howard, a man living with glaucoma, has only 7% of his vision left. After meeting with a surgeon to relieve some of his severe pain due to intraocular pressure, he has decided to no longer let his disability limit him, and is going to attempt to sail around the world, solo. http://www.cbsnews.com/videos/overcoming-glaucoma-dennis-howards-story/
During the Introduction/Motivation section, student pairs complete the Under Pressure WebQuest to learn about various pressure gauges and identify a suitable pressure gauge for an intraocular pressure sensor, which is provided at http://underpressurewebquest.weebly.com/.
After the activity, show students photographs of real-life biomedical inventions by searching online for "intraocular pressure sensor."
Subscribe
Get the inside scoop on all things Teach Engineering such as new site features, curriculum updates, video releases, and more by signing up for our newsletter!More Curriculum Like This

Students learn about glaucoma—its causes, how it affects individuals and how biomedical engineers can identify factors that trigger or cause this eye disease, specifically the increase of pressure in the eye. Students sketch their own designs for a pressure-measuring eye device, prepare them to cond...
Copyright
© 2015 by Regents of the University of Colorado; original © 2014 Michigan State UniversityContributors
Janelle OrangeSupporting Program
Robotics Engineering for Better Life and Sustainable Future RET, College of Engineering, Michigan State UniversityAcknowledgements
The contents of this digital library curriculum were developed through the Robotics Engineering for Better Life and Sustainable Future research experience for teachers under National Science Foundation RET grant number CNS 1300794. However, these contents do not necessarily represent the policies of the NSF and you should not assume endorsement by the federal government.
Last modified: March 7, 2020


User Comments & Tips