
Quick Look

- Grade Level:
- 6 (6 – 8)
- Time Required:
- 4 hours 15 minutes
(five 50-minute sessions)
- Group Size:
- 3
- Subject Areas:
-
Physics Problem Solving -
NGSS Performance Expectations:

MS-ETS1-1 MS-ETS1-3 MS-PS2-2

Summary
Students explore the science and engineering behind hydraulic bridges. They begin by considering how bridges lift to allow large ships to pass and learn that hydraulic systems use pressurized fluids to generate controlled, powerful motion. Through hands-on exploration with syringes filled with air, water, and viscous substances, students observe how different fluids transfer force and how viscosity affects movement. These investigations reinforce key physics concepts, including balanced and unbalanced forces, fluid behavior, and Newton’s First Law of Inertia. Students then apply this knowledge by designing and constructing a model hydraulic bridge using syringes, tubing, and craft materials. During the design process, they evaluate stability, force transfer, and structural support while troubleshooting and refining their ideas.Engineering Connection
Engineers who create hydraulic bridges come from several specialties and work together to design structures that can safely lift, rotate, or open using powerful fluid-driven systems. Civil and structural engineers plan the overall bridge design, making sure it can support heavy loads and withstand environmental forces, while mechanical engineers develop the hydraulic components—such as pistons, pumps, and valves—that allow the bridge to move smoothly and reliably. Electrical and control systems engineers add sensors, wiring, and automated controls that coordinate the bridge’s motion and ensure safe operation. By combining their expertise, these engineers create bridges that are both strong and dynamic, allowing boats and vehicles to move efficiently through shared spaces.
Learning Objectives
After this activity, students should be able to:
- Understand how balanced and unbalanced forces affect motion.
- Understand how hydraulic systems work and how fluids behave under pressure.
- Explore the structural components and mechanisms of famous hydraulic bridges.
- Design, build, and test a hydraulic bridge prototype that meets specific criteria.
- Collaborate effectively in teams to research, brainstorm, and execute a project.
Educational Standards
Each Teach Engineering lesson or activity is correlated to one or more K-12 science,
technology, engineering or math (STEM) educational standards.
All 100,000+ K-12 STEM standards covered in Teach Engineering are collected, maintained and packaged by the Achievement Standards Network (ASN),
a project of D2L (www.achievementstandards.org).
In the ASN, standards are hierarchically structured: first by source; e.g., by state; within source by type; e.g., science or mathematics;
within type by subtype, then by grade, etc.
Each Teach Engineering lesson or activity is correlated to one or more K-12 science, technology, engineering or math (STEM) educational standards.
All 100,000+ K-12 STEM standards covered in Teach Engineering are collected, maintained and packaged by the Achievement Standards Network (ASN), a project of D2L (www.achievementstandards.org).
In the ASN, standards are hierarchically structured: first by source; e.g., by state; within source by type; e.g., science or mathematics; within type by subtype, then by grade, etc.
NGSS: Next Generation Science Standards - Science
| NGSS Performance Expectation | ||
|---|---|---|
|
MS-ETS1-1. Define the criteria and constraints of a design problem with sufficient precision to ensure a successful solution, taking into account relevant scientific principles and potential impacts on people and the natural environment that may limit possible solutions. (Grades 6 - 8) Do you agree with this alignment? |
||
| Click to view other curriculum aligned to this Performance Expectation | ||
| This activity focuses on the following Three Dimensional Learning aspects of NGSS: | ||
| Science & Engineering Practices | Disciplinary Core Ideas | Crosscutting Concepts |
| Define a design problem that can be solved through the development of an object, tool, process or system and includes multiple criteria and constraints, including scientific knowledge that may limit possible solutions. Alignment agreement: | The more precisely a design task's criteria and constraints can be defined, the more likely it is that the designed solution will be successful. Specification of constraints includes consideration of scientific principles and other relevant knowledge that is likely to limit possible solutions. Alignment agreement: | All human activity draws on natural resources and has both short and long-term consequences, positive as well as negative, for the health of people and the natural environment. Alignment agreement: The uses of technologies and any limitations on their use are driven by individual or societal needs, desires, and values; by the findings of scientific research; and by differences in such factors as climate, natural resources, and economic conditions.Alignment agreement: |
| NGSS Performance Expectation | ||
|---|---|---|
|
MS-ETS1-3. Analyze data from tests to determine similarities and differences among several design solutions to identify the best characteristics of each that can be combined into a new solution to better meet the criteria for success. (Grades 6 - 8) Do you agree with this alignment? |
||
| Click to view other curriculum aligned to this Performance Expectation | ||
| This activity focuses on the following Three Dimensional Learning aspects of NGSS: | ||
| Science & Engineering Practices | Disciplinary Core Ideas | Crosscutting Concepts |
| Analyze and interpret data to determine similarities and differences in findings. Alignment agreement: | There are systematic processes for evaluating solutions with respect to how well they meet the criteria and constraints of a problem. Alignment agreement: Sometimes parts of different solutions can be combined to create a solution that is better than any of its predecessors.Alignment agreement: Although one design may not perform the best across all tests, identifying the characteristics of the design that performed the best in each test can provide useful information for the redesign process—that is, some of the characteristics may be incorporated into the new design.Alignment agreement: | |
| NGSS Performance Expectation | ||
|---|---|---|
|
MS-PS2-2. Plan an investigation to provide evidence that the change in an object's motion depends on the sum of the forces on the object and the mass of the object. (Grades 6 - 8) Do you agree with this alignment? |
||
| Click to view other curriculum aligned to this Performance Expectation | ||
| This activity focuses on the following Three Dimensional Learning aspects of NGSS: | ||
| Science & Engineering Practices | Disciplinary Core Ideas | Crosscutting Concepts |
| Plan an investigation individually and collaboratively, and in the design: identify independent and dependent variables and controls, what tools are needed to do the gathering, how measurements will be recorded, and how many data are needed to support a claim. Alignment agreement: Science knowledge is based upon logical and conceptual connections between evidence and explanations.Alignment agreement: | The motion of an object is determined by the sum of the forces acting on it; if the total force on the object is not zero, its motion will change. The greater the mass of the object, the greater the force needed to achieve the same change in motion. For any given object, a larger force causes a larger change in motion. Alignment agreement: All positions of objects and the directions of forces and motions must be described in an arbitrarily chosen reference frame and arbitrarily chosen units of size. In order to share information with other people, these choices must also be shared.Alignment agreement: | Explanations of stability and change in natural or designed systems can be constructed by examining the changes over time and forces at different scales. Alignment agreement: |
International Technology and Engineering Educators Association - Technology
-
Refine design solutions to address criteria and constraints.
(Grades
6 -
8)
More Details
Do you agree with this alignment?
-
Evaluate the strengths and weaknesses of different design solutions.
(Grades
6 -
8)
More Details
Do you agree with this alignment?
Materials List
Each student needs:
Each group needs:
- 1 laptop/computer/tablet connected to the Internet for research
- 4-8 blocks with holes
- 30.48 cm – 60.96 cm of tubing (another option)
- 2 skewers (30.48 cm)
- 2-4 syringes
- (optional) 4-8 ¾” blocks (depending on student design)
- chart paper or larger sheets of paper for poster
- colored markers
- Decision Matrix
- (optional) Hydraulics: Reading
For the entire class to share:
- popsicle sticks (students tend to prefer the jumbo sticks)
- hot glue gun and glue gun sticks
For teacher’s reference: YouTube videos for problem solving hydraulic bridges with engineering design:
- Young Engineers: Hydraulic Bridge Design (3:27 minutes)
- Hydraulic Bridge Project Demonstration (9:39 minutes)
- School Science Project: Lift Bridge (5:51 minutes)
Worksheets and Attachments
Visit [www.teachengineering.org/activities/view/rice-3008-fluid-forces-bridges-hydraulic-systems-activity] to print or download.Pre-Req Knowledge
Students should have:
- A demonstrated understanding of general lab safety and how to use hot glue guns.
- Familiarity with basic vocabulary terms pertaining to forces and fluids.
Optional: It is helpful for students to have background knowledge on balanced/unbalanced forces and Newton’s First Law of Inertia.
Introduction/Motivation
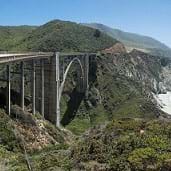
Today, you will step into the role of engineers to explore a real-world challenge: designing a hydraulic bridge.
To begin, consider this question: What happens when a large ship approaches a bridge that does not have enough clearance? Take one minute to think silently. (Give students one minute of “think” time.)
Now discuss your ideas with a shoulder partner using the sentence stem, “When a ship approaches a bridge, it will… because…” Student A will share first, and then Student B. (Give partners two minutes to discuss.)
The bridge needs to lift, right? But how does that work? Let’s look at the word “hydraulic.” What does that mean? (Pause to let students think. They should relate this to water.) The word hydraulic comes from the Greek word “hydro,” meaning water, and aulos, meaning pipe. Hydraulic refers to using a liquid, usually oil or water, to create force or movement.
How do you think a system transfers force to make something as heavy as a bridge move smoothly? (Let students offer answers. They should begin to connect water and movement.) A hydraulic system moves something heavy, like a bridge, by using pressurized fluid to transfer force from a small piston to a larger one, multiplying the force and allowing smooth, controlled movement.
Today we are going to explore how water and other fluids can exert enough force to raise a heavy bridge!
Procedure
Background
Hydraulic bridges work by using pressurized fluid to move large sections of the bridge, allowing them to lift, swing, or open so boats can pass through safely. At the heart of the system is a hydraulic power unit that pumps fluid—usually oil—into cylinders or pistons. When pressurized fluid enters a cylinder, it pushes a piston forward with enough force to lift or rotate heavy bridge sections that would be impossible to move manually. Because fluid cannot be compressed, hydraulics provide smooth, powerful, and precise movement, making them ideal for lifting massive structures.
Sensors, valves, and control systems help regulate how the hydraulic system operates. Valves control the direction and flow rate of the fluid, ensuring the bridge moves at the right speed, while sensors monitor pressure, alignment, and position. These controls prevent sudden motions and help keep the system stable, even under heavy loads or changing weather conditions. Many hydraulic bridges also use counterweights to reduce the force needed from the hydraulic system, improving efficiency and reducing energy use.
Once the bridge has completed its movement, the hydraulic system locks it securely in place for safety. When it is time to close the bridge, the process works in reverse: valves redirect the fluid out of the cylinders, allowing the bridge to lower gently back into position. Safety interlocks ensure cars, pedestrians, and boats are protected during every step. Through this combination of fluid power, precise controls, and structural engineering, hydraulic bridges provide a reliable way to manage transportation on both water and land.
In this activity, students need to understand that forces are always acting around us in our everyday environment. When forces are balanced, an object’s motion does not change, but when forces become unbalanced, motion occurs. This idea connects directly to Newton’s First Law of Inertia: The larger or heavier an object is, the more it resists changes in motion. That is why a massive bridge requires such a large force to move: It has a lot of inertia.
Another key concept is that fluids are any substances that are not completely solid. Students are often surprised to learn that gases count as fluids, too. Fluids can exert force in powerful ways, which can be demonstrated with examples such as firehoses, water jet packs, rockets, or even something as simple as releasing the air from a balloon.
Engineers use these physics principles to design systems that move people, cars, and boats more efficiently, but their applications go far beyond transportation. In chemical plants, for example, engineers rely on fluid power to push products through pipes, moving chemicals from where they are produced to storage tanks, shipping areas, or processing stations.
Before the Activity
- For each group, create 3 sets of 2 syringes connected with a tube.
- Set 1: Empty (just air) syringes (Students may ask why it is empty; explain that gases are considered fluids.)
- Set 2: Syringes with water in them.
- Set 3: Syringes with a viscous substance (can be honey [Newtonian], or bubble bath/shampoo [non-Newtonian]).
- Order materials before introducing the activity and ensure you have all necessary supplies.
- Prepare slides that chunk instructions and include timers for discussions, research time, work time, and clean-up.
- Prepare copies of the Student Worksheet (one per student for recording observations and information).
- Prepare copies of the Student Reflection Sheet (one per student for reflecting on the activity).
- Prepare copies of the Decision Matrix (one per group).
- (optional) Prepare copies of the Hydraulics: Reading (one per group).
- Consider pre-prepping baskets or supply stations to make it easier for students to gather supplies and self-manage during the building process.
- Complete the safety lesson: ensure students know how to use hot glue guns safely.
With the Students
Day 1: Ask and Research
- Separate the class into groups of 3-4 students.
- Give each student a Student Worksheet.
- Walk students through the following exercise:
- Give each group 3 sets of 2 syringes connected with a tube.
- Set 1: Empty (just air) syringes (Students may ask why it is empty; explain that gases are considered fluids.)
- Set 2: Syringes with water in them.
- Set 3: Syringes with a viscous substance (can be honey [Newtonian], or bubble bath/shampoo [non-Newtonian]).
- State the following: “Engineers use fluids to transfer force in machines all around us, from car brakes to hydraulic lifts. Today we will explore how different fluids behave.”
- Give students 5 minutes to play with each set, guiding student observations with questions such as:
- How much force does it take to push each syringe?
- How quickly does the force transfer?
- How does viscosity affect movement?
- Have students record their observations of the different types of fluids and how each fluid exerts a different force in their worksheet.
- Give students 5 minutes to answer the analysis questions in their worksheet.
- Optional: Review student answers in a class discussion.
- Instruct each group to draw a free body diagram for each fluid showing how the force is transferred in the Illustration of Observations section of their Student Worksheet.
- Bring the class back together and ask students what they think “viscous” means; write the definition on the board. (For example: Viscous means thick and sticky, describing a fluid that flows slowly because it resists movement. Viscosity is a measure of how much a fluid resists flowing. The higher the viscosity, the slower it moves.)
- Explain how this exploration connects to their upcoming engineering challenge: They will be building a hydraulic bridge using syringes, tubing, and craft materials.
- Ask students to brainstorm real-world examples of hydraulics in action. Examples include:
- Car brakes – Pressing the brake pedal uses hydraulic fluid to squeeze the brake pads and stop the car.
- Excavators and construction equipment – Machines such as diggers, bulldozers, and forklifts use hydraulic cylinders to lift and move heavy loads.
- Drawbridges – Hydraulics lift or swing large bridge sections so ships can pass underneath.
- Airplane landing gear – Hydraulic systems help the wheels extend, retract, and absorb shock during landing.
- Hydraulic lifts – Elevators, car lifts in repair shops, and wheelchair lifts all use hydraulic pressure to raise and lower loads.
- Amusement park rides – Many rides use hydraulics to control smooth, powerful motion.
- Garbage trucks – Use hydraulics to lift dumpsters and compact trash.
- Firefighter ladder trucks – Hydraulics raise and stabilize the long rescue ladders.
- Snowplows – Hydraulics adjust the height and angle of the plow blade.
- Provide optional reading resources. Students can also read about hydraulics here: Britannica Kids/Students. (There is a great graphic to use for a free body diagram.) This is an additional literacy resource that was developed using ChatGPT: Hydraulics: Reading.
- Optional: Review or introduce balanced vs. unbalanced forces, free body diagrams, and Newton’s Law of Inertia.
- Give students 10 minutes to research and fill out the Vocabulary Development section of the Student Worksheet.
Day 2: Research, Imagine and Plan
- Give students 10 minutes to research hydraulic bridges around the world, recording the bridge name and a summary of how the bridge works in their worksheet.
- Have students share their hydraulic bridge research with their groups.
- Decision Matrix
- Give each group a Decision Matrix.
- Read through the Decision Matrix with the class, ensuring students understand the requirements and criteria of the design challenge.
- Describe how groups can use the matrix to choose a design.
- Give students 10 minutes to individually brainstorm their initial bridge designs. Remind them to include the following:
- Size and proportions
- Placement of syringes and tubing (minimum of two)
- Optional control dock
- Mechanism for how the bridge will open
- Arrows showing direction of motion
- A method for crossing when closed
- Supports for stability and balance
- Give students 5 minutes to share their designs with a partner.
- Have groups compare their designs.
- Have each group use the Decision Matrix to choose the final design they will build.
- Have each group sketch a final design plan for their build.
- Optional: Have each group share their final design with you for approval. This sketch may also be graded.

Day 3: Create
- Have students gather their materials using either supply stations or pre-prepared baskets.
- Give students the class period to construct their bridges using syringes, tubing, popsicle sticks, blocks, and glue.
- Encourage students to problem-solve through challenges such as the following:
- How will the bridge rotate?
- Use blocks with holes and skewers to create an axle-like mechanism.
- Why does the entire bridge move when pushing the syringes?
- Add a control dock or stabilizing structure.
- Remind students to use small amounts of hot glue and be resourceful with materials.


Day 4: Test and Improve
- Have students test their bridges using air or water first.
 standing above the bottom base. As the student pushed one syringe, the syringe at the other end of the plastic tube extends pushing the block the other direction, and when the student pushes the opposite syringe, the same thing happens but in the other direction.")

- Have students record their observations in their Student Worksheet.
- Optional: Have students test their bridge with thicker fluids (honey or body wash) to observe how viscosity affects motion.
- Have students record what worked, what did not work, and what they will do to improve their bridge.
- Have students refine or modify their bridges based on testing.


Day 5: Present
- Give groups 30 minutes to create a presentation poster of their designed bridge that includes the following:
- Their bridge name
- A free body diagram explaining the force transfer
- 2–3 academic sentences explaining the science behind hydraulic motion
- Take 10 minutes to conduct a gallery walk.
- Have students leave anonymous sticky-note feedback with positive comments and engineering recommendations.
Day 6: Reflect and Summarize
- Give students time to complete the Student Reflection Sheet.
- Have a class discussion about the engineering and physics behind their bridge, referencing the Student Reflection Sheet Answer Key.
Vocabulary/Definitions
balanced forces: Forces that are equal in magnitude and opposite in direction, resulting in no change in an object's motion. An object remains at rest or continues moving at a constant velocity.
fluids: Substances that can flow and take the shape of their container, including liquids (e.g., water) and gases (e.g., air).
forces: A push or pull on an object that can cause it to start moving, stop moving, or change direction. Forces are measured in Newtons (N).
hydraulic: Relating to systems that use liquids to transmit force or motion, typically through confined spaces, as in brakes, lifts, or bridges.
inertia: The tendency of an object to resist changes to its motion. An object at rest stays at rest, and an object in motion stays in motion, unless acted upon by an unbalanced force.
Pascal’s Law: A principle in fluid mechanics that states: When pressure is applied to a confined fluid, the pressure is transmitted equally in all directions throughout the fluid. This principle is the foundation of hydraulic systems, where a small force applied to a small area can generate a much larger force in a larger area.
pressure: The amount of force exerted per unit area. It is calculated using the formula: Pressure = Force/Area Pressure is measured in Pascals (Pa), where 1 Pa = 1N/m^2.
unbalanced forces: Forces that are not equal, causing a change in an object’s motion, such as accelerating, decelerating, or changing direction.
viscosity: A measure of a fluid's resistance to flow. Higher viscosity means the fluid flows more slowly (e.g., honey), while lower viscosity means it flows more easily (e.g., water).
Assessment
Pre-Activity Assessment
Free Body Diagrams: Introduce free body diagrams and have students label and describe the motion in each image. This will provide background information on the students' understanding of forces and motion.
Activity Embedded (Formative) Assessment
Peer-to-Peer Discussion: Formative assessment is made informally by facilitating and listening to peer-to-peer discussion.
Student Worksheet: More formal information can be gathered by reviewing the Student Worksheet for each student.
Post-Activity (Summative) Assessment
Poster Presentation: Students will create a poster to illustrate the name of their bridge, a free body diagram showing how the forces affect the motion, and a brief explanation of the science behind the mechanism causing the motion.
Reflection Questions: Students will also complete the Student Reflection Sheet related to the physics behind their bridge.
Safety Issues
- Eye protection
- Cutting gloves/heat resistant to prevent burns from hot glue guns.
Troubleshooting Tips
- If you are limited on time, have students build a bridge that is no bigger than 12” long. A larger bridge and control dock took my higher-performing students a minimum of 90 minutes to build.
- Use the suggested size tubing, otherwise the fluid will leak.
- Syringes are more effective if placed at a slight angle.
- All bridges needed a small base to lift/rotate to or from. This can be seen in the provided pictures.
- All bridges ended up needing some kind of control panel or docking wall for syringes to push off for stability and leverage.
- Students did all the problem solving through research; the most recommended design suggestion by the teacher was how to ensure the bridge could rotate to some degree (blocks and skewers).
Activity Scaling
- For older/ advanced students: Students use the surface area of the syringes and do a simple calculation to determine the force of their hydraulics. This video gives a brief overview: Hydraulics Force and Motion (4:30 minutes).
Subscribe
Get the inside scoop on all things Teach Engineering such as new site features, curriculum updates, video releases, and more by signing up for our newsletter!More Curriculum Like This

Students learn about the fundamental concepts important to fluid power, which includes both pneumatic (gas) and hydraulic (liquid) systems.

Students are introduced to Pascal's law, Archimedes' principle and Bernoulli's principle. Fundamental definitions, equations, practice problems and engineering applications are supplied.

tudents are introduced to the similarities and differences in the behaviors of elastic solids and viscous fluids. In addition, fluid material properties such as viscosity are introduced, along with the methods that engineers use to determine those physical properties.

Learn the basics of the analysis of forces engineers perform at the truss joints to calculate the strength of a truss bridge known as the “method of joints.” Find the tensions and compressions to solve systems of linear equations where the size depends on the number of elements and nodes in the trus...
Copyright
© 2026 by Regents of the University of Colorado; original © 2024 Rice UniversityContributors
Gwenanne MichalskySupporting Program
Research Experience for Teachers (RET) at Rice University through the Office of STEM EngagementAcknowledgements
This curriculum was developed through the Research Experience for Teachers (RET) at Rice University through the Office of STEM Engagement and is based on experiences in the Rheology Lab at Rice University Department of Earth, Environmental and Planetary Sciences. This program is funded through NSF (NSF EEC-2302127). This lesson was administered at Woodcreek Middle School in Humble ISD to 6-8 grade students in an Introduction to STEM course.
Any opinions, findings, and conclusions or recommendations expressed in this material are those of the authors and do not necessarily reflect the views of the National Science Foundation, Rice University, Woodcreek Middle School, or Humble ISD.
Last modified: January 9, 2026
User Comments & Tips