Hands-on Activity Fabricating a Focus Tool - Not a Fidget Spinner!

Quick Look

Grade Level: 4 (3-5)

Time Required: 1 hours 45 minutes

(two 50-minute blocks)

Expendable Cost/Group: US $2.00

Group Size: 3

Activity Dependency: None

Subject Areas: Problem Solving, Science and Technology

NGSS Performance Expectations:

NGSS Three Dimensional Triangle
3-5-ETS1-1

Photo of a completed fidget tool prototype. A student holds a red balloon slightly inflated and filled with beads.
Students design and create focus tools.
copyright
Copyright © 2022 Krisinda Bouton, University of Florida MRET

Summary

Students work through the Engineering Design Process while creating a tool to help them focus in their classrooms. The focus tool that they design is required to meet given constraints. While creating their tool, they learn how engineers go about this process in the real world. They work with hands-on research, hold group presentations to share their prototype, keep thorough notes in their science journals, and implement multiple iterations.
This engineering curriculum aligns to Next Generation Science Standards (NGSS).

Engineering Connection

Designing is essential to engineering. Engineers follow the steps of the design process to help them create the best possible solutions to real-world problems. This field has engineers heavily lean on their creativity and analytical skills to bring their ideas to fruition. They must keep detailed notes, plan, and then test multiple trials. How can they design an aircraft that, not only flies, but also keep its occupants safe on the journey? Through the design process, they can answer questions like this. The engineering design process that takes place during this activity approximates what engineers do every day.

Learning Objectives

After this activity, students should be able to:

  • Describe the engineering design process.
  • Discuss the importance of keeping records.
  • Compare and contrast how the design process they experience relates to how engineers use the engineering design in everyday life.
  • Design a focus tool, which they can use in the classroom, fitting constraints.
  • Think and outline design iteration suggestions.

Educational Standards

Each TeachEngineering lesson or activity is correlated to one or more K-12 science, technology, engineering or math (STEM) educational standards.

All 100,000+ K-12 STEM standards covered in TeachEngineering are collected, maintained and packaged by the Achievement Standards Network (ASN), a project of D2L (www.achievementstandards.org).
In the ASN, standards are hierarchically structured: first by source; e.g., by state; within source by type; e.g., science or mathematics; within type by subtype, then by grade, etc.

NGSS Performance Expectation

3-5-ETS1-1. Define a simple design problem reflecting a need or a want that includes specified criteria for success and constraints on materials, time, or cost. (Grades 3 - 5)

Do you agree with this alignment?

Click to view other curriculum aligned to this Performance Expectation
This activity focuses on the following Three Dimensional Learning aspects of NGSS:
Science & Engineering Practices Disciplinary Core Ideas Crosscutting Concepts
Define a simple design problem that can be solved through the development of an object, tool, process, or system and includes several criteria for success and constraints on materials, time, or cost.

Alignment agreement:

Possible solutions to a problem are limited by available materials and resources (constraints). The success of a designed solution is determined by considering the desired features of a solution (criteria). Different proposals for solutions can be compared on the basis of how well each one meets the specified criteria for success or how well each takes the constraints into account.

Alignment agreement:

People's needs and wants change over time, as do their demands for new and improved technologies.

Alignment agreement:

Suggest an alignment not listed above

Materials List

Each student needs:

  • notebook or a sheets of paper
  • pencil

For the entire class to share:

  • felt sheets
  • fabric mesh
  • marbles
  • balloons
  • dried beans
  • yarn
  • rubber bands
  • paper clips
  • pipe cleaners
  • beads
  • fabric glue
  • bungee cords
  • stapler
  • tape
  • scissors
  • other types of focus devices, including but not limited to:
    • Roller Jr. fidget
    • stress ball
    • tactile brush
    • stretch ball
    • non-example fidgets: pop-it, fidget spinner, bending tubes

Note: Teachers may use other varying materials they already have in their classroom, in place of the materials above for supplies students can use to create their prototypes, but keep in mind constraints when gathering possible alternative materials. If teachers do not have and do not want to buy the other types of focus devices, pictures can be found online and shown to the students.

Worksheets and Attachments

Visit [www.teachengineering.org/activities/view/uof-2711-fabricating-focus-tool-engineering-design-process] to print or download.

Introduction/Motivation

(Have ready to present the Fabricating a Focus Tool PowerPoint Presentation to the class. Students will be given the following quick poll by the teacher.)  

Raise your hand if you have ever had trouble focusing during class! Raise your hand if you have zoned out and realized you had no idea what the teacher was just saying about the lesson. Raise your hand if you have ever been distracted in the classroom.

(Give students the following scenario:) Jordyn is sitting in class, doodling on the side of her notebook page. She realizes she has not been listening to what the teacher has been saying. She looks around the classroom. She sees Daniel, with his eyes on the teacher, only looking away to write down notes in his journal. She sees Izzy, bouncing his knee, flipping through his textbook. Durward is tapping his shoes with his pencil, like he is playing the drum. Kymani is picking at his fingernails, while looking at the teacher. Collette is twirling her ponytail around her fingers while looking out the window. After looking around the classroom, she finally looks back at her teacher and begins taking notes again.

Think back to a time when you were in the classroom and had trouble focusing, whether it was working on a group assignment, when the teacher was talking, or doing independent work. How did you respond to that situation? What could you do to help yourself get back on track? (Some people say fidget spinners/pop-its help them focus in class.) However, what problems do fidget spinners/pop-its create in the classroom?

(Possible answers: They make noise. Students can focus all attention on it, instead of their work. It is more of a toy to play with.)

Today, we are going to be engineers! Engineers are people who consider problems and then come up with different ways to solve those problems. The problem I am tasking you with, What kind of tool can you create that would help you focus while at your seat?

I am now going to bring out some focus tools to allow you to do some research. While you are handling these focus tools, I want you to ask yourself some questions. What do these tools have in common? What aspects of these tools do you want to incorporate? What aspects of these tools do you want to make sure NOT to incorporate?

Many fidget tools sit on a table. There is a bending tube, a Pop-it shaped like a heart, a stress ball, a tactile brush, a stretch ball, and a bendy wood toy.
There are many fidgets that are on the market today. It is great for students to see examples and non-examples!
copyright
Copyright © 2022 Krisinda Bouton, University of Florida MRET

(Pass out the tactile brush, stress ball, Roller Jr., fidget spinner, bending tubes, and pop-its for students to manipulate.)

Remember to write down your observations of what you see in your science notebooks! What did you notice while you were looking through these tools? Did they have anything in common? Were there any aspects you thought would be a hindrance to your design if you did something similar? Turn and talk with your table mates about this. Share what you have noticed. We will share out after.

 What did your group discuss? (Write out what students share on the board. Possible answers could include: The tool makes noise. The tool seems more like a toy. The tool is too big/small. The toy has lots of colors or not a lot of color use.)

Okay, based off what we came up with just now, it seems like we have some constraints to consider. Constraints are the real-world limits of the design, which is something engineers must consider as they approach any problem they may have. If an engineer is designing a bridge, they need to figure out what materials would work, how long their bridge will have to be, how much weight their bridge should be able to hold and many other things. You can think of constraints as parts of the design our tool will have to meet, and you’ll need to think about them when you begin your designs. Here are the constraints we will have with our focus tool designs. (Write these on the board to post during from the Design Constraints Sheet.)

These are the constraints your prototype will have to meet. Make sure to always write down all your observations and steps in your notebook! We need to be able to look back on this later.

Procedure

Background

The activity is designed to take 100 minutes and there are three parts. If the activity is split between two 50-minute blocks, it is recommended to use the first block for Part 1 but allow students to complete their prototypes for the first 5-10 minutes of the second block if needed. Then, use the remaining time in the second block to cover Part 2 and Part 3. 

Before the Activity

  • Gather materials and make copies of the worksheet.
  • Make sure Design Constraints are posted for students to reference (whether it is on the board, in the presentation, or printed out on student desks/tables).
  • Assign students into groups of 3 or 4.
  • The teacher will keep the Design Rubric for grading purposes.

With the Students

Part 1:

  1. Introduce the activity using the Introduction & Motivation as seen above, connecting the activity to what Engineers do within their profession.
  2. Show materials available for use, having them out on an unused table, accessible to all students.
    A photograph of craft materials, including pipe cleaners, paper clips, fabric mesh, beads, yarn, glue, bungee cords, rubber bands, and felt sheets.
    There are a variety of materials that could be used to create a Focus Tool. Safety should always be addressed when introducing these materials.
    copyright
    Copyright © 2022 Krisinda Bouton, University of Florida MRET
  3. Review safety procedures for using scissors and bungee cords if students are to use these materials. Remind students that the marbles, beans, and balloons are not to be ingested. Talk with students about being mindful of the quantity of materials they pick up, only grabbing what they believe they will need. Tell students that if they decide to change their design after beginning building their prototype, they must document, in their notebooks, what they did and why they changed their idea, allowing the teacher to review it with them before trying again.
  4. Give the students time to draw out possible designs for their prototype and a list of materials they will need to create it. Once students have chosen and shown their completed design drawing and materials list, the teacher will dismiss students individually to begin building their prototype.
    Student writing in science notebook
    Designing the prototype on paper is a great start for students to complete before getting their hands on materials.
    copyright
    Copyright © 2022 Krisinda Bouton, University of Florida MRET
      Give students time to create their physical prototype during this time (matching the constraint given). 
    Student working on prototype
    While creating the prototype, students can learn the importance of material choice. This is a great connection to what engineers must consider.
    copyright
    Copyright © 2022 Krisinda Bouton, University of Florida MRET

Part 2:

  1. After all prototypes have been created, divide the class into groups of three or four students each.
  2. Have students answer the following questions in their science notebook (questions can be printed out ahead of time on a worksheet, folded in half “hamburger-style” and then pasted (top back part of folded worksheet) into the notebook to make it fit on the notebook page OR students can write them down in their science notebook): What went well with your focus tool prototype design? What would you do differently, if given more time and materials to make the adjustments? What were the steps you took in designing your focus tool?
  3. Have students present their prototype, using their reflection answers they wrote down to their small group, explaining what went well and what they would adjust if they were given more time, and what steps they took, to their assigned group. Model how to give appropriate feedback.  Encourage students to share any occurrences that surprised them while going through this design process. After a student has presented their design and shared, the group will be given time to make supportive comments or suggestions. After this, the next member will present, continuing the sharing and bouncing ideas off the group steps. 
    Photo of a completed fidget tool prototype. A student holds a red balloon slightly inflated and filled with beads.
    Once completed, students can implement iterations to their design.
    copyright
    Copyright © 2022 Krisinda Bouton, University of Florida MRET

Part 3:

  1. As a class, ask students to share what all steps they had to take to create their prototype. Write student answers on the board.
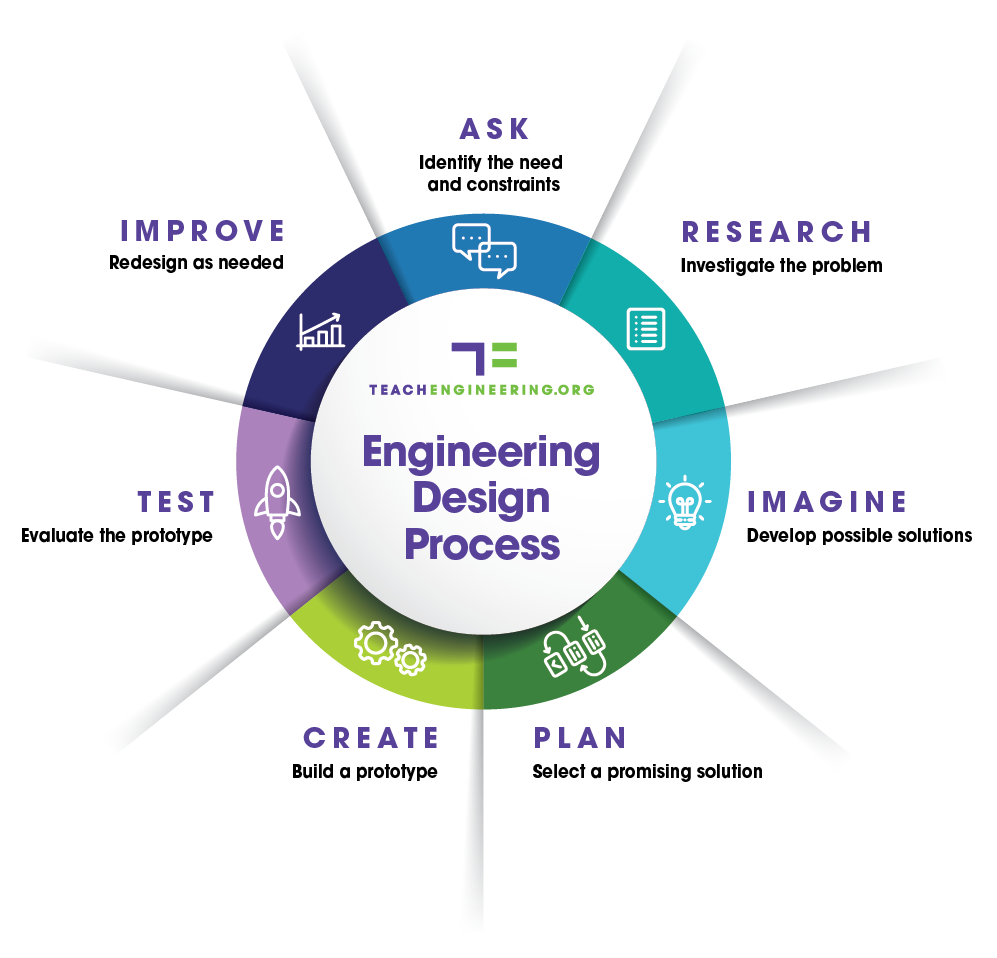
    1. Explain that engineers do these steps as well, through the Engineering Design Process. Engineers have to ask critical questions about what their problem is or what they are trying to solve.
    2. These questions could include:
      1. What are the constraints: time, materials, size, strength?
      2. What has to happen to make this a successful solution?
      3. What kind of research do we need to perform? For example: Civil engineers design many things, one of is bridges. They can’t just use any materials. They need to know how long the bridge must be, how strong it has to be to hold a certain amount of weight, what weather will affect it and how.
      4. They will then need to choose an appropriate material to use for their design. They will need to research various designs that would be sturdy enough to handle cars moving on it without it swaying in the wind.
  2. After doing this research, explain that engineers have to think up different possible solutions to their problem. They have to think outside of the box and be very creative. After going through possible ideas, they select the best one and build their prototype. After, they have to test it! For many engineers, their prototype are just smaller models that allow the engineers to see if their design would work. While they are testing it, they see if there needs to be adjustments to help the prototype be better. This is a VERY important part of the engineering design process called iteration. This allows them to improve upon what they did.
  3. Show the Engineering Design Process Diagram for students to copy into their notebooks. (This can be printed out, cut, and glued into journals for time constraints or those students who have writing accommodations.)
  4. Finally, have students numerically order given steps of the Engineering Design Process as an exit ticket using the Engineering Design Process Post-Assessment.

Vocabulary/Definitions

constraint: Limitation (parameter) the design must meet.

engineering design process: A series of steps that guides engineering teams to solve problems.

focus tool: A device that provides movement or stimulation that can be used to help maintain focus, while completing a separate activity.

iteration: Repeating the steps as many times as needed, making improvements along the way as we learn from failure and uncover new design possibilities to arrive at great solutions.

Assessment

Pre-Activity Assessment

Quick Poll: Before the activity begins share the provided scenario, then ask the class a question and tally their responses on the board. Ask: How many of you have ever had trouble focusing in class?

Activity Embedded (Formative) Assessment

Circulating: The teacher will walk around the room for formative assessment, asking about their thinking and the process/steps they had to take, adjustments they had to make.                               

Reflection: Students will be given time to reflect on the design process they used and write a reflection in their science notebook using the Journal Reflection Questions.

Post-Activity (Summative) Assessment

Group Presentation: Students will present their final focus tool prototype to the class and the different steps of the engineering design process that they completed while creating their focus tool

Exit ticket/Assessment: Students will complete the Engineering Design Process Post-Assessment, identifying the order of steps of the engineering design process cycle.

Making Sense Assessment: Have students reflect on the science concepts they explored and/or the science and engineering skills they used by completing the Making Sense Assessment.

Safety Issues

The teacher needs to remind the students that they should:

  • Be cautious when using scissors to cut materials.
  • Not ingest beans or marbles.
  • Be careful not to stretch and release bungee cord or rubber bands, causing it to hit themselves or others.

Activity Extensions

  • At the activity end, have students redesign their model, with different materials.
  • Have students compare and contrast their focus tool to peers within a different group, finding what they would maybe want to replicate or suggestions of alternatives materials to use.
  • To add a math component, the teacher can share the price of the materials. Students will then be given a budget and will be asked to try to redesign their tool within that budget. 
  • Students could create a “pitch” to Walmart to buy their design to sell in their store, but Walmart needs the product as “cheap” as possible so they are to redesign their tool to be more budget-friendly.

Activity Scaling

  • For lower grades, students can have question stems glued into their notebooks, as well as the guiding questions and Engineering Design Process Cycle. Small groups can collaborate and work on one design per group, instead of individually.
  • For upper grades, students can research an engineering branch and create a report on how engineers in that field specifically use the Engineering Design Process.

Additional Multimedia Support

Here are some videos from YouTube that speak on Engineers and what they do that you can show before and after this lesson (based on Teacher discretion).

Here are some websites to allow for further discussion on the Engineering Design Process:

Subscribe

Get the inside scoop on all things TeachEngineering such as new site features, curriculum updates, video releases, and more by signing up for our newsletter!
PS: We do not share personal information or emails with anyone.

Copyright

© 2023 by Regents of the University of Colorado; original © 2022 University of Florida

Contributors

Krisinda Bouton

Supporting Program

Multidisciplinary Research Experiences for Teachers of Elementary Grades, Herbert Wertheim College of Engineering, University of Florida

Acknowledgements

This curriculum was based upon work supported by the National Science Foundation under RET grant no. EEC 1711543— Engineering for Biology: Multidisciplinary Research Experiences for Teachers in Elementary Grades (MRET) through the College of Engineering at the University of Florida. Any opinions, findings, and conclusions or recommendations expressed in this material are those of the authors and do not necessarily reflect the views of the National Science Foundation.

Last modified: March 15, 2023

Free K-12 standards-aligned STEM curriculum for educators everywhere.
Find more at TeachEngineering.org