Quick Look
Grade Level: 8 (6-8)
Time Required: 45 minutes
Expendable Cost/Group: US $1.00
Group Size: 2
Activity Dependency: None
Subject Areas: Physical Science
Summary
In this math activity, students conduct a strength test using modeling clay, creating their own stress vs. strain graphs, which they compare to typical steel and concrete graphs. They learn the difference between brittle and ductile materials and how understanding the strength of materials, especially steel and concrete, is important for engineers who design bridges and structures.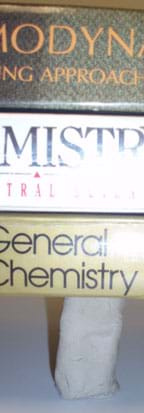
Engineering Connection
Engineers want to know the properties of materials in advance of using them in a project so they can design the structure to be strong enough to stay safe (not fail) under its anticipated forces and stresses. Thus, strength of materials is a significant area in engineering design because engineers want to be able to make informed decisions about construction materials. Many engineering companies have a team dedicated to researching and selecting the optimal materials for their products and projects to make sure their designs work dependably and last a long time.
Learning Objectives
After this activity, students should be able to:
- Define several engineering terms such as stress, strain and elasticity.
- Use calculations to determine the material properties of clay.
- Construct and analyze graphs to compare properties of different building materials used in engineering.
Educational Standards
Each TeachEngineering lesson or activity is correlated to one or more K-12 science,
technology, engineering or math (STEM) educational standards.
All 100,000+ K-12 STEM standards covered in TeachEngineering are collected, maintained and packaged by the Achievement Standards Network (ASN),
a project of D2L (www.achievementstandards.org).
In the ASN, standards are hierarchically structured: first by source; e.g., by state; within source by type; e.g., science or mathematics;
within type by subtype, then by grade, etc.
Each TeachEngineering lesson or activity is correlated to one or more K-12 science, technology, engineering or math (STEM) educational standards.
All 100,000+ K-12 STEM standards covered in TeachEngineering are collected, maintained and packaged by the Achievement Standards Network (ASN), a project of D2L (www.achievementstandards.org).
In the ASN, standards are hierarchically structured: first by source; e.g., by state; within source by type; e.g., science or mathematics; within type by subtype, then by grade, etc.
NGSS: Next Generation Science Standards - Science
-
Structures can be designed to serve particular functions by taking into account properties of different materials, and how materials can be shaped and used.
(Grades 6 - 8)
More Details
Do you agree with this alignment?
-
Analyze and interpret data to determine similarities and differences in findings.
(Grades 6 - 8)
More Details
Do you agree with this alignment?
-
Use mathematical representations to describe and/or support scientific conclusions and design solutions.
(Grades 6 - 8)
More Details
Do you agree with this alignment?
Common Core State Standards - Math
-
Fluently add, subtract, multiply, and divide multi-digit decimals using the standard algorithm for each operation.
(Grade
6)
More Details
Do you agree with this alignment?
-
Use variables to represent two quantities in a real-world problem that change in relationship to one another; write an equation to express one quantity, thought of as the dependent variable, in terms of the other quantity, thought of as the independent variable. Analyze the relationship between the dependent and independent variables using graphs and tables, and relate these to the equation.
(Grade
6)
More Details
Do you agree with this alignment?
-
Recognize and represent proportional relationships between quantities.
(Grade
7)
More Details
Do you agree with this alignment?
-
Construct and interpret scatter plots for bivariate measurement data to investigate patterns of association between two quantities. Describe patterns such as clustering, outliers, positive or negative association, linear association, and nonlinear association.
(Grade
8)
More Details
Do you agree with this alignment?
-
Use the equation of a linear model to solve problems in the context of bivariate measurement data, interpreting the slope and intercept.
(Grade
8)
More Details
Do you agree with this alignment?
International Technology and Engineering Educators Association - Technology
-
The selection of designs for structures is based on factors such as building laws and codes, style, convenience, cost, climate, and function.
(Grades
6 -
8)
More Details
Do you agree with this alignment?
-
Manufacturing systems use mechanical processes that change the form of materials through the processes of separating, forming, combining, and conditioning them.
(Grades
6 -
8)
More Details
Do you agree with this alignment?
State Standards
Colorado - Math
-
Use ratio and rate reasoning to solve real-world and mathematical problems.
(Grade
6)
More Details
Do you agree with this alignment?
-
Fluently add, subtract, multiply, and divide multidigit decimals using standard algorithms for each operation.
(Grade
6)
More Details
Do you agree with this alignment?
-
Use variables to represent two quantities in a real-world problem that change in relationship to one another.
(Grade
6)
More Details
Do you agree with this alignment?
-
Construct and interpret scatter plots for bivariate measurement data to investigate patterns of association between two quantities.
(Grade
8)
More Details
Do you agree with this alignment?
-
Use the equation of a linear model to solve problems in the context of bivariate measurement data, interpreting the slope and intercept.
(Grade
8)
More Details
Do you agree with this alignment?
Materials List
Each group needs:
- 6 or 7 books, each smaller than 1-inch (2.5-cm) thick, totaling ~ 10 lbs (~4.5 kg)
- modeling clay piece, 1 inch x 1 inch x 3 inches (2.5 cm x 2.5 cm x 7.6 cm)
- wax paper or plastic wrap, to keep clay pieces from drying out
- measuring stick or ruler with 1/16-inch (1-mm) marks
- Materials Data Sheet, one per person
For the entire class to share:
- scale, to weigh books
- scrap paper
- tape
Worksheets and Attachments
Visit [www.teachengineering.org/activities/view/cub_brid_lesson04_activity1] to print or download.Pre-Req Knowledge
Students should have a basic understanding of compressive and tensile forces, in relation to the different types of bridges and beams. Students should also know that steel and concrete are two common materials used in bridge design. A discussion of these materials can be found in the background of this activity as well as the associated lesson, Strength of Materials..
Introduction/Motivation
Who benefits from a bridge? How? (Possible answers: Me, my family and businesses – for work, school, visiting family or friends, shopping, travel.) How do the needs of a community dictate the characteristics of a bridge? (Possible answers: A bridge meets a community's need to access resources; for commerce and industry; for expansion; to be connected to another community, city or region; and to overcome specific environmental obstacles such as rivers or gorges.) How important is it for us that our bridges do not break or fail? (Gather suggestions from the students.)

What materials would you use to build a bridge? (Gather suggestions from the students.) These days, two main materials are used to construct bridges: steel and concrete. While several other types of materials can be used, they are not as popular or as commonly-used as steel and concrete. It is important for engineers to be able to measure the strength of these materials so that they can properly design bridge members (components) to handle the anticipated amount of compressive and tensile forces from the environment and traffic.
What types of forces must the materials of a bridge be able to handle? Stress (σ) is basically the applied forces acting on the material. Strain (ε) is basically the change in shape of the material when a stress is applied. As you can imagine, stress and strain are related to each other. Tensile strength is the amount of tensile stress that a material can resist before breaking, cracking or failing. Compressive strength is the amount of compressive stress that a material can resist before breaking, cracking or failing. A material that exhibits ductile properties can be subjected to large strains before it fails, meaning that it can bend easily. A material that exhibits brittle properties shows little or no yielding before failure. Elasticity is the ability of a material to return to its previous shape after stress is released.
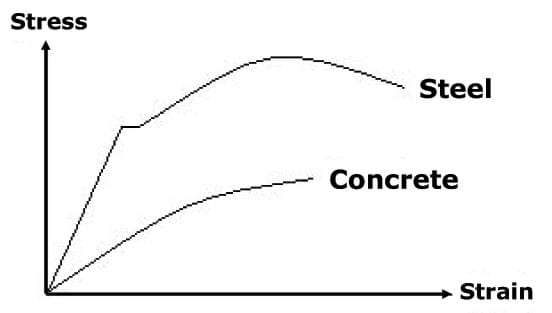
To better understand these properties of materials, engineers examine graphs of stress and strain, called stress-strain diagrams. (Draw the Figure 1 graph on the board for everyone to see). For example, here is a typical stress-strain diagram for two materials, steel and concrete. The end points of each of these curves represent the point at which the material breaks or fails. The concrete curve shows a steady increase in strain and stress before it ruptures. That tells us that when concrete fails we should expect little or no warning and that is why concrete is considered a brittle material. Now look at the steel curve. Just before its breaking point, the steel curve shows a reduction in stress while strain continues to increase. That tells us that when steel fails we can expect some type of warning, usually in the form of large changes in the material. Because of this behavior, steel is considered a ductile material.
(Optional: Show students an online interactive tool to illustrate visually the properties of wood, plastic, aluminum, brick, concrete, reinforced concrete, cast iron and steel. Use a fun mouse-controlled slider to drag to stretch or squeeze material to failure. See WGBH's Building Big: Materials Lab website at http://www.pbs.org/wgbh/buildingbig/lab/materials.html)
Today, we are going to test the strength of a piece of clay, and calculate how it compares to steel and concrete in its material behaviors. Engineers would do similar calculations to determine the strength of a material or mixture of concrete before choosing a material to use in the design of a bridge.
Procedure
Background
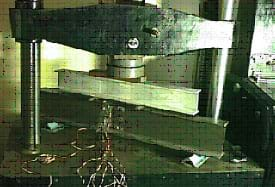
Steel is created by eliminating most of the impurities found in iron. Engineers test various types of steel so they know what to expect when it is used as a construction material. Figure 2 shows an example of a steel beam being tested to failure. Some advantages to using steel for bridge members:
- Steel is very strong in both tension and compression and therefore has high compressive and tensile strengths.
- Steel is a ductile material and it yields or deflects before failure.
Some disadvantages to using steel:
- Steel is expensive compared to concrete and wood.
- Steel can rust when exposed to some environmental conditions thus reducing its strength.
- Steel is a heavy material and thus reduces the allowable span of the member when considered for use as a beam.
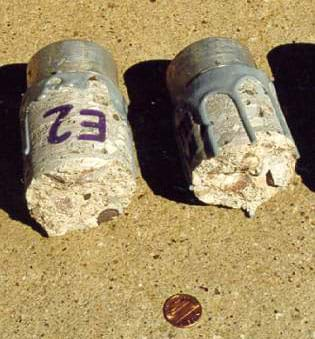
Cement is an ingredient used to make concrete. Cement is a powder; concrete is a solid mass. Cement hardens when mixed with water. Concrete is made with cement, aggregate (gravel and sand) and water. Engineers test various "recipes" for concrete so they know what to expect when it is used as a construction material. Figure 3 shows an example of concrete that was tested to failure. Sometimes other materials are added to the concrete mix to give it specific characteristics not typical with plain concrete mixes, making the concrete less brittle, stronger, more durable, a better insulator, or less likely to suffer freeze-thaw damage.
Some advantages to using concrete for members of a bridge:
- Concrete is extremely strong in compression and therefore has a high compressive strength.
- Concrete is inexpensive compared to steel.
- Using forms, concrete can be made into practically any shape.
Some disadvantages to using concrete:
- Concrete is a brittle material and can crack or break without any warning.
- Concrete is very weak when a tension force is applied to it and therefore has a very low tensile strength. (To address this weakness, steel is often embedded within the concrete at locations where tension forces are known to exist, making reinforced concrete. In a concrete beam, the steel would be placed along the bottom of the beam.)
- Because a certain amount of time is needed for hydration to completely occur, concrete members do not gain their full strength until much time has passed.
Before the Activity
- Form the modeling clay into pieces that are 1 inch x 1 inch x 3 inches (2.5 cm x 2.5 cm x 7.6 cm) tall, one piece per student team. Make sure the base is 1 inch x 1 inch (2.5 cm x 2.5 cm) to get a cross-sectional area = 1 in2 (6.35 cm2). Wrap the clay in wax paper or plastic wrap to keep it from drying out.
- Weigh the books and tape to each a piece of paper with its weight written on it. Be as accurate as possible when weighing the books.
- Gather materials and make copies of the Materials Data Sheet, one per person
- Divide the class into teams of two students each.
With the Students
- Discuss with students the two most popular materials used in bridge construction: steel and concrete (as provided in the Introduction/Motivation section). Explain that today they are using clay and calculations to create their own stress vs. strain diagrams just like the ones used in engineering analysis, and compare them to the same diagrams for steel and concrete.
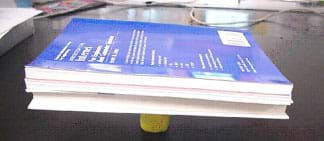
- Have each group place the clay piece on a flat table or desk. Orient it so that it is standing tall. Use a measuring stick or ruler to measure the initial height of the clay and record it on the data sheet. Balance one book on top of the clay, leaving it there for about 5 seconds (see Figure 4). What happens to the clay when the book is placed on top? (Answer: The clay should get shorter.) Remove the book and immediately take a measurement of the clay height and record it on the data sheet. Have students record on the data sheet the number of books (in this case, one) and the total weight of the books. Now, take the book just used, and a second book, and balance them both on top of the clay, leaving them there for about 5 seconds. What happens to the clay when two books are placed on top? (Answer: The clay should get even shorter.) Remove the books and immediately take a measurement of the clay height and record it and the number of books (in this case, two) and the total weight of the books. Have students repeat this process until the clay crumbles or falls over, or they run out of books. Remind students to make sure to always use the same books from the previous measurement when adding more books.
- Ask the class to explain (using engineering terms of forces, stress and strain) what is happening? (Answer: The books place a compressive force on the clay. As more books are added, the clay cannot support the increasing weight and the clay compresses. The force on the top of the clay creates a strain in the clay and therefore stress as well.)
- Have students fill in the change of height (original height – new height), strain (change in height ÷ original length), and stress (weight ÷ area) on the data sheet table, as shown in the example line at the top of the table.
- Next, have students graph a displacement vs. load curve on the data sheet. Plot the weight of the books on the horizontal axis and the displacement on the vertical axis. Point out how we always plot the independent variable on the horizontal axis and the dependent variable on the vertical axis. In this case, the displacement is dependent on the weight of the books. What do our graphs show us? Compare graphs from different teams. Invite student comments.
- Next, have students graph a stress vs. strain curve on the data sheet. Plot stress on the vertical axis and strain on the horizontal axis. Using this graph, have students calculate the slope of the line in a linear (flat) portion of their graph. The slope can be found by selecting two points. Calculate the change in stress between these two points (the rise). Calculate the change in strain between these two points (the run). Then divide the change in stress by the change in strain (or rise over run). This value is the modulus of elasticity for the clay sample. Compare graphs and modulus of elasticity calculations from different teams. What do the graphs show us? Invite student comments.
- Have students compare their graphs to the graph provided on the last page of the data sheet, showing stress vs. strain curves for steel and concrete. Also have them compare their calculated modulus of elasticity for the clay sample to that provided for steel and concrete. When comparing clay, steel and concrete, what have we learned? The modulus of elasticity indicates the stiffness of a material; how does clay compare to steel and concrete?
- To conclude, lead a class discussion comparing results and conclusions. Ask the class the post-activity questions provided in the Assessment section.
Vocabulary/Definitions
brittle: The inability of a material to deflect or yield before failure.
compression: A pushing force that tends to shorten objects.
compressive strength: The amount of compressive stress that a material can resist before failing.
concrete: A combination of cement and aggregate into one solid mass. Example: Gravel, sand, cement and water were mixed to create our concrete sidewalk.
ductile: The ability of a material to be subjected to large strains before it ruptures or fails.
engineer: A person who applies her/his understanding of science and math to creating things for the benefit of humanity and our world.
member: A constituent part of any structural or composite whole, such as a subordinate structural beam, column or wall.
modulus of elasticity : (E) Indicates the stiffness of a material.
reinforced concrete: A concrete member with steel embedded inside it to resist tensile forces.
steel: Refined iron that contains virtually no impurities.
strain: The elongation or contraction of a material per unit length of the material.
stress: Applied load divided by the material area it is acting on (typically the cross-sectional area of the member).
tensile strength: Applied load divided by the material area it is acting on.
tension: A pulling or stretching force that tends to lengthen objects.
Assessment
Pre-Activity Assessment
Prediction: Have students predict the outcome of the activity before the activity is performed. Ask students to predict whether there are similarities between the strength of steel, concrete and clay.
Activity Embedded Assessment
Data Sheet/Pairs Check: Use the attached Materials Data Sheet to help students follow along with the activity. After students finish the worksheet, have them compare answers with a peer or another pair, giving all students time to finish the worksheet. Review their answers to gauge their mastery of the concepts.
Post-Activity Assessment
Prediction Analysis: Have students compare their initial predictions with their test results, as recorded on the worksheets.
Question/Answer: Pose the following questions to the entire class or individually as homework:
- When creating graphs from collected data, the independent variable goes on which axis of the graph? The dependent variable? (Answer: The independent variable always goes on the horizontal axis [x-axis] and the dependent variable always goes on the vertical axis [y-axis].)
- Based on your observations, is the clay a brittle material or a ductile material? (Answer: The clay behaves as a ductile material when it is moist. Recall how the clay yielded some before it toppled over, or deflected a lot before complete failure)
- If the clay were to be completely dried out, making it look and feel like a rock, would the clay be a brittle material or a ductile material? (Answer: If completely dried out, the clay would behave as a brittle material. In this case, we would observe the clay easily crack or chip when a force was applied.)
- Based on the curves in the graph on the last page of the data sheet, is steel a brittle material or a ductile material? (Answer: Steel is a ductile material. We can tell from its stress vs. strain curve that steel yields before it fractures.)
- Based on the curves in the graph on the last page of the data sheet, is concrete a brittle material or a ductile material? (Answer: Concrete is generally considered a brittle material. We can tell from its stress vs. strain curve that concrete might yield some before it fractures but very little.)
- Why is it important for engineers to be able to quantify (measure) the strength of materials? (Answer: Use this open-ended question to encourage students to think about the strength of materials. In general, engineers want to know the properties of the material in advance of using them in a bridge so they can design the structure to be strong enough to stay safe [not fail] under its anticipated forces and stresses.)
Troubleshooting Tips
When placing the books on top of the clay, first use the lightest books, followed by the heavier books.
Have at least 10 lbs (4.5 kg) of books available to use per team. The clay usually starts to compress just after 1.5 pounds (.68 kg), depending on the clay.
When selecting the two points for calculating the slope of the line, make sure students choose points that are separated by at least two other points. Choosing points adjacent to each other may yield erroneous values.
If the cross-sectional area of the clay piece is not equal to 1 in2 (6.35 cm2) with 1 inch x 1 inch (2.5 cm x 2.5 cm) dimensions, revise the area of clay column of the table on the data sheet with the actual area.
Activity Extensions
Perform the test on a dried-out piece of clay and compare the difference between a brittle (dry clay) and non-brittle (moist clay) material by comparing the graphs and calculations.
Arrange to visit a local university's materials testing lab or ask engineering students or professors to bring examples of tested materials for "show and tell" in your classroom. Ask if the university tests steel, concrete, wood, plastics and/or composite materials.
Arrange for a tour at your local cement plant. Find out all the different mixes of concrete they make, and for what specific applications.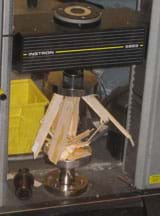
Activity Scaling
- For lower grades, complete the data sheet together, as a class.
- For upper grades, have students prepare a short presentation on their findings. Using all of the values obtained for the modulus of elasticity (E), calculate the class average.
Additional Multimedia Support
Learn more about the properties of wood, plastic, aluminum, brick, concrete, reinforced concrete, cast iron, steel. Use a fun mouse-controlled slider to drag to stretch or squeeze material to failure (good visual and audio). Material information on forces, loads and shapes, too. Plus, good bridge information and photos. Building Big: Materials Lab. WGBH Educational Foundation. Accessed October 16, 2007. http://www.pbs.org/wgbh/buildingbig/lab/materials.html
Subscribe
Get the inside scoop on all things Teach Engineering such as new site features, curriculum updates, video releases, and more by signing up for our newsletter!More Curriculum Like This

Students learn about the variety of materials used by engineers in the design and construction of modern bridges. They also find out about the material properties important to bridge construction and consider the advantages and disadvantages of steel and concrete as common bridge-building materials ...

Students calculate stress, strain and modulus of elasticity, and learn about the typical engineering stress-strain diagram (graph) of an elastic material.

Students are introduced to the concepts of stress and strain with examples that illustrate the characteristics and importance of these forces in our everyday lives. They explore the factors that affect stress, why engineers need to know about it, and the ways engineers describe the strength of mater...

To introduce the two types of stress that materials undergo — compression and tension — students examine compressive and tensile forces and learn about bridges and skyscrapers. They construct their own building structure using marshmallows and spaghetti to see which structure can hold the most weigh...
References
ACI Committee 318, Building Code Requirements for Structural Concrete (ACI 318-02) and Commentary (ACI 318R-02): An ACI Standard, American Concrete Institute, Farmington Hills, MI, 2002.
AISC Committee on Manuals and Textbooks, Manual of Steel Construction: Load and Resistance Factor Design, Third Edition, American Institute of Steel Construction, 2001.
Brain, Marshall. How Iron & Steel Work. HowStuffWorks, Inc. Accessed October 16, 2007. http://www.howstuffworks.com/iron.htm
Concrete Basics. Portland Cement Association. Accessed October 16, 2007. (Good overview of concrete and cement) http://www.epa.gov/ttn/chief/old/ap42/ch11/s12/reference/ref_05c11s12_2001.pdf
Dictionary.com. Lexico Publishing Group, LLC. Accessed October 16, 2007. (Source of some vocabulary definitions, with some adaptation) http://www.dictionary.com
Hibbeler, R.C. Mechanics of Materials, Third Edition. Prentice Hall: Upper Saddle River, NJ, 1997.
Nilson, Arthur H. Design of Concrete Structures, Twelfth Edition. WCB McGraw-Hill: Boston, MA, 1997.
Copyright
© 2006 by Regents of the University of Colorado.Contributors
Jonathan S. Goode; Joe Friedrichsen; Natalie Mach; Denali Lander; Chris Valenti; Denise W. Carlson; Malinda Schaefer ZarskeSupporting Program
Integrated Teaching and Learning Program, College of Engineering, University of Colorado BoulderAcknowledgements
The contents of this digital library curriculum were developed under a grant from the Fund for the Improvement of Postsecondary Education (FIPSE), U.S. Department of Education and National Science Foundation GK-12 grant no. 0338326. However, these contents do not necessarily represent the policies of the Department of Education or National Science Foundation, and you should not assume endorsement by the federal government.
Last modified: February 25, 2020


User Comments & Tips