Quick Look
Grade Level: 7 (7-9)
Time Required: 45 minutes
Expendable Cost/Group: US $1.20
Group Size: 2
Activity Dependency:
Subject Areas: Geometry, Problem Solving
Summary
Students learn how to create two-dimensional representations of three-dimensional objects by utilizing orthographic projection techniques. They build shapes using cube blocks and then draw orthographic and isometric views of those shapes—which are the side views, such as top, front, right—with no depth indicated. Then working in pairs, one blindfolded partner describes a shape by feel alone as the other partner draws what is described. A worksheet is provided. This activity is part of a multi-activity series towards improving spatial visualization skills.
Engineering Connection
Orthographic projection is a technique used in spatial visualization, which is an essential skill for engineers in taking an idea that initially only exists in the mind, to something that can be communicated clearly to other engineers and eventually turned into a product. Orthographic views are especially helpful for detailing the product/structure designs for manufacturing and construction. Since orthographic drawings show multiple viewpoints, they are helpful to make sure that a product or object can be accurately created in accordance with an engineer’s requirements. While isometric drawings, which provide a three-dimensional view of an object, can be a convenient means of providing a complete understanding of some objects from a single drawing, other objects require information from additional viewpoints; in these cases, engineers use orthographic drawings.
Learning Objectives
After this activity, students should be able to:
- Explain the concept of orthographic projection and why it is useful in engineering.
- Draw the three principle orthographic views of an object.
Educational Standards
Each Teach Engineering lesson or activity is correlated to one or more K-12 science,
technology, engineering or math (STEM) educational standards.
All 100,000+ K-12 STEM standards covered in Teach Engineering are collected, maintained and packaged by the Achievement Standards Network (ASN),
a project of D2L (www.achievementstandards.org).
In the ASN, standards are hierarchically structured: first by source; e.g., by state; within source by type; e.g., science or mathematics;
within type by subtype, then by grade, etc.
Each Teach Engineering lesson or activity is correlated to one or more K-12 science, technology, engineering or math (STEM) educational standards.
All 100,000+ K-12 STEM standards covered in Teach Engineering are collected, maintained and packaged by the Achievement Standards Network (ASN), a project of D2L (www.achievementstandards.org).
In the ASN, standards are hierarchically structured: first by source; e.g., by state; within source by type; e.g., science or mathematics; within type by subtype, then by grade, etc.
Common Core State Standards - Math
-
Draw, construct, and describe geometrical figures and describe the relationships between them.
(Grade
7)
More Details
Do you agree with this alignment?
-
Verify experimentally the properties of rotations, reflections, and translations:
(Grade
8)
More Details
Do you agree with this alignment?
-
Apply geometric concepts in modeling situations
(Grades
9 -
12)
More Details
Do you agree with this alignment?
-
Visualize relationships between two-dimensional and three-dimensional objects
(Grades
9 -
12)
More Details
Do you agree with this alignment?
-
Identify the shapes of two-dimensional cross-sections of three-dimensional objects, and identify three-dimensional objects generated by rotations of two-dimensional objects.
(Grades
9 -
12)
More Details
Do you agree with this alignment?
State Standards
Colorado - Math
-
Modeling geometric figures and relationships leads to informal spatial reasoning and proof.
(Grade
7)
More Details
Do you agree with this alignment?
-
Verify experimentally the properties of rotations, reflections, and translations.
(Grade
8)
More Details
Do you agree with this alignment?
-
Objects in the real world can be modeled using geometric concepts.
(Grades
9 -
12)
More Details
Do you agree with this alignment?
-
Visualize relationships between two-dimensional and three-dimensional objects.
(Grades
9 -
12)
More Details
Do you agree with this alignment?
-
Identify the shapes of two-dimensional cross-sections of three-dimensional objects, and identify three-dimensional objects generated by rotations of two-dimensional objects.
(Grades
9 -
12)
More Details
Do you agree with this alignment?
Materials List
Each group needs:
- 8 snap cubes (interlocking cubes); available at https://www.amazon.com/Learning-Resources-LER4285-Mathlink-Cubes-100/dp/B000URL296 or https://www.amazon.com/Learning-Resources-LER7584-Snap-Cubes/dp/B000G3LR9Y, ~$10-13 for a set of 100)
- pencil with erasers, for each student
- Blank Triangle-Dot Paper, two sheets per student
- Orographic Drawings Worksheet, one per student
- blindfold
To share with the entire class:
- (optional) computer with projector to show examples as provided in the Spatial Visualization Presentation, a PowerPoint® file; alternatively, draw the examples for students

Worksheets and Attachments
Visit [www.teachengineering.org/activities/view/cub_spatviz_lesson01_activity2] to print or download.Pre-Req Knowledge
Before taking part in this spatial visualization activity, students should have taken the Spatial Visualization Practice Quiz and learned about spatial visualization in the associated lesson, Let’s Learn about Spatial Viz! They should know how to use triangle-dot (isometric) paper and how to make isometric drawings and coded plans, as can be learned in the associated activity, Connect the Dots: Isometric Drawing and Coded Plans. Students should also be familiar with the x, y and z axes.
Introduction/Motivation
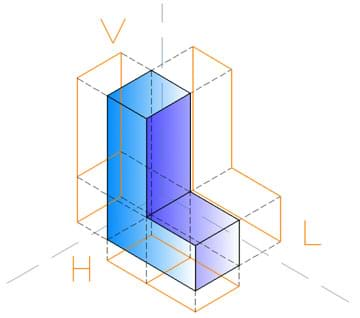
Today, we are going to learn about orthographic views and why orthographic drawings are important in engineering. Orthographic views are two-dimensional depictions used to describe three-dimensional objects. This spatial visualization skill is different from our last activity, during which we worked on representing objects using 3-D depictions. Typically, we only need three orthographic views—top, front and right—to describe an object. So, if you describe a skyscraper to someone, you might say, “The front of the building is all glass, but the top of the building is all steel.” That is an orthographic description. More complicated objects sometimes require more views, but for today we will just focus on the main three. The three orthographic views are defined by the three planes of an orthogonal coordinate system: the x-y plane, the y-z plane and the x-z plane.

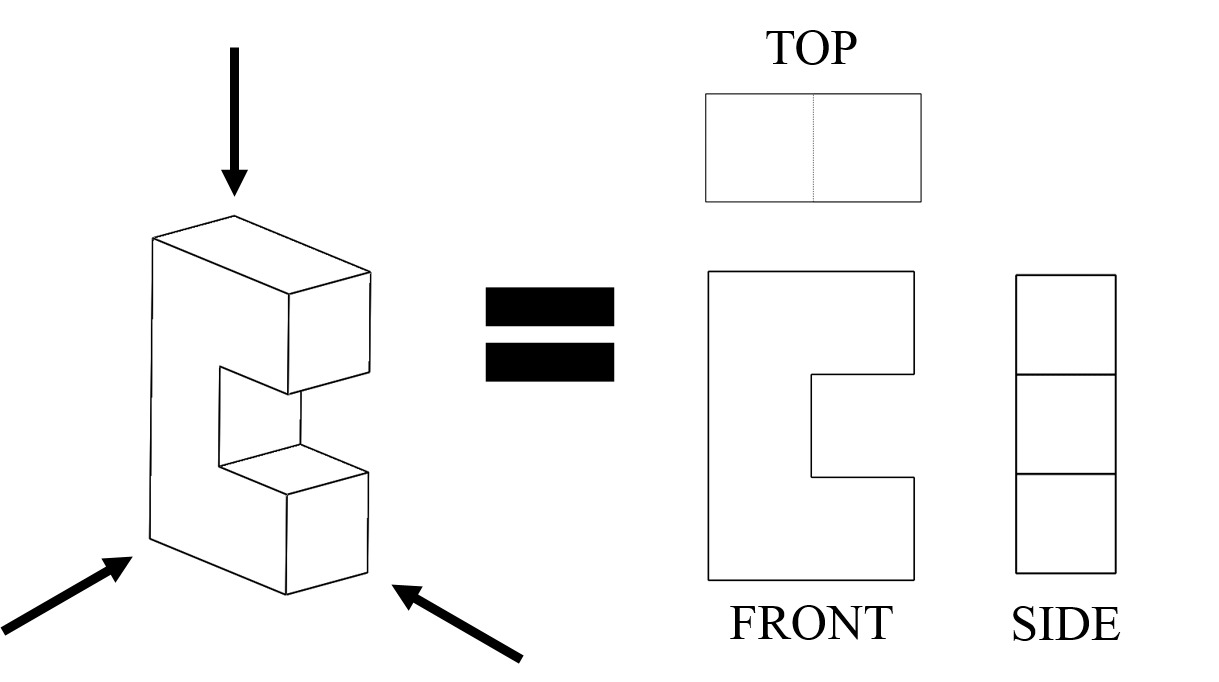
(Show students slides 12-20, various depictions of isometric objects and their orthographic views, of which slide 13 is the same as Figure 1. The slides are animated, so a mouse or keyboard click brings up the next graphic or text.) Take a look at this graphic. On the left is a three-dimensional object shown in isometric view. Recall that this is how we drew objects using coded plans and triangle-dot paper. The three side (orthographic) views of this object are shown to the right of the object. (Click to reveal.)
Notice that the top and front views are the same width, while the front and side views are the same height. We typically draw the views the way they are drawn in this figure, so that they are aligned. This helps us visualize the object.
Solid lines are drawn to represent an edge, while dashed lines show components of the object that are hidden from a particular view. (Next show students slides 14-17 for other graphics that depict orthographic drawings and views. Then show students slide 18—drawings of a bench and a church.) Here are two real-world examples.
Procedure
Before the Activity
- Gather materials and make copies of the Blank Triangle-Dot Paper and Orographic Drawings Worksheet.
- Prepare to project the Spatial Visualization Presentation, a PowerPoint® file, and use its content to aid in your instruction, as makes sense for your class. Slides 12-20 support this activity. The slides are animated so a mouse or keyboard click brings up the next graphic or text.
With the Students
- Present to the class the Introduction/Motivation content. Also ask the pre-assessment question, as described in the Assessment section.
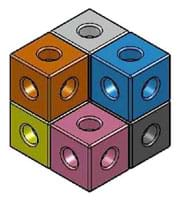
- Divide the class into student pairs. Hand out two pieces of triangle dot paper and four cubes to each student.
- Explain to students that they will use two methods to draw cube shapes.
- Method 1: Block-n-Draw Relay
- Each pair joins up with another pair to form a group of four. Have students bring their blocks and paper with them when merging groups.
- Each of the four group members builds an object.
- Each student’s object is passed to the person on their right. That person then produces on their triangle-dot paper orthographic and isometric views of the object.
- After two minutes, each student passes the object to the next student on the right. Repeat step C.
- Repeat step D until all objects have been drawn by each student in the group.
- After all objects are drawn by all students, the group compares results and discusses the correct solutions for each object.
- As makes sense, show students the drawing tips on slide 19.
- Method 2: The No-Look Pass
- Working in pairs, one student wears a blindfold. The other student builds an object using up to four blocks.
- Holding the object, the blindfolded student describes to the partner the front, side and top views of the object.
- The partner draws ONLY what the blindfolded student describes, make note of missing or problematic features.
- Switch roles and repeat steps A-C.
- Repeat steps A-D with five blocks.
- Repeat steps A-D with six blocks.
- If students are struggling with their drawings, show them slide 20 (same as Figure 2).

- Have students complete the worksheet. Observe and assist as necessary.
Vocabulary/Definitions
orthographic views: A way to draw an object that shows three views of an object from the three planes in an orthogonal (right angle) coordinate system. The views represent the exact shape of an object as seen from one side at a time as you are looking perpendicularly to it. Depth is not shown. An orthographic drawing is also called a multiview drawing.
spatial visualization: The ability to mentally manipulate two- and three-dimensional objects. It is typically measured with cognitive tests and is a predictor of success in STEM fields. Also referred to as visual-spatial ability.
triangle-dot paper: A grid of dots arranged equidistant from one another. Used in making isometric sketches. Also called isometric paper.
Assessment
Pre-Activity Assessment
Question/Answer: Ask students:
- Why are orthographic drawings important to engineers? How do orthographic views help engineers to visualize something? (Point to make: Orthographic views show the exact shapes and details of an object or structure seen from one side at a time as you are looking perpendicularly to it. That’s helpful to engineers who are communicating their designs to other people for accurate manufacturing or construction.)
- Challenge question: When might an engineer choose to use orthographic drawings instead of—or in addition to—a single isometric drawing? (Point to make: Sometimes a single isometric drawing can provide a complete understanding an object, such as a simple cube. In other cases, orthographic drawings of additional viewpoints are needed in order to accurately communicate all of an object’s details. Going back to the example of a cube, if each side of the cube has different details, engineers would use orthographic drawings in order to fully and accurately describe each cube side.)
Activity Embedded Assessment
Worksheet: After completing the classroom instructions and group exercises, have students complete the Orthographic Drawings Worksheet. Observe whether students are able to draw the objects or if they are struggling. Assist them as necessary. Review their answers to gauge their depth of understanding.
Post-Activity Assessment
Discussion: Ask students to explain and describe their drawings with specific focus on orthographic views. What strategies did they use to draw their cube shapes? What were the limitations they experienced, if any? How did students solve any drawing challenges? Since everyone has worked through the same exercises, group sharing of their challenges and approaches informs the teacher of students’ depth of understanding and provides their peers with relevant ideas and tips.
Activity Scaling
- For lower grades, spend more time introducing the concept by having the entire class make the same object, giving students time to draw the three orthographic views, and then drawing them on an overhead projector as a class. This provides more time to fully practice and grasp the topic before branching off in pairs. Also, provide students with a longer time on the Block-n-Draw Relay.
- For higher grades, have students use more blocks to make more complicated objects. Also, during the Block-n-Draw Relay, have each student draw all four isometric views of the object before passing the object to the next person. Adjust the time allotment as needed.
Subscribe
Get the inside scoop on all things Teach Engineering such as new site features, curriculum updates, video releases, and more by signing up for our newsletter!More Curriculum Like This

Students learn about isometric drawings and practice sketching on triangle-dot paper the shapes they make using multiple simple cubes. They also learn how to use coded plans to envision objects and draw them on triangle-dot paper.

In this lesson, students are introduced to the concept of spatial visualization and measure their spatial visualization skills by taking the provided 12-question quiz. Following the lesson, students complete the four associated spatial visualization activities and then re-take the quiz to see how mu...

Students learn about two-axis rotations, and specifically how to rotate objects both physically and mentally about two axes. Students practice drawing two-axis rotations through an exercise using simple cube blocks to create shapes, and then drawing on triangle-dot paper the shapes from various x-, ...

Students learn about one-axis rotations, and specifically how to rotate objects both physically and mentally to understand the concept. They practice drawing one-axis rotations through a group exercise using cube blocks to create shapes and then drawing those shapes from various x-, y- and z-axis ro...
Copyright
© 2011 by Regents of the University of ColoradoContributors
Emily C. Gill; Jacob Segil; Emily BreidtSupporting Program
Engineering Plus Degree Program, University of Colorado BoulderAcknowledgements
This activity was developed by the Engineering Plus degree program in the College of Engineering and Applied Science at the University of Colorado Boulder.
This lesson plan and its associated activities were derived from a summer workshop taught by Jacob Segil for undergraduate engineers at the University of Colorado Boulder. The activities have been adapted to suit the skill level of middle school students, with suggestions on how to adapt activities to elementary or, in some instances, high school level.
Last modified: March 23, 2021


User Comments & Tips