
Quick Look
Grade Level: 6 (6-8)
Time Required: 3 hours 15 minutes
Time spread over 4 class periods (45-60 minutes): 2 class periods to design and assemble product, 2 class periods to present
Expendable Cost/Group: US $2.00
Group Size: 4
Activity Dependency: None
Subject Areas: Computer Science, Measurement, Physics, Science and Technology
NGSS Performance Expectations:

| MS-ETS1-1 |
| MS-ETS1-2 |
Quick Look

- Grade Level:
- 6 (6 – 8)
- Time Required:
- 3 hours 15 minutes
Time spread over 4 class periods (45-60 minutes): 2 class periods to design and assemble product, 2 class periods to present
- Group Size:
- 4
- Subject Areas:
-
Computer Science Measurement Physics Science and Technology -
NGSS Performance Expectations:
MS-ETS1-1 MS-ETS1-2

Summary
Students begin by following instructions to connect a Sunfounder Ultrasonic Sensor and an Arduino Microcontroller. Once they have them set up, students calibrate the sensor and practice using it. Students are then given an engineering design problem: to build a product that will use the ultrasonic sensors for a purpose that they all specify. Students will have to work together to design and test their product, and ultimately present it to their classmates.Engineering Connection
Civil engineers need to have strategies for measuring distances that do not require the use of hand measurement, such as long tape measures. Instead of solid tools, they use sensing systems to determine distance. One of these sensing systems uses light (through a beam or laser) or sound (high frequency radio waves) to measure distance. Electrical and computer engineers work to make improvements in the use of sound energy to assist in more efficient and accurate surveying tools for civil engineers. A type of testing called “nondestructive evaluation testing” uses distance sensors to help identify depths at which electrical lines are buried underground. They also use distance sensors to identify the location and depth of defects in materials. One such laboratory has created sensing systems that detect defects and obstructions at certain distances within materials. The use of ultrasonic devices also provide opportunities to support product sustainability.
Learning Objectives
After this activity, students should be able to:
- Apply knowledge about ultrasonic sensors to find a need/use for measuring distances between 20 cm and 700 cm accurately and efficiently.
- Design a package that will house the sensor and microcontroller safely while allowing access to connections.
- Present and communicate ideas and demonstrate use of product to their peers.
Educational Standards
Each Teach Engineering lesson or activity is correlated to one or more K-12 science,
technology, engineering or math (STEM) educational standards.
All 100,000+ K-12 STEM standards covered in Teach Engineering are collected, maintained and packaged by the Achievement Standards Network (ASN),
a project of D2L (www.achievementstandards.org).
In the ASN, standards are hierarchically structured: first by source; e.g., by state; within source by type; e.g., science or mathematics;
within type by subtype, then by grade, etc.
Each Teach Engineering lesson or activity is correlated to one or more K-12 science, technology, engineering or math (STEM) educational standards.
All 100,000+ K-12 STEM standards covered in Teach Engineering are collected, maintained and packaged by the Achievement Standards Network (ASN), a project of D2L (www.achievementstandards.org).
In the ASN, standards are hierarchically structured: first by source; e.g., by state; within source by type; e.g., science or mathematics; within type by subtype, then by grade, etc.
NGSS: Next Generation Science Standards - Science
| NGSS Performance Expectation | ||
|---|---|---|
|
MS-ETS1-1. Define the criteria and constraints of a design problem with sufficient precision to ensure a successful solution, taking into account relevant scientific principles and potential impacts on people and the natural environment that may limit possible solutions. (Grades 6 - 8) Do you agree with this alignment? |
||
| Click to view other curriculum aligned to this Performance Expectation | ||
| This activity focuses on the following Three Dimensional Learning aspects of NGSS: | ||
| Science & Engineering Practices | Disciplinary Core Ideas | Crosscutting Concepts |
| Define a design problem that can be solved through the development of an object, tool, process or system and includes multiple criteria and constraints, including scientific knowledge that may limit possible solutions. Alignment agreement: | The more precisely a design task's criteria and constraints can be defined, the more likely it is that the designed solution will be successful. Specification of constraints includes consideration of scientific principles and other relevant knowledge that is likely to limit possible solutions. Alignment agreement: | The uses of technologies and any limitations on their use are driven by individual or societal needs, desires, and values; by the findings of scientific research; and by differences in such factors as climate, natural resources, and economic conditions. Alignment agreement: Models can be used to represent systems and their interactions.Alignment agreement: |
| NGSS Performance Expectation | ||
|---|---|---|
|
MS-ETS1-2. Evaluate competing design solutions using a systematic process to determine how well they meet the criteria and constraints of the problem. (Grades 6 - 8) Do you agree with this alignment? |
||
| Click to view other curriculum aligned to this Performance Expectation | ||
| This activity focuses on the following Three Dimensional Learning aspects of NGSS: | ||
| Science & Engineering Practices | Disciplinary Core Ideas | Crosscutting Concepts |
| Evaluate competing design solutions based on jointly developed and agreed-upon design criteria. Alignment agreement: Use mathematical representations to describe and/or support scientific conclusions and design solutions.Alignment agreement: | There are systematic processes for evaluating solutions with respect to how well they meet the criteria and constraints of a problem. Alignment agreement: | |
Common Core State Standards - Math
-
Model with mathematics.
(Grades
K -
12)
More Details
Do you agree with this alignment?
-
Find the volume of a right rectangular prism with fractional edge lengths by packing it with unit cubes of the appropriate unit fraction edge lengths, and show that the volume is the same as would be found by multiplying the edge lengths of the prism. Apply the formulas V = l w h and V = b h to find volumes of right rectangular prisms with fractional edge lengths in the context of solving real-world and mathematical problems.
(Grade
6)
More Details
Do you agree with this alignment?
-
Solve real-world and mathematical problems involving area, volume and surface area of two- and three-dimensional objects composed of triangles, quadrilaterals, polygons, cubes, and right prisms.
(Grade
7)
More Details
Do you agree with this alignment?
International Technology and Engineering Educators Association - Technology
-
Students will develop an understanding of the role of troubleshooting, research and development, invention and innovation, and experimentation in problem solving.
(Grades
K -
12)
More Details
Do you agree with this alignment?
-
Students will develop an understanding of and be able to select and use information and communication technologies.
(Grades
K -
12)
More Details
Do you agree with this alignment?
State Standards
Michigan - Math
-
Model with mathematics.
(Grades
K -
12)
More Details
Do you agree with this alignment?
-
Find the volume of a right rectangular prism with fractional edge lengths by packing it with unit cubes of the appropriate unit fraction edge lengths, and show that the volume is the same as would be found by multiplying the edge lengths of the prism. Apply the formulas V = l w h and V = b h to find volumes of right rectangular prisms with fractional edge lengths in the context of solving real-world and mathematical problems.
(Grade
6)
More Details
Do you agree with this alignment?
-
Solve real-world and mathematical problems involving area, volume and surface area of two- and three-dimensional objects composed of triangles, quadrilaterals, polygons, cubes, and right prisms.
(Grade
7)
More Details
Do you agree with this alignment?
Michigan - Science
-
Define the criteria and constraints of a design problem with sufficient precision to ensure a successful solution, taking into account relevant scientific principles and potential impacts on people and the natural environment that may limit possible solutions.
(Grades
6 -
8)
More Details
Do you agree with this alignment?
-
Evaluate competing design solutions using a systematic process to determine how well they meet the criteria and constraints of the problem.
(Grades
6 -
8)
More Details
Do you agree with this alignment?
Materials List
For Part 1:
Each group needs:
- Arduino Mega 2560 Microcontroller
- laptop, desktop (or other device with internet capability) with tabs open to Arduino Create page with TE One Sensor Sketch Open (See Figure 1)

- SunFounder Distance Sensor, model HC-SR04, with connecting wires
- Use information from the Assembly of Microcontroller & Ultrasonic Sensor PowerPoint Presentation for students
- USB Standard Male A/Male B Cable
- Assembly of Microcontroller & Ultrasonic Sensor PowerPoint Presentation, electronic or paper
- camera or capability to take photos for documentation
Part 2:
Each group needs:
- Student Group Planning Sheet for Ultrasonic Sensor Project
- recycled or commonly available arts and crafts materials to serve as the “housing” for the Arduino unit such as tin foil, string, boxboard, cardboard, felt, modeling clay, tape or other adhesive, scissors, egg cartons, scrap paper, etc.
- ruler (for measuring the package)
- calculator (if a package is allowed volume)
Note: The amount of material depends on what teachers have available and what each group may want to use. Students are not required to use all of the materials.
To share with the entire class:
- 1 microcontroller with sensor set up and running with Arduino Sketch. Use the NewPing Instructions and Code for the coding to use. You will copy and paste the text into the web editor. Make sure to save the sketch after you copy and paste it. It would be great to show a serial monitor to students using a projector.
Worksheets and Attachments
Visit [www.teachengineering.org/activities/view/mis-2227-distance-sensing-product-ultrasonic-arduino-microcontroller] to print or download.Pre-Req Knowledge
Students should know how to measure using metric units and how to convert from millimeters to centimeters. Students should know how to calculate volume of a rectangular solid and/or a composite figure. Students need to apply concepts from the Ultrasonic Devices at the Speed of Sound! lesson to help design their products.
Introduction/Motivation
In the Ultrasonic Devices at the Speed of Sound! lesson, we discussed the nature of sound, what products use sound, and the elements of ultrasonic sensors. In this activity, let’s put all those concepts together! For our project, you are going to take on two important projects. The first part is constructing a working ultrasonic sensor. Think of this as the “invisible” portion of the product, much like sound. While the components that make up your sensor are critical to building a working ultrasonic device, they remain hidden behind the second part of your project, which is the housing, casing, or packaging.
Think of devices we use every day, such as computers and smartphones. Or, think of machines that are used in professional settings such as SONAR devices and medical imaging equipment. The delicate electronics are always housed inside a sturdy container or package. Engineers develop packaging to hold and protect materials and ensure that they run properly. Almost every item that we use in our daily lives has a specific material to ensure it functions correctly. Engineers plan how to have the packaging protect all parts, but aesthetics—notions that are concerned with beauty or design—are also important. While users buy products because of what they do, they also purchase products because of the way they look. Think about how Apple designs their products as an example.
The lesson displayed several real-world applications of ultrasonic sensors, I would like you to turn to a partner. Each partner needs to give one example they remember from the lesson and how it is useful and helpful in our lives. (Allow students to discuss these real-life examples; this would be a good opportunity to point out that many engineers use ultrasonics to measure distances because it is more accurate.)
Today you will work as a team of engineers. Your team must follow the steps to accurately set up and use your Sunfounder Ultrasonic Sensor with the Arduino Mega 2560 Microcontroller. Then, your team must design a product that will use the ultrasonic sensors for a purpose of your choosing. You will design and build your product according to your plan, test out your product, and present it to the class. I am giving you a planning sheet that gives you all the constraints to consider when designing your product. Remember, think about the problem you want your sensor package to solve as you think about what purpose it will serve: how will your product help people?”
Give the students the following prompts prior to them beginning the task.
- Who could benefit from knowing when something gets close to them, such as visually impaired individuals, small children, etc.?
- Think about your parents or family members’ jobs. How could your product be useful to them?
- Could a product be helpful in the classroom?
- Do you think a product that measures distance could be included in a game or activity for you or others?
Procedure
Background
Students learned about the uses of ultrasound distance sensors in the lesson and now they are going to build their own and design a product that can use this technology. Students need to know that these sensors are very sensitive. When working on development and research, 25 sensors were purchased and of that 5 sensors would not function properly with the Arduino Web Editor. For this reason, anchoring and packaging of the sensors is essential when students are creating the product.
Before the Activity
- Teachers should be familiar with how the serial monitor displays information. This is identified in the Assembly of Microcontroller & Ultrasonic Sensor PowerPoint Presentation. Also, it would be a good idea to make sure the sensors are accurate by testing them prior to the activity. Faulty sensors can cause errors.
Teacher must collect the following materials:
- Arduino Mega 2560 Microcontroller
- Chromebook (or other device with internet capability) with tabs already open to Arduino Create page with TE One Sensor Sketch (see Figure 1)
- After you have created your Arduino account, go to web editor
- Select the sketchbook tab at the top left
- Select New Sketch
- Right click to rename your New Sketch, “TE One Sensor Sketch”
- Copy and paste all the code from the attached word document into the main area of the web editor
- Make sure to save the sketch
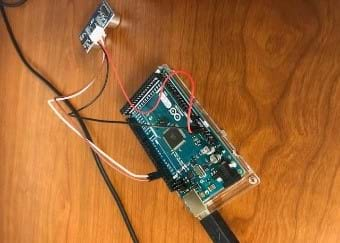
- SunFounder Distance Sensor, model HC-SR04, with connecting wires (see Figure 2, below)

- USB Standard Male A/Male B Cable
- Assembly of Microcontroller & Ultrasonic Sensor PowerPoint Presentation, electronic or paper, one per group
- Student Group Planning Sheet for Ultrasonic Sensor Project, one per group
- extra cameras (student phones if allowed)
- 1 Arduino microcontroller correctly connected to teacher station with Sunfounder Sensor connected. Sketch is open to the NewPing Instructions and Code, students will see that the LED light is working on the Microcontroller and numbers are shown on the serial display. (Follow all the picture steps in the Assembly of Microcontroller & Ultrasonic Sensor PowerPoint Presentation, prior to teaching the activity to the students.)
- Set out Phase 2 materials (sans the Planning Sheet) in a central location in the room.
With the Students
Days 1-2
- Get students thinking about engineers by engaging them in the Pre-Activity Assessment discussion.
- Introduce students to their engineering challenge in the Introduction/Motivation section. Organize the class into groups of four students each.
- Pass out copies or have students open the Assembly of Microcontroller & Ultrasonic Sensor PowerPoint Presentation. Provide students with Phase 1 materials.
- Give students time to assemble their ultrasonic sensors. Walk around and assist students as necessary; see Figure 2 for an image of a completed assembly. As the students complete assembly, provide them with access to the pre-made Arduino Create sketch (from NewPing Instructions and Code). Let students test their sensors.
- After groups ensure that their code and sensors work, pass out copies of the Student Group Planning Sheet for Ultrasonic Sensor Project. Have students work through the Planning Sheet; sign off on their plans as they complete the different sections on the sheet.
- Once students complete through page five of the Planning Sheet, allow them access to the Phase 2 building materials. Give students time to build their designs; walk around the room and ensure that groups are working together during the build.
- Near the end of class, have students finish the Student Group Planning Sheet for Ultrasonic Sensor Project. This will prepare them for their presentations.
Days 3-4
- Give students time to review their roles and presentation.
- Have groups present their designs; this is the Presentation Post-Activity Assessment.
Vocabulary/Definitions
microcontroller: A computer present in a single integrated circuit which is dedicated to perform one task and execute one specific application.
open source: Software for which the original source code is made freely available and may be redistributed and modified.
prototype: A first model of something from which other forms are developed or copied.
sensor: A device that detects or measures a physical property and records and transmits the information.
Assessment
Pre-Activity Assessment
Engineering Brainstorm: Introduce students to the concept, “Engineering is essential to our health, happiness, and safety.” Have students brainstorm ways that engineers have improved, or could improve, their health, happiness, or safety. Remind students that no idea is too “out there” during brainstorming and write student ideas on the board. Possible engineering improvements include: new medical technology to detect cancer, drones as a cool toy, new car/plane designs to protect people during a crash, etc.
Activity Embedded Assessment
Planning Sheet: Students should complete the Student Group Planning Sheet for Ultrasonic Sensor Project. This worksheet will give all constraints for the project. Students are given an area to write or draw a sketch on how they plan to meet each constraint. There are places to check in with the teacher. The teacher will sign off on the plans prior to students building the product. When working with groups and signing off on plans, make sure to emphasize and discuss how students adjusted and changed the plan during the activity. Remind students that engineers often adjust their designs based on constraints many times before they create a final product.
Post-Activity Assessment
Reflection: Have students write a reflective thought on the design or ask them what they would change if given the option to redesign the package.
Presentation: Groups present their products to the classroom. Teachers should use the Distance Sensor Group Presentation Rubric to grade the design and package.
Troubleshooting Tips
- Students need to be able to access the serial monitor in the Arduino program during their design process, which means a desktop computer is not optimal. The serial monitor gives a read of the distance.
- Teachers could go into Arduino Create and program a sketch that added an LED monitor. Then students would not need access to the laptop/netbook the whole time.
- Teachers need to determine how they want students to take pictures to document their prototypes. This activity states that students will use their tablet to take pictures.
- Students may find that they need to adjust the calibration of the sensor. Use the document that has the highlighted value for changing this. The number stated in the sketch is based on the speed of sound in air divided in half.
- When testing this product in the classroom, an unexpected server error with Arduino Create could happen. A suggestion would be to test out the teacher’s demo system prior to the activity.
- Students have to remember the computer/tablet and product are connected with the USB.
- Have at least two extra ultrasonic sensors in case any do not turn on or are very far off in calibration.
Activity Extensions
- Students could take another group's design and redesign it, with improvements (iterate).
- Students could be given different constraints for designing a product. Instead of asking for volume measurements, students could try to find a design focusing on:
- surface area
- weight
- density
- Teachers can purchase Arduino Starter Kits online ranging from $50-150.
- Students could explore the Arduino libraries and try some of the other sketches that are available for use. If you allow students to create their own accounts, they can learn how to program on their own. Many starter kits also come with projects designed for student use.
Activity Scaling
For lower grades:
- Have sensors already set up and have students practice measuring with them.
- Another option would be to adjust your Arduino code to add a range for students to get feedback. You could set a max distance to 3 m (3000mm) and have the code involve a buzzer or LED light to indicate when the distance will work.
- Adjust code to register inches rather than mm. (Note: this code is available in Arduino libraries.)
For higher grades:
- Students may be able to work on more of the coding in the Arduino software, and/or be able to connect two distance sensors to see if they give the same value.
- This could create a larger discussion about the need for individual calibration, measurement error, instrument error, and instrument handling.
Subscribe
Get the inside scoop on all things Teach Engineering such as new site features, curriculum updates, video releases, and more by signing up for our newsletter!More Curriculum Like This

Students learn vocabulary necessary for understanding how ultrasonic waves are reflected and refracted. Students also see how ultrasound technology is used in medical devices.
Students learn about how ultrasonic sensors work, reinforcing the connection between this sensor and how humans, bats and dolphins estimate distance. They learn the echolocation process—sound waves transmitted, bounced back and received, with the time difference used to calculate the distance of obj...

Students learn about the three components of biosensors—a special type of sensor—and their functions and importance. With this understanding, students identify various organs in the human body that behave as sensors, such as the pancreas. Using LEGO® MINDSTORMS® robots, provided rbt robot programs a...

References
Smith, Alan. Introduction to Arduino: A Piece of Cake! September 20, 2011: 1-172. Accessed November 27, 2018. https://www.introtoarduino.com/downloads/IntroArduinoBook.pdf
Copyright
© 2018 by Regents of the University of Colorado; original © 2016 Michigan State UniversityContributors
Kendra RandolphSupporting Program
Smart Sensors and Sensing Systems RET, College of Engineering, Michigan State UniversityAcknowledgements
This curriculum was developed through the Smart Sensors and Sensing Systems research experience for teachers under National Science Foundation RET grant no. CNS 1609339. However, these contents do not necessarily represent the policies of the NSF, and you should not assume endorsement by the federal government.
Dr. Lalita Upda, Michigan State University College of Engineering, Non-Destructive Evaluation (NDE) Laboratory
Oleksii Karpenko(MS, Mechanical Engineering), Michigan State University,, Non-Destructive Evaluation (NDE) Laboratory
Dr. Anders Rosell, Michigan State University College of Engineering, Non-Destructive Evaluation (NDE) Laboratory
Drew Kim, Michigan State University College of Engineering, RET Program Director
Last modified: March 21, 2023
User Comments & Tips