Summary
Students reinforce an antenna tower made from foam insulation so that it can withstand a 480 N-cm bending moment (torque) and a 280 N-cm twisting moment (torque) with minimal deflection. During one class period, students discuss the problem, run the initial bending and torsion tests and graph the results. During the following class periods, students design, construct and test sturdier towers, and graph the results.Engineering Connection
Evaluation of the effect of torsional forces on objects such as building support beams or machine parts (by civil and mechanical engineers, respectively) is extremely important in making sure that structures and machines do not fail. Understanding how torsion affects objects helps engineers design structures that are safe and sound.
Learning Objectives
After this activity, students should be able to:
- Understand the concept of a moment (torque) of a force and learn how to calculate moments.
- Understand how moments (torque) ("turning forces") create bending and torsion loads on structures; understand the effects of bending and torsion loads, and gain some appreciation of how engineers can design structures to resist bending and torsion.
Educational Standards
Each TeachEngineering lesson or activity is correlated to one or more K-12 science,
technology, engineering or math (STEM) educational standards.
All 100,000+ K-12 STEM standards covered in TeachEngineering are collected, maintained and packaged by the Achievement Standards Network (ASN),
a project of D2L (www.achievementstandards.org).
In the ASN, standards are hierarchically structured: first by source; e.g., by state; within source by type; e.g., science or mathematics;
within type by subtype, then by grade, etc.
Each TeachEngineering lesson or activity is correlated to one or more K-12 science, technology, engineering or math (STEM) educational standards.
All 100,000+ K-12 STEM standards covered in TeachEngineering are collected, maintained and packaged by the Achievement Standards Network (ASN), a project of D2L (www.achievementstandards.org).
In the ASN, standards are hierarchically structured: first by source; e.g., by state; within source by type; e.g., science or mathematics; within type by subtype, then by grade, etc.
NGSS: Next Generation Science Standards - Science
| NGSS Performance Expectation | ||
|---|---|---|
|
MS-ETS1-1. Define the criteria and constraints of a design problem with sufficient precision to ensure a successful solution, taking into account relevant scientific principles and potential impacts on people and the natural environment that may limit possible solutions. (Grades 6 - 8) Do you agree with this alignment? |
||
| Click to view other curriculum aligned to this Performance Expectation | ||
| This activity focuses on the following Three Dimensional Learning aspects of NGSS: | ||
| Science & Engineering Practices | Disciplinary Core Ideas | Crosscutting Concepts |
| Define a design problem that can be solved through the development of an object, tool, process or system and includes multiple criteria and constraints, including scientific knowledge that may limit possible solutions. Alignment agreement: | The more precisely a design task's criteria and constraints can be defined, the more likely it is that the designed solution will be successful. Specification of constraints includes consideration of scientific principles and other relevant knowledge that is likely to limit possible solutions. Alignment agreement: | All human activity draws on natural resources and has both short and long-term consequences, positive as well as negative, for the health of people and the natural environment. Alignment agreement: The uses of technologies and any limitations on their use are driven by individual or societal needs, desires, and values; by the findings of scientific research; and by differences in such factors as climate, natural resources, and economic conditions.Alignment agreement: |
| NGSS Performance Expectation | ||
|---|---|---|
|
MS-ETS1-2. Evaluate competing design solutions using a systematic process to determine how well they meet the criteria and constraints of the problem. (Grades 6 - 8) Do you agree with this alignment? |
||
| Click to view other curriculum aligned to this Performance Expectation | ||
| This activity focuses on the following Three Dimensional Learning aspects of NGSS: | ||
| Science & Engineering Practices | Disciplinary Core Ideas | Crosscutting Concepts |
| Evaluate competing design solutions based on jointly developed and agreed-upon design criteria. Alignment agreement: | There are systematic processes for evaluating solutions with respect to how well they meet the criteria and constraints of a problem. Alignment agreement: | |
| NGSS Performance Expectation | ||
|---|---|---|
|
MS-ETS1-3. Analyze data from tests to determine similarities and differences among several design solutions to identify the best characteristics of each that can be combined into a new solution to better meet the criteria for success. (Grades 6 - 8) Do you agree with this alignment? |
||
| Click to view other curriculum aligned to this Performance Expectation | ||
| This activity focuses on the following Three Dimensional Learning aspects of NGSS: | ||
| Science & Engineering Practices | Disciplinary Core Ideas | Crosscutting Concepts |
| Analyze and interpret data to determine similarities and differences in findings. Alignment agreement: | There are systematic processes for evaluating solutions with respect to how well they meet the criteria and constraints of a problem. Alignment agreement: Sometimes parts of different solutions can be combined to create a solution that is better than any of its predecessors.Alignment agreement: Although one design may not perform the best across all tests, identifying the characteristics of the design that performed the best in each test can provide useful information for the redesign process—that is, some of the characteristics may be incorporated into the new design.Alignment agreement: | |
| NGSS Performance Expectation | ||
|---|---|---|
|
MS-ETS1-4. Develop a model to generate data for iterative testing and modification of a proposed object, tool, or process such that an optimal design can be achieved. (Grades 6 - 8) Do you agree with this alignment? |
||
| Click to view other curriculum aligned to this Performance Expectation | ||
| This activity focuses on the following Three Dimensional Learning aspects of NGSS: | ||
| Science & Engineering Practices | Disciplinary Core Ideas | Crosscutting Concepts |
| Develop a model to generate data to test ideas about designed systems, including those representing inputs and outputs. Alignment agreement: | Models of all kinds are important for testing solutions. Alignment agreement: The iterative process of testing the most promising solutions and modifying what is proposed on the basis of the test results leads to greater refinement and ultimately to an optimal solution.Alignment agreement: | |
Common Core State Standards - Math
-
Reason abstractly and quantitatively.
(Grades
K -
12)
More Details
Do you agree with this alignment?
-
Model with mathematics.
(Grades
K -
12)
More Details
Do you agree with this alignment?
-
Fluently add, subtract, multiply, and divide multi-digit decimals using the standard algorithm for each operation.
(Grade
6)
More Details
Do you agree with this alignment?
-
Summarize numerical data sets in relation to their context, such as by:
(Grade
6)
More Details
Do you agree with this alignment?
-
Reporting the number of observations.
(Grade
6)
More Details
Do you agree with this alignment?
-
Describing the nature of the attribute under investigation, including how it was measured and its units of measurement.
(Grade
6)
More Details
Do you agree with this alignment?
-
Recognize and represent proportional relationships between quantities.
(Grade
7)
More Details
Do you agree with this alignment?
-
Construct and interpret scatter plots for bivariate measurement data to investigate patterns of association between two quantities. Describe patterns such as clustering, outliers, positive or negative association, linear association, and nonlinear association.
(Grade
8)
More Details
Do you agree with this alignment?
International Technology and Engineering Educators Association - Technology
-
Students will develop an understanding of the attributes of design.
(Grades
K -
12)
More Details
Do you agree with this alignment?
-
Students will develop an understanding of engineering design.
(Grades
K -
12)
More Details
Do you agree with this alignment?
-
Students will develop an understanding of the relationships among technologies and the connections between technology and other fields of study.
(Grades
K -
12)
More Details
Do you agree with this alignment?
-
Evaluate designs based on criteria, constraints, and standards.
(Grades
3 -
5)
More Details
Do you agree with this alignment?
-
Modeling, testing, evaluating, and modifying are used to transform ideas into practical solutions.
(Grades
6 -
8)
More Details
Do you agree with this alignment?
-
Design involves a set of steps, which can be performed in different sequences and repeated as needed.
(Grades
6 -
8)
More Details
Do you agree with this alignment?
-
Make two-dimensional and three-dimensional representations of the designed solution.
(Grades
6 -
8)
More Details
Do you agree with this alignment?
-
Identify trends and monitor potential consequences of technological development.
(Grades
6 -
8)
More Details
Do you agree with this alignment?
-
Engage in a research and development process to simulate how inventions and innovations have evolved through systematic tests and refinements.
(Grades
6 -
8)
More Details
Do you agree with this alignment?
-
Analyze how an invention or innovation was influenced by its historical context.
(Grades
6 -
8)
More Details
Do you agree with this alignment?
-
Critue whether existing and proposed technologies use resources sustainably.
(Grades
9 -
12)
More Details
Do you agree with this alignment?
State Standards
Massachusetts - Math
-
Model with mathematics.
(Grades
Pre-K -
12)
More Details
Do you agree with this alignment?
-
Reason abstractly and quantitatively.
(Grades
Pre-K -
12)
More Details
Do you agree with this alignment?
-
Fluently add, subtract, multiply, and divide multi-digit decimals using the standard algorithm for each operation.
(Grade
6)
More Details
Do you agree with this alignment?
-
Summarize numerical data sets in relation to their context, such as by:
(Grade
6)
More Details
Do you agree with this alignment?
-
Reporting the number of observations.
(Grade
6)
More Details
Do you agree with this alignment?
-
Describing the nature of the attribute under investigation, including how it was measured and its units of measurement.
(Grade
6)
More Details
Do you agree with this alignment?
-
Decide whether two quantities are in a proportional relationship, e.g., by testing for equivalent ratios in a table, or graphing on a coordinate plane and observing whether the graph is a straight line through the origin.
(Grade
7)
More Details
Do you agree with this alignment?
-
Construct and interpret scatter plots for bivariate measurement data to investigate patterns of association between two quantities. Describe patterns such as clustering, outliers, positive or negative association, linear association, and nonlinear association.
(Grade
8)
More Details
Do you agree with this alignment?
Massachusetts - Science
-
Define the criteria and constraints of a design problem with sufficient precision to ensure a successful solution. Include potential impacts on people and the natural environment that may limit possible solutions.
(Grade
6)
More Details
Do you agree with this alignment?
-
Explain how the forces of tension, compression, torsion, bending, and shear affect the performance of bridges.
(Grades
6 -
8)
More Details
Do you agree with this alignment?
-
Describe and explain the purpose of a given prototype.
(Grades
6 -
8)
More Details
Do you agree with this alignment?
-
Identify appropriate materials, tools, and machines needed to construct a prototype of a given engineering design.
(Grades
6 -
8)
More Details
Do you agree with this alignment?
-
Explain how such design features as size, shape, weight, function, and cost limitations would affect the construction of a given prototype.
(Grades
6 -
8)
More Details
Do you agree with this alignment?
-
Generate and analyze data from iterative testing and modification of a proposed object, tool, or process to optimize the object, tool, or process for its intended purpose.
(Grade
7)
More Details
Do you agree with this alignment?
-
Construct a prototype of a solution to a given design problem.
(Grade
7)
More Details
Do you agree with this alignment?
Materials List
Comprehensive list of materials
Team Tools:
- tabletop vise and small c-clamp ($15)
- 2 20 N spring scales ($10)
- rulers, protractor, mini glue gun, Xacto knife ($5)
- black sharpie marker
- duct tape
- 1 x 1 x 11-inch extruded foam insulation block
- 14 x 14-inch foam board
- coat hanger wire, 9 1/2 -inches long
- bolt cutters or aviation snips (to cut coat hangers)
- scissors
Student Tools:
$6 per class
- extruded foam insulation 1-inch thick, 12 x 48-inch piece
- foam core board, 20 x 20-inch sheet
- Popsicle sticks (6 allowed per design)
- masking tape
- string
- coat hanger wire, two 12-inch pieces per design (bring from home or ask for donations from dry cleaners)
- hot glue sticks
Worksheets and Attachments
Visit [www.teachengineering.org/activities/view/wimpy_radar_antenna] to print or download.Pre-Req Knowledge
Basic understanding of forces, which can be obtained in the Fairly Fundamental Facts about Forces and Structures lesson.
Introduction/Motivation
Not long ago, a team of Raytheoff engineers was asked to design a huge radar antenna tower to be mounted atop the United Nations building in New York City. However, they forgot to take into account the wind loads when they designed the tower; so now, when the wind blows, the tower rocks back and forth, and twists so much that the antenna does not work correctly. That was a costly learning experience for those engineers!
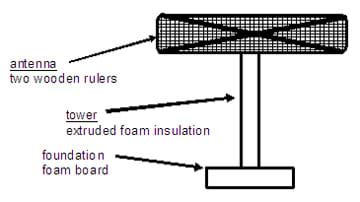
To fix the problem, your engineering consulting team has been called in. You will make models of the radar antenna tower (shown in Figure 1) using extruded foam insulation and foam core board. For this problem, you will not build a new tower. You must use the materials provided to use the engineering design process to redesign (modify) the existing tower so that it can better resist bending and twisting.
Procedure
Background
For a basic understanding of tension, compression, shear, bending, torsion, and concept of a moment (torque), review the Fairly Fundamental Facts about Forces and Structures lesson and have students complete the Wait a Moment Worksheet.
Moment and torque can be used interchangeably; physicists tend to use the word "torque" and engineers tend to use "moment" when referring to forces that cause rotation. The ability of any beam or structural member to resist bending and torsion, depends on the following factors (variables):
- Material: Every material has a different yield strength, tensile strength and shear strength, which ultimately determine the load that the material can withstand and the amount of deformation (stretching, bending, twisting) that accompany a given load.
- Size: Engineers calculate the moment of inertia of a beam or column, which is a measure of the size and shape of its cross-sectional area, and how far away the area is from the center of the beam. The greater the moment of inertia, the greater the load that can be carried by the structural member. This means that increasing the cross-sectional area of a beam or taking a certain amount of area and spreading it out farther from the center, increases the strength and stiffness of the beam (see Figure 2). It is instructive for students to draw different designs for beams on graph paper showing how the cross-sectional area, or the distribution of area can be increased to make a stronger, stiffer beam. Have them try to draw two beam cross-sections that have the same area but different moments of inertia (meaning that the area of one beam is spread out farther away from the center, and the area of the other is more concentrated around the center).
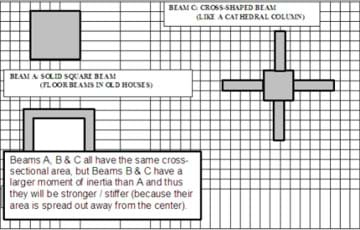
Figure 2. Variations in moment of inertia in example beams. - Reinforcement/Composite Structure: Many structural members are composite materials, which means that they are made from two or more materials bonded together. Foam core board is an example of a composite material; it is a layer of foam sandwiched between two layers of paper. Reinforced concrete has steel rods (called rebar, short for reinforcing bars) placed inside the form before the concrete is poured. Concrete is a material that is very strong in compression, but very weak in tension; the steel rebars can take great tensile loads and thus overcome the weakness of the concrete resulting in a composite material that is much stronger. Fiberglass, which is often used to make boats, is mostly a plastic epoxy resin; the epoxy resin by itself would not be strong, however, it is reinforced by glass fibers that are very strong in tension.
- Structural Bracing: Any members that help a structure to resist bending and/or torsion, such as wire cables (called guy wires) bracing a tower; truss bracing for bridges, towers and skyscrapers (a truss structure is a triangular formation of long, thin bars pinned together at the ends); brackets and braces such as those that hold up book shelves and store signs, and strengthen table legs and dump truck bodies.
Before the Activity
- Cut up the extruded foam insulation into 1 x 1 x 4-ft strips for the tower models. Use of a small benchtop bandsaw will cut these pieces quickly; otherwise, carefully use a straightedge and utility (razor blade) knife.
- Make the radar antenna models and the angle measuring plates in advance (6 of each is enough for a class of 24 students). See "Constructing the Torsion Test Setup" section below.
- Before beginning this activity, review the handouts and lab activities provided, unless students already have an understanding of the five fundamental loads and the concept of a moment of a force.
- Make two extra "wimpy towers" to use for a class demonstration. Before students do the project, demonstrate the procedure for the bending and torsion tests; be sure to record the data for this baseline test on the classroom board and have all students graph this data in their handouts.
- On the day you introduce the project and do the class demonstrations, challenge students to go home that evening and do some background research and preliminary brainstorming to help them create good designs. Ask students to look around and think of various structures that are bent and twisted, and what it is about their design that makes them stiff enough to withstand these loads (for example, a flagpole, street-sign pole, large highway-sign structure, highway guard rails, tower, bridge, dam, steel I-beam, concrete beam, airplane wing, tree, human bones, bicycle frame, snowboard, kitchen table, different shoe soles).
- You might choose to run only 2 or 3 class testing stations instead of each team having its own test setup. The advantage is that students can see the results of their classmates' tests, which may in turn help them to make design improvements. The disadvantage is the amount of class time that is required for testing (since each test takes about 10 minutes). We recommend having each team run its own tests, and then have the class present their results after each round of testing.
Constructing the Torsion Test Setup:
For the torsion tests, make a model of the radar antenna to mount on the tower being tested. Also make an angle measuring plate to measure the angle of twist of the tower.
Materials and Tools (only those required for torsion test setup):
- 2 wood (or metal) rulers
- protractor
- black sharpie marker
- duct tape
- 1 x 1 x 11-inch extruded foam insulation block
- 14 x 14-inch foam core board
- coat hanger wire (9 1/2-inch)
- small c-clamp
- Xacto or utility knife
- bolt cutters or aviation snips (to cut coat hanger wire)
Radar Antenna Model:
The model radar antenna must be attached to the tower for torsion tests only; it serves as both the means of applying the twisting moment, and it also has the pointer that is used to measure the angular deflection of the tower (see Figure 3). 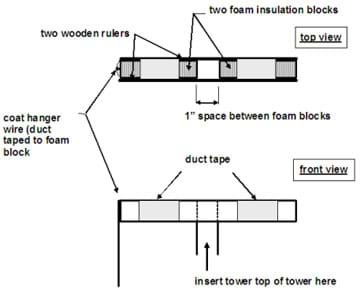
First, cut two small blocks of extruded foam insulation that are 1 x 1 x 5 1/2-inch long. Place the two foam insulation blocks end-to-end. Place the two wooden (or metal) rulers flat against the sides of the blocks. Slide the two foam insulation blocks apart so that each one lines up with the ends of the rulers; there should be exactly a 1-inch square hole between the two blocks at the center of the ruler. Holding everything in place, duct tape the rulers together on each side of this center hole (but do not cover the hole). Then slide the top of a model tower into this square hole, making sure that it fits fairly snugly. If not, untape the rulers and readjust the position of the foam blocks. When you conduct the torsion test, you will use the c-clamp to firmly secure the antenna to the tower; the clamp will be placed right across the square hole in the middle of the antenna (see torsion test procedure). Finally, duct tape the 9 1/2-inch piece of coat hanger to the middle of one end of the antenna so that it points straight down.
Angle Measuring Plate:
The antenna tower to be tested will be placed in the square cut-out in the angle measuring plate and then clamped in the table top vise (see Figure 4). 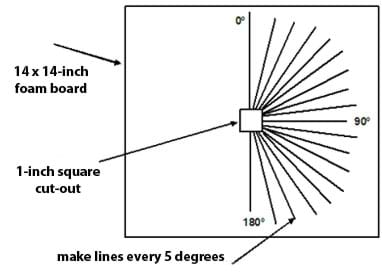
Find the center of the 14-inch square foam core board plate using diagonal lines. Draw a line through the center, parallel to a side, running the entire length of the board. Align the protractor at the center of the line (center of the board). Mark 5-degree increments around the protractor on the board. Draw straight lines that radiate from the center through the 5-degree marks, out to the edge of the board; label each line with its degree measure. Next draw and cut out a 1-inch square that is at the center of the board, and has its sides parallel with the outside edges of the foam core board.
With the Students
Each team's goal is to reinforce and brace the existing radar tower so that it can withstand a 480 N-cm bending moment (20 N applied at 24 cm above tower foundation) and a 280 N-cm twisting moment (20 N applied at 14 cm from center of the tower) with the smallest amount of deflection (movement) possible. Any materials that you use to reinforce the structure must be attached to the existing tower and/or to the 5-inch square foundation block. No materials may extend from the tower more than 2-inches in any direction.
Procedures:
- Build 4 models of Raytheoff radar antenna tower:
- Measure and cut 8 pieces of foam core board, 5 x 5-inches
- Cut a 1-inch square out of the middle of each foam core board square. Make a template on graph paper, like the one shown in Figure 5, and use it to mark the location of the cutout on each piece.
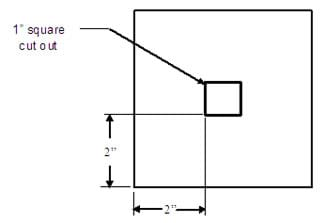
Figure 5. Template for making foam core board foundation squares. - Cut out 4 extruded foam insulation blocks, 1 x 1 x 12-inch (the teacher may provide 1 x 1 x 4-ft blocks that can be cut in fourths).
- To assemble the model, see Figure 6: hot glue two foam board squares together making sure to line up the cut-outs. Then slide the foam insulation block through the cutout, so it sticks out 1 1/2-inch, and hot glue in place.
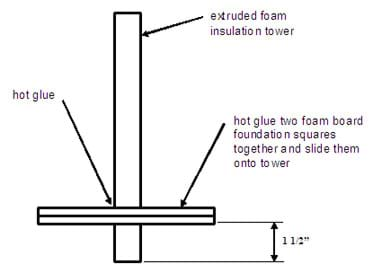
Figure 6. Assembly of radar antenna tower models.
- Brainstorm ideas for redesigning the tower. Remember that you are in step three of the engineering design process: Imagine Possible Solutions. In your teams, talk about and sketch several different ideas (at least five) for bracing and reinforcing the wimpy antenna tower before you are allowed to get your materials and build your designs. You may only use the materials provided to solve the problem. Plan to spend at least 20 minutes generating possible solutions.
- Move into step four and five of the engineering design process: Plan by Selecting a Promising Solution and Create a Prototype. Select and build models of the two ideas that you believe to be the best tower designs. Using the wimpy models you assembled and the materials provided, build two identical models of each of your two best tower designs. One will be used for the bending test and the other one for the torsion test.
- Once your prototypes are built, you can move into step six of the engineering design process: Test and Evaluate the Prototype. Bending Test Procedure (See Figure 7) :
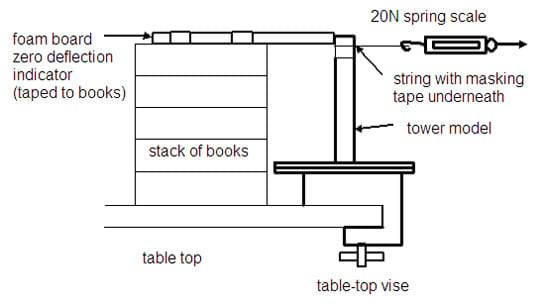
Figure 7. Experimental setup for bending test.
- Stack a pile of books on each side of the antenna tower, and lay a strip of foam core board across the books so that it touches the tower exactly where the string loop is tied on. Use masking tape to attach the foam core board to the books and keep it from moving. This piece of foam board becomes the zero mark from which you measure the deflection of the tower when it bends.
- Three students are needed to run the test: one uses the spring scale to apply force to the top of your tower, the second measures the deflection of the tower from the foam board upright; and the third records all results in a data table, Table 1. Load the tower until you reach a force of 20N (20N applied at 24 cm = 480 N-cm). Stop every 2N to measure and record the tower's deflection.
![Table with four columns: applied force (N) [0, 2, 4...20], moment arm (cm) [always 24], bending moment (N-cm) and tower deflection (cm). Table with four columns: applied force (N) [0, 2, 4...20], moment arm (cm) [always 24], bending moment (N-cm) and tower deflection (cm).](/content/wpi_/activities/wpi_wimpy_radar_antenna/table_1_smlr.jpg)
Table 1. Bending test data for design #1. - Repeat the bending test for your other tower design, and record your results in Table 2. Then graph the results of both tests on Graph 1.
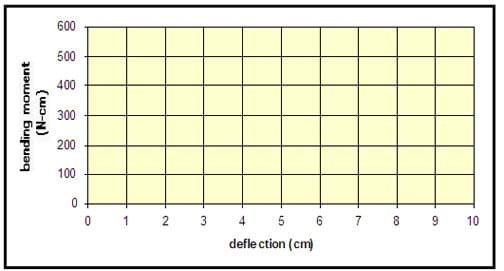
Graph 1. Bending moment vs. deflection of Raytheoff radar antenna towers – a comparison of designs #1 and #2.
- Torsion Test Procedure (See Figure 8):

Figure 8. Experimental setup for torsion test (top view).
- Place tower model into the angle measuring plate, and then into the table top vise so it sits flat against the vise. Clamp with just enough pressure to hold the tower from moving.
- Place the antenna (two wooden rulers) onto the top of the tower, and clamp it firmly in place using the small c-clamp.
- Take two 8-inch pieces of string and tie them into loops. Place one loop of string over each side of the antenna and tape them in place exactly 14 cm from the center of the tower; 14 cm is the moment arm for the twisting moment because these loops are where the spring scales will be inserted to apply the load.
- Cut a 9 1/2-inch piece of coat hanger wire and attach it to one end of antenna so it hangs straight down and comes within 1/2-inch of touching the angle measuring plate. Use this pointer to measure the angular deflection of the tower when it is twisted. Make sure the pointer starts out pointing to zero degrees
- You need 4 students to run this test: one student holds the foundation from twisting and also measures the angular deflection of the tower; two other students each use a spring scale to apply a force to each end of the antenna to make the tower twist; and the other student records all test results in Table 3.
![A table with four columns: applied force (N) [0, 2, 4...20], moment arm (cm) [always 14], bending moment (N-cm), and angular deflection of tower (degrees). A table with four columns: applied force (N) [0, 2, 4...20], moment arm (cm) [always 14], bending moment (N-cm), and angular deflection of tower (degrees).](/content/wpi_/activities/wpi_wimpy_radar_antenna/table_3_smlr.jpg)
Table 3. Torsion test data for design #1. - Two students load the tower together, trying to keep exactly the same force on both sides of the antenna at all times. Keep loading the tower until both spring scales record 10N at the same time (which makes a total of 24 N being applied at a distance of 14 cm from the tower = 280 N-cm). Stop every 2N (1N on each scale) to record the angular deflection.
- Repeat the torsion test for your other tower design, and record your results in Table 4. Then graph the results from both tests on one graph on Graph 2.
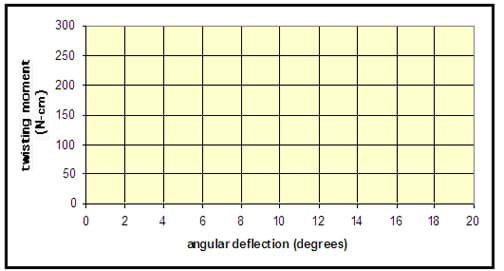
Graph 2. Twisting moment vs. angular deflection of Raytheoff radar antenna towers, a comparison of designs #1 and #2. - Now that torsion and bending tests have been completed for two designs, discuss with your group which features of each design helped give the tower stability. Which features could have been improved? Using what you learned, generate a third design. Build two identical models of this third design. Perform bending and torsion tests on this new design and complete Table 5 and Table 6. Graph the results of this test versus the first two designs on Graph 3 and Graph 4. Do you see an improvement over your first designs? The seventh step in the engineering design process is to improve and redesign your prototype as needed. Engineers constantly learn from their failures and use that knowledge to make their design better.
Vocabulary/Definitions
load: To engineers, any force that pushes or pulls. For example: the weight of snow pushes down on a building, creating a snow load. Wind loads push on the sides of buildings and towers.
model: A copy of an object that is too big, too small, or too complicated, costly or dangerous to study easily. Engineers use models to test and examine how well things are built or to test different designs.
Assessment
Example rubric constraints:
- Minimum deflection in bending.
- Minimum angular deflection in torsion.
- Minimum amount of materials used in design.
Investigating Questions
- What is a moment (of a force)?
- How is it different from a force?
- How do you calculate moments?
- Describe the effect of a bending moment on a structure.
- Describe the effect of a twisting moment on a structure.
- How can you design and build a structure that can resist bending and torsion loads?
Subscribe
Get the inside scoop on all things Teach Engineering such as new site features, curriculum updates, video releases, and more by signing up for our newsletter!More Curriculum Like This

Students learn about torsion as a force acting upon structures and have the opportunity to design something to withstand this force.

Students are introduced to the five fundamental loads: compression, tension, shear, bending and torsion. They learn about the different kinds of stress each force exerts on objects.
Copyright
© 2013 by Regents of the University of Colorado; original © 2005 Worcester Polytechnic InstituteContributors
Douglas Prime, Tufts University; Brad George, Hale Middle School and Nashoba Regional High SchoolSupporting Program
Center for Engineering Educational Outreach, Tufts UniversityLast modified: July 31, 2020


User Comments & Tips