Quick Look
Grade Level: 4 (3-5)
Time Required: 1 hour
Expendable Cost/Group: US $6.00
Group Size: 4
Activity Dependency: None
Associated Informal Learning Activity: Light Your Way: Design-Build a Series Circuit Flashlight
Subject Areas: Physical Science
NGSS Performance Expectations:

| 3-5-ETS1-1 |
Summary
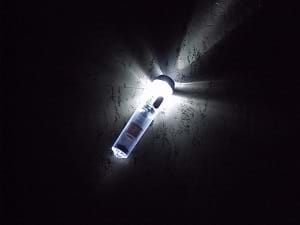
During a power failure, or when we go outside at night, we grab a flashlight so we can find our way. What happens inside a flashlight that makes the bulb light up? Why do we need a switch to turn on a flashlight? Have you ever noticed that for the flashlight to work you must orient the batteries a certain way as you insert them into the casing? Many people do not know that a flashlight is a simple series circuit. In this hands-on activity, students make sense of the phenomenon of electricity when they build this everyday household item. They use the science and engineering practice of defining a simple design problem and the disciplinary core idea of designing solutions to design their own operating series circuit flashlights. By exploring electricity and how flashlights work, students engage with the crosscutting concept of evolving technologies.
Engineering Connection
When engineers design electrical equipment, they figure out the optimum circuitry design for the situation, whether it is the installation of solar panels, design of electric cars, behavior of traffic signals, hair dryer on/off switch, turn indicator lights on a vehicle or even a simple flashlight. They decide between creating a parallel or series circuit, or they often create a complex circuit system composed of both types.
Learning Objectives
After this activity, students should be able to:
- Design and construct a working portable flashlight.
- Define, recognize and assemble series circuits.
- Explain the path of electrical charge through their circuit.
- Describe the engineering process behind designing a flashlight.
Educational Standards
Each TeachEngineering lesson or activity is correlated to one or more K-12 science,
technology, engineering or math (STEM) educational standards.
All 100,000+ K-12 STEM standards covered in TeachEngineering are collected, maintained and packaged by the Achievement Standards Network (ASN),
a project of D2L (www.achievementstandards.org).
In the ASN, standards are hierarchically structured: first by source; e.g., by state; within source by type; e.g., science or mathematics;
within type by subtype, then by grade, etc.
Each TeachEngineering lesson or activity is correlated to one or more K-12 science, technology, engineering or math (STEM) educational standards.
All 100,000+ K-12 STEM standards covered in TeachEngineering are collected, maintained and packaged by the Achievement Standards Network (ASN), a project of D2L (www.achievementstandards.org).
In the ASN, standards are hierarchically structured: first by source; e.g., by state; within source by type; e.g., science or mathematics; within type by subtype, then by grade, etc.
NGSS: Next Generation Science Standards - Science
| NGSS Performance Expectation | ||
|---|---|---|
|
3-5-ETS1-1. Define a simple design problem reflecting a need or a want that includes specified criteria for success and constraints on materials, time, or cost. (Grades 3 - 5) Do you agree with this alignment? |
||
| Click to view other curriculum aligned to this Performance Expectation | ||
| This activity focuses on the following Three Dimensional Learning aspects of NGSS: | ||
| Science & Engineering Practices | Disciplinary Core Ideas | Crosscutting Concepts |
| Define a simple design problem that can be solved through the development of an object, tool, process, or system and includes several criteria for success and constraints on materials, time, or cost. Alignment agreement: | Possible solutions to a problem are limited by available materials and resources (constraints). The success of a designed solution is determined by considering the desired features of a solution (criteria). Different proposals for solutions can be compared on the basis of how well each one meets the specified criteria for success or how well each takes the constraints into account. Alignment agreement: | People's needs and wants change over time, as do their demands for new and improved technologies. Alignment agreement: |
Common Core State Standards - Math
-
Understand a fraction a/b with a > 1 as a sum of fractions 1/b.
(Grade
4)
More Details
Do you agree with this alignment?
International Technology and Engineering Educators Association - Technology
-
Processing systems convert natural materials into products.
(Grades
3 -
5)
More Details
Do you agree with this alignment?
-
Tools, machines, products, and systems use energy in order to do work.
(Grades
3 -
5)
More Details
Do you agree with this alignment?
State Standards
Colorado - Science
-
Show that electricity in circuits requires a complete loop through which current can pass
(Grade
4)
More Details
Do you agree with this alignment?
-
Describe the energy transformation that takes place in electrical circuits where light, heat, sound, and magnetic effects are produced
(Grade
4)
More Details
Do you agree with this alignment?
Materials List
Each group needs:
- 2 D-cell batteries (If each student brings in 2 D-cell batteries, then they can take their homemade flashlights home with them. If you do this, make sure to have enough of the other supplies to make one flashlight per student, not per group.)
- 5 pieces of insulated copper wire (various lengths) (available at hardware stores)
- 1 #40 bulb (available at hardware stores)
- 1 bulb holder (available at hardware stores)
- 1 cardboard paper towel or wrapping paper tube
- Light Your Way Worksheets, one per student
For the entire class to share:
- reflective material, such as aluminum foil, small pie tins, foil muffin cups, etc.
- thumb tacks
- rubber bands
- masking tape
- wire strippers or medium-grade sandpaper (to remove insulation from wire ends)
- wire cutters
- scissors
Optional materials for this design project:
- thin flat strips of wood or plastic
- switch (available at electronics stores), or a variety of materials to make switches: paper clips, aluminum foil, nails, coins, insulated wire (possibly of varying gauges), keys, etc.
- thumb tacks
Note: Many of the materials required for this lab can be reused in numerous other electricity activities. When the batteries wear out, dispose of them at a hazardous waste disposal site.
Worksheets and Attachments
Visit [www.teachengineering.org/activities/view/cub_electricity_lesson05_activity2] to print or download.Introduction/Motivation
Have you ever heard a bell or buzzer from a ringing building alarm? (Some will answer yes.) Let's brainstorm: How do you think the building knows to set off an alarm when an intruder tries to open a door or window? (Give students some time to think of some ideas. Possible answers: The building is really smart, or the alarm circuit is broken causing the bell to sound.) Electrical engineers design the wiring of an alarm system to be an "in series" circuit. The doors and windows of the building act as a switch for the alarm circuit. The alarm circuit is a closed circuit when the alarm is on and the windows and doors are closed. However, when someone tries to open a door or window (without turning off the alarm first), the alarm circuit becomes "open" and the building is, in essence, telling the alarm to sound.....ding, ding, ding!
Alarm systems are not the only items with an in series circuit. Batteries can also be connected in series, which provides more voltage to a device. For example, if we connect three AA batteries "in series," it provides more voltage than a single AA battery. When engineers design a flashlight, they determine if the batteries should be connected "in series" or "in parallel."
During today's activity, just like engineers, we will design our own flashlights and determine if the batteries in our flashlight will be connected "in series" or "in parallel."
Procedure
Background — Flashlights
The first flashlight was invented in 1896, and made possible by the invention of the D-cell battery in that same year. Prior to 1896, the only battery that could be used for portable lighting was too heavy to be practical. These new devices were called "flash lights" because they provided a brief flash of light when the user pushed a switch — unlike the steady light beam produced by today's flashlights.
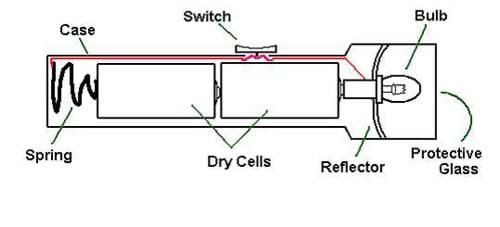
Over time, the parts of a flashlight have not changed much (see Figure 1). Batteries are connected to a bulb in a basic series circuit containing a switch. A metal reflector placed behind the bulb increases the light output. A protective lens cap covers the bulb and reflector. A casing, often tubular in shape, contains the batteries, bulb, spring, wires and reflector, and connects to the lens cap. The switch is held in place on the outside of the casing. The flashlight that students build in this activity has all these parts except a lens cap and the spring.

Before the Activity
- If applicable, collect leftover pieces of insulated wire (various lengths) from previous electricity activities.
- Assemble all the materials.
- Note: If you are using pre-made switches, you will not need to assemble any switch materials.

With the Students
- Open-ended design: Have students form into teams of four. Inform them that the goal of this activity is for teams to design and construct a working flashlight using only the provided materials. The flashlight must turn on and off using a switch. Also, all of the wiring and batteries must be contained within the paper towel tubes. All team members must participate in both the design and building phases.
- Discuss the qualities of a good flashlight with the students. (Possible features: On/off switch, reliable switch, easy-to-use switch, easy to carry, small size, bright beam of light, lasts a long time, does not break.) Hand out the Light Your Way Worksheet, and have students fill out the corresponding question on the worksheet.
- As a class, have students draw a flashlight on the board. Individual students should contribute one part to the drawing. (Parts include: Case, spring, bulb, switch, protective glass/plastic, reflector, batteries.) Have other students describe the function of each part of the flashlight that has been drawn. (For functions, see the Light Your Way Worksheet Answers.) Have each student answer the corresponding question on the worksheet.
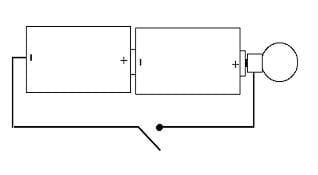
- Show students the materials available to construct their flashlight. Let teams brainstorm the design of their flashlight, determining which materials they will use for each part. To aid the brainstorming process, show students the circuit diagram for a typical flashlight (Figure 2) as a printout or by drawing it on the board. Have students document their materials plan on the worksheet (question #3).
- Have students draw a circuit diagram for their flashlight on the worksheet.
- Have students write out the steps they are going to take to build their flashlight. Once you have looked at (and approved) a team's design, have the students gather their materials.
- Allow time for each team to construct their flashlight design.
- Test each team's flashlight. To be considered reliable, it should be able to light up three times in a row. If a team's flashlight does not work, have them compare the flashlight circuit diagram (Figure 2) to their team's flashlight circuit diagram. On the worksheet, have students write up any design changes or fabrication improvements they need to make. If time permits, have them implement their changes so the flashlight works.

Assessment
Pre-Activity Assessment
Brainstorming: Have the students engage in open discussion to list on the board the qualities of a good flashlight. Remind students that no idea or suggestion is "silly." All ideas should be respectfully heard. Encourage wild ideas and discourage criticism of ideas.
Drawing: As a class, have students draw a flashlight on the board. Individual students should contribute one part to the drawing. (Parts include: Case, spring, bulb, switch, protective glass/plastic, reflector, batteries.) Have other students describe the function of each part of the flashlight that has been drawn. (For functions, see the Light Your Way Worksheet Answers.) Have each student answer the corresponding question on the Light Your Way Worksheet.
Activity Embedded Assessment
Worksheet: Have the students complete the Light Your Way Worksheet; review their answers to gauge their mastery of the subject.
Drawing: Have students draw a circuit diagram of their flashlight on the Light Your Way Worksheet.
Brainstorming: In their teams, have the students engage in open discussion to determine the design of their flashlight. They should decide which materials they will use for each part. All ideas should be respectfully heard. Encourage wild ideas and discourage criticism of ideas. Have each student answer the corresponding question on the Light Your Way Worksheet.
Procedure Practice: Using the Light Your Way Worksheet, have students list the steps they will take to design and build their flashlight.
Re-Design Practice: Have the students list any design or fabrication changes they would make to their flashlight on the Light Your Way Worksheet.
Post-Activity Assessment
Drawing: Using the Light Your Way Worksheet, have students complete the last item on the worksheet by drawing their team's flashlight and labeling all the parts.
Math & Circuits: Have students complete the Fraction Circuit Worksheet to learn about circuit diagrams and practice adding fractions!
Sales Pitch! Have the students pretend to be salespeople who are trying to sell their flashlight to a manufacturer or a consumer. Have student teams create a persuasive poster or flyer, as well as a 10-minute sales pitch of their flashlight design for presentation at the next class. Have them incorporate into their sales pitch their series circuit diagram, the parts and features of the flashlight and how it works.
Safety Issues
- Caution students not to play with the insulated wire; they may poke or cut themselves or others.
- Caution students not to hold the insulated wire on the D-cell battery with their fingers for extended periods of time. The stripped ends of the wire heat up when held on the battery terminals.
Troubleshooting Tips
Slice small cardboard tubes down the middle to accommodate the D-cell batteries.
A paperclip may be used to hold the light bulb in place.
Have students make sure all of their connections are reliable, so when they move the flashlight the connections do not come loose.
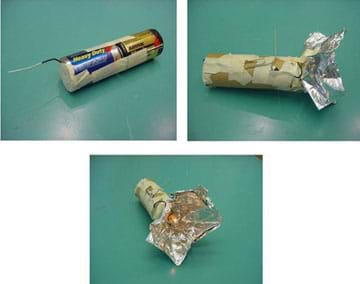
Ideally, all the wires used in the flashlight should be contained within the paper towel tube — no wires should be hanging out. If students have problems making the switch inside the tube, have them set up their switch externally, as in Figure 3.
Activity Extensions
Portable flashlights can be powered by means other than batteries. Have students conduct Internet research on solar-powered flashlights, "shake" flashlights and "crank" flashlights. Ask students to discuss the environmental and economic implications of using these types of flashlights.
Activity Scaling
- For lower grades, provide completed flashlight examples and a drawing of the electrical circuit (as a printout or on the board) for students to examine. This helps them during the brainstorming process when they determine what materials to use to construct a flashlight. Complete the circuit diagram on the Light Your Way Worksheet together, as a class.
- For upper grades, you may not need to provide a drawing of the flashlight's electrical circuit for students to examine during the brainstorming process when they determine what materials to use to construct their team's flashlight.
Subscribe
Get the inside scoop on all things Teach Engineering such as new site features, curriculum updates, video releases, and more by signing up for our newsletter!More Curriculum Like This

Students learn that charge movement through a circuit depends on the resistance and arrangement of the circuit components. In one associated hands-on activity, students build and investigate the characteristics of series circuits. In another activity, students design and build flashlights.

During this activity, students build a simple series circuit and discover the properties associated with series circuits.

Students explore the composition and practical application of parallel circuitry, compared to series circuitry. Students design and build parallel circuits and investigate their characteristics, and apply Ohm's law.

Students learn about current electricity and necessary conditions for the existence of an electric current. Students construct a simple electric circuit and a galvanic cell to help them understand voltage, current and resistance.
References
Activity adapted from: Make a Flashlight, Rough Science, PBS. Accessed April 29, 2004. http://www.pbs.org/weta/roughscience/discover/powerplant.html#flashlight
Copyright
© 2004 by Regents of the University of ColoradoContributors
Xochitl Zamora Thompson; Sabre Duren; Joe Friedrichsen; Daria Kotys-Schwartz; Malinda Schaefer Zarske; Denise W. CarlsonSupporting Program
Integrated Teaching and Learning Program, College of Engineering, University of Colorado BoulderAcknowledgements
The contents of this digital library curriculum were developed under grants from the Fund for the Improvement of Postsecondary Education (FIPSE), U.S. Department of Education and National Science Foundation (GK-12 grant no. 0338326). However, these contents do not necessarily represent the policies of the Department of Education or National Science Foundation, and you should not assume endorsement by the federal government.
Last modified: May 28, 2021


User Comments & Tips