Quick Look
Grade Level: 4 (3-5)
Time Required: 45 minutes
Expendable Cost/Group: US $4.50
Group Size: 3
Activity Dependency: None
Subject Areas: Physical Science
NGSS Performance Expectations:

| 3-5-ETS1-2 |
| 5-PS1-3 |
Summary
In this hands-on activity, students practice the crosscutting concept that engineers improve existing technologies or develop new ones that benefit society. Using the science and engineering practices of making observations and generating multiple solutions, students make sense of the phenomenon of electricity as they construct a simple switch using objects of various types of materials. Students utilize the disciplinary core concepts of testing and communicating ideas to determine what objects and what types of materials can be used to close a switch in a circuit and light a light bulb.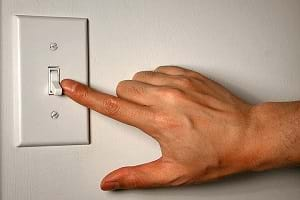
Engineering Connection
Engineers have a fundamental understanding of electrical circuits and the function of insulators and conductors. The first true plastic material used for the housing of electrical switches and electrical outlets was an insulator called Bakelite, invented in 1909 by engineer and chemist Leo Hendrik Baekeland. Today, material and chemical engineers continue to design and develop specialty materials that can be used for many different types of electrical device parts, both for conducting and insulating.
Learning Objectives
After this activity, students should be able to:
- Explain the function of a switch in an electrical circuit.
- Understand that an object's material properties determine whether it will make a good switch.
- Explain why engineers must have a fundamental understanding of electrical circuits and the function of insulators and conductors.
Educational Standards
Each TeachEngineering lesson or activity is correlated to one or more K-12 science,
technology, engineering or math (STEM) educational standards.
All 100,000+ K-12 STEM standards covered in TeachEngineering are collected, maintained and packaged by the Achievement Standards Network (ASN),
a project of D2L (www.achievementstandards.org).
In the ASN, standards are hierarchically structured: first by source; e.g., by state; within source by type; e.g., science or mathematics;
within type by subtype, then by grade, etc.
Each TeachEngineering lesson or activity is correlated to one or more K-12 science, technology, engineering or math (STEM) educational standards.
All 100,000+ K-12 STEM standards covered in TeachEngineering are collected, maintained and packaged by the Achievement Standards Network (ASN), a project of D2L (www.achievementstandards.org).
In the ASN, standards are hierarchically structured: first by source; e.g., by state; within source by type; e.g., science or mathematics; within type by subtype, then by grade, etc.
NGSS: Next Generation Science Standards - Science
| NGSS Performance Expectation | ||
|---|---|---|
|
3-5-ETS1-2. Generate and compare multiple possible solutions to a problem based on how well each is likely to meet the criteria and constraints of the problem. (Grades 3 - 5) Do you agree with this alignment? |
||
| Click to view other curriculum aligned to this Performance Expectation | ||
| This activity focuses on the following Three Dimensional Learning aspects of NGSS: | ||
| Science & Engineering Practices | Disciplinary Core Ideas | Crosscutting Concepts |
| Generate and compare multiple solutions to a problem based on how well they meet the criteria and constraints of the design problem. Alignment agreement: | Research on a problem should be carried out before beginning to design a solution. Testing a solution involves investigating how well it performs under a range of likely conditions. Alignment agreement: At whatever stage, communicating with peers about proposed solutions is an important part of the design process, and shared ideas can lead to improved designs.Alignment agreement: | Engineers improve existing technologies or develop new ones to increase their benefits, to decrease known risks, and to meet societal demands. Alignment agreement: |
| NGSS Performance Expectation | ||
|---|---|---|
|
5-PS1-3. Make observations and measurements to identify materials based on their properties. (Grade 5) Do you agree with this alignment? |
||
| Click to view other curriculum aligned to this Performance Expectation | ||
| This activity focuses on the following Three Dimensional Learning aspects of NGSS: | ||
| Science & Engineering Practices | Disciplinary Core Ideas | Crosscutting Concepts |
| Make observations and measurements to produce data to serve as the basis for evidence for an explanation of a phenomenon. Alignment agreement: | Measurements of a variety of properties can be used to identify materials. (Boundary: At this grade level, mass and weight are not distinguished, and no attempt is made to define the unseen particles or explain the atomic-scale mechanism of evaporation and condensation.) Alignment agreement: | Standard units are used to measure and describe physical quantities such as weight, time, temperature, and volume. Alignment agreement: |
International Technology and Engineering Educators Association - Technology
-
Models are used to communicate and test design ideas and processes.
(Grades
3 -
5)
More Details
Do you agree with this alignment?
-
Tools, machines, products, and systems use energy in order to do work.
(Grades
3 -
5)
More Details
Do you agree with this alignment?
State Standards
Colorado - Math
-
Appropriate measurement tools, units, and systems are used to measure different attributes of objects and time.
(Grade
4)
More Details
Do you agree with this alignment?
Colorado - Science
-
Show that electricity in circuits requires a complete loop through which current can pass
(Grade
4)
More Details
Do you agree with this alignment?
-
Describe the energy transformation that takes place in electrical circuits where light, heat, sound, and magnetic effects are produced
(Grade
4)
More Details
Do you agree with this alignment?
Materials List
Each group needs:
- Switcheroo Worksheet, one per student
- 1 D-cell battery
- 1 large rubber band
- 1 #40 miniature bulb, such as a flashlight bulb (available at most electronics stores)
- 1 miniature light bulb holder
- 2 small nails (or metal thumbtacks, but not push pins)
- a small piece of wood (or a small piece of thick cardboard)
- 2 ft (30.5 cm) insulated wire (gauge AWG 22, available at hardware stores), cut into three pieces of equal length (8 in)
For the entire class to use:
- an assortment of conducting/insulating objects: paper clips, aluminum foil, nails, coins, various gauges of insulated wire, keys, rubber bands, erasers, plastic rulers, cloth, pipe cleaners, etc.
- wire strippers or sandpaper (to remove insulation at wire ends)
- masking tape
- hammer
Note: Many of the materials required for this lab can be reused in numerous other electricity activities. When the batteries wear out, dispose of them at a hazardous waste disposal site.
Worksheets and Attachments
Visit [www.teachengineering.org/activities/view/cub_electricity_lesson04_activity2] to print or download.Introduction/Motivation
Ask students if they have ever used a light switch to turn on a light in a room. Have you ever tried to figure out what is happening when you flip a switch on the wall and the light turns on? How does an electrical switch work? What would happen to the light in your room if you left the switch on? (Possible answers: The bulb would burn out, I would be scolded for leaving the light on, I would waste electricity.)
A switch can create either an open circuit or a closed circuit, depending on its position (on or off). Inform the students that in today's activity they will build their own electrical switches and determine which materials make the best switches.
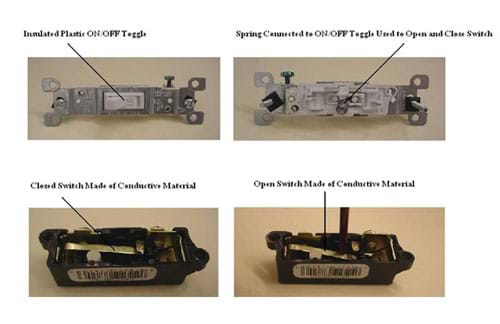
Explain to students that material engineers create new types of materials for specific purposes, for example, so that they are strong and can survive very high temperatures. Material engineers work with chemical engineers to design and develop materials that can be used for many different types of switches and socket plugs. The switches and electric socket plugs used in our homes and schools are connected to copper wires that carry electrical current and can get very hot, so for our safety, the housing and parts that touch the wires of switches and plugs must be made of insulators developed by material and chemical engineers. An early material used for the housing of electrical switches and plugs was a plastic insulator called Bakelite. It is considered the first, true plastic and was invented in 1909 by engineer and chemist Leo Hendrik Baekeland.
Procedure
Background — Switches
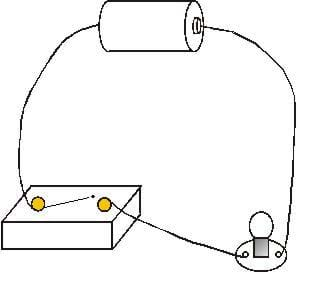
The purpose of an electrical switch is to regulate current (the flow of electric charge) in a circuit. Most switches are used to open and close a circuit. Light and appliance power switches are examples of the most basic type of switch. When the switch is in the "on" position, a conductor inside the device closes the circuit so electrical charge can move through it, powering the light bulb or appliance (see Figure 2). When the switch is moved to the "off" position the circuit is broken, and no current flows.
Background — Dimmers and Multi-Position Switches
Dimmer switches and multi-position switches regulate the amount of current in a circuit. Dimmer switches are used on lamps and light fixtures. When a dimmer switch is first turned to the "on" position, the circuit is closed and a small amount of current is present in the circuit, lighting the bulb dimly. As you move the dimmer switch, the resistance of the lamp circuit is decreased, thus increasing the current in the circuit, causing the bulb to shine brighter and brighter. An electrical component called a variable resistor, or rheostat, is connected to the dimmer switch knob to change the resistance in the circuit within some range. The volume knob on a stereo works in a similar way. Multi-position switches work in almost the same way as dimmer switches except that the resistance of the circuit can only be changed between a few set values. Multi-position switches are typically used on appliances with motors or fans.
Before the Activity
- Assemble an assortment of materials for the students to use in making switches. Include materials that will not work as switches (insulators), too.
With the Students
Remind students that electricity flows more easily through some objects than others. The materials that electrons can move through are called conductors. The atoms in a conductor have loosely-attached electrons, so a negative charge buildup pushes electrons through the material. Electrons in metals are loosely attached to the atom, so metals are conductors. If the electrons in a material are tightly attached to the atoms and cannot be forced to move from one atom to another, no electricity flows. These materials are called insulators. Some examples of insulators include rock, wood, plastic, glass, cloth, and air.
- Hand out a Switcheroo Worksheet to each student. Have the students look at and list all the objects available to make switches. Next to each object listed write "yes" if you think it will make a good switch and "no" if you think it will not.
- Working in teams and using wire strippers or sand paper, have students remove 1/2 in (1.3 cm) of the insulation from the ends of three pieces of wire to ensure a good connection.
- Use one piece of wire to connect the positive terminal of the D-cell battery to one of the terminals on the light bulb holder. Use rubber bands and masking tape to attach the wire to the positive terminal of the battery.
- Use a second piece of wire to connect the negative terminal of the D-cell battery to a small nail (or thumbtack). Use rubber bands and masking tape to attach the wire to the negative terminal of the battery.
- Tightly wrap one of the bare ends of the third piece of wire around a small nail (or thumbtack). Connect the other end of this wire to the opposite, unused light bulb terminal.
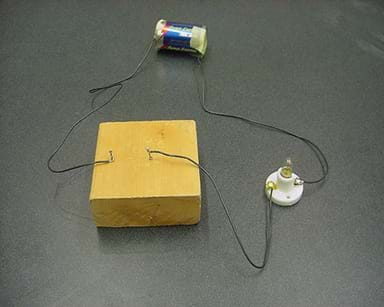
- To complete the setup, hammer the nails (or tacks) into the wood (or cardboard) so they are 1–2 cm apart (see Figure 3).
- Have students choose two to three objects with which to construct their team's switches.
- To create and test a switch, lay a test object across the two nails (or thumbtacks) to complete (close) the circuit (see Figure 4). If the light bulb lights up, the circuit is closed, current flows and the object works as a switch (conductor). If the bulb does not light up, the object does not make a good switch.
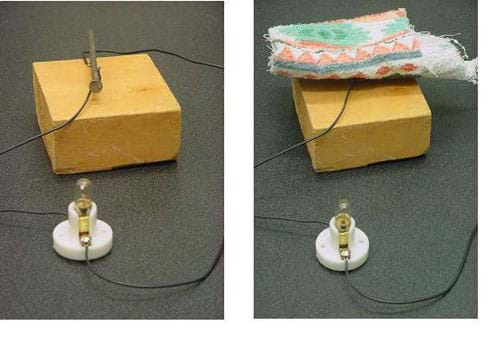
- After a team has tested and found a switch that they believe is reliable, have them demonstrate its operation. To be a good switch, it should be able to open and close the circuit three times in a row.
- Have students complete the Switcheroo Worksheet.
Assessment
Pre-Activity Assessment
Prediction: Have students use the Switcheroo Worksheet to list all the objects provided to make a switch. Next to each object, have them write "good switch" if they think it will make a good switch and "no" if it will not.
Activity Embedded Assessment
Worksheet: Have students use the Switcheroo Worksheet throughout the activity to record test results, observations and conclusion.
Post-Activity Assessment
Worksheet Analysis: Review the various objects that the class used to make switches. Have students compare their initial predictions about each test object with their test results, as recorded on the worksheets. Have each group make a short presentation to the class explaining which objects they chose and why, and demonstrating their best switch. Discuss with the class which materials made good switches.
Discussion Questions: Solicit, integrate, and summarize student responses:
- What properties are required in a good switch? (Possible answers: The ability to complete the circuit so the current can flow to light the bulb, a conductor, a metal.)
- How might an engineer determine if a material would make a good switch? (Answer: An engineer would test a material to determine whether it was a conductor. Conductors make good switches.)
- How might an engineer determine if a material would make a safe housing for a switch? (Answer: An engineer would find, test and/or develop materials that would keep the current in the switch from leaking from the circuit and/or harming a person using it. An insulator would make a good switch housing.)
Safety Issues
- Advise students to be careful when handling the sharp nails (or thumbtacks).
- Warn students to be cautious when hammering nails into blocks of wood.
Troubleshooting Tips
Some coins may not be very good conductors due to their metal combination. If a coin is being used to close the circuit, make sure that it will conduct electricity at this low voltage. For example, some nickels are not good conductors.
Activity Extensions
Have students estimate the cost of the different materials or objects they used to make switches. Which materials or objects do they think make the best and least expensive switches?
Bring a dimmer switch and a multi-position switch to class (available at hardware stores). Let the students examine the switches. Have the students find picture of devices that use variable resistors and rheostats.
Subscribe
Get the inside scoop on all things Teach Engineering such as new site features, curriculum updates, video releases, and more by signing up for our newsletter!More Curriculum Like This

Students gain an understanding of the difference between electrical conductors and insulators, and experience recognizing a conductor by its material properties. In a hands-on activity, students build a conductivity tester to determine whether different objects are conductors or insulators.
References
Leo Baekeland, Scientists & Thinkers, Time Online, accessed April 2004. Formerly available at: http://inventors.about.com/gi/dynamic/offsite.htm?site=http://www.pathfinder.com/time/time100/scientist/profile/baekeland.html
Copyright
© 2004 by Regents of the University of Colorado.Contributors
Xochitl Zamora Thompson; Sabre Duren; Joe Friedrichsen; Daria Kotys-Schwartz; Malinda Schaefer Zarske; Denise W. CarlsonSupporting Program
Integrated Teaching and Learning Program, College of Engineering, University of Colorado BoulderAcknowledgements
The contents of this digital library curriculum were developed under a grant from the Fund for the Improvement of Postsecondary Education (FIPSE), U.S. Department of Education and National Science Foundation GK-12 grant no. 0338326. However, these contents do not necessarily represent the policies of the Department of Education or National Science Foundation, and you should not assume endorsement by the federal government.
Last modified: August 28, 2023


User Comments & Tips