Summary
Students are introduced to faults in the context of plate tectonics. They learn about different kinds of faults and their relationship to earthquakes. Student pairs create cardboard models of the three different types of faults—transcurrent, normal and reverse—as they learn about how earthquakes are formed and impact the structure of the Earth's crust.
Engineering Connection
Engineers study faults and the location of fault lines when they design structures so that they remain secure during earthquakes and fault activity. Engineers must understand fault types and how fast the plates are moving in order to predict the resulting type of land formation, such as a hill or valley. Engineers also consider the forces of the Earth and fault lines when designing roads, airports, dams, sewage systems and methods to obtain and filter drinking water so as to reduce the likelihood of damage occurring to these structures. Engineers also design seismometers, the sensitive equipment that measures ground motion generated by earthquakes and volcanic eruptions.
Learning Objectives
After this activity, students should be able to:
- Explain the concepts of plate tectonics and continental drift.
- Describe the three main types of faults: transcurrent, normal and reverse.
- Explain that earthquakes and volcanoes occur along the boundaries of crustal plates.
- Explain why engineers need to learn about the Earth's structure.
- Write as a means of applying, analyzing and synthesizing new information.
Educational Standards
Each TeachEngineering lesson or activity is correlated to one or more K-12 science,
technology, engineering or math (STEM) educational standards.
All 100,000+ K-12 STEM standards covered in TeachEngineering are collected, maintained and packaged by the Achievement Standards Network (ASN),
a project of D2L (www.achievementstandards.org).
In the ASN, standards are hierarchically structured: first by source; e.g., by state; within source by type; e.g., science or mathematics;
within type by subtype, then by grade, etc.
Each TeachEngineering lesson or activity is correlated to one or more K-12 science, technology, engineering or math (STEM) educational standards.
All 100,000+ K-12 STEM standards covered in TeachEngineering are collected, maintained and packaged by the Achievement Standards Network (ASN), a project of D2L (www.achievementstandards.org).
In the ASN, standards are hierarchically structured: first by source; e.g., by state; within source by type; e.g., science or mathematics; within type by subtype, then by grade, etc.
NGSS: Next Generation Science Standards - Science
| NGSS Performance Expectation | ||
|---|---|---|
|
MS-ESS2-2. Construct an explanation based on evidence for how geoscience processes have changed Earth's surface at varying time and spatial scales. (Grades 6 - 8) Do you agree with this alignment? |
||
| Click to view other curriculum aligned to this Performance Expectation | ||
| This activity focuses on the following Three Dimensional Learning aspects of NGSS: | ||
| Science & Engineering Practices | Disciplinary Core Ideas | Crosscutting Concepts |
| Construct a scientific explanation based on valid and reliable evidence obtained from sources (including the students' own experiments) and the assumption that theories and laws that describe the natural world operate today as they did in the past and will continue to do so in the future. Alignment agreement: | The planet's systems interact over scales that range from microscopic to global in size, and they operate over fractions of a second to billions of years. These interactions have shaped Earth's history and will determine its future. Alignment agreement: Water's movements—both on the land and underground—cause weathering and erosion, which change the land's surface features and create underground formations.Alignment agreement: | Time, space, and energy phenomena can be observed at various scales using models to study systems that are too large or too small. Alignment agreement: |
| NGSS Performance Expectation | ||
|---|---|---|
|
MS-ESS3-2. Analyze and interpret data on natural hazards to forecast future catastrophic events and inform the development of technologies to mitigate their effects. (Grades 6 - 8) Do you agree with this alignment? |
||
| Click to view other curriculum aligned to this Performance Expectation | ||
| This activity focuses on the following Three Dimensional Learning aspects of NGSS: | ||
| Science & Engineering Practices | Disciplinary Core Ideas | Crosscutting Concepts |
| Construct an oral and written argument supported by empirical evidence and scientific reasoning to support or refute an explanation or a model for a phenomenon or a solution to a problem. Alignment agreement: | Mapping the history of natural hazards in a region, combined with an understanding of related geologic forces can help forecast the locations and likelihoods of future events. Alignment agreement: | Graphs, charts, and images can be used to identify patterns in data. Alignment agreement: The uses of technologies and any limitations on their use are driven by individual or societal needs, desires, and values; by the findings of scientific research; and by differences in such factors as climate, natural resources, and economic conditions. Thus technology use varies from region to region and over time.Alignment agreement: |
International Technology and Engineering Educators Association - Technology
-
Explain how various relationships can exist between technology and engineering and other content areas.
(Grades
3 -
5)
More Details
Do you agree with this alignment?
State Standards
Colorado - Science
-
Analyze and interpret data identifying ways Earth's surface is constantly changing through a variety of processes and forces such as plate tectonics, erosion, deposition, solar influences, climate, and human activity
(Grade
5)
More Details
Do you agree with this alignment?
-
Develop and communicate an evidence based scientific explanation around one or more factors that change Earth's surface
(Grade
5)
More Details
Do you agree with this alignment?
Materials List
Each group needs:
- 3 pieces of corrugated cardboard, cereal box cardboard or tag board, each approximately 5 x 16 inches
- crayons or colored pencils
- scissors
- 12-inch ruler
- protractor
- 3-4 strips of different colored construction paper, each approximately 1-½ x 6 inches
- Earthquakes KWL Chart, one per student
To share with the entire class:
- Tectonic Plates Map Overhead; make into an overhead transparency
- overhead projector, or other way to show the above tectonic plates map
Worksheets and Attachments
Visit [www.teachengineering.org/activities/view/cub_natdis_lesson02_activity3] to print or download.Introduction/Motivation
Over time, rock is deposited on the surface of the Earth in layers. By looking at the layers, and subsequently the displacement of layers, engineers can infer which Earth processes have been at work. Since the Earth's crust is divided into plates that float on the liquid mantle of the Earth, the processes of mountain formation and valley creation are constantly at work. Earthquakes are the signs that the surface features of the Earth are continually changing.
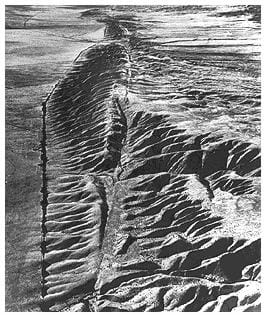
Faults are cracks that occur between the tectonic plates. Movement is apparent at these fault lines. The three main types of faults are transcurrent faults, in which the crustal plates slide past each other; normal faults, in which a block of crust, known as the hanging wall, falls, creating a valley; and reverse faults, in which a block of crust, again known as the hanging wall, is pushed upward, creating hills. The San Andreas Fault in California is a transcurrent fault (see Figure 1).
Engineers need to know about faults and where they are located in order to design structures that remain stranding and protect their inhabitants during earthquakes or other activity. Engineers also need to know what type of fault is occurring and how fast and in which direction the associated plates are moving so that they can predict what type of formation a fault may be producing, such as a hill or a valley.
Procedure
Before the Activity
- Make copies of the Earthquakes KWL Chart so that each student has one chart.
- Prepare the Tectonic Plates Map Overhead and be ready to show it to the class.
- Organize all activity materials.
- Find an assortment of photographs and/or videos from books or the Internet and be ready to show them to the class. Refer to the U.S. Geological Survey website for some earthquake damage photos: https://www.usgs.gov/natural-hazards/earthquake-hazards/science/earthquake-photo-collections?qt-science_center_objects=0#qt-science_center_objects.
With the Students
- Review with the class the idea of earthquakes. Ask if anyone has ever experienced an earthquake and listen to any first-hand stories. Show students photographs and videos of earthquake damage.
- Pass out a KWL chart to each student.
- Ask students if they know what the crust of the Earth is? (Answer: The crust is the Earth's outermost layer.) Ask them if know what the crust is made of? (Answer: The Earth's crust is made up of interlocking pieces, called plates.)
- Ask students to write down all they know about the crust of the Earth under the "Know" column of the KWL Chart.
- Remind them to keep up their chart with what they have learned during the activity by recording items under the "Learned" column.
- Ask the class if anyone has ever seen a rock or mountainside with layers in it. Rocks with layers are called sedimentary rocks. Take the strips of colored construction paper and place them on top of each other. Explain to students that they represent layers of sedimentary rock in the Earth's crust. Hold one strip at each end and push toward the middle. Explain that when forces are pushing at the edge of faults, the land often buckles and folds, sometimes forming hills or even mountains.
- Show students the tectonic plates map (overhead transparency). Explain that the Earth's crust is also broken into large interlocking plates floating on the molten mantle. At plate boundaries (where two different plates meet), the plates crack and break, causing earthquakes. These cracks are called faults. Tell students that they will make models of how land moves when blocks of rock slide sideways, apart or towards each other.
- Distribute three pieces of cardboard to each group.
- Instruct one student in each group to color a road with several houses along it on one piece of the cardboard. This piece of cardboard represents a bird's-eye view of the Earth (from above). On the other two cardboard pieces, have a different team member color layers of rock. Suggest they use colors that they believe are found in the Earth's layers. These two cardboard pieces each represent a cross-section of the Earth, as though we cut through the layers of a cake in order to see and be able to count how many layers are stacked on top of each other.
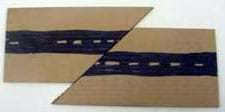
- On the piece of cardboard that represents the bird's-eye view, have students make a line at a 45° angle from a point at the center, which splits the cardboard piece in two (the line should angle across the colored road). Cut along this line (see Figure 2). This is a model of a transcurrent fault.

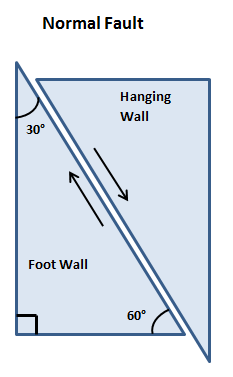
- On one of the pieces of cardboard that represents a cross-sectional view of the layers of the Earth, have students make a line at a 30° angle from a point at the top, which divides the cardboard piece in two (similar to what they did in step 10). Cut along this line. This is a model of a normal fault (see Figure 3). The piece on the right represents the hanging wall, which moves downward relative to the foot wall.

- In the second model, have students slide the left piece up and the right piece down. Doing this displaces the rock layers drawn on the cardboard. Tell students that this type of fault is called a normal fault. Normal faults create valleys in the Earth's surface.
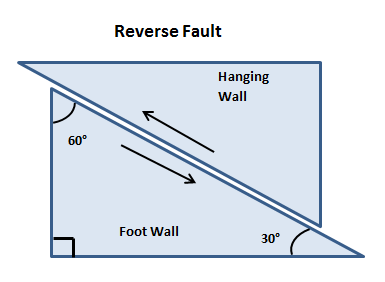
- To model the third type of fault, have students take the second cardboard piece that represents a cross-sectional view of the layers of the Earth and make a line at a 60° angle from a point at the top, dividing the cardboard piece into two (see Figure 4). Have them cut along the line and then slide the left piece (the foot wall) downward and the right piece (the hanging wall) upwards. This model illustrates a reverse fault. Reverse faults create hills in the Earth's landscape.

- Go over the "Learned" column on the KWL chart. Solicit answers for what they learned and write them on the classroom board. Next, ask students if they can think of any additional questions or information they would like to know about faults. Ask students to write these down under the "Want to Know" column of their charts. Solicit questions and facilitate a class discussion.
- As a class, create a Venn diagram with three overlapping circles. Compare and contrast the three different types of faults, noting their similarities and differences.
Vocabulary/Definitions
model: (noun) A representation of something to show its construction or appearance, or for imitation, comparison or analysis; often at a smaller scale. (verb) To make something to help learn about something else that cannot be directly observed or experimented upon.
normal fault: A type of fault in which a block of crust falls, creating a valley.
reverse fault: A type of fault in which a block of crust is pushed upward, creating hills.
transcurrent fault: A type of fault in which the crustal plates slide past each other.
Assessment
Pre-Activity Assessment
Quick Questions: Gauge students' base knowledge of the activity subject matter by asking them the following questions: What is the crust of the Earth? (Answer: The crust is the Earth's outermost layer.) What is the crust made of? (Answer: The Earth's crust is composed of interlocking pieces, called plates.)
KWL Chart: Ask students to write down all they know about the crust of the Earth under the "Know" column of the KWL Chart. KWL is an acronym for "Know," "Want to Know, and "Learned." Students fill out the rest of the chart at different points during the activity.
Activity Embedded Assessment
KWL Chart: Throughout the activity, ask students to keep up with what they have learned during the activity by recording items under the "Learned" column of their KWL Charts.
Post-Activity Assessment
KWL Chart: Go over the "Learned" column with students. Solicit answers and write them on the classroom board. Next, ask students if they have any additional things they would like to know about faults. Ask students to write these down under the "Want to Know" column of the KWL Chart. Solicit questions and facilitate a class discussion.
Venn Diagram: Individually, or as a class, create a Venn diagram to compare and contrast the three different types of faults.
Life Along the Fault Line: Have students think about what life is like living along a fault line. What information would someone living along a fault line want to know? Create a drawing or informational flyer for a family who is moving into a neighborhood along the fault line.
Troubleshooting Tips
For the models to be effective, make the cardboard cuts smooth and straight. If necessary, use a box cutter or X-Acto® knife to trim or re-cut students' cardboard models.
Activity Extensions
Find a map of earthquake and volcanic activity. Make posters of earthquakes around the world and indicate on the map where these earthquakes have occurred. One good resource is the Earthquakes Living Lab, which shows USGS data in map form for earthquakes happening every day around the world.
Subscribe
Get the inside scoop on all things Teach Engineering such as new site features, curriculum updates, video releases, and more by signing up for our newsletter!More Curriculum Like This

Students learn about the structure of the earth and how an earthquake happens. In one activity, students make a model of the earth including all of its layers. In a teacher-led demonstration, students learn about continental drift. In another activity, students create models demonstrating the di...

Students learn about major landforms (such as mountains, rivers, plains, valleys, canyons and plateaus) and how they occur on the Earth's surface. They learn about the civil and geotechnical engineering applications of geology and landforms, including the design of transportation systems, mining, ma...

Students investigate how mountains are formed. Students learn that geotechnical engineers design technologies to measure movement of tectonic plates and mountain formation, as well as design to alter the mountain environment to create safe and dependable roadways and tunnels.

Students learn about the causes, composition and types of volcanoes. They begin with an overview of the Earth's interior and how volcanoes form. Once students know how volcanoes function, they learn how engineers predict eruptions.
References
http://earthquake.usgs.gov/4kids/
http://infotrek.er.usgs.gov/pubs/
Copyright
© 2004 by Regents of the University of ColoradoContributors
Jessica Todd; Melissa Straten; Malinda Schaefer Zarske; Janet YowellSupporting Program
Integrated Teaching and Learning Program, College of Engineering, University of Colorado BoulderAcknowledgements
The contents of this digital library curriculum were developed under grants from the Fund for the Improvement of Postsecondary Education (FIPSE), U.S. Department of Education, and National Science Foundation (GK-12 grant no. 0338326). However, these contents do not necessarily represent the policies of the Department of Education or National Science Foundation, and you should not assume endorsement by the federal government.
Last modified: September 14, 2020


User Comments & Tips