Quick Look
Grade Level: 5 (3-5)
Time Required: 45 minutes
Expendable Cost/Group: US $1.50
Group Size: 2
Activity Dependency: None
Subject Areas: Biology
Summary
Students learn the purpose of a fever in the body's immune system and how it protects the body against germs. The students continue to explore temperature by creating a model thermometer and completing a temperature conversion worksheet. They come to see how engineers are involved in designing helpful medical instruments such as thermometers.
Engineering Connection
Engineers have developed many tools and instruments to help doctors diagnose diseases. Thermometers are one of the quickest ways to determine if your body is sick or suffering from an infection of some kind. Engineers designed thermometers by capitalizing on the physical properties of certain fluids and the knowledge that most fluids expand when they are exposed to heat.
Learning Objectives
After this activity, students should be able to:
- Describe the purpose of a fever in the body's immune system.
- Create a model of a thermometer and describe its function.
- Give examples of engineering that have helped with the immune system.
- Convert degrees of temperature from Celsius to Fahrenheit.
Educational Standards
Each TeachEngineering lesson or activity is correlated to one or more K-12 science,
technology, engineering or math (STEM) educational standards.
All 100,000+ K-12 STEM standards covered in TeachEngineering are collected, maintained and packaged by the Achievement Standards Network (ASN),
a project of D2L (www.achievementstandards.org).
In the ASN, standards are hierarchically structured: first by source; e.g., by state; within source by type; e.g., science or mathematics;
within type by subtype, then by grade, etc.
Each TeachEngineering lesson or activity is correlated to one or more K-12 science, technology, engineering or math (STEM) educational standards.
All 100,000+ K-12 STEM standards covered in TeachEngineering are collected, maintained and packaged by the Achievement Standards Network (ASN), a project of D2L (www.achievementstandards.org).
In the ASN, standards are hierarchically structured: first by source; e.g., by state; within source by type; e.g., science or mathematics; within type by subtype, then by grade, etc.
NGSS: Next Generation Science Standards - Science
-
Develop a model to describe phenomena.
(Grades 4 - 5)
More Details
Do you agree with this alignment?
Common Core State Standards - Math
-
Add, subtract, multiply, and divide decimals to hundredths, using concrete models or drawings and strategies based on place value, properties of operations, and/or the relationship between addition and subtraction; relate the strategy to a written method and explain the reasoning used.
(Grade
5)
More Details
Do you agree with this alignment?
-
Convert like measurement units within a given measurement system.
(Grade
5)
More Details
Do you agree with this alignment?
International Technology and Engineering Educators Association - Technology
-
Technological advances have made it possible to create new devices, to repair or replace certain parts of the body, and to provide a means for mobility.
(Grades
3 -
5)
More Details
Do you agree with this alignment?
-
Describe the properties of different materials.
(Grades
3 -
5)
More Details
Do you agree with this alignment?
State Standards
Colorado - Math
-
Convert like measurement units within a given measurement system.
(Grade
5)
More Details
Do you agree with this alignment?
-
Add, subtract, multiply, and divide decimals to hundredths.
(Grade
5)
More Details
Do you agree with this alignment?
Colorado - Science
-
Assess further scientific explanations regarding basic human body system functions
(Grade
5)
More Details
Do you agree with this alignment?
-
Create and evaluate models of human body systems and organs
(Grade
5)
More Details
Do you agree with this alignment?
Materials List
Each group needs:
- cold water
- isopropyl (rubbing) alcohol
- food coloring (any color)
- clear, narrow-necked plastic or glass bottle (for example, an 11 oz water bottle)
- rubber stopper with a hole (often part of classroom science kits), to create an airtight seal for the thermometer (alternative: modeling clay, but more difficult to get a good seal)
- long, clear straw (such as balloon sticks from a party supply store)
- Temperature Conversion Worksheet
To share with the entire class:
- isopropyl (rubbing) alcohol or mercury thermometer for calibrating
- black Sharpie® or waterproof marker
- (optional) large bowls or containers of water in different temperatures (to act as water baths, with varying temperatures from ice cold to very warm)
Worksheets and Attachments
Visit [www.teachengineering.org/activities/view/cub_human_lesson10_activity1] to print or download.Pre-Req Knowledge
Conducting the associated Fighting Back! (lesson 10) of this unit is helpful, but not required.
Introduction/Motivation
Have you ever wondered why your parents take your temperature to see if you are sick? They are checking to see if your body is hotter than it should be (98.6°F is considered normal). When your body temperature rises, it is called a fever. Fevers are thought to be one way that the immune system defends itself against germs and infection. By raising your body's temperature, certain bacteria and viruses that are sensitive to temperature changes are destroyed (killed by the higher than normal temperature). However, if a fever is too high, it can cause physical damage or even death, so often it is necessary to reduce a fever by using cooling baths, cloths or packs, or medications.
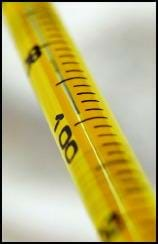
To check if your body has a fever, your parents or a medical practitioner uses a thermometer. So how does a thermometer know how hot your body really is (that is, your temperature)? Bulb thermometers contain a type of fluid that changes volume relative to its temperature: heat makes the fluid expand (take up more space), while the cold makes it shrink (take up less space). Mercury is the most common fluid used due to its low freezing point, and high boiling point. To see the liquid shrinking or expanding, the mercury is placed in a narrow tube (contained inside a wider-diameter glass tube) to magnify the changes that occur. The interior mercury tube has a bulb at the end of it that is placed on an object to obtain its temperature (that is, under your tongue if you are sick and want to know your temperature). The final step is calibrating the thermometer (dividing the tube into degrees, either Fahrenheit or Celsius). Degrees are the units of temperature; similar to how meters are units of length. The very first thermometer was calibrated by sticking it in freezing water and marking where the fluid was. Then, the thermometer was placed in boiling water and that temperature was marked. Today engineers have developed machines that calibrate thermometers while they are being made.
Engineers need to know about the immune system and how it works. In fact, engineers have developed many of the instruments that help doctors diagnose and treat diseases. Engineers also help develop the vaccinations, antibiotics and disinfectants to help kill germs before they can invade your body. Other engineers help design systems to keep the air we breathe and the water we drink healthy, and yet others develop the instruments to monitor our health at the hospital or doctor's office. It is important for engineers to design devices that will help our immune system maintain a safe temperature in our body and still kill harmful bacteria and viruses.
Today is your chance to make your very own thermometer and see it in action! We are going to study how a thermometer measures temperature and discuss how this relates to our body's immune system.
Procedure
Before the Activity
- Gather materials and make copies of the Temperature Conversion Worksheet.
With the Students
- Divide the class into groups of two students each. Pass out materials.
- Peel any labels off the plastic/glass bottle.
- Fill the bottle about one eighth of the way full with cold water.
- Add rubbing alcohol so the bottle is now one-quarter of the way full (equal parts water and alcohol).
- Add a few drops of red food coloring to the liquid. Screw on the cap and swirl the bottle to adequately mix the water and food coloring.
- Place the straw in the bottle so that it is almost touching the bottom.
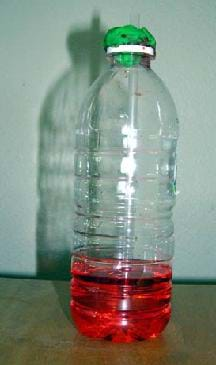
- At the opening of the bottle, secure the straw with the rubber stopper, creating an airtight seal. (If using clay, make sure it completely covers the opening, creating an airtight seal, as shown in Figure 1.)

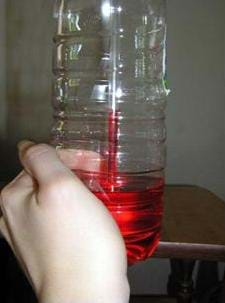
- While the bottle is sitting on the table, place your hands around the bottom of the bottle to warm up the liquid, as shown in Figure 2. (If using a plastic bottle, make sure not to squeeze the bottle or you might stain your shirt!)

- Observe how the liquid flows up the straw as its temperature increases.
- Explain to the students why this works: The liquid in the bottle responds to changes in temperature by expanding or contracting. When the temperature increases, the liquid expands and is forced up the straw. The reverse happens when the temperature cools.
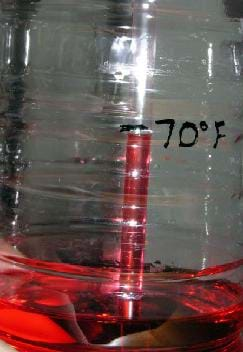
- Use a commercial thermometer to check the current temperature in the classroom. Once the liquid has reached room temperature, use a black Sharpie® or other waterproof marker to place a mark on the bottle even with the liquid level in the straw. Then, label the mark on your bottle with the room temperature (make sure to note the units, Celsius or Fahrenheit).

- Play around with the thermometer by placing it in cooler and warmer areas or in different temperature water baths. Mark each different temperature on the outside of the bottle. (Note, this thermometer does not work once the water begins to freeze or boil.) At what temperature does the liquid reach the top of the straw?
- Have students complete the worksheet.
Vocabulary/Definitions
Celsius: Of or relating to a temperature scale that registers the freezing point of water as 0° and the boiling point as 100° under normal atmospheric pressure; invented by Anders Celsius, a Swedish astronomer, in 1742.
Fahrenheit: Of or relating to a temperature scale that registers the freezing point of water as 32° and the boiling point as 212° at one atmosphere of pressure; invented by Gabriel D. Fahrenheit, a German-born physicist, in 1714.
temperature: The degree of heat in the body of a living organism.
Assessment
Pre-Activity Assessment
Brainstorming: In small groups, have students engage in open discussion. Remind them that no idea or suggestion is "silly." All ideas should be respectfully heard. Ask the students:
- How does a thermometer work?
Activity Embedded Assessment
Math Worksheet: Have the students complete the Temperature Conversion Worksheet; review their answers to gauge their mastery of the subject.
Re-Design Practice: Have students list any design or fabrication changes they would make to their thermometer on their worksheets or separate pieces of paper.
Post-Activity Assessment
Discussion/Journal Reflection: Engineers need to know about the immune system and how it works. Ask students to write a paragraph, in their science journal or on a sheet of paper, to explain why it is important for engineers to understand how the human body's immune system works. Evaluate students' research and reflection write-ups using the attached Report Research Rubric. (Possible answers: Engineers have developed many of the instruments and tools that help doctors diagnose and treat diseases. Engineers also help develop the vaccinations, antibiotics and disinfectants to help kill germs before they can invade our bodies. An understanding of the body helps engineers design products that help us keep our bodies healthy.)
Sales Pitch! Thermometer Advertising: After the activity, ask student teams: For what purpose might your thermometer be used? Is it used in a house? In a hospital? Or in an appliance? Have teams decide on product names for their thermometers and create magazine ads for them, as well as 10-minute sales pitches of their designs for presentation at the next class. Suggest they get crazy and be creative. In their ads, have teams include diagrams of their thermometers and short explanations of how they work.
Safety Issues
Since rubbing alcohol is toxic, warn students to not drink the liquid.
Troubleshooting Tips
If using modeling clay, make sure the seal around the straw is tight, or the thermometer will not work properly (or at all).
Activity Extensions
Have students place their thermometers in different places around the school and take measurements. Have them hypothesize why different areas of the school may be different temperatures. They can generate a class data chart and develop engineering reports in small groups about the temperatures around the school.
Have students experiment to see what happens when they use this thermometer in very cold or very hot circumstances (outside if very hot or cold, or in a freezer, or in a pot of water heated on a burner). This homemade thermometer does not work once the water begins to freeze or boil. Use this opportunity to discuss the limitations of this thermometer and how its design might be modified to work in those temperatures.
Have students investigate fevers, specific bacteria or viruses and what effects they have on the immune system.
Have students make lists of all the places thermometers are used. For example, thermometers are used in cars to make sure they are not overheating, in buildings for monitoring heating and air conditioning, in weather stations to measure outside temperatures, etc.
-Using the same general concept, have the students redesign a second prototype that improves either the (1) asthetic appeal, (2) portability, or (3) sensitivity to temperature. [Examples: For (1), they could improve anything about the way it looks, for (2) they could try to make it smaller, and for (3) they could alter the amount of alcohol]. The teacher can alter this based on time – i.e. if there is enough time, the students could actually go ahead and rebuild. If not, they could submit detailed design plans that outline the changes they would make and what those changes would be improving upon.
Activity Scaling
To add more math extensions and/or for upper grades, have students convert the temperatures on the worksheet to the Kelvin scale (Celsius temperature + 273.15 = Kelvin temperature).
For lower grades, it may be helpful to only complete the last set of problems on the worksheet: converting temperatures from Celsius to Fahrenheit.
Subscribe
Get the inside scoop on all things Teach Engineering such as new site features, curriculum updates, video releases, and more by signing up for our newsletter!More Curriculum Like This

Students learn about the major components and functions of the immune system and the role engineers play in keeping the body healthy through the design of medical care such as vaccinations and antibiotics. They also learn how an astronaut's immune system is suppressed during spaceflight due to stres...

Students learn about the difference between temperature and thermal energy. They create thermometers using simple materials and develop their own scales for measuring temperature. They compare their thermometers to a commercial thermometer, and get a sense for why engineers need to understand the pr...

Students are introduced to various types of energy with a focus on thermal energy and types of heat transfer as they are challenged to design a better travel thermos that is cost efficient, aesthetically pleasing and meets the design objective of keeping liquids hot.

Students explore materials engineering by modifying the material properties of water. Using either a simple thermometer or a mechatronic temperature sensor, students learn about the lower temperature limit at which liquid water can exist—such that even if placed in contact with a material much colde...
Copyright
© 2006 by Regents of the University of Colorado.Contributors
Teresa Ellis; Denali Lander; Malinda Schaefer Zarske; Janet Yowell; Jesse AscunceSupporting Program
Integrated Teaching and Learning Program, College of Engineering, University of Colorado BoulderAcknowledgements
The contents of this digital library curriculum were developed under a grant from the Fund for the Improvement of Postsecondary Education (FIPSE), U.S. Department of Education and National Science Foundation GK-12 grant no. 0338326. However, these contents do not necessarily represent the policies of the Department of Education or National Science Foundation, and you should not assume endorsement by the federal government.
Last modified: May 5, 2019


User Comments & Tips