
Quick Look
Grade Level: 5 (3-5)
Time Required: 2 hours 30 minutes
(can be split into three 50-minute sessions)
Expendable Cost/Group: US $4.50
Group Size: 4
Activity Dependency:
Subject Areas: Earth and Space
NGSS Performance Expectations:

| 3-5-ETS1-1 |
| 3-5-ETS1-3 |
| 5-ESS3-1 |
Quick Look

- Grade Level:
- 5 (3 – 5)
- Time Required:
- 2 hours 30 minutes
(can be split into three 50-minute sessions)
- Group Size:
- 4
- Subject Areas:
-
Earth and Space -
NGSS Performance Expectations:
3-5-ETS1-1 3-5-ETS1-3 5-ESS3-1
Summary
Students learn about oil spills and their environmental and economic effects. They experience the steps of the engineering design process, starting by brainstorming potential methods for oil spill cleanup. They model small-size oil spills in plastic bins, and then design, build and re-design oil booms to prevent the spread of oil spills. Oil booms are like floating fences on the water surface to help contain and collect spilled oil. During a reflective session after cleaning up their oil booms, students come up with ideas on how to reduce oil consumption to prevent future oil spills. A PowerPoint presentation is provided.
Engineering Connection
Environmental engineers assist with the cleanup of oil spills. They must be familiar with the different methods of chemical and physical material cleanup. Engineers follow the universal steps of the engineering design process to imagine, design and test possible cleanup and containment strategies. Petroleum engineers weigh the risks and benefits of a well before they decide to drill.
Learning Objectives
After this activity, students should be able to:
- Identify the effects of oil spills on water sources and the organisms that depend on the water sources.
- Describe methods that environmental engineers use to clean up water pollution.
- Explain the importance of the redesign step of the engineering design process.
Educational Standards
Each Teach Engineering lesson or activity is correlated to one or more K-12 science,
technology, engineering or math (STEM) educational standards.
All 100,000+ K-12 STEM standards covered in Teach Engineering are collected, maintained and packaged by the Achievement Standards Network (ASN),
a project of D2L (www.achievementstandards.org).
In the ASN, standards are hierarchically structured: first by source; e.g., by state; within source by type; e.g., science or mathematics;
within type by subtype, then by grade, etc.
Each Teach Engineering lesson or activity is correlated to one or more K-12 science, technology, engineering or math (STEM) educational standards.
All 100,000+ K-12 STEM standards covered in Teach Engineering are collected, maintained and packaged by the Achievement Standards Network (ASN), a project of D2L (www.achievementstandards.org).
In the ASN, standards are hierarchically structured: first by source; e.g., by state; within source by type; e.g., science or mathematics; within type by subtype, then by grade, etc.
NGSS: Next Generation Science Standards - Science
| NGSS Performance Expectation | ||
|---|---|---|
|
3-5-ETS1-1. Define a simple design problem reflecting a need or a want that includes specified criteria for success and constraints on materials, time, or cost. (Grades 3 - 5) Do you agree with this alignment? |
||
| Click to view other curriculum aligned to this Performance Expectation | ||
| This activity focuses on the following Three Dimensional Learning aspects of NGSS: | ||
| Science & Engineering Practices | Disciplinary Core Ideas | Crosscutting Concepts |
| Define a simple design problem that can be solved through the development of an object, tool, process, or system and includes several criteria for success and constraints on materials, time, or cost. Alignment agreement: | Possible solutions to a problem are limited by available materials and resources (constraints). The success of a designed solution is determined by considering the desired features of a solution (criteria). Different proposals for solutions can be compared on the basis of how well each one meets the specified criteria for success or how well each takes the constraints into account. Alignment agreement: | People's needs and wants change over time, as do their demands for new and improved technologies. Alignment agreement: |
| NGSS Performance Expectation | ||
|---|---|---|
|
3-5-ETS1-3. Plan and carry out fair tests in which variables are controlled and failure points are considered to identify aspects of a model or prototype that can be improved. (Grades 3 - 5) Do you agree with this alignment? |
||
| Click to view other curriculum aligned to this Performance Expectation | ||
| This activity focuses on the following Three Dimensional Learning aspects of NGSS: | ||
| Science & Engineering Practices | Disciplinary Core Ideas | Crosscutting Concepts |
| Plan and conduct an investigation collaboratively to produce data to serve as the basis for evidence, using fair tests in which variables are controlled and the number of trials considered. Alignment agreement: | Tests are often designed to identify failure points or difficulties, which suggest the elements of the design that need to be improved. Alignment agreement: Different solutions need to be tested in order to determine which of them best solves the problem, given the criteria and the constraints.Alignment agreement: | |
| NGSS Performance Expectation | ||
|---|---|---|
|
5-ESS3-1. Obtain and combine information about ways individual communities use science ideas to protect the Earth's resources and environment. (Grade 5) Do you agree with this alignment? |
||
| Click to view other curriculum aligned to this Performance Expectation | ||
| This activity focuses on the following Three Dimensional Learning aspects of NGSS: | ||
| Science & Engineering Practices | Disciplinary Core Ideas | Crosscutting Concepts |
| Obtain and combine information from books and/or other reliable media to explain phenomena or solutions to a design problem. Alignment agreement: | Human activities in agriculture, industry, and everyday life have had major effects on the land, vegetation, streams, ocean, air, and even outer space. But individuals and communities are doing things to help protect Earth's resources and environments. Alignment agreement: | A system can be described in terms of its components and their interactions. Alignment agreement: Science findings are limited to questions that can be answered with empirical evidence.Alignment agreement: |
International Technology and Engineering Educators Association - Technology
-
Students will develop an understanding of the attributes of design.
(Grades
K -
12)
More Details
Do you agree with this alignment?
-
Students will develop an understanding of engineering design.
(Grades
K -
12)
More Details
Do you agree with this alignment?
-
Students will develop abilities to apply the design process.
(Grades
K -
12)
More Details
Do you agree with this alignment?
-
The use of technology affects the environment in good and bad ways.
(Grades
3 -
5)
More Details
Do you agree with this alignment?
-
Describe the helpful and harmful effects of technology.
(Grades
3 -
5)
More Details
Do you agree with this alignment?
Materials List
Each group needs:
- 1 plastic bin (shoebox size or similar)
- 2 cups (473 ml) sand
- duct tape, 4 feet (1.2 m)
- 6 cotton balls
- 8 plastic drinking straws
- 1 feather
- half a standard-sized sponge (rectangular, palm-sized)
- 1/4 cup (~60 ml) toasted sesame or other dark-colored oil (see the Troubleshooting Tips section)
- scissors
- (optional) stopwatch, to time the testing
To share with the entire class:
- access to a sink or water source
- paper towels for cleanup
- liquid dishwashing detergent, for use as a dispersant
- computer and projector, to show the Oil Spills Presentation
Worksheets and Attachments
Visit [www.teachengineering.org/activities/view/cub_enveng_lesson01_activity2] to print or download.Introduction/Motivation

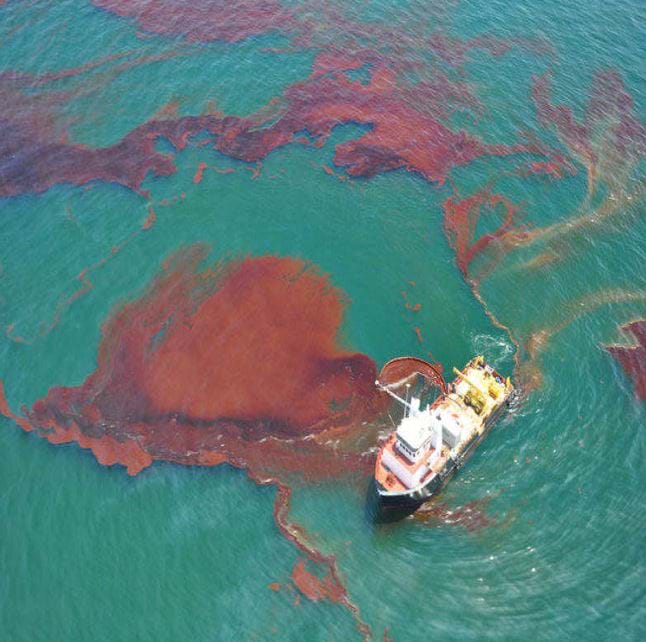
Has anyone heard of oil spills taking place? Do you know of a big oil spill that has happened in your lifetime? Many of you probably heard about the Deepwater Horizon oil spill in the Gulf of Mexico in 2010. The spill was caused by an explosion and led to about 4.9 million barrels (780,000 m3) of oil spilling into the Gulf over a time period of three months. Even years later, many people were working to clean up the oil. Why is it important to clean up oil? Since oil has a low density, it floats on top of water. Also, oil is hydrophobic ("afraid" or repellent of water) so it does not mix well with water, and it would rather stick to anything else. This means the oil sticks to animals and plants, sand and rocks in the ocean and on the beaches. This can harm animals and disrupt the ocean's ecosystem.
Why is it so hard to clean up oil? Oil spills, like many environmental issues, become very political situations. Who is responsible for the pollution? Who should pay for the cleanup? How should the spill be cleaned up? These and other issues are often highly debated. For example, the oil company, which is assigned most of the cost, prefers the least-expensive cleanup method. Environmental organizations and people suffering the impact of oil spills want the most effective cleanup options. After the first year, BP had spent more than $17.7 billion on response activities. That's the price of 55 jumbo jets (747s)!
Today we are going to create a model oil spill. You are going to play the role of environmental engineers and design booms to contain the oil. Booms are used to contain oil spills and help scoop oil off the water surface. They work like floating fences in the ocean. Once oil is contained by a boom, it can be collected for reuse or safer storage and disposal. The use of a boom reduces the risk of contaminating the shoreline and reduces the size of the affected area. This approach also helps to preserve a larger clean area for wildlife to occupy. Using booms in the Gulf of Mexico kept the oil from spreading so that workers could clean it up more easily. Are you ready to create booms to learn how to help protect the environment from oil spills? Let's get started!
Procedure
Background
The 2010 Deepwater Horizon oil spill in the Gulf of Mexico impacted many people living along the Gulf Coast. Many animals were injured by being coated in oil or ingesting it, and more than 6,000 animals died. The economic injury to the people of the Coast was also great. Due to the tar on the beaches and negative publicity, the tourism industry in the region lost a lot of money. Fishermen lost a lot of income due to lowered fish populations and reduced demand for fish due to contamination. The cleanup effort took more than a year and employed many techniques to stop the spread of oil. The steps taken to handle the spill included stopping the spill, containing the oil and removing the oil.
In this activity, students learn about the second step in this process: containing the oil. In their plastic bins, students model oil spills by placing sand on one side to represent a beach, and filling the rest of the bin with water. First, in a teacher demonstration, add a dark (visible) oil and a dispersant to the bin water so students can observe how oil spreads to the beach. Next, in the activity, students use the provided materials to design and create prototype booms to contain the oil spills in their bins. After testing their designs, students redesign their booms to be more effective. To conclude, students reflect on their designs and on how we might be able to reduce oil spills in the future.
Before the Activity
- Gather materials for this boom-building activity.
- Separate materials for each team into design and redesign packets. The design materials include: 2 feet of duct tape, 3 cotton balls, 4 straws, 1 feather and one-half a sponge. The redesign materials include: 2 feet of duct tape, 3 cotton balls and 4 straws.
- In each bin, create a beach by filling one-quarter to one-half of one side of the bin with sand; then fill the bin with 2 or 3 inches of water.
- Set up a computer and projector to show the six-slide Oil Spills Presentation.
With the Students
- Ask students if they have heard anything about oil spills. Present the first three slides of the presentation to introduce the problems caused by oil spills. Emphasize the large area covered and the wildlife and people (such as fishermen and tourism) negatively impacted.
- Ask students to spend five minutes brainstorming ways that they might clean up oil. Then have them discuss their brainstorming ideas within their groups. Ask them to think of any downsides to their cleanup methods.
- Show students slides 4-6 of the presentation. Explain that it is desirable to remove as much oil from the ocean as possible. However, removing too much water from the ocean is not good because then more oily water must be stored and treated, which is expensive. Also, different cleanup methods are associated with different costs. For example, dispersants are often expensive because they are applied by planes flying over the area. Booms can be less expensive, but usually must be combined with another cleanup method to remove the oil after it is contained.
- As a class demonstration, fill a bin with water and pour 2 or 3 tablespoons of oil on the water. To show students how dispersants work, have them gather around as you drop a few drops of dish soap or dispersant on the water.
- Show students how the oil reaches the beach with nothing to stop it. Observe the oil creep toward the sand. This gives students an idea of what they are working to prevent—the design challenge. Explain that booms prevent oil from spreading and reaching beaches where it can be further destructive.
- Divide the class into groups of four students each, and challenge each group to design an oil boom. Give students the available building materials, except the duct tape, while they design their booms, so they see what they have to work with, while ensuring they design before constructing. Real-world design projects have requirements and constraints. Good restrictions to place on boom design are keeping the boom at least one inch from the beach and not taping the boom to the bin. The reasoning is that in reality engineers want clean water around the beach, not just clean sand, and in the ocean it is not practical to fasten a boom to the ocean floor. Encourage students to alter the materials to serve their purposes, such as cutting the straws.
- Require students to draw their final designs and label all parts. After students have come up with designs and they are approved by the teacher, pass out the remaining initial design materials (a bin with water and sand, duct tape, scissors). Explain that they will test their booms by placing them near the beaches to see if they keep the oil from reaching the sand.
- Give teams time to construct their booms.
- Have students place their booms in the water, then add oil to the non-beach side of the tub and see if the boom stops it from reaching the sand. If the oil is not spreading, gently rock the bin to create wave action or drip dish soap on the oil to spread it out.
- After the oil reaches the boom, let the oil spread for at least two minutes. Inform students that a real boom may need to stay in the water for months.
- Now give students a chance to redesign their booms. Explain that engineers often design objects and products several times before they have a final version. The redesign process makes better end products. Even if a boom prevents water from getting to the beach, see if they can make a boom that floats or lasts longer. Do not give students more materials until they have drawn new designs. Once they have approved new designs, provide another 2 feet of duct tape, 3 cotton balls and 4 straws, because some of the materials may have become unusable after the first test. Test the booms again using the same method. While students are fabricating their booms, pour out the oily water and add fresh water and sand (if needed) to the bins.
- Test students' redesigned booms. Ask students if their new booms worked better than their first designs and to describe why or why not.
- Have students dip feathers into their bins of oily water. Ask for their observations. Comment on how the feather becomes sticky and thin. Explain that wildlife are harmed by oil spills because the oil disrupts their biology, habitat and food supplies. They can see from the oily feather how birds might have trouble flying.
- Have students reflect on how we can reduce oil spills. Give them five minutes to brainstorm. Then compile all their ideas on the board. Next, have students brainstorm for 10 minutes about how they can reduce their oil use. The less oil we use, the less likely it is for oil spills to occur.
Vocabulary/Definitions
absorbent: Able to soak up liquid.
boom: A barrier used to contain oil spills on water surfaces.
hydrophobic: Afraid of water; something that cannot mix with or absorb water. Point out the word "phobic."
oil spill: An accidental release of oil.
Assessment
Pre-Activity Assessment
Brainstorming: Before introducing commonly used methods, have students brainstorm approaches and methods for cleaning up oil spills. Then, have students share their ideas with the class. It may help to have students sketch their ideas on paper to aid in their presentation to others.
Activity Embedded Assessment
Redesign: Verify that students are redesigning their booms and not just using the same ones for both trials. Ask them for the reasoning behind the changes made. Expect students to be able to point out flaws in their old designs and explain how the new designs fix those problems. It is helpful to ask each group how its redesign is an improvement as the students are building or before they get their redesign materials.
Post-Activity Assessment
Reflection: Have students discuss causes and effects of oil spills. Ask them to brainstorm how to reduce oil spills. Expect them to come to the conclusion that less oil consumption leads to fewer oil spills. They may also have other ideas. Require students to write paragraphs about how engineers clean up oil spills and why it is important. Good paragraphs make reference to the booms and how they help engineers clean by containing oil, and how oil makes animals sick, ruins their food supplies, and can make it hard for them to swim or fly. Also have students reflect on why the redesign step is important in the engineering design process. Do this as either a class discussion or another writing assignment. Expect students to realize that each redesign loop leads to better and better solutions to the design challenge.
Making Sense: Have students reflect about the science phenomena they explored and/or the science and engineering skills they used by completing the Making Sense Assessment.
Safety Issues
Be alert for slipping hazards if oil or water is spilled on the floor.
Troubleshooting Tips
Make sure to use dark-colored oil, such as toasted sesame oil. If you use light-colored oil, such as most vegetable oils, it is too difficult to distinguish it from the water.
Expect some students to put their initial design materials in the water before they are finished building, which can make it difficult to get the duct tape to stick. If this happens, suggest using long skinny pieces of tape to wrap all the way around the materials and suggest to students that they avoid this when redesigning their booms.
During the testing process, make sure groups test long enough that the oil has a chance to penetrate the boom—at least two minutes after the oil reaches the boom. From classroom experience, sometimes the oil needs a minute or two to reach the boom. Also, some designs that absorb oil work really well at first, but once full of oil they let oil pass through the boom. It helps to walk around the classroom and observe the testing to make sure students test their designs long enough to determine whether the oil will eventually spread to the beach or be reliably contained by the boom.
During the post-activity oil use brainstorming session, expect some students to suggest using batteries instead of electricity as a way to lower oil consumption. Clarify for them that the power in batteries can still come from fossil fuel sources such as oil. However, one use of batteries to reduce oil consumption is to store wind or solar power in batteries to make these intermittent sources more constant so that less coal and oil is used for energy.
Additional Multimedia Support
"We now know how to mitigate future oil spills," by Matthew Teague of The Guardian. Some unexpected good effects from oil spills are the development of new sea-cleaning techniques such as: deploying rangia clams in pallets to spill sites where they munch on oil and remove it from the water; using aerogel—frozen smoke—the least dense material on Earth, as a sponge to sop up oil; and deploying swarms of tiny nanosubmarines smaller than human hair, powered by hydrogen peroxide bubbles to skim oil from the water surface. See https://www.theguardian.com/lifeandstyle/2015/dec/31/guide-to-a-hopeful-2016-things-to-look-forward-to (scroll down to article)
Subscribe
Get the inside scoop on all things Teach Engineering such as new site features, curriculum updates, video releases, and more by signing up for our newsletter!More Curriculum Like This

Students explore an important role of environmental engineers—cleaning the environment. They learn details about the Exxon Valdez oil spill, which was one of the most publicized and studied human-caused environmental tragedies in history.

Environmental engineers play a big role in the cleanup of oil spills. But how do you clean up a huge amount of oil that has been mixed in a body of water like the ocean? In this activity, students simulate a spill and cleanup and learn the effectiveness of different methods.

Through the use of models and scientific investigation, students explore the causes of water pollution and its effects on the environment. Through the two associated activities, they investigate filtration and aeration processes that are used for removing pollutants from water.

Students engage with the engineering design process and engineering thinking as they iterate and compare how much oil they can remove across two rounds.
References
Deepwater Horizon Accident. BP Global. Accessed May 7, 2012. http://www.bp.com/sectiongenericarticle800.do?categoryId=9036575&contentId=7067541
New Estimate Puts Oil Leak at 205 Million Gallons. PBS Newshour. MacNeil/Lehrer Productions. Accessed June 18, 2012. http://www.pbs.org/newshour/rundown/2010/08/new-estimate-puts-oil-leak-at-49-million-barrels.html
Copyright
© 2012 by Regents of the University of ColoradoContributors
Kristen Brown; Berkeley Almand; Sharon D. Perez-Suarez; Melissa Straten; Malinda Schaefer Zarske; Janet Yowell; Carleigh SamsonSupporting Program
Integrated Teaching and Learning Program, College of Engineering and Applied Science, University of Colorado BoulderAcknowledgements
The contents of this digital library curriculum were developed under grants from the Fund for the Improvement of Postsecondary Education (FIPSE), U.S. Department of Education and the National Science Foundation (GK-12 grant no. 0338326). However, these contents do not necessarily represent the policies of the DOE or NSF, and you should not assume endorsement by the federal government.
Last modified: October 20, 2020
User Comments & Tips