Quick Look
Grade Level: 10 (9-12)
Time Required: 2 hours 15 minutes
(can be split into different sessions)
Expendable Cost/Group: US $0.16 This activity also uses some non-expendable (reusable) lab equipment; see the Materials List for details.
Group Size: 5
Activity Dependency: None
Subject Areas: Chemistry, Physical Science, Physics, Science and Technology
Summary
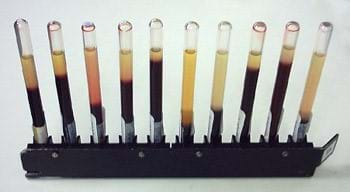
Students demonstrate the erythrocyte sedimentation rate test (ESR test) using a blood model composed of tomato juice, petroleum jelly and olive oil. They simulate different disease conditions, including rheumatoid arthritis, anemia, leukocytosis and sickle-cell anemia, by making appropriate variations in the particle as well as in the fluid matrix. Students measure the ESR for each sample blood model, correlate the ESR values with disease conditions and confirm that diseases alter blood composition and properties. During the activity, students learn that when non-coagulated blood is let to stand in a tube, the red blood cells separate and fall to the bottom of the tube, resulting in a sediment and a clear liquid called serum. The height in millimeters of the clear liquid on top of the sediment in a time period of one hour is taken as the sedimentation rate. If a disease is present, this ESR value deviates from the normal, disease-free value. Different diseases cause different ESR values because blood composition and properties, such as density and viscosity, are altered differently by different diseases. Thus, the ESR test serves as a real-world diagnostic screening test to identify indications of the presence of any diseases in people.Engineering Connection
Sedimentation is a popular industrial technique for the separation of solids from solution-based heterogeneous mixtures by gravitational force and is used in food, beverage, pharmaceutical, paper and pulp, and clean water industries. The sedimentation principle is also utilized in the medical industry in clinical tests developed by biomedical engineers. In fact, the medical industry benefits so much from the sedimentation technique that it is put to use every day in hospitals around the world. The erythrocyte sedimentation rate (ESR) test is a popular clinical test and is solely based on the sedimentation principle. Chemical engineering and biotech processes frequently employ the sedimentation process in the separation of powders into fractions, isolation of various products in food processing, pharmaceuticals, pigment production, mineral beneficiation, drinking water industry, wastewater treatment, marine sedimentation, and in the silting of rivers and dams.
Learning Objectives
After this activity, students should be able to:
- Show that the ESR clinical test is based on the sedimentation technique for blood separation.
- Explain that the mass, size and shape of erythrocytes influence the ESR value.
- Demonstrate that the density and viscosity of the fluid influences the ESR value.
- Demonstrate the ESR test using a blood model.
- Simulate different disease conditions in the ESR test.
- Explain that pursuing college level courses in science, math and engineering can aid in securing jobs in the clinical medical industry.
Educational Standards
Each TeachEngineering lesson or activity is correlated to one or more K-12 science,
technology, engineering or math (STEM) educational standards.
All 100,000+ K-12 STEM standards covered in TeachEngineering are collected, maintained and packaged by the Achievement Standards Network (ASN),
a project of D2L (www.achievementstandards.org).
In the ASN, standards are hierarchically structured: first by source; e.g., by state; within source by type; e.g., science or mathematics;
within type by subtype, then by grade, etc.
Each TeachEngineering lesson or activity is correlated to one or more K-12 science, technology, engineering or math (STEM) educational standards.
All 100,000+ K-12 STEM standards covered in TeachEngineering are collected, maintained and packaged by the Achievement Standards Network (ASN), a project of D2L (www.achievementstandards.org).
In the ASN, standards are hierarchically structured: first by source; e.g., by state; within source by type; e.g., science or mathematics; within type by subtype, then by grade, etc.
NGSS: Next Generation Science Standards - Science
-
Use a model to predict the relationships between systems or between components of a system.
(Grades 9 - 12)
More Details
Do you agree with this alignment?
International Technology and Engineering Educators Association - Technology
-
Models are used to communicate and test design ideas and processes.
(Grades
3 -
5)
More Details
Do you agree with this alignment?
-
Evaluate designs based on criteria, constraints, and standards.
(Grades
3 -
5)
More Details
Do you agree with this alignment?
-
Modeling, testing, evaluating, and modifying are used to transform ideas into practical solutions.
(Grades
6 -
8)
More Details
Do you agree with this alignment?
State Standards
Georgia - Science
-
Students will analyze the physical, chemical, and biological properties of process systems as these relate to transportation, absorption and excretion, including the cardiovascular, respiratory, digestive, excretory and immune systems.
(Grades
9 -
12)
More Details
Do you agree with this alignment?
-
Students will analyze the nature of matter and its classifications.
(Grades
9 -
12)
More Details
Do you agree with this alignment?
-
Students will characterize the properties that describe solutions and the nature of acids and bases.
(Grades
9 -
12)
More Details
Do you agree with this alignment?
-
Students will investigate the properties of solutions.
(Grades
9 -
12)
More Details
Do you agree with this alignment?
-
Students will use tools and instruments for observing, measuring, and manipulating scientific equipment and materials.
(Grades
9 -
12)
More Details
Do you agree with this alignment?
-
Students will demonstrate the computation and estimation skills necessary for analyzing data and developing reasonable scientific explanations.
(Grades
9 -
12)
More Details
Do you agree with this alignment?
-
Students will communicate scientific investigations and information clearly.
(Grades
9 -
12)
More Details
Do you agree with this alignment?
-
Students will analyze how scientific knowledge is developed.
(Grades
9 -
12)
More Details
Do you agree with this alignment?
-
Students will understand important features of the process of scientific inquiry.
(Grades
9 -
12)
More Details
Do you agree with this alignment?
Materials List
Each group needs:
- Sedimentation and the ESR Test Presentation (printed out to serve as a handout), Student Lab Handout, Post-Lab Quiz and Homework Sheet, one each per student
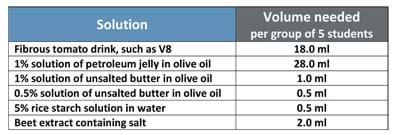
- Each of the solutions and amounts listed in Table 1; see the Procedure > Before the Activity section for preparation instructions for the solutions and beet extract; solution ingredients include: tomato juice/V8, petroleum jelly, olive oil, unsalted butter, rice starch, beet, salt and water; solution preparation equipment includes: digital scale, beakers, plastic spatulas/spoons, glass stir rods, stove (or hot plate or Bunsen burner), vegetable grater (hand or electric), tissues, storage containers.
- lab aprons and safety goggles, one each per student
- computer or tablet, one per student
- clear, labeled containers to store each of the five solutions
- 1 tablespoon of finely grated beet shavings placed in a cup; preparation details provided in the Procedure > Before the Activity section
- small tweezers, for transferring beet shavings
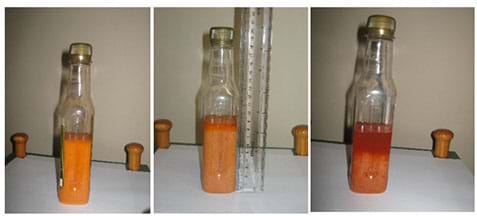
- 5 graduated test tubes of 25-ml capacity with screw caps, placed in a zip-lock bag or cup; alternatively use 25-ml graduated measuring cylinders with caps; note: if you scale up the experiment 5 to 10 times, then use five tall, skinny, clear plastic bottles that are 8-9 inches tall and 1.5-2 inches wide, such as empty recycled soda bottles or dollar-store olive oil bottles, as shown in Figure 1
- 1 test tube stand, if using test tubes
- 5 graduated plastic laboratory droppers of 2-3 ml capacity; used to add solution into the empty test tube when making the blood model
- tray, to organize each group’s materials
- paper towels
- clock, to time the 60 minutes needed to let the samples settle
To share with the entire class:
- computer and projector, plus Internet access, to show the Sedimentation and the ESR Test Presentation, a Microsoft® PowerPoint® file, and some short online videos
Worksheets and Attachments
Visit [www.teachengineering.org/activities/view/gat_esr_test_activity1] to print or download.Pre-Req Knowledge
Pre-requisite knowledge about blood is essential, specifically as it relates to homogeneous and heterogeneous mixtures, viscosity and blood composition. As necessary, spend about one period in advance of the activity to strengthen students’ understanding of the topic. Recommended resources:
- A good PowerPoint® presentation covering homogenous and heterogeneous mixtures is available as an attachment in the Mixture Dualism of Blood activity.
- Study.com has an excellent video lesson on blood composition at http://study.com/academy/lesson/what-is-the-composition-of-blood.html.
- A good YouTube video on viscosity called “What Is Viscosity?” (5:43 minutes) is available at https://www.youtube.com/watch?v=1AESWxko4nI.
Introduction/Motivation
(With the Sedimentation and the ESR Test Presentation open and projected for the class (on slide 1), hand out paper copies of the same slides. Give students time at each slide to read and digest the material.)
(Slide 2) Orange juice bottles have instructions on the labels telling you to shake them before drinking the juice. Have you ever wondered why we need to do this? (Listen to student explanations.) Because the juice is a heterogeneous mixture and the pulp settles down! Where else do you encounter “shake well before use” instructions? (Examples: Soy milk, inhalers, and oral suspensions or syrups.) We shake them before use because they are heterogeneous solution-based mixtures with some insoluble dispersed solutes.
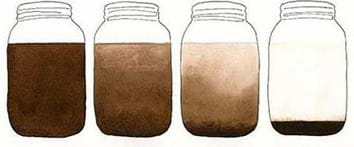
(Slide 3) What do you understand about the term “suspension?” (Direct students to use the think-pair-share technique.) A suspension is a solution-based heterogeneous mixture; such a mixture has a liquid solvent and one or more solutes, some or all of which are insoluble. A good example of suspension is muddy water. When you collect muddy water in a container and leave it undisturbed, what happens? (Circulate the room and pick a student to respond. See Figure 2, the series of jars with muddy water; also on slide 3.) The mud separates from the water and settles down at the bottom of the container due to gravity. We call the settled mud a sediment.
In nature, settling takes place all the time. For instance, look at these photographs of sedimentary rocks (on slide 3), which are the result of settling mud. What is the series of events that take place from sediment formation to sedimentary rock formation? (Encourage multiple students to participate; synthesize responses and frame a complete statement.) The sediment gets thickened, the water trapped inside the mud oozes out of the sediment, and the sediment gets hardened into sedimentary rocks. The entire series of events from settling to thickening is called sedimentation. Outside of nature, the sedimentation process has been used in the industrial world for a long time, such as in the manufacture of food, beverages, pharmaceuticals, paper and pulp, and clean water. These industries use sedimentation as a separation process that helps to separate insoluble solutes from solution-based mixtures.
(Continue on with the slides, using presentation information provided in the Procedure section.)
Procedure
Solution Preparation Instructions
Purchase adequate fibrous tomato beverages, such as V8, and prepare each of the remaining solutions listed in Table 1 by following the instructions below. Note: Since weight/volume is a standard measurement for solutions, the solute is measured in grams and the solvent in milliliters.
- Preparation of 1% solution of petroleum jelly in olive oil (for 150 ml; scale as necessary for class size): Place a clean, dry beaker on a digital scale and tare it. With a clean plastic spatula or spoon, take a small quantity of petroleum jelly, add it to the beaker (make sure to place the jelly on the inner floor of the beaker) and find the mass. If it is above or below 1.5 g, remove or add some petroleum jelly in such a way as to read 1.5 g. Remove the beaker from the scale and place it on the work bench; place a clean glass rod inside the beaker; add 150 ml of olive oil in small portions while you constantly mix and dissolve (using the glass rod) the petroleum jelly into the olive oil. It is difficult to dissolve the petroleum jelly if you add all the 150 ml of olive oil at once on top of the petroleum jelly.
- Preparation of 1% and 0.5% solution of unsalted butter in olive oil (scale as necessary for class size): The procedure for the preparation of the butter solutions is very similar to that of petroleum jelly in olive oil. For the two solutions, follow the same preparation instructions for the butter and olive oil amounts shown in Table 2.

- Preparation of rice starch solution in water: Dissolve 2.5 g of rice starch (available in grocery stores) in 50 ml of cold water and heat it to a boil while continually stirring it with a glass rod or spatula. As it boils, the starch gets cooked and mixes evenly with the water to produce the starch solution. Let it cool.
- Preparation of beet extract containing salt: Either make this solution at home and bring it to school, or prepare it at school if you have a hot plate or gas connection and Bunsen burner. Slice about a half head of a medium-sized beet and place it in a beaker or metal pan with 200 ml of water and a teaspoon of salt. Heat it for about 12 minutes. Then decant it. This beet extract can be prepared in advance and stored in the refrigerator where it stays fresh for about 10 days without spoilage.
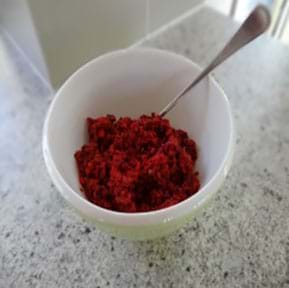
- To make the beet shavings, peel the beet and use a hand (or electric) vegetable grater to finely grate the beet on the finest side (or setting) (see Figure 3). If it’s easier, grate it at home and bring it to school; the shavings stay fresh in the refrigerator for about a week. If your hand vegetable grater does not have a very fine side, then use a mortar and pestle to further crush the grated beet. As you grate the beet, absorb any juice with a tissue.
Before the Activity
- Gather materials and prepare the solutions listed in Table 1 according to the instructions above.
- Organize on trays the materials for each group. On each group tray place: 1) a cup containing beet shavings and a tweezer, 2) a zip-lock bag or cup containing the 5 clean, dry graduated test tubes of 25-ml capacity with screw caps, as well as 3) the 5 clear, plastic, labeled containers with the following prepared solutions (25 ml each), each with a graduated plastic dropper:
- Tomato juice drink
- 1% solution of petroleum jelly in olive oil
- 1% solution of unsalted butter in olive oil
- 0.5% solution of unsalted butter in olive oil
- 5% rice starch solution
- 1 Beet extract containing salt
- (optional) Decide if you want to precede the activity by having students make glitter bottles as a preliminary hands-on experience with sedimentation, as described at https://www.youtube.com/watch?v=bJIYMl_XV00. If so, gather those materials.
- As necessary, adjust according to grade level the content of the Introduction/Motivation section (slides 1 to 12) and the Background information about the ESR test. Print out copies of the Sedimentation and the ESR Test Presentation, one per student.
- Make copies of the Student Lab Handout, one per student, and place them at the lab stations.
- Make copies of the Post-Lab Quiz, one per student, and hand out to students to work on during the 60 minutes they are waiting on the lab test results.
- Put the lab aprons in a readily accessible place and UV clean the safety goggles.
- Set up the computer and projector; then open the Sedimentation and the ESR Test Presentation, Student Lab Handout and Post-Lab Quiz, so they are ready to show.
- Decide how you will organize the class into teams of five students each.
With the Students: Prior to the Experiment
- (optional) Before showing the slides and leading a discussion on sedimentation, and as a preliminary hands-on experience with sedimentation, have students make glitter bottles as described at https://www.youtube.com/watch?v=bJIYMl_XV00. Note that slide 4 provides a URL for a short YouTube video showing sedimentation using glitter bottes.
- With the slide presentation open and projected for the class (slide 1), hand out paper copies of the slides.
- To provide motivation about the concept of sedimentation and thus prepare students for the activity, present to the class the Introduction/Motivation content along with slides 2 and 3, which help you to interactively explore suspension and why we need to shake some everyday solutions like juice before use. The focus is on “heterogeneous solution-based mixtures, insoluble solutes, and settling upon standing.” Then discuss how settling leads to sedimentation using real-world examples from nature: clarification of muddy water that forms sediment (depositing silt in rivers/dams) and sedimentary rocks.
- Continue with the slide presentation, using the suggested content provided below. The slides are dense and detailed so provide enough time at each slide for students to read and digest the material as you present it.
- (Slide 4) From macro sedimentation to micro sedimentation. Introduce the idea of the erythrocyte sedimentation rate (ESR) blood test as an important clinical test used worldwide. Go through the slide content, including the following information:
Sedimentation is not just a large-scale process; it can also occur on a small scale. For instance, a micro-level sedimentation process is employed in the medical world as a clinical blood test. (Lead the following section interactively.)
Blood is a heterogeneous solution mixture and red blood cells (also called erythrocytes) are a major insoluble solute in blood. So if you left a sample of blood undisturbed in a container, the red blood cells would sediment. This event is called erythrocyte sedimentation.
The erythrocyte sedimentation rate (ESR) is measured in millimeters as the height of the plasma that clarifies over the erythrocyte sediment. The numerical value of ESR is affected by changes in blood composition. Since diseases generally alter blood’s composition, the ESR value of blood from a person who is sick is different from that person’s normal ESR value. Isn’t that interesting? Do you think the ESR value would vary for different diseases? (Have students vote on the answer. Tell students that yes, the ESR value is different for different disease conditions.)
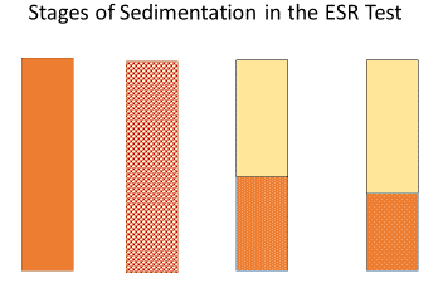
- Go through the three stages of sedimentation—aggregation, settling, packing—as illustrated by the Figure 4 diagram (also on slide 4). Point out how erythrocyte sedimentation follows the same sequence as the clarification of muddy water by sedimentation.
- Give a little introduction about ESR tubes, namely the Wintrobe and the Westerngren tubes. Tell students that they are going to learn about the ESR tubes in more detail a little later (slide 9).
- Still on slide 4, play the two-minute glitter bottle video so students can observe the sedimentation of glitter in two bottles containing different amounts of glue added to the water. Glitter settles slowly in the bottle containing more glue. Ask students: What difference do you notice between the sedimentation in the two glitter bottles? Why is the fall rate different? Have them brainstorm in pairs and encourage them to share their responses with the class. Point out that the fall rate is different for different solutions and that is why the ESR value is different for different disease conditions (as listed in Table 3, also on slide 4).

- (Slide 5) Resistance to settling: plasma and erythrocyte factors. Tell students that to understand the ESR, it is important to understand the influence of the fluid properties and particle properties on sedimentation. Play the glitter video again, for 25 to 30 seconds. Then ask what materials students could have used in the place of glue. Give them a list of substances and ask them to select from the list: glycerin, xanthan gum, starch solution, corn syrup, honey or maple syrup, vinegar, and lemon juice. Explain that xanthan gum is simply corn sugar fermented by bacteria. (The bacterium name is xanthomonas campestris.) Discuss that maple syrup and honey can dissolve and increase viscosity in high concentration. Then play a sedimentation animation video for 1.21 seconds and interactively discuss free (unhindered) and hindered settling, and the influence of particle size and concentration on the sedimentation rate.
- (Slide 6) The influence of particle size and shape. Introduce sickle-cell anemia and show students a video (6:29 minutes) about it. Explain how the distorted erythrocyte shape is accompanied by mass and density decreases. So, in ESR tests, sickle cells do not settle down due to less mass and less density. The fastest-settling particles are the larger, heaver, spherical molecules, so having a spherical or near-spherical particle shape results in good sedimentation. Ask students: In the glitter bottles, what could you have done differently with the glitter (not the solutions) to speed up the fall? Give them some scenarios: 1) increase the glitter particle size; 2) decrease the glitter particle size; 3) use a mix of bigger and smaller glitter particles; 4) use sequins of moon shape mixed with the glitter; 5) add some starch powder to the solution. Discuss the scenarios; answers are provided on slide 7.
- (Slide 7) Exploring cause and effects in plasma and erythrocyte factors. Continue to discuss the reasons why some causes produce the anticipated ESR values and some do not produce the effect. Highlight the behavior of honey and maple syrup in high and low concentrations. Discuss the influence of charge of particles, vibration, inclination and heating on the sedimentation rate. Reinforce that vibration, inclination and heating need to be avoided during ESR tests.
- (Slide 8) The laboratory investigation: ESR test in the classroom. Inform students that they are going to act as if they are clinical engineers who apply biomedical engineering concepts to healthcare. Their team challenge is to prepare sample blood models that correspond to different disease conditions, namely, rheumatoid arthritis, anemia, leukocytosis and sickle-cell anemia. Then, they will measure the ESR for each sample blood model. After the ESR tests, they will correlate the ESR values with disease conditions and confirm that diseases alter blood’s composition and properties. For example, the anemia blood model should show a higher ESR value than the 18 mm normal ESR value and the sickle-cell anemia blood model should be lower than the normal value.
- Review the lab handout and its lab instructions. Also talk about the assessment (mentioned on slide 8), which has two parts: the post-lab quiz (as described in the Assessment section) and the homework, which requires research and writing about clinical engineering careers. Direct students to answer the quiz inquiry questions while waiting for the 60-minute ESR test.
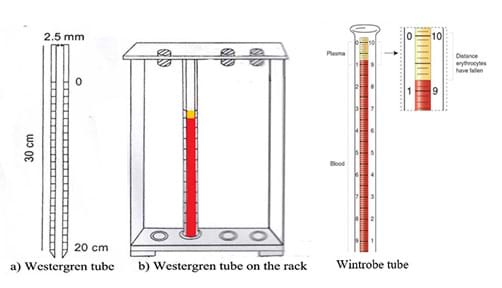
- (Slide 9) Real-world, relevant work. Guide students to appreciate that the lab investigation they are about to conduct is very much like the important biomedical work done in hospitals around the world. Describe the lab equipment typically used. Show them the Westerngren and Wintrobe tubes used in real ESR tests (Figure 5, also on slide 9). The ESR tube is 250 to 350 mm long with an internal diameter of 2.5 to 3.5 mm. The tube is graduated with marks from 0 to 200 mm (or 20 cm) so researchers can measure the height of the plasma that clarifies from the sediment. The small diameter and length only require a very small amount of blood. The tube dimensions also help the sedimentation to be completed within one hour. Because the ESR test is easy to conduct and only requires a small blood sample, it is commonly used as a baseline and follow-up monitoring tool to determine the efficacy of medications and other treatments.
- Using the specific gravity values (Figure 10 on slide 9), show students why only erythrocytes sediment and not other blood constituents, which remain with the plasma—a straw colored liquid medium of the blood.
- (slide 10) Lab materials and instructions for ESR tests. Help students understand the organization of materials at their lab stations. Explain that the handout provides the step-by step procedure for the experimental part, which includes how to mix the given materials to create the blood models. The same content is also provided on slide 8. Before starting the lab, go over all the lab details so you are sure students understand the experimental part completely before beginning.
- Divide the class into groups of five students each and ask them to put on the aprons and safety goggles before proceeding to the lab stations.
With the Students: During the Experiment
- Walk around, monitor and check on student progress, providing support and encouragement, as necessary.
- Inform students that they need to add only one or two beet shreds when they are creating the model blood for sickle-cell anemia.
With the Students: After the Experiment
- As students finish and leave their ESR tubes in undisturbed locations for 60 minutes, direct them to clean up the classroom and lab areas. Then have them spend the rest of the time finishing the last table in the lab handout and then answering the post-lab quiz questions.
- (Slide 11) ESR test background information: Why is the ESR value altered depending on blood conditions? Project this slide’s list of references to help students conduct Internet research to answer the post-lab inquiry questions. Of the 10 free response questions, the first seven are short-answer questions, while the last three questions require more elaborate answers. A few of this slide’s Internet resources are repeated below:
- What is an ESR test? (2:08-minute video) https://www.youtube.com/watch?v=wwW1sZ4utag
- How is an ESR test done? (4:23-minute video) https://www.youtube.com/watch?v=h7lmji5vx6Q
- Erythrocyte sedimentation rate (scroll down to February 17, 2011 post): http://vjahnavi57.blogspot.com/2011_02_01_archive.html
- How age and sex affect the erythrocyte sedimentation rate and C-reactive protein in early rheumatoid arthritis (research paper): https://bmcmusculoskeletdisord.biomedcentral.com/articles/10.1186/1471-2474-15-368
- Blood test results explained: https://bloodtestsresults.com/high-esr-blood-test-results-elevated-rbc-sed-rate-levels/
- Diseases and conditions: https://my.clevelandclinic.org/health/diseases/16777-benign-hematology
- Sedimentation levels of red blood cells (ESR) and its effect on viscosity of blood cells (PVC) and glucose in elderly people (research paper): https://www.iasj.net/iasj?func=fulltext&aId=90699
- Advise students to refer to slides 10 and 11 on their slide handouts to learn and research background information about ESR. This helps them answer the post-lab inquiry questions in a self-directed way.
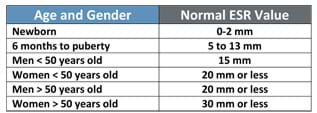
- As prompted by student questions, use slide 11 and Table 4 (Table 2 on the slide) to explain why normal ESR values are age and gender dependent, and in the case of females, how the high fibrinogen levels during menstruation and pregnancy also elevate the ESR. Explain that the ESR test is a non-specific screening test because the test does not identify the source of the problem or illness that caused the inflammation, infection or other conditions alerted by the test.
- (Slide 12) Explanations as to why ESR values are altered depending on blood conditions. Discuss the plasma factors and erythrocyte factors that operate in each disease condition resulting in different ESR values compared to normal values.
- (Slide 13) Homework Help. After students complete the post-lab inquiry questions, discuss the homework assignment with them. The homework is focused on careers in clinical testing labs, with the objective to increase student awareness about career options in the biomedical blood analysis industry. The slide provides a list of references to help with Internet research.
- Test Results. When the 60-miniute time periods are up, guide students to measure and record their ESR test results, referring to slide 10 for help in verifying the ESR results. Then, after the homework assignment is discussed, direct students to go back to the lab benches to note the ESR value for each disease state; ask them to verify that their anticipated results agree with the experimentally obtained results, namely:
- The normal ESR value is 18 ± 3 mm
- Normal blood < rheumatoid arthritis < anemia
- Normal blood > leukocytosis > sickle-cell anemia
- Conclude by making the following point: This task of verifying the ESR results takes about eight minutes, so you can see and appreciate that the speed and simplicity with which the ESR test is conducted in clinics around the world gives doctors valuable information so they can provide appropriate diagnostic and medical care to people.
Vocabulary/Definitions
anemia: A blood composition with fewer red blood cells than normal, leading to a decreased amount of hemoglobin and hence a decrease in the oxygen-carrying capacity of the blood.
anticoagulant: An anti-clotting drug that helps to maintain blood in a non-coagulated condition.
auto coagulation: A self-initiated coagulation process in which the particles of the dispersed phase are allowed to aggregate and separate out of the dispersion medium.
blood plasma: The fluid portion of the blood in which the particulate components are suspended.
cancer: A condition involving an abnormally high rate of cell division and the migration of such divided cells to other body sites.
coagulation: The process by which the addition of an external substance makes dispersed particles of a colloidal solution aggregate and separate out of the dispersion medium.
density: The ratio of mass to volume, with a unit of kg/m3.
dispersed phase: The condition when solute particles of dimensions between approximately 1 nm and 1 μm are uniformly dispersed in a solvent (called dispersion medium).
dispersion medium: A solvent in a colloidal solution that holds the solute particles of size in colloidal range (1 nm to μm).
erythrocyte sedimentation rate: A measure of the rate at which red blood cells settle (sediment) in a thin, tall, vertical tube of blood during a one-hour time period. Abbreviated as ESR. It is a common hematology test for non-specific detection of inflammation that may be caused by infection, some cancers and certain autoimmune diseases.
flocculation: The aggregation of small-sized irregularly shaped dispersed particles of a solution into bigger and denser particles of spherical or near-spherical shape.
heterogeneous mixture: A mixture of non-uniform composition, easily separable into individual constituents by simple separation techniques.
homogeneous mixture: A mixture of uniform composition that is not easily separable into individual constituents by simple separation techniques, but can be separated by special separation techniques.
hypocythemia: Abnormally low numbers of red blood cells, white blood cells and other formed elements of the blood.
hypofibrinogenemia: The presence of lower than normal fibrinogen content in the blood. The normal range is about 100 mg per deciliter.
infection: The invasion of an organism’s body tissues by pathogens that cause health concerns.
inflammation: The body’s response to infection and or injuries.
Kawasaki disease: A disease affecting children that is characterized by inflammation of the walls of the medium sized arteries.
leukocytosis: A condition in which the count of white blood cells is elevated.
multiple myeloma: Cancer originating in the plasma cell, which is a type of white blood cell.
polycythemia: An abnormal condition of the blood in which the concentration of hemoglobin is very high.
red blood cell: A non-nucleated cell that is biconcave in shape. Also called an erythrocyte.
rheumatoid arthritis : A disorder that results in long-term progressive joint inflammation.
sedimentation: A separation technique in which insoluble solute particles settle out of a heterogeneous solution upon standing and deposit at the bottom of the container under the influence of gravity.
sickle-cell anemia: A disorder in which the shape of the red blood cells in human blood is not in the discoid shape but in the shape of a sickle. A number of health problems may develop from this condition, such as pain, anemia, infections and stroke, as well as shortened life expectancy. Also called sickle-cell disease.
slurry: A mixture of insoluble or partially soluble solute(s) with a minimum amount of solvent.
specific gravity: A quantity without unit obtained by taking the ratio of density of a substance to the density of water.
viscosity: Internal friction in a liquid causing a resistance to its flow. Expressed in SI units of Pa.
Waldenström's macroglobulinemia: A cancerous condition of the B cells (a type of white blood cells) characterized by the presence of a high level of a macroglobulin in the blood plasma.
Assessment
Pre-Activity Assessment
Q & A: During the Introduction/Motivation portion of the activity, present everyday examples (content of slides 2 and 3) in a Q & A format to create (or enhance) students’ awareness about sedimentation, its meaning and its characteristics. Why do we need to shake juices before serving? What is sedimentation? What is suspension? What is settling?
Online Quiz: In addition, as a gradable pre-assessment or class exercise, having students complete the SoftSchools.com 10-question, multiple-choice chemistry mixtures quiz about homogeneous and heterogeneous mixtures (including solutions, suspensions, colloids, particle sizes, examples) at http://www.softschools.com/quizzes/chemistry/mixtures/quiz1861.html.
Activity-Embedded Assessment
Lab Data and Analysis: Have students use the Student Lab Handout to guide their lab experimentation: preparing blood models for different diseases, measuring ESR test values, recording team data, and drawing conclusions about the results. Review their data and conclusions to gauge their comprehension.
Post-Lab Quiz: During the 60 minutes when students are waiting for their ESR tests, direct them to complete the 10-question Post-Lab Quiz, which covers sedimentation and ESR test concepts and information. Let them use the Internet to prepare answers to questions 8-10. Collect their quizzes and review their answers to assess their depth of learning.
Post-Activity Assessment
Homework: Assign students to complete the Homework Sheet, which asks them to research and compose long answers about clinical technician, clinical engineer, field clinical engineer and human factor engineer careers. Review their answers to assess their understanding of the topic.
Investigating Questions
Central investigating question: How would you use simple materials and containers to create model blood samples that simulate human blood in different disease conditions that we could use to perform one-hour ESR tests (and obtain reliable ESR values) in the classroom? (Answer: Asked before the activity, student answers for this central investigating question might vary largely, however, at activity end, expect students to be able to confidently recall the materials they used for creating each blood model, which corresponded to different diseases. Refer to slide 10 for this purpose.)
Safety Issues
- All materials are benign, however, no material should be smelled, tasted or consumed.
- No material should be heated or burned.
- Have students wear aprons and goggles when conducting the lab.
Activity Extensions
Consider extending student learning by conducting one of the following TeachEngineering activities: Mixture Dualism of Blood, Floating and Falling Flows or Clearing a Path to the Heart.
Activity Scaling
For ninth-grade students, give them colored glitter of different shapes and sizes and ask them to prepare glitter jars with individual and combined (different mass combinations) of the glitter with different proportions of water and glycerin.
For grades 11 and 12 students, consider adjusting the lab activity as follows: Have student groups each make a normal blood sample and find the ESR value. Then, instead of giving them formulas (or recipes) for making the high ESR and low ESR blood, have them experiment with the different given materials to find their own solutions that result in high or low ESR values. At the end, after students do their own experimentation, provide them with the formulas/recipes from this activity.
For grade 11 students, ask higher-level post-lab inquiry questions. For instance, ask them to research the rapid ESR method and then compare and contrast it to the regular ESR test. On the lab handout, at first only give students the formula for normal blood samples. Then have student groups each make a normal blood sample and find the ESR value. Instead of giving them formulas (or recipes) for making the high ESR and low ESR blood, have students experiment with the different materials to find their own solutions that result in high or low ESR values. Then, after students do their own experimentation, provide them with the remaining formulas on the lab handout.
For grade 12 students, ask them to explore the correlation between the ESR test tube diameter and the ESR rate. You could also ask them to debate on the surface area-volume criteria in the ESR behavior. Debate is an important educational tool to promote critical thinking as well as presentation and public speaking skills. To do this, the teacher proposes a topic that has two sides (in this case, the surface area of the particle and volume of the solution), asking students to form two team of three or four students each (more than four is not generally recommended). One team favors one surface area while the other side favors the volume. The teacher serves as a moderator and helps in summarizing findings. The Teaching Channel has good videos about to how to conduct debates. Give students time to research and get prepared. Suggest some good reading materials.
Additional Multimedia Support
An alternate short video about sickle-cell anemia (58 seconds): https://www.dnalc.org/view/15532-sickle-cell-anemia-3d-animation-with-narration.html
Subscribe
Get the inside scoop on all things Teach Engineering such as new site features, curriculum updates, video releases, and more by signing up for our newsletter!More Curriculum Like This

Students learn about the separation techniques of sedimentation and centrifugation and investigate whether blood is a homogeneous or a heterogeneous mixture. Working in groups as if they are biomedical researchers, they employ the scientific method and make observations about the known characteristi...
References
Bochen, Krzysztof, Anna Krasowska, Sylwia Milaniuk, Monika Kulczyńska, Andrzej Prystupa, & Grzegorz Dzida. (2011) “Erythrocyte Sedimentation Rate—An Old Marker with New Applications,” Journal of Pre-Clinical and Clinical Research, Vol. 5, No. 2, pp. 50–55. (Source of some of Table 4 data.) https://www.infona.pl/resource/bwmeta1.element.agro-8f2cf24c-baa5-4817-9d30-50873bbb6c11
Brigden, Malcom, L. (1999) “Clinical Utility of the Erythrocyte Sedimentation Rate,” American Family Physician, Vol. 60, No. 5, pp. 1443-1450. http://www.aafp.org/afp/1999/1001/p1443.html
Casiday, Rachel, Noelken, Greg, and Frey, Regina. (1999) “Treating the Public Water Supply: What Is in Your Water, and How Is It Made Safe to Drink?” Accessed March 8, 2010. http://www.chemistry.wustl.edu/~edudev/LabTutorials/Water/PublicWaterSupply/PublicWaterSupply.html
Decantation of Oil and Water Experiment. Minerals and Energy Education, Oresome Resources. Accessed January 2015. http://www.oresomeresources.com/resources_view/resource/experiment_decantation_experiment
Giri, Dhurba (2016) “Erythrocyte Sedimentation Rate (ESR): Principle, Methods of Determination and Clinical Significance.” Posted January 11, 2016. LaboratoryInfo.com. Accessed June 7, 2016. http://laboratoryinfo.com/esr/
High ESR, Low Hemoglobin. Posted October 10, 2010. Expert Questions/Answers, Health24.com. http://www.health24.com/Experts/Question/high-esr-low-haemoglobin-20051010
Rafnsson V. and Bengtsson C. (1981) “Female sex hormones and the erythrocyte sedimentation rate results from a population study of women in Göteberg, Sweden.” Scandinavian Journal of Clinical and Laboratory Investigation, Vol. 41, Issue 8: pp. 729–733. http://www.tandfonline.com/doi/abs/10.3109/00365518109090522
Sediment. Encyclopedic entry, National Geographic Society. Accessed January 2015. http://nationalgeographic.org/encyclopedia/sediment/
Shearn, M.A. and Kang, I.Y. (1986) “Effect of age and sex on the erythrocyte sedimentation rate.” Journal of Rheumatology, Vol. 13, No. 2: pp. 297–298. http://www.ncbi.nlm.nih.gov/pubmed/3723495
Sickle-Cell Disease. Last modified December 2014. Vikaspedia, India Development Gateway, Ministry of Electronics and Information Technology, Government of India. Accessed January 2015. http://vikaspedia.in/health/diseases/genetic-disorders/sickle-cell-disease
Siemons, Liseth, Peter M ten Klooster, Harald E Vonkeman, Piet LCM van Riel, Cees AW Glas, and Mart AFJ van de Laar. (2014) “How age and sex affect the erythrocyte sedimentation rate and C-reactive protein in early rheumatoid arthritis.” BMC Musculoskeletal Disorder, Vol. 15: pp. 368; published online November 6, 2014. DOI: 10.1186/1471-2474-15-368. (Source of some of Table 4 data.) http://bmcmusculoskeletdisord.biomedcentral.com/articles/10.1186/1471-2474-15-368
Spaulding, Johanna. “Relax Bottle/Time Out Timer.” (glitter bottle) Posted October 3, 2011. My Crazy Blessed Life! Accessed January 2015. https://mycrazyblessedlife.com/2011/10/03/relax-bottletime-out-timer/
Stec, Theresa C. "What is in the Bag?" Biovigilance Program, Surgical Services Administration, Baystate Medical Center, Springfield, MA. Accessed December 2014. (34-slide PDF file; an overview of blood and blood products) http://c.ymcdn.com/sites/www.apheresis.org/resource/collection/387FC8D3-D586-4DC2-A60D-EA1A83285A68/Fri_1515._2_ES_V_Stec_Seacliff_A_&_B_update.pdf
van der Bom, Johanna, G., de Maat MP, Bots ML, Haverkate F, de Jong PT, Hofman A, Kluft C, and Grobbee DE. (1998) “Elevated plasma fibrinogen: cause or consequence of cardiovascular disease?” Arteriosclerosis, Thrombosis, and Vascular Biology, Vol. 18, No. 4: pp. 621-625. http://www.ncbi.nlm.nih.gov/pubmed/9555868
Wadell, Hakon. (1935) “Volume, Shape and Roundness of Quartz Particles." The Journal of Geology, Vol. 43, No. 3: pp. 250–280. DOI:10.1086/624298. https://www.jstor.org/stable/30056250?seq=1#page_scan_tab_contents
Warsy, Arjumand S. “Plasma Proteins.” (PDF lecture slides) Last modified Nov 29, 2007. Postgraduate Lecture, Department of Biochemistry, College of Science, King Saud University, Riyadh, Saudi Arabia. http://faculty.ksu.edu.sa/52876/Postgraduate%20lecture/Plasma%20proteins.pdf and http://faculty.ksu.edu.sa/52876/Postgraduate%20lecture/Forms/AllItems.aspx
Wilson Deborah A. “Chapter 167: Immunologic Tests.” In: Walker HK, Hall WD, Hurst JW, editors. Clinical Methods: The History, Physical, and Laboratory Examinations. Third edition. Boston, MA: Butterworths, 1990. http://www.ncbi.nlm.nih.gov/books/NBK275/
World Sickle-cell Day. June 19, 2014. Archives, The Pulse, College of Health Science at California Baptist University, Riverside, CA. Accessed December 2014. http://blogs.calbaptist.edu/alliedhealth/tag/sickle-cell-disease/
Copyright
© 2016 by Regents of the University of Colorado; original © 2015 Georgia Institute of TechnologyContributors
Renuka RajasekaranSupporting Program
Partnerships for Research, Innovation and Multi-Scale Engineering (PRIME) RET, Georgia TechAcknowledgements
This work was carried out by the author as a part her PRIME GIFT summer internship at the Bioengineering Division of Georgia Institute of Technology under the guidance of David Ku.
This activity was developed by the Partnerships for Research, Innovation and Multi-Scale Engineering (PRIME) Research Experience for Teachers (RET) Program at Georgia Institute of Technology, funded by National Science Foundation RET grant no. EEC 140718. However, these contents do not necessarily represent the policies of the NSF, and you should not assume endorsement by the federal government.
Last modified: January 14, 2026


User Comments & Tips