
Quick Look
Grade Level: 10 (9-12)
Time Required: 6 hours
(six 60-minute sessions)
Expendable Cost/Group: US $0.00
Group Size: 3
Activity Dependency: None
Subject Areas: Algebra, Biology, Computer Science, Data Analysis and Probability, Physical Science, Physics, Problem Solving, Reasoning and Proof, Science and Technology
NGSS Performance Expectations:

| HS-ETS1-1 |
| HS-ETS1-2 |
| HS-ETS1-3 |
| HS-PS2-1 |
| HS-PS3-3 |
Quick Look

- Grade Level:
- 10 (9 – 12)
- Time Required:
- 6 hours
(six 60-minute sessions)
- Group Size:
- 3
- Subject Areas:
-
Algebra Biology Computer Science Data Analysis and Probability Physical Science Physics Problem Solving Reasoning and Proof Science and Technology -
NGSS Performance Expectations:
HS-ETS1-1 HS-ETS1-2 HS-ETS1-3 HS-PS2-1 HS-PS3-3

Summary
Students act as engineers as they design, build, and test a smart prosthetic grip system using Arduino, a force-sensitive resistor (FSR), and a servo motor. Students construct a prosthetic finger or hand from materials of their choice and program it to move through different angles of motion, modeling how real-world assistive technologies function. As they test their designs, students collect data to investigate how the angle of the prosthetic joint affects the force applied at the fingertip. They use this data to create and analyze a quadratic model, identify the angle that produces maximum grip force, and interpret key features of the function such as the vertex and intercepts. Using their mathematical analysis, students refine and optimize their prosthetic designs to improve performance.Engineering Connection
Biomedical engineers and mechanical engineers work together to design and improve prosthetic hands. Biomedical engineers focus on how the prosthetic interacts with the human body by studying anatomy, movement, and user needs to ensure the device is safe, comfortable, and functional. Mechanical engineers design and refine the physical components of the prosthetic, including joints, linkages, and gripping mechanisms, so the hand can move smoothly, apply the right amount of force, and withstand repeated use. By combining knowledge of the human body with principles of mechanics and materials, these engineers continuously test, analyze data, and improve prosthetic designs to better restore hand function and quality of life for users.
Learning Objectives
After this activity, students should be able to:
- Design and construct a prosthetic hand prototype using different materials and servo motor.
- Control a servo motor with input from a force-sensitive resistor (FSR) using Arduino.
- Collect and analyze data relating grip force to servo position.
- Model the relationship between the servo motor position (angle of rotation) and the grip force (pressure) applied by the prosthetic hand, using a quadratic function and interpreting the parameters.
Educational Standards
Each Teach Engineering lesson or activity is correlated to one or more K-12 science,
technology, engineering or math (STEM) educational standards.
All 100,000+ K-12 STEM standards covered in Teach Engineering are collected, maintained and packaged by the Achievement Standards Network (ASN),
a project of D2L (www.achievementstandards.org).
In the ASN, standards are hierarchically structured: first by source; e.g., by state; within source by type; e.g., science or mathematics;
within type by subtype, then by grade, etc.
Each Teach Engineering lesson or activity is correlated to one or more K-12 science, technology, engineering or math (STEM) educational standards.
All 100,000+ K-12 STEM standards covered in Teach Engineering are collected, maintained and packaged by the Achievement Standards Network (ASN), a project of D2L (www.achievementstandards.org).
In the ASN, standards are hierarchically structured: first by source; e.g., by state; within source by type; e.g., science or mathematics; within type by subtype, then by grade, etc.
NGSS: Next Generation Science Standards - Science
| NGSS Performance Expectation | ||
|---|---|---|
|
HS-ETS1-1. Analyze a major global challenge to specify qualitative and quantitative criteria and constraints for solutions that account for societal needs and wants. (Grades 9 - 12) Do you agree with this alignment? |
||
| Click to view other curriculum aligned to this Performance Expectation | ||
| This activity focuses on the following Three Dimensional Learning aspects of NGSS: | ||
| Science & Engineering Practices | Disciplinary Core Ideas | Crosscutting Concepts |
| Analyze complex real-world problems by specifying criteria and constraints for successful solutions. Alignment agreement: | Criteria and constraints also include satisfying any requirements set by society, such as taking issues of risk mitigation into account, and they should be quantified to the extent possible and stated in such a way that one can tell if a given design meets them. Alignment agreement: Humanity faces major global challenges today, such as the need for supplies of clean water and food or for energy sources that minimize pollution, which can be addressed through engineering. These global challenges also may have manifestations in local communities.Alignment agreement: | New technologies can have deep impacts on society and the environment, including some that were not anticipated. Analysis of costs and benefits is a critical aspect of decisions about technology. Alignment agreement: |
| NGSS Performance Expectation | ||
|---|---|---|
|
HS-ETS1-2. Design a solution to a complex real-world problem by breaking it down into smaller, more manageable problems that can be solved through engineering. (Grades 9 - 12) Do you agree with this alignment? |
||
| Click to view other curriculum aligned to this Performance Expectation | ||
| This activity focuses on the following Three Dimensional Learning aspects of NGSS: | ||
| Science & Engineering Practices | Disciplinary Core Ideas | Crosscutting Concepts |
| Design a solution to a complex real-world problem, based on scientific knowledge, student-generated sources of evidence, prioritized criteria, and tradeoff considerations. Alignment agreement: | Criteria may need to be broken down into simpler ones that can be approached systematically, and decisions about the priority of certain criteria over others (trade-offs) may be needed. Alignment agreement: | |
| NGSS Performance Expectation | ||
|---|---|---|
|
HS-ETS1-3. Evaluate a solution to a complex real-world problem based on prioritized criteria and trade-offs that account for a range of constraints, including cost, safety, reliability, and aesthetics, as well as possible social, cultural, and environmental impacts. (Grades 9 - 12) Do you agree with this alignment? |
||
| Click to view other curriculum aligned to this Performance Expectation | ||
| This activity focuses on the following Three Dimensional Learning aspects of NGSS: | ||
| Science & Engineering Practices | Disciplinary Core Ideas | Crosscutting Concepts |
| Evaluate a solution to a complex real-world problem, based on scientific knowledge, student-generated sources of evidence, prioritized criteria, and tradeoff considerations. Alignment agreement: | When evaluating solutions it is important to take into account a range of constraints including cost, safety, reliability and aesthetics and to consider social, cultural and environmental impacts. Alignment agreement: | New technologies can have deep impacts on society and the environment, including some that were not anticipated. Analysis of costs and benefits is a critical aspect of decisions about technology. Alignment agreement: |
| NGSS Performance Expectation | ||
|---|---|---|
|
HS-PS2-1. Analyze data to support the claim that Newton's second law of motion describes the mathematical relationship among the net force on a macroscopic object, its mass, and its acceleration. (Grades 9 - 12) Do you agree with this alignment? |
||
| Click to view other curriculum aligned to this Performance Expectation | ||
| This activity focuses on the following Three Dimensional Learning aspects of NGSS: | ||
| Science & Engineering Practices | Disciplinary Core Ideas | Crosscutting Concepts |
| Analyze data using tools, technologies, and/or models (e.g., computational, mathematical) in order to make valid and reliable scientific claims or determine an optimal design solution. Alignment agreement: Theories and laws provide explanations in science.Alignment agreement: Laws are statements or descriptions of the relationships among observable phenomena.Alignment agreement: | Newton's second law accurately predicts changes in the motion of macroscopic objects. Alignment agreement: Attraction and repulsion between electric charges at the atomic scale explain the structure, properties, and transformations of matter, as well as the contact forces between material objects.Alignment agreement: | Empirical evidence is required to differentiate between cause and correlation and make claims about specific causes and effects. Alignment agreement: |
| NGSS Performance Expectation | ||
|---|---|---|
|
HS-PS3-3. Design, build, and refine a device that works within given constraints to convert one form of energy into another form of energy. (Grades 9 - 12) Do you agree with this alignment? |
||
| Click to view other curriculum aligned to this Performance Expectation | ||
| This activity focuses on the following Three Dimensional Learning aspects of NGSS: | ||
| Science & Engineering Practices | Disciplinary Core Ideas | Crosscutting Concepts |
| Design, evaluate, and/or refine a solution to a complex real-world problem, based on scientific knowledge, student-generated sources of evidence, prioritized criteria, and tradeoff considerations. Alignment agreement: | At the macroscopic scale, energy manifests itself in multiple ways, such as in motion, sound, light, and thermal energy. Alignment agreement: Although energy cannot be destroyed, it can be converted to less useful forms—for example, to thermal energy in the surrounding environment.Alignment agreement: Criteria and constraints also include satisfying any requirements set by society, such as taking issues of risk mitigation into account, and they should be quantified to the extent possible and stated in such a way that one can tell if a given design meets them.Alignment agreement: | Energy cannot be created or destroyed—it only moves between one place and another place, between objects and/or fields, or between systems. Alignment agreement: Modern civilization depends on major technological systems. Engineers continuously modify these technological systems by applying scientific knowledge and engineering design practices to increase benefits while decreasing costs and risks.Alignment agreement: |
Common Core State Standards - Math
-
Make sense of problems and persevere in solving them.
(Grades
K -
12)
More Details
Do you agree with this alignment?
-
Reason abstractly and quantitatively.
(Grades
K -
12)
More Details
Do you agree with this alignment?
-
Construct viable arguments and critique the reasoning of others.
(Grades
K -
12)
More Details
Do you agree with this alignment?
-
Model with mathematics.
(Grades
K -
12)
More Details
Do you agree with this alignment?
-
Use appropriate tools strategically.
(Grades
K -
12)
More Details
Do you agree with this alignment?
-
Attend to precision.
(Grades
K -
12)
More Details
Do you agree with this alignment?
-
Look for and make use of structure.
(Grades
K -
12)
More Details
Do you agree with this alignment?
-
Interpret functions that arise in applications in terms of the context
(Grades
9 -
12)
More Details
Do you agree with this alignment?
-
Relate the domain of a function to its graph and, where applicable, to the quantitative relationship it describes.
(Grades
9 -
12)
More Details
Do you agree with this alignment?
-
Calculate and interpret the average rate of change of a function (presented symbolically or as a table) over a specified interval. Estimate the rate of change from a graph.
(Grades
9 -
12)
More Details
Do you agree with this alignment?
-
Write a function that describes a relationship between two quantities
(Grades
9 -
12)
More Details
Do you agree with this alignment?
-
Identify the effect on the graph of replacing f(x) by f(x) + k, k f(x), f(kx), and f(x + k) for specific values of k (both positive and negative); find the value of k given the graphs. Experiment with cases and illustrate an explanation of the effects on the graph using technology. Include recognizing even and odd functions from their graphs and algebraic expressions for them.
(Grades
9 -
12)
More Details
Do you agree with this alignment?
-
Represent data on two quantitative variables on a scatter plot, and describe how the variables are related.
(Grades
9 -
12)
More Details
Do you agree with this alignment?
-
Informally assess the fit of a function by plotting and analyzing residuals.
(Grades
9 -
12)
More Details
Do you agree with this alignment?
International Technology and Engineering Educators Association - Technology
-
Develop a plan that incorporates knowledge from science, mathematics, and other disciplines to design or improve a technological product or system.
(Grades
9 -
12)
More Details
Do you agree with this alignment?
-
Evaluate ways that technology can impact individuals, society, and the environment.
(Grades
9 -
12)
More Details
Do you agree with this alignment?
-
Optimize a design by addressing desired qualities within criteria and constraints.
(Grades
9 -
12)
More Details
Do you agree with this alignment?
-
Apply principles of human-centered design.
(Grades
9 -
12)
More Details
Do you agree with this alignment?
-
Apply a broad range of design skills to their design process.
(Grades
9 -
12)
More Details
Do you agree with this alignment?
-
Synthesize data and analyze trends to make decisions about technological products, systems, or processes.
(Grades
9 -
12)
More Details
Do you agree with this alignment?
-
Use various approaches to communicate processes and procedures for using, maintaining, and assessing technological products and systems.
(Grades
9 -
12)
More Details
Do you agree with this alignment?
Materials List
Each group needs:
- 1 set of chopsticks
- 1 oven mitt
- 1 ping pong ball
- 1 cracker
- access to Arduino IDE
- 1 box cutter
- 1 SparkFun Kit (Microcontroller, Breadboard, Pushbutton, LED, Resistor, Potentiometer, USB cable)
- 1 force sensitive resistor (FSR)
- 1 servo motor
- 15 jumper wires
- 1 hollow eggshell, plastic bottle, empty Easter egg, or marshmallows (for testing)
- 1 hot glue gun and glue
- 1 laptop computer
- 1 ruler
- 1 scissors
- 1 roll of transparent tape
- Prosthetic Hand Design Worksheet (1 per student)
- Notice and Wonder Sheet (1 per student)
- Data Collection and Analysis Worksheet (1 per student)
- Grading Rubric (1 per group)
For the entire class to share:
- chart paper or white board for Notice and Wonder master chart.
- sharpies or dry-erase markers
- cardboard
- dental floss
- Popsicle sticks
- sewing thread
- strings
- straws
Worksheets and Attachments
Visit [www.teachengineering.org/activities/view/uok-3021-smart-prosthetic-hand-grip-arduino-activity] to print or download.Pre-Req Knowledge
Students should:
- Have a basic understanding of functions and specifically be able to interpret input-output relationships and recognize function notation.
- Have experience with quadratic functions, and specifically:
- Be able to recognize parabolas and understand key features including vertex, intercepts, and direction of opening.
- Be able to evaluate and graph quadratic equations.
- Have experience interpreting real-world meaning of quadratic models (e.g., maximum/minimum values).
- Understand basic data collection and graphing, and specifically:
- Be able to create and analyze scatter plots.
- Be familiar with using graphing tools (Desmos, graphing calculator, spreadsheet software).
- Be able to Interpret trends in data.
- Have basic knowledge of coding and Arduino, and specifically:
- Be able to read and lightly modify basic Arduino code (e.g., analogRead(), map(), Serial.print() functions)
- Have familiarity with uploading code to an Arduino using the IDE.
Introduction/Motivation
(Put students into small groups. Give each group an oven mitt, chopsticks, ping pong ball and cracker. Give each student a Notice and Wonder Sheet.)
Here’s a quick challenge to start today’s class: I want each group member to try picking up a ping pong ball or a delicate cracker while wearing an oven mitt. (Give groups time for each member to try this.) What did you notice?
Next, I want each group member to try gripping an object using only chopsticks. (Give groups time for each member to try this.) What did you notice? What made it so difficult to control your grip?
I had you try these simple tasks to highlight the immense challenges faced by individuals who rely on prosthetic limbs every day.
On your Notice and Wonder Sheet, I want you to fill out the Notice section. In particular, what did you notice about holding the objects with the oven mitt/chopsticks compared to your bare hand? What observations did you make about how your natural hand works? (Give students a few minutes to fill out the Notice section; potential responses include: "I noticed my natural hand adjusts pressure automatically," "I noticed I couldn't feel the object with the oven mitt," "I noticed the chopsticks were clumsy.")
Now I want you to fill out the Wonder section. Specifically, I want you to think about what questions you wonder about how prosthetic hands work. What do you wonder about how engineers design them to overcome these challenges? (e.g., "I wonder how they make a prosthetic hand feel how hard it's gripping?", "I wonder if prosthetics can pick up something fragile?", "I wonder what sensors they use?")
Now I want you all to share your "Notices" and "Wonders" within your groups, building on each other's ideas. (Give groups time to share their ideas. While they share, create a master "Notices" chart and a "Wonders" chart on the whiteboard or chart paper.)
Okay, let’s summarize what we notice and wonder. (Let students share their ideas. As students share, capture their ideas without judgment. Group similar ideas if possible.)
Looking at our 'Wonders' list, what are some of the key problems engineers try to solve when designing prosthetic hands? Many of your 'Wonders' lead directly to the core of our activity!
Now, it's your turn to make a difference. You are going to become biomedical and mechanical engineers, and your mission is to design and build a smart prosthetic hand that can sense and adapt its grip pressure automatically, just like a natural human hand. You'll use Arduino, a servo motor, and a force sensor to collect real-time data, modeling how grip strength changes with movement. Then, you'll program your prototype to respond intelligently, creating an assistive technology system that mimics real-world feedback and precision. Get ready to apply math, science, and engineering principles to develop a more human-like prosthetic grip capable of handling even the most fragile objects.
Procedure
Background
This activity demonstrates how engineers use science and mathematics to solve human-centered problems, particularly in prosthetics and robotics. Students explore how adjusting the angle of a joint (input) affects the resulting pressure or force (output), modeling the behavior of smart prosthetic systems. Understanding how force sensors respond to motion integrates physics concepts like force, pressure, and resistance with mathematical tools such as nonlinear functions and data modeling. The servo motor’s role highlights feedback and control systems (key principles in automation) where precision and adaptability are essential. By analyzing real sensor data and applying mathematical reasoning, students learn how engineers iteratively design responsive, data-driven systems in fields such as healthcare, automation, wearable technology, and advanced manufacturing.
Teachers should understand how science, engineering, mathematics, and computer programming intersect in this hands-on STEM activity. At its core, the project simulates the function of smart prosthetic hands—using sensors and motors to mimic human grip control based on real-time data.
Scientifically, students explore how the angle of a prosthetic joint (input) affects the applied pressure or force (output). Pressure is defined as the distribution of force over an area, and in this activity, it’s detected using a force-sensitive resistor (FSR), a sensor whose resistance changes depending on how much pressure is applied. The Arduino microcontroller reads these changes as analog signals, which students use to track how grip pressure varies as the prosthetic finger moves.
A servo motor, acting as a simplified muscle, rotates the prosthetic finger to specific angles. Students either manually adjust these angles or program the servo to sweep through a range. As the finger bends, the FSR at the fingertip detects the pressure being applied, creating a real-time input-output system. This mimics the biological feedback loops in the human body, where sensors such as touch receptors inform motor responses.
Engineering design is central to the project: Students identify the problem of controlling grip strength, design and build a solution, test their prototype, and refine it—mirroring the iterative design process used by bioengineers.
Arduino coding brings the system to life. Students use beginner-friendly code written in Arduino’s C-based language to control servo angles, read sensor input, and display data using the Serial Monitor. Key coding concepts include reading analog input (analogRead()), mapping sensor values to motor control using map(), and using servo.write() to adjust movement. This introduces students to embedded systems and computational thinking in an accessible way, with no prior coding experience required.
Mathematically, students explore functional relationships and nonlinear modeling. By collecting data on servo angle (independent variable) and the resulting pressure (dependent variable), they generate a dataset that often forms a quadratic pattern: Pressure increases up to a certain angle, then decreases slightly due to mechanical limitations or sensor behavior. Using graphing tools such as Desmos, spreadsheets, or graphing calculators, students fit a quadratic regression model to their data. They interpret features of the function—such as the vertex (maximum pressure), intercepts, and domain—to draw conclusions and optimize their designs.
Through this interdisciplinary project, students engage deeply in math, science, engineering, and programming in a way that mirrors the real work of engineers designing assistive technologies. It offers a powerful opportunity to apply mathematical modeling in a meaningful, human-centered context.
Resources for Arduino Beginners
Official Arduino Resources
- Arduino Website: The best starting point, offering comprehensive guides, documentation, and downloads.
- Arduino Getting Started Guide: Walks you through setting up your Arduino board, installing the IDE, and writing your first program.
- Arduino IDE: Where to download the official Arduino Integrated Development Environment (IDE) for programming your boards.
Online Tutorial and Courses
- Arduino Project Hub: A collection of community-contributed projects and tutorials. Great for inspiration and learning through hands-on projects.
- Adafruit Learning System: Offers detailed tutorials and guides for a variety of Arduino projects, from basic to advanced.
- Instructables: A platform where makers share detailed guides and tutorials on Arduino projects.
- Coursera: Offers a course on "Introduction to Programming the Internet of Things (IoT) Specialization," which includes a module on Arduino.
- University of Kansas Human Motion Control Laboratory: Offers a plethora of resources for K-12 teachers that include Arduino instructional videos.
YouTube Channels and Chatbot
- Arduino: Provides tutorials, project ideas, and updates.
- Paul McWhorter: Offers a popular series of Arduino tutorials for beginners.
- Jeremy Blum: Includes comprehensive tutorials and project videos.
- Arduino Chatbot: Created by Dr. Sara Wilson of the University of Kansas and designed to simulate conversations with human users about Arduino.
Before the Activity
- Make copies:
- Notice and Wonder Sheet (1 per student)
- Prosthetic Hand Design Worksheet (1 per student)
- Data Collection and Analysis Worksheet (1 per student)
- Grading Rubric (1 per group)
- Gather materials for the Notice and Wonder master chart: chart paper or white board and markers. (Day 1)
- Gather materials needed by each group for the introductory activity: chopsticks, oven mitts, ping pong ball, and cracker. (Day 1)
- Put together a simple demonstration showing how force sensors and servos work in a circuit. (Day 2)
- Gather materials needed by each group for the design challenge (Days 3-6) (Note: Each group will need an Arduino set or SparkFun kit and a laptop or computer.)
- Download Arduino IDE to each laptop/computer and test.
- Use the Tinkercad Circuit Example – Teacher Guide to determine the best option for student groups to build a simulated Arduino + FSR + servo circuit on Tinkercad. (Day 3)
- Anticipate student struggles and where they might stumble. For example, some students might need support on coding or building the prosthetic hand.
- Prepare ways to support these struggles without decreasing the cognitive demand of the activity/task.
- Prepare assessing and guiding questions.
- Review lab safety and precautions with students. (See Lab Safety section.)
During the Activity
Day 1: Introduction, Goal Setting, Designing the Prosthetic Hand (60 minutes)
Ask and Research (15 minutes)
- Introduce the activity using the Introduction and Motivation section.
- Explain the design challenge: Student groups will design and build a smart prosthetic hand that senses pressure and responds to different angles, just like a real hand.
- Optional: Review the engineering design process.
- Provide and review the Grading Rubric so students understand the expectations and goals of the activity.
- Distribute one Prosthetic Hand Design Worksheet to each student.
- Have each student answer the Goal Statement in their worksheet.
- Optional: Have students research current smart prosthetic hands.
Imagine (20 minutes)
- Give students 5-10 minutes to individually brainstorm key features of a prosthetic grip. Prompt students with questions such as: What should a prosthetic hand do? How can we mimic that?
- Bring the class back together and have a class discussion about the prosthetic grip features students brainstormed.
- Have students respond (or write 3-4 sentences in response) to the following prompts. Remind students that there are no wrong answers during brainstorming!
- What do you think a prosthetic hand should be able to do? (Example Answer: It should help someone grab objects or hold things like a cup or pencil.)
- What might be a challenge in building one that works like a real hand? (Example Answer: It might be hard to know how much pressure to use, so the hand doesn’t crush things.)
- How do you think math or science might help engineers design a prosthetic hand? (Example Answer: Science could help understand how pressure works, and math could help figure out how much force is applied.)
Plan (25 minutes)
- Show students the materials available for their designs.
- Have students share their brainstormed ideas and discuss potential designs.
- Allow groups to spend the remainder of the class period sketching and labeling their group-chosen design on their Prosthetic Hand Design Worksheets using the available materials.
- Remind students:
- To choose one design idea for their group and make sure each group member can explain why this design was selected based on the problem and constraints.
- To label and annotate their group sketch. Design sketches should be drawn neatly and labeled with all key parts, materials, and components (e.g., joints, sensors, motors).
- To make sure their sketch describes how inputs (like finger angle or pressure) lead to outputs (movement or response). This is not just drawing; it’s also reasoning.
- To check that their design meets the project requirements and stays within material, time, and cost limits.
- Optional: To assign roles and steps, specifically who will build what and in what order.
- No building! This stage is about planning and justification, not construction.
Day 2: Building and Testing their Prosthetic Hand (60 minutes)
Build (30 minutes)
- Give groups time to build the mechanical aspects of their prosthetic design using the available materials.
- Remind students to follow their planned design they previously sketched on their Prosthetic Hand Design Worksheet.

Test and Improve (30 minutes)
- Have groups test their design’s hand motion (by manual flexing).
- Optional: Let groups modify their designs to improve design hand motion.
Day 3: Arduino Demo and Start Building the Circuit on Tinkercad (60 minutes)
Arduino Demo (10 minutes)
- Demonstrate to the class how force sensors and servos work in a circuit.
- State what force sensors and servo motors are:
- Force sensor: The force sensor detects how hard it is being pressed. The harder it is pressed, the stronger the signal it sends.
- Servo motor: The servo motor moves to a specific position based on the signal it receives. It functions like a robotic finger.
- Show students the components by displaying the sensor and the servo.
- Use a simple circuit diagram or a labeled breadboard to show power (+ and –), the sensor, and the servo. Make sure to use colors or labels to match the wires physically.
- Demonstrate the connection:
- Press the sensor lightly and watch the servo move slightly.
- Press harder and watch the servo move more.
- Narrate what’s happening: “Sensor senses more force → signal gets stronger → servo moves further.”
Tinkercad (50 minutes)
- Have students build a simulated Arduino + FSR + Servo circuit on Tinkercad.
- Have students code basic movement in Tinkercad and simulate input-output behavior. See the Tinkercad Circuit Example – Teacher Guide for student options on how to do this, depending on their C++ programming and Arduino background. See C++ Code for the Arduino Setup to view the code.
Day 4: Build the Physical Arduino Circuit + Connecting to Prosthetic Hand (60 minutes)
- Ensure each team has an assembled Arduino circuit: FSR, servo, breadboard, and jumper wires. (wiring demo)
- Have each team upload the starter C++ Code for the Arduino Setup to test their sensor and servo.
- Instruct students to attach the servo motor to prosthetic joints (e.g., "finger knuckle").
- Distribute the Data Collection and Analysis Worksheet to each student.
- Have students begin testing angle vs. pressure on the actual prototype.
- Instruction students to use the Data Collection and Analysis Worksheet to input and analyze their data.
Days 5 and 6: Data Collection and Analysis on Arduino IDE + Prosthetic Hand Revision (if needed)
- Have students continue to collect data and analyze their data.

- Remind students to:
- Control the servo angle (0°-180°) with potentiometer dial.
- Push and hold the button to record angle and pressure on the Serial Monitor.
- Gather trials by adjusting dial in increments to increase servo angle.
- Remove any obvious outliers from their data where the servo has already returned to its original position (20°), but the force sensor is still showing a high value. (This can happen because of the delay in the code; readings are still being printed after the test angle has changed).
- Look for data points where the angle is 20° but the force reading is unusually high. These should be deleted for more accurate results.
- Once students have collected their data:
- Instruct them to enter their data into Excel, Google Sheets, or Desmos and create a scatter plot.
- Fit a quadratic regression and interpret the graph.
- Based on their results, allow students to revise their prototype based on what they observe (e.g., mechanical design, materials, or sensor placement).
Day 6: Panel Presentation
- Have student groups present their design and results to a panel (classmates, teacher, guest judges, community members). It would be great to have someone from the community, such as a prosthetist. (Presentation includes design overview, data model, and real-world connection.)
- Provide the panel the Grading Rubric.
- Optional: Peer feedback forms.
- Wrap-up reflection: What did you learn about math, engineering, and human needs?

Vocabulary/Definitions
dependent variable: The output that changes in response (in this project: the pressure from the FSR).
force: A push or a pull that acts on the object.
function: A relationship between two quantities where each input has one output.
independent variable: The input you control (in this project: the angle of the servo motor).
pressure: Force spread over an area.
quadratic function: A polynomial function of degree two. It forms a U-shaped graph called a parabola.
regression: A way to find the mathematical model (like a line or a curve) that fits the data.
scatter plot: A graph that shows data points based on two variables.
vertex of a parabola: The highest or lowest point of a parabola (represents maximum/minimum pressure in this context).
Assessment
Pre-Activity Assessment
Notice and Wonder: The Notice and Wonder activity in the beginning will allow teachers to gather students’ prior knowledge about prosthetic hands.
Prompt Questions: Have students respond (or write 3-4 sentences in response) to the following prompts:
- What do you think a prosthetic hand should be able to do? (Example Answer: It should help someone grab objects or hold things like a cup or pencil.)
- What might be a challenge in building one that works like a real hand? (Example Answer: It might be hard to know how much pressure to use, so the hand doesn’t crush things.)
- How do you think math or science might help engineers design a prosthetic hand? (Example Answer: Science could help understand how pressure works, and math could help figure out how much force is applied.)
Teachers can use this activity to get a sense of students’ misconceptions and identify vocabulary or science/math concepts to emphasize.
Activity Embedded (Formative) Assessment
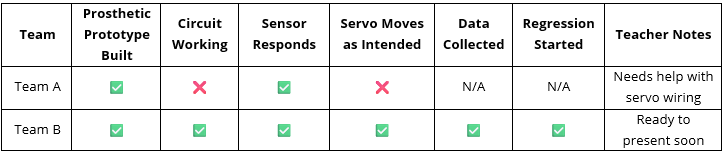
Teacher Observation Checklist Table: As the teacher circulates during Days 2–5, they can use this checklist to record formative data. This can be used to target mini-conferences with teams and note common issues to address in whole-class tips.
Example of Checklist Table:
Checkpoint Discussions: At midpoints of each session, gather teams for short check-ins. Ask check point questions such as:
- How is your prosthetic functioning right now?
- What does your data look like so far?
- What are you using to model your data?
- What is your biggest challenge right now?
Post-Activity (Summative) Assessment
Smart Prosthetic Hand Presentation: Learning teams present their prosthetic hand, data collection and analysis, quadratic regressions, and recommendations. This Grading Rubric will be used.
Safety Issues
While this project is generally low risk, the following safety measures should be observed.
| Area | Safety Guidance |
| electronics & wiring | Ensure wires are connected securely. Avoid short circuits. Disconnect power before rewiring. |
| servos & moving parts | Keep fingers clear of moving servo arms. Do not force servos to move manually, as they can strip gears. |
| hot glue or sharp tools | If students use glue guns or cutting tools (e.g., box cutters), enforce close supervision. Wear safety glasses as needed. |
| power supplies | If using external battery packs, double-check polarity. Avoid mixing battery types or using damaged batteries. |
| ergonomics | Prevent hand strain by limiting repetitive force application during testing. Use objects (such as a tennis ball) to apply force consistently. |
| clean workspace | Keep cords, tools, and materials organized to avoid trip hazards or clutter. |
Troubleshooting Tips
Please follow these troubleshooting so students can ensure a smooth, effective, and safe experience while working on the smart prosthetic hand project.
Circuit Not Working
Likely Causes:
- Loose or incorrect wiring.
- FSR not connected properly (wrong resistor placement).
- Servo requires too much current from USB port.
- Code uploaded incorrectly.
Solutions:
- Use a printed or projected circuit diagram for students to double-check wiring.
- Have students test components separately (e.g., servo with basic “sweep” code).
- If the servo isn’t moving, try an external power supply (like a 4xAA battery pack).
- Add Serial.print() statements to debug where the code stops working.
FSR Pressure Readings Are Inconsistent or Unclear
Likely Causes:
- FSR is not securely taped or pressed to the finger structure.
- Pressure is applied unevenly or sensor is bending.
- FSR is not calibrated for the desired force range.
Solutions:
- Reinforce with tape or foam to stabilize the FSR placement.
- Have students press with consistent, flat pressure (use coins or objects for consistency).
- Use the map() function in Arduino code to scale FSR readings to servo angles appropriately.
- Encourage multiple trials to reduce noise and improve reliability.
Data Doesn’t Show a Clear Pattern
Likely Causes:
- Inconsistent pressure during testing
- FSR readings collected during servo movement instead of after movement completes
- Not enough data points
Solutions:
- Train students to collect data only after the servo stops moving.
- Add a delay after movement in the code to allow for consistent readings.
- Ensure at least 6–8 consistent data points to generate a usable regression.
If activity fails or doesn’t work right the first time:
- Remind students that iteration is part of engineering.
- Create time for structured team troubleshooting—review logs and circuits.
- Have pre-written “backup” code samples and wiring guides available.
- Provide example data to analyze if time or tech limits arise.
Activity Extensions
- For Lower Grades (Upper Elementary – Early Middle School)
- Have students test their prosthetic finger to pick up different small objects and record which designs work best.
- Create a reflection drawing or short video explaining their design.
- For Middle Grades
- Add a challenge where students try to pick up different weight objects and adjust their code to grip appropriately.
- For Older/Advanced Students (High School – STEM Pathways)
- Research and report on real-world prosthetic technologies (e.g., DEKA “Luke” Arm, bionic hands).
- Design and test multi-finger grip systems.
- Challenge teams to develop a grip that can adjust automatically to different object sizes.
Activity Scaling
For Lower Grades (Upper Elementary – Early Middle School)
- Simplify the Engineering Task:
- Use paper straws, tape, string, and cardboard to build a mechanical (non-electronic) prosthetic finger.
- Focus on grip function using levers or pulleys instead of electronics.
- Replace the FSR sensor with a spring scale to measure how much force the finger applies.
- Math Connections:
- Skip regression and focus on data tables, bar graphs, or pictographs.
- Practice reading and creating t-charts showing “Angle of bend” and “How well it holds an object.”
- Design Process:
- Limit to one redesign step.
- Focus on identifying the problem, sketching ideas, and sharing in a show-and-tell format.
For Middle Grades
- Focus Areas:
- Build a basic Arduino-powered prosthetic finger with a servo motor only (skip FSR if needed).
- Introduce the concept of input/output systems and feedback loops.
- Math Connections:
- Have students manually adjust the servo angle using code and measure how the finger closes.
- Create a line graph to represent movement, or introduce basic function tables.
- Coding:
- Scaffold Arduino code with comments and prewritten chunks.
- Emphasize coding structures like setup(), loop(), and function calls like servo.write().
For Older/Advanced Students (High School – STEM Pathways)
- Extended Engineering Design:
- Have each team build a robotic hand controlled by a flex sensor glove.
- They may use a 3D-printer to construct the prosthetic hand. See Prosthetic Hand 3D Printing Files.
- They must develop a code on Arduino IDE. Here is an example.
- Extended Research on Real-World Engineering:
- Set up research stations or guided reading (e.g., articles on smart prosthetics, biomedical careers, real applications).
- Provide guide questions such as:
- Who benefits from prosthetic technology?
- How do sensors and feedback systems work in real-world devices?
- What careers use this kind of technology?
- Engineering Task:
- Use both the FSR sensor and servo for a fully functional feedback loop.
- Encourage full use of the engineering design process, including multiple redesigns.
- Introduce 3D modeling tools such as Tinkercad or Fusion 360 for prosthetic part design.
- Math Connections:
- Model the relationship between angle and pressure using quadratic regression (in Desmos, Excel, or TI calculators).
- Have students analyze the vertex and interpret the real-world meaning.
- Include a discussion of system limits (e.g., max pressure due to sensor constraints).
- Coding Extensions: See Wired servo arm Code.
- Add an LCD screen or LED indicators to give visual feedback.
- Include thresholds: If pressure gets too high, stop servo motion (safety feature).
- Implement modular code with custom functions.
Subscribe
Get the inside scoop on all things Teach Engineering such as new site features, curriculum updates, video releases, and more by signing up for our newsletter!More Curriculum Like This

In this high school engineering activity, students use a sound level meter or Arduino microcontrollers to measure sound levels at various locations and then analyze the data. The project begins with identifying constraints and learning to set up and program Arduino devices with sound sensors, while ...

References
The Smallpeice Trust. Engineering@Home – Challenge 5: The Prosthetic Hand Challenge. YouTube, 5 years ago, 5:02 minutes, https://youtu.be/cbWCoEaQ_FY.
The Smallpeice Trust. STEM Engineering Design Challenge Prototype Prosthetic Hand. YouTube, uploaded 8 July 2017 (8.7 years ago), 5:02 minutes, https://youtu.be/2skFC8Sfgq8.
Viral Dodhia. Arduino Flex Sensor Controlled Robot Hand. Viral Science, 18 Sept. 2022, www.viralsciencecreativity.com/post/arduino-flex-sensor-controlled-robot-hand. Accessed 10 July 2025.
Viral Science. Arduino Flex Sensor Controlled Robot Hand | Prosthetic Hand. YouTube, uploaded around September 2022, 5:02 minutes, https://youtu.be/Fvg‑v8FPcjg.
Copyright
© 2026 by Regents of the University of Colorado; original © 2025 University of KansasContributors
Cherryl Delacruz, 6-12 Math Consulting Teacher, Topeka Public Schools; Esraa Abdelsalam, Program Assistant, University of Kansas ; Dr. Prajna Dhar, Professor and Director of Graduate Studies Department of Chemical and Petroleum Engineering, University of Kansas; Dr. Douglas Huffman, Professor of Science Education, University of Kansas; Dr. Massa Mafi, Postdoctoral Researcher, University of Kansas; Dr. Meagan Patterson, Professor Department of Educational Psychology, University of Kansas; Sofia Patino, Engineering Undergraduate, University of Kansas; Tarannom Salehi, Graduate Research Assistant Department of Educational Psychology, University of Kansas; Ridma Tabassum, Graduate BioEngineering Student, University of Kansas; Dr. Sara Wilson, Associate Professor and Graduate Director Mechanical Engineering, University of KansasSupporting Program
Inquiry-Driven Engineering Activities using Bioengineering (IDEA-BioE), University of KansasAcknowledgements
This material is based upon work supported by the National Science Foundation under grant no. ECC-2055716 - a Research Experience for Teachers program titled Inquiry-Driven Engineering Activities using Bioengineering (IDEA-BioE) at the University of Kansas. Any opinions, findings and conclusions or recommendations expressed in this material are those of the author(s) and do not necessarily reflect the views of the National Science Foundation.
Last modified: February 10, 2026
User Comments & Tips