Quick Look
Grade Level: 10 (9-11)
Time Required: 5 hours
(6 x 50-minutes)
Expendable Cost/Group: US $28.04 This activity also uses some non-expendable (reusable) items such as multimeters, calculators, breadboards, wire, resistors, op amps, weights, seam ripper, wire strippers; see the Materials List for details.
Group Size: 3
Activity Dependency: None
Subject Areas: Algebra
NGSS Performance Expectations:

| HS-ETS1-2 |
Summary
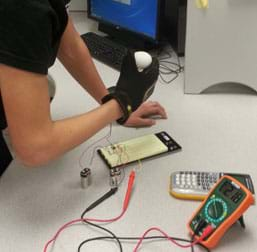
Students groups act as NASA/GM engineers challenged to design, build and test robotic hands, which are tactile feedback systems made from cloth gloves and force sensor circuits. Student groups construct force sensor circuits using electric components and FlexiForce sensors to which resistance changes based on the applied force. They conduct experiments to find the mathematical relationship between the force applied to the sensor and the output voltages of the circuit. They take several measurements—force vs. resistance, force vs. voltage—and use the data to find the best fit curve models for the sensor. Different weights applied to the sensor are used as a scalable force. Students use traditional methods and current technology (calculators) to plot the collected data and define the curve equations. Students test their gloves and use a line of best fit to determine the minimum force required to crack an egg held between the index finger and thumb. A PowerPoint® file and many student handouts are included.Engineering Connection
Curve fitting plays an important role in all STEM fields. Studying models helps to provide a better understanding of the behavior and relationships among variables. Often, models are an effective and efficient way to simulate solutions to real-world problems. For example, the design of robots by biomedical and electrical engineers involves looking at curve models that relate voltages, resistance and forces applied on load sensors. In fact, all devices that output resistance require a circuit to convert the resistance to voltage range. The curve models used to calibrate sensors serve as a tool to improve robotic tactile feedback systems for surgical and manufacturing applications. In this activity scenario, students act as real-world engineers challenged to discover the correct model that best fits voltage data collected from an applied force to a sensor. To test their models, students create tactile feedback systems using gloves and apply pressure to a fragile object.
Learning Objectives
After this activity, students should be able to:
- Identify and use simple engineering curve models.
- Collect and plot data using two variables.
- Graph linear functions on the coordinate plane.
- Estimate solutions by writing, with and without the assistance of technology, linear functions that provide a reasonable fit to data.
- Use and apply force sensors.
Educational Standards
Each TeachEngineering lesson or activity is correlated to one or more K-12 science,
technology, engineering or math (STEM) educational standards.
All 100,000+ K-12 STEM standards covered in TeachEngineering are collected, maintained and packaged by the Achievement Standards Network (ASN),
a project of D2L (www.achievementstandards.org).
In the ASN, standards are hierarchically structured: first by source; e.g., by state; within source by type; e.g., science or mathematics;
within type by subtype, then by grade, etc.
Each TeachEngineering lesson or activity is correlated to one or more K-12 science, technology, engineering or math (STEM) educational standards.
All 100,000+ K-12 STEM standards covered in TeachEngineering are collected, maintained and packaged by the Achievement Standards Network (ASN), a project of D2L (www.achievementstandards.org).
In the ASN, standards are hierarchically structured: first by source; e.g., by state; within source by type; e.g., science or mathematics; within type by subtype, then by grade, etc.
NGSS: Next Generation Science Standards - Science
| NGSS Performance Expectation | ||
|---|---|---|
|
HS-ETS1-2. Design a solution to a complex real-world problem by breaking it down into smaller, more manageable problems that can be solved through engineering. (Grades 9 - 12) Do you agree with this alignment? |
||
| Click to view other curriculum aligned to this Performance Expectation | ||
| This activity focuses on the following Three Dimensional Learning aspects of NGSS: | ||
| Science & Engineering Practices | Disciplinary Core Ideas | Crosscutting Concepts |
| Design a solution to a complex real-world problem, based on scientific knowledge, student-generated sources of evidence, prioritized criteria, and tradeoff considerations. Alignment agreement: | Criteria may need to be broken down into simpler ones that can be approached systematically, and decisions about the priority of certain criteria over others (trade-offs) may be needed. Alignment agreement: | |
Common Core State Standards - Math
-
Create equations in two or more variables to represent relationships between quantities; graph equations on coordinate axes with labels and scales.
(Grades
9 -
12)
More Details
Do you agree with this alignment?
-
Rearrange formulas to highlight a quantity of interest, using the same reasoning as in solving equations.
(Grades
9 -
12)
More Details
Do you agree with this alignment?
International Technology and Engineering Educators Association - Technology
-
The design needs to be continually checked and critiqued, and the ideas of the design must be redefined and improved.
(Grades
9 -
12)
More Details
Do you agree with this alignment?
-
A prototype is a working model used to test a design concept by making actual observations and necessary adjustments.
(Grades
9 -
12)
More Details
Do you agree with this alignment?
-
Evaluate the design solution using conceptual, physical, and mathematical models at various intervals of the design process in order to check for proper design and to note areas where improvements are needed.
(Grades
9 -
12)
More Details
Do you agree with this alignment?
-
Evaluate final solutions and communicate observation, processes, and results of the entire design process, using verbal, graphic, quantitative, virtual, and written means, in addition to three-dimensional models.
(Grades
9 -
12)
More Details
Do you agree with this alignment?
-
Use computers and calculators to access, retrieve, organize, process, maintain, interpret, and evaluate data and information in order to communicate.
(Grades
9 -
12)
More Details
Do you agree with this alignment?
-
Illustrate principles, elements, and factors of design.
(Grades
9 -
12)
More Details
Do you agree with this alignment?
-
Determine the best approach by evaluating the purpose of the design.
(Grades
9 -
12)
More Details
Do you agree with this alignment?
-
Apply a broad range of design skills to their design process.
(Grades
9 -
12)
More Details
Do you agree with this alignment?
-
Use various approaches to communicate processes and procedures for using, maintaining, and assessing technological products and systems.
(Grades
9 -
12)
More Details
Do you agree with this alignment?
-
Apply a broad range of making skills to their design process.
(Grades
9 -
12)
More Details
Do you agree with this alignment?
-
Develop a plan that incorporates knowledge from science, mathematics, and other disciplines to design or improve a technological product or system.
(Grades
9 -
12)
More Details
Do you agree with this alignment?
State Standards
Texas - Math
-
graph linear functions on the coordinate plane and identify key features, including x-intercept, y-intercept, zeros, and slope, in mathematical and real-world problems;
(Grade
9)
More Details
Do you agree with this alignment?
-
compare and contrast association and causation in real-world problems; and
(Grade
9)
More Details
Do you agree with this alignment?
-
write, with and without technology, linear functions that provide a reasonable fit to data to estimate solutions and make predictions for real-world problems.
(Grade
9)
More Details
Do you agree with this alignment?
-
communicate mathematical ideas, reasoning, and their implications using multiple representations, including symbols, diagrams, graphs, and language as appropriate;
(Grades
9 -
12)
More Details
Do you agree with this alignment?
-
display, explain, and justify mathematical ideas and arguments using precise mathematical language in written or oral communication.
(Grades
9 -
12)
More Details
Do you agree with this alignment?
-
Functions. The student uses process standards in mathematics to explore, describe, and analyze the attributes of functions. The student makes connections between multiple representations of functions and algebraically constructs new functions. The student analyzes and uses functions to model real-world problems. The student is expected to:
(Grades
9 -
12)
More Details
Do you agree with this alignment?
Materials List
Each group needs:
- FlexiForce A201 sensor; for $14.63 at Tekscan
- battery (2-9 volts); such as a 9V Energizer® alkaline battery for $2.25
- mini multimeter; such as a 3½ digit mini digital multimeter for $9.95 at Jameco
- classic breadboard; such as a 400-point solderless breadboard (3.3 x 2.1 in) for $5.49 at Jameco
- 30k resistor; such as a resistor carbon film 30k ohm 1/3 watts 5% for 1¢ at Jameco
- LM741CN op amp; such as an op amp single general purpose +/-18V 8-pin MDIP rail for 29¢ at Jameco
- weight set, 100 g, 500 g, 1000 g, etc.
- Mechanix work gloves; for $15 at Lowes
- needle and thread, to sew glove fingers
- TI-84 or similar graphing calculator
- raw egg or empty eggshell
- Gentle Touch Background Handout, one per person
- Calibrating the Force Sensor Resistance/Conductance Instructions, one per group
- Calibrating the Force Sensor Data Collection Sheet, one per person
- Building an Electric Circuit Instructions, one per group
- Calibrating the Force Sensor Voltage Instructions, one per group
- Building an Electric Circuit Evaluation Sheet, one per person
- Designing and Building a Robotic Hand Guidance & Tips, one per group
- Check Your Understanding Summary, one per person
To share with the entire class:
- computer and projector to show the class A Robotic Hand with a Gentle Touch Presentation, a PowerPoint® file, and a few short online videos to introduce the topic
- (optional) pre-made example simple robotic hands made from cardboard, tape, drinking straws, rubber bands and cord; see the Procedure section for details
- black electrical wire, 22 gauge; such as 100 feet AWG black wire for $7.95 at Jameco
- red electrical wire, 22 gauge; such as 100 feet AWG red wire for $7.95 at Jameco
- wire strippers; such as 7-inch size for $5.95 at Jameco
- wooden dowel; such as round poplar dowel, .25-in x 48 in, for 78¢ at Lowes
- saw, to cut dowel into wood pucks
- seam ripper; for $2,45 at Walmart
- super glue; such as .28 oz of Duro super glue in four small tubes for $1.98 at Lowes
- scissors
- (optional) pin cushion
Worksheets and Attachments
Visit [www.teachengineering.org/activities/view/utpa_gentle_activity1] to print or download.Pre-Req Knowledge
Students must have an understanding of linear functions. It is imperative that students understand domain and range, know how to plot data in the Cartesian coordinate system, and are able to solve linear equations in two variables in the form y = mx + b, where m is the slope and b is the y intercept.
Introduction/Motivation
(Introduce the activity by playing an online video that shows students the current state of humanoid robot capabilities and/or show students a few simple robotic-like hands made from household materials, as described in the Procedure section.
After the video and/or some time played with the robotic hand, spark a discussion on the current applications of robots. Discuss the pervasive use of robotic arms for purposes such as the manufacturing of automobiles and other factory work, for delicate surgical procedures, and warehouse inventory distribution. Lead the discussion towards the precision of tactile functions.)
How do you think the precision of tactile functions affects job performance? (Students may struggle to answer this question. Give some examples of good and bad performance consequences, such as malfunctioning car parts, incorrect merchandise distribution, precise surgical stitching and accurate force application.)
(Make the connection to curve modeling by telling students that engineers who work with robots must test the exerted forces produced from tactile functions.) After testing, the analysis of the collected data may reveal a correlation among the tested variables. If a correlation exists, a curve model may be used to interpret data, predict, and possibly improve the model. All engineering fields use curve models. The study of these models provides us with a better understanding of the behavior and relationships among variables. In most cases, models are an effective and efficient method to simulate solutions to real-world problems.
Procedure
Activity Overview
Expect this activity take six 50-minute class periods. Depending on students' preparation and progress, it may take less time. The activity requires students to work in groups of three. Students follow instructions, connect wires/chips on a breadboard, collect data, design and test their own tactile feedback system robotic hands as if they were real-world engineers. Through the course of the activity, students experience a good portion of the engineering design process. Refer to Table 1 for the scope and sequence of the activity, including when each attachment is used.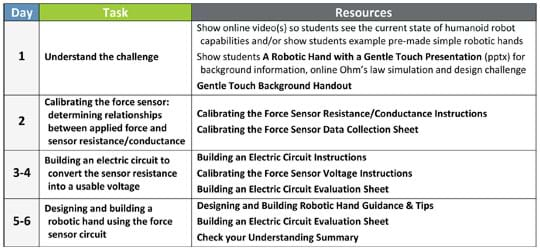
Background
The PowerPoint® presentation provides students with the general background knowledge necessary to complete and understand the various components of the activity. The information also serves to connect the activity to a real-world application, which sets up the hypothetical design challenge scenario.
- During the presentation, direct students to take notes and answer questions to complete a background handout.
- An online multimedia application (linked to the equation in the upper right-hand corner in slide 4) explains Ohm's law and is suitable for exploration as a class. The website link is also provided in the Additional Multimedia Support section.
- The activity design challenge is presented on slide 12. Make sure students know that the Robo-Glove and Robonaut 2 are not fictional—they are real-world NASA/General Motors projects!
Welcome to Johnson Space Center, young NASA/GM engineers. It is with great privilege that I reveal to you our latest project—Robo-Glove! Our latest prototype is functional, but not calibrated correctly. Our Robo-Glove used on Robonaut 2 keeps CRUSHING people's hands when shaking them. To improve our design, we would like you to add the revolutionary FlexiForce sensors on our Robo-Glove X2. Your task is to develop a working prototype of our glove, calibrate it using weights, and test it using an egg (a delicate object) within three days!! If time allows, test it by shaking people's hands.
Oh, one more thing, our senior electrical engineers do not want to replicate the calibration or testing. So please provide them with a scatterplot graph using resistance vs. force, conductance vs. force, and voltage vs. force (lbs). And, for the last two graphs, create a best fit line on the graph and a best fit equation.
Once students have gained an understanding of the challenge, they proceed in small "engineering teams" to perform their own research on a FlexiForce sensor using weights and multimeters. By calibrating and experimenting with the sensor, students learn that applying more pressure to the sensor produces less resistance. It is imperative that students understand that the measured resistance needs to be translated into a meaningful voltage range. Voltage can be converted into a digital unit.
The partial design cycle concludes with groups constructing simple circuits and producing their own tactile feedback systems—"robotic hands." To convert a resistance to voltage value, teams create simple circuits. Although instructions are provided, not all teams will end up with the exact same-looking circuit design since they may choose to connect wires differently on the breadboard. Then students attach the sensor to a working glove and make the breadboard connections. Using a multimeter, students record the output (in voltages) of the sensor based on a force. At the end, students evaluate their final designs and are able to answer the question: What is the minimum force required to break an egg?
Before the Activity
- Gather materials and make group sets of all documents needed for this activity. Refer to Table 1 for which attachments are required at what point in the activity.
- Cut the wooden dowel into slices to serve as wooden pucks to be placed on the centers of sensors. A puck is an object with the same diameter as the sensing area that is used when the force area being applied is greater than the sensing area.
- It is highly recommended that the instructor preview all provided documents and try all components of the activity before implementing them with students. For example, verify that the steps provided to calculate best fit lines using TI-8X graphing calculators work for the calculators your students will use.
- Organize the materials into activity kits for the student groups and decide where to locate shared resources in the classroom. Making these kits and determining a shared resource location expedites the distribution process so students can better focus on the learning objectives. The various instructions and guidance documents indicate the materials each group needs in a box at the top of the first pages, for example, see Figure 1 for the contents of one kit.
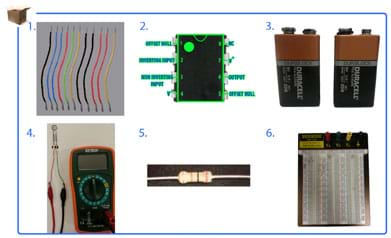
Figure 1. Example activity kit; this one is the robotic hand activity kit. - On Day 1, be ready to introduce the activity by playing a video of your choice that involves robots and the current state of their capabilities, such as the World's Top 3 Humanoid Robots video (9-minutes) at YouTube: https://www.youtube.com/watch?feature=player_detailpage&v=N_m56irWKeI. In addition or alternatively, make and display a few simple robotic-like hands made from cardboard, tape, drinking straws, rubber bands and cord, as described in the NASA Educational Materials activity, I Want to Hold Your Hand, at https://www.nasa.gov/pdf/172353main_Hold_Your_Hand.pdf Also be prepared to show the class the 12-slide A Robotic Hand with a Gentle Touch Presentation that includes a link to an online simulation.
- For the final day, choose whether to give the teams real eggs or empty eggshells for testing the robotic hands; one is neater than the other!
With the Students—Day 1
- Show students an online video about the latest humanoid robots and/or some simple robotic-like hands made from ordinary materials.
- Present the Introduction/Motivation content. Pass out the Gentle Touch Background Handout.
- Show students the presentation. Have students take notes and answer questions to complete the background handout. Refer to information provided in the slide notes as you go through the presentation with the class. Topics and highlights include:
- Slide topics: Curve fitting, electrical engineering fundamentals (I = V/R, current, resistor, voltage, ground), curve modeling equations (Ohm's law, Newton's second law of motion, Amdahl's law), curve modeling graphs, regression and correlation, curve fitting with linear models (residuals), finding best fit line using summation, finding best fit line using calculator (using a T1-8X graphing calculator; adjust the steps to match the specific technology available), and rise to the challenge (presentation of activity challenge)
- (slide 4) As a class, explore the online Ohm's law simulation.
- (slide 12) Introduce the scenario for the students' engineering design challenge, including some background information on the real-world Robo-Glove and Robonaut 2 engineering projects.
- Through this process, make sure that students see the connection between the activity and its real-world application so that they are able to understand and solve the design challenge.
With the Students—Day 2
- Divide the class into groups of three students each. Distribute the activity kits.
- Distribute the Calibrating the Force Sensor Resistance/Conductance Instructions and Calibrating the Force Sensor Data Collection Sheets.
- Ask students to verify that the kits are supplied with all the necessary items, which are identified at the top of the instructions document.
- Direct groups to follow the instructions to calibrate their sensors and record all their calibration data on the data collection sheet. Refer to Figure 2 for the correct setup to measure resistance from the force sensor. The data collection sheet asks students to make a table, graph and find the line of best fit using their collected data and graphing calculators. The procedure for calculating the line of best fit was reviewed in the presentation and is outlined in the data collection sheet.
- Make sure students understand why the sensor needs to be calibrated. Clarify as necessary: We need to find the correct correlation between known forces (grams) and resistance, conductance and voltage to produce a line of best fit. Once we know the line of best fit from our sensors, then we can easily determine the force based on a given voltage.
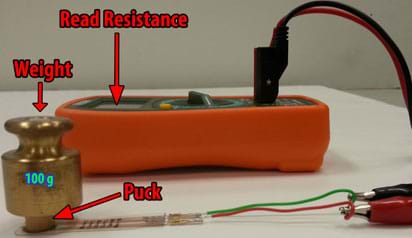
Figure 2. Measuring resistance from a FlexiForce sensor.
With the Students—Days 3-4
- Have groups each build an electric circuit to convert the sensor resistance into a usable voltage, such as the one shown in Figure 3. Distribute the Building an Electric Circuit Instructions to guide students in constructing the circuit.
- As students work, walk around the room to verify that each group is connecting the components correctly. Guide students who are stalled or stuck. Once a circuit is completed, quickly double-check their connections.
- Next, direct students to follow the exact same calibration steps from the previous section except attach the multimeter to the op amp output to read a voltage output instead of a resistance value. Distribute the Calibrating the Force Sensor Voltage Instructions to serve as a guide for how to collect voltage data from the sensor. Have each student use a Building an Electric Circuit Evaluation Sheet to record the collected data, as well as make a table, graph and find the line of best fit.
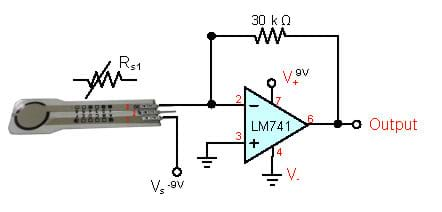
Figure 3. Robotic hand circuit.
With the Students—Days 5-6
- Direct groups that have successfully calibrated their FlexiForce sensors to start to design their robotic hands using a work glove, needle and thread. Try not to give them any design ideas. As is desired in initial design brainstorming, expect students to come up with some crazy ideas. Then remind each team of the following constraints to help them create a workable design: a FlexiForce sensor cannot be pierced or punctured, glue may only be used to secure the puck, wires must be concealed, and the pressure sensing area is located at the top of the sensor (circle).
- Either verbally explain the basic concepts of glove/sensor construction or provide each group with a copy of the Designing and Building a Robotic Hand Guidance & Tips, which provides a general idea on how to design and put together a robotic hand.
- After students design their robotic hands, direct them to connect them to their circuits.
- Verify that the force sensor inside the glove is working correctly. Apply pressure to the sensor area to see an increase/decrease in voltage on the multimeter. Figure 4 shows a complete setup with a glove/sensor connected to the breadboard and multimeter.
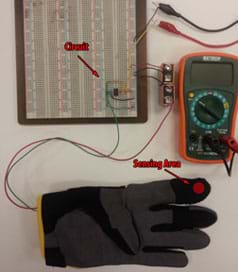
Figure 4. An example student-designed and constructed robotic hand. - To conclude the activity, have groups evaluate the performance of their robotic hands on a delicate object such as real eggs. Figure 5 shows a robotic hand applying pressure to an egg with the nearby multimeter showing the corresponding voltage.
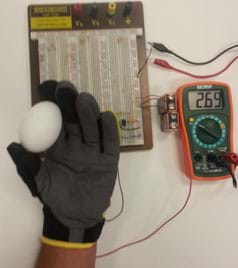
Figure 5. An egg is used to test a robotic hand. - Remind students that the goal is to gather data by increasing the force ever so slightly. Applying the maximum force will only give one result and it might not be accurate!
- Have students complete the bottom portion of the Building an Electric Circuit Evaluation Sheet (a blank table) to answer and calculate (using the line of best fit) the force required to crack an egg.
- To conclude and summarize what was learned throughout the activity, assign students to individually answer the five-question Check Your Understanding Summary.
Vocabulary/Definitions
constraint: A limitation or restriction. For engineers, constraints are the limitations and requirements that must be considered when designing a workable solution to a problem.
current: A flow of electrical charge.
curve fitting: The process of constructing a curve model (or mathematical function) that has the best fit to a series of data points.
force sensor: A transducer that converts an input mechanical force into an electrical output signal.
ground: A reference point in an electrical circuit from which other voltages are measured.
line of best fit: The line that comes closest to all data samples in a regression study.
Ohm's law: The current through a conductor between two points is directly proportional to the potential difference across the two points.
residual: The vertical distance between a data point and a line of best fit.
resistor: A device that has a designed resistance to the passage of an electric current.
tactile feedback: The use of the touch sense to cause a response within a system that influences the continued process or productivity of that system.
voltage: The electric potential energy difference between two points.
Assessment
Pre-Activity Assessment
Gaining Background: During the presentation, have students complete the Gentle Touch Background Handout to aid them in gaining the general background knowledge necessary to complete and understand the various components of this activity as well as connect the activity to a real-world application.
Activity Embedded Assessment
Data: Have students use the Calibrating the Force Sensor Data Collection Sheet as a structured place to record their data for output resistance and conductance due to force. On this handout, students complete a table, make a graph, and create a line of best fit. Review their data and work to gauge their depth of comprehension.
Evaluation: Have students use the Building an Electric Circuit Evaluation Sheet to provide a structured place to record their data for output voltage due to force. On this sheet, students complete a table, make a graph, and create a line of best fit. Review their data and work to gauge their depth of comprehension.
Post-Activity Assessment
Check for Understanding: Administer the five-question Check Your Understanding Summary to have students individually demonstrate what they have learned throughout the course of the activity. Review their answers to assess their mastery of the subject matter. Also use the assessment results to inform instruction improvements for future activity sections.
Activity Extensions
Assign groups to use their robotic hands to gather data on human handshaking. Direct students to walk around the room shaking hands and recording information about voltage output, person's height and person's age. Then have students generate their own scatter plots and best fit equations from voltage vs. height or voltage vs. age data analysis.
Activity Scaling
- For lower grades, have students only collect output resistance data using a multimeter. Then have them make two tables and two graphs for resistance vs. force and conductance vs. force.
- For upper grades, explain how a breadboard and the pins of the op amp work. Provide students with the schematics for a robotic hand and have them build them on their own.
Additional Multimedia Support
Show students some short videos of the most advanced humanoid robots, such as the World's Top 3 Humanoid Robots video (9-minutes) at YouTube: https://www.youtube.com/watch?feature=player_detailpage&v=N_m56irWKeI
Show students some short videos of robots that are malfunctioning or need some adjustment to their levels of applied force, such as a Robotic Arm MK II Prototype (a malfunctioning robotic hand feeding a face; 42 seconds) at https://www.youtube.com/watch?v=5CiE32h55HI and Death of a Garbage Truck (automated arm with too much power throws trash; 1 minute) at https://www.youtube.com/watch?v=uy-CHohV2H4
As a class (at slide 4 of the presentation), use WGBH's Ohm's Law Simulation to explore the variable relationships. Use the sliders to adjust the voltage and resistance in a circuit to observe how this affects the flow of current according to Ohm's law. http://www.pbslearningmedia.org/asset/hew06_int_ohmslaw/
The Robotics – Hands Down lesson by NASA includes a series of activities based on robotics applications, including a link to the I Want to Hold Your Hand instructions for making an example robotic hand using everyday household materials. http://www.nasa.gov/offices/education/programs/national/summer/education_resources/engineering_grades7-9/E_hands-down.html#.VK4kbyvF-So
Subscribe
Get the inside scoop on all things Teach Engineering such as new site features, curriculum updates, video releases, and more by signing up for our newsletter!More Curriculum Like This

Students experience haptic (the sense of touch) feedback by using LEGO® MINDSTORMS® EV3 robots and touch sensors to emulate touch feedback recognition. With four touch sensors connected to LEGO EV3s, they design sensor attachments that feel physically distinguishable from each another.
References
GM, NASA Jointly Developing Robotic Gloves for Human Use: Robonaut Technology Coming to the Factory Floor or Space Station Soon. Published March 13, 2012. GM News. Accessed August 2014. http://media.gm.com/media/us/en/gm/news.detail.html/content/Pages/news/us/en/2012/Mar/0313_roboglove.html
Merriam-Webster Dictionary. Accessed August 2014 (source of definitions, with some modification) http://www.merriam-webster.com/dictionary
Copyright
© 2014 by Regents of the University of Colorado; original © 2014 The University of Texas-Pan AmericanContributors
Luis AvilaSupporting Program
RET-ENET Program, Electrical Engineering Department, The University of Texas-Pan AmericanAcknowledgements
This activity was created through The University of Texas-Pan American's Electrical Engineering Research Experiences for Teachers in Emerging and Novel Engineering Technologies (RET-ENET) Program with support from National Science Foundation grant no. CNS 1132609. However, these contents do not necessarily represent the policies of the National Science Foundation, and you should not assume endorsement by the federal government.
Last modified: October 5, 2018


User Comments & Tips