Summary
Air is one of Earth's most precious resources, and we need to take care of it in order to preserve the environment and protect human health. To this end, students develop their understanding of visible air pollutants with an incomplete combustion demonstration, a "smog in a jar" demonstration, and by building simple particulate matter collectors.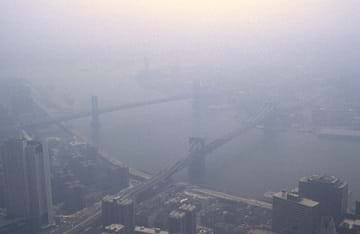
Engineering Connection
Engineers use a variety of technologies to measure the concentrations and identify types of particulate matter. Before they can clean up pollutants, engineers first learn everything they can about a pollution site (source). They use this scientific information to design new technologies, such as new fuel types, more efficient engines, and industrial process and emissions treatments. These designs help to protect the Earth's environment and resources from human impacts.
Learning Objectives

After this activity, students should be able to:
- Identify the two major types of visible pollutants, smog and particulate matter.
- Explain why air pollutants are harmful to human health and the environment.
- Build a simple particulate matter collector.
- Explain how air pollutants are generated during incomplete combustion.
- Make and analyze a pollutant location map.
Educational Standards
Each TeachEngineering lesson or activity is correlated to one or more K-12 science,
technology, engineering or math (STEM) educational standards.
All 100,000+ K-12 STEM standards covered in TeachEngineering are collected, maintained and packaged by the Achievement Standards Network (ASN),
a project of D2L (www.achievementstandards.org).
In the ASN, standards are hierarchically structured: first by source; e.g., by state; within source by type; e.g., science or mathematics;
within type by subtype, then by grade, etc.
Each TeachEngineering lesson or activity is correlated to one or more K-12 science, technology, engineering or math (STEM) educational standards.
All 100,000+ K-12 STEM standards covered in TeachEngineering are collected, maintained and packaged by the Achievement Standards Network (ASN), a project of D2L (www.achievementstandards.org).
In the ASN, standards are hierarchically structured: first by source; e.g., by state; within source by type; e.g., science or mathematics; within type by subtype, then by grade, etc.
NGSS: Next Generation Science Standards - Science
| NGSS Performance Expectation | ||
|---|---|---|
|
4-ESS3-1. Obtain and combine information to describe that energy and fuels are derived from natural resources and their uses affect the environment. (Grade 4) Do you agree with this alignment? |
||
| Click to view other curriculum aligned to this Performance Expectation | ||
| This activity focuses on the following Three Dimensional Learning aspects of NGSS: | ||
| Science & Engineering Practices | Disciplinary Core Ideas | Crosscutting Concepts |
| Obtain and combine information from books and other reliable media to explain phenomena. Alignment agreement: | Energy and fuels that humans use are derived from natural sources, and their use affects the environment in multiple ways. Some resources are renewable over time, and others are not. Alignment agreement: | Cause and effect relationships are routinely identified and used to explain change. Alignment agreement: Knowledge of relevant scientific concepts and research findings is important in engineering.Alignment agreement: Over time, people's needs and wants change, as do their demands for new and improved technologies.Alignment agreement: |
| NGSS Performance Expectation | ||
|---|---|---|
|
5-ESS3-1. Obtain and combine information about ways individual communities use science ideas to protect the Earth's resources and environment. (Grade 5) Do you agree with this alignment? |
||
| Click to view other curriculum aligned to this Performance Expectation | ||
| This activity focuses on the following Three Dimensional Learning aspects of NGSS: | ||
| Science & Engineering Practices | Disciplinary Core Ideas | Crosscutting Concepts |
| Obtain and combine information from books and/or other reliable media to explain phenomena or solutions to a design problem. Alignment agreement: | Human activities in agriculture, industry, and everyday life have had major effects on the land, vegetation, streams, ocean, air, and even outer space. But individuals and communities are doing things to help protect Earth's resources and environments. Alignment agreement: | A system can be described in terms of its components and their interactions. Alignment agreement: Science findings are limited to questions that can be answered with empirical evidence.Alignment agreement: |
Common Core State Standards - Math
-
Represent and interpret data.
(Grade
5)
More Details
Do you agree with this alignment?
International Technology and Engineering Educators Association - Technology
-
Students will develop an understanding of the effects of technology on the environment.
(Grades
K -
12)
More Details
Do you agree with this alignment?
-
Waste must be appropriately recycled or disposed of to prevent unnecessary harm to the environment.
(Grades
3 -
5)
More Details
Do you agree with this alignment?
-
Develop innovative products and systems that solve problems and extend capabilities based on individual or collective needs and wants.
(Grades
6 -
8)
More Details
Do you agree with this alignment?
State Standards
Colorado - Math
-
Visual displays are used to interpret data.
(Grade
5)
More Details
Do you agree with this alignment?
Materials List
Demo 1 – Incomplete Combustion Demonstration
- 1 utility candle
- 1 tin can (soup can)
- matches
- 1 straw
- paper towel or rag
- hot mitt
Demo 2 – Smog Demonstration
- 1 large glass jar
- aluminum foil
- 2-3 ice cubes
- 1 cup of water
- paper
- ruler
- scissors
- matches
Student Activity – Building Particulate Matter Collectors
Each group needs:
- 1 small glass jar (spice jar or baby food jar)
- 1 large glass jar (pickle, mayo or mason-type jar)
- petroleum jelly
- masking tape
- magnifying glass
- 1 index card
For the entire class to share:
- chart paper (large, bulletin-board sized)
- colored construction paper
- scissors
- transparent tape
Introduction/Motivation
Air pollution is commonly a result of human activities, but in turn can be harmful to human health and also the environment. Although we might not always think of it, the Earth's air is one of our precious resources, just like water and soils. Therefore, we need to protect it! Air pollution can make it more difficult to breathe, particularly for people who have asthma and for the elderly, but anyone who spends time outside can be affected by poor air quality. Exposure to air pollution can cause respiratory infections, heart disease, and lung cancer. Particulate matter is one of the main types of air pollution, and the amount of particulate matter can be reduced by controlling what is emitted by the combustion of fossil fuels. Therefore, it is important to learn more about particulate matter in order to help solve these problems.
Particulate matter is often invisible to the naked eye unless it is very concentrated. To study the particulates more easily, it is possible to "catch" and identify some of them by concentrating them on a collector. Engineers use a variety of technologies to measure concentrations of and identify types of particulate matter. Engineers must first learn this information about a pollution site before working towards cleaning up the pollutants. Engineers also use this information to help design new technologies (new fuel types, more efficient engines, process treatments in industrial applications, etc.) that more effectively prevent and reduce air pollution.
One of the greatest sources of air pollution is the incomplete combustion of gasoline in car engines. The engines are only about 30% efficient; this means that for every 10 gallons of gasoline in the tank, only three gallons are actually used to move the vehicle! Some of the remaining gas heats the engine and some is pushed out of the engine unburned. This inefficiency is one of the largest contributors to photochemical smog. If gasoline were completely burned, the only by-products would be water vapor and carbon dioxide. Engineer-designed devices that reduce pollution emissions include catalytic converters, modified fuels and more efficient engines.
Ask students what air pollution looks like? What are some of the different sources of air pollution? Do they think that an increase in human population leads to an increase in pollution? Why or why not? Do they think air pollution is a problem? Have they ever seen air pollution in their city? Tell them they will learn more about what air pollution looks like in this activity.
Procedure
Before the Activity
Consider conducting these activities simultaneously with those in this lesson, as the same collection sites can be used to test for visible and invisible air pollutants.
- Demo 1: Incomplete Combustion Demonstration — Practice the process a few times before demonstrating it to the class.
- Demo 2: Smog Demonstration — Practice the process a few times before demonstrating it to the class. The critical step has to be done quite quickly.
- Student Activity: Building Particulate Matter Collectors — Consider testing possible collection sites for the particulate matter collectors before the experiment. Some sites may not result in a lot of visible particulates and this can frustrate the students.
With the Students
Demo 1: Incomplete Combustion Demonstration
- Light the candle.
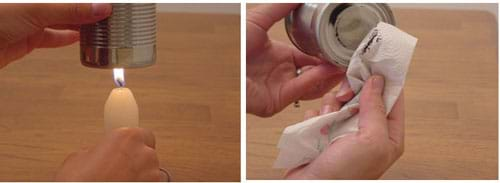
- Place the bottom of the can directly over the flame for a few seconds (see Figure 2). The top of the flame should be almost touching the can.
- Look at the bottom of the can. Ask students what they see. (Answer: Black, sooty area.) Have the students record their observations in their journals. Do you think this is evidence of pollution? (Answer: Yes)
- Clean off the bottom of the can with a paper towel (see Figure 2). Have students also observe the pollution on the towel.
- Repeat the procedure, but use the straw to gently blow air on the bottom of the can (see Figure 3). Be careful not to blow the flame out.
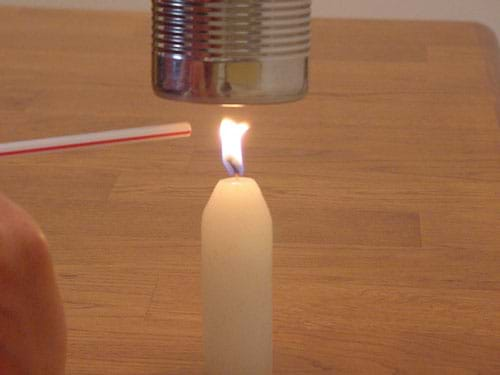
- Look at the bottom of the can and ask students what they see. (Answer: Nothing or perhaps some water vapor condensing on the bottom of the can.) Do you see any pollutants? (Answer: No) Have students record their observations and responses in their journals.
- Ask students how the additional air affected the combustion of the candle. (Answer: Complete combustion takes place, producing only carbon dioxide and water vapor. Other types of pollutants are avoided.) Have students record their responses.
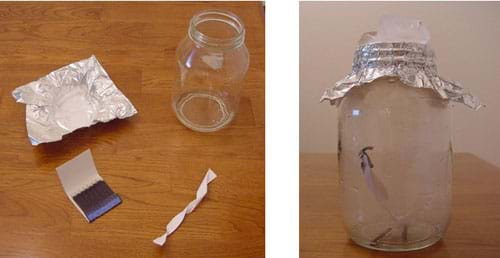
Demo 2: Smog Demonstration (see Figure 4)
- Cut a strip of paper about 15 cm x 1 cm. Fold the strip in half lengthwise and twist it.
- Use a piece of aluminum foil to make a "lid" for the jar. Mold it to the shape of the jar opening and then remove it and set it aside.
- Put some water in the jar and swirl it around until the inside walls of the jar are wet.
- Put the ice cubes on top of the foil to make it cold.
- Attention: All the parts of this next step must be done very quickly. Light the strip of paper and drop it and the match into the jar. Place the foil lid on the jar and seal it as tightly as possible. Place the ice cubes back on the middle of the foil lid.
- Ask students to describe what they see in the jar. How is it like real smog? How is it different? Ask students to write their responses in their journals.
Safety note: Do not breathe the "smog." Be sure to release it outdoors when you are finished with the demonstration.
Student Activity: Building Particulate Matter Collectors
- Divide the class into student pairs. Distribute supplies to each group (1 small jar, 1 large jar, petroleum jelly, masking tape).
- Demonstrate the collector set up. (You can place the lid on this collector and keep it in the classroom as a control.)
- Smear petroleum jelly on the outside of the small jar.
- Carefully place the small jar inside large jar.
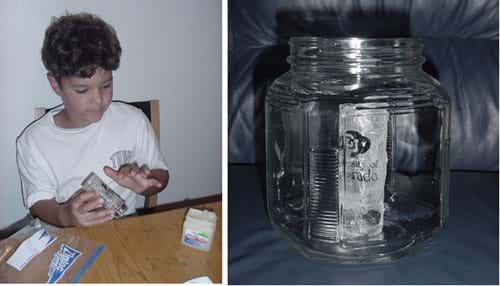
- Use the masking tape to make a label for the large jar; include name, date and test site location.
- Decide on several locations around the school — inside and outside — at which students think visible pollutants may be found. Assign each group to a different collection site. (Possible locations: Near a road or parking lot, a garage with car exhaust, a sandy/dusty playground, teachers' lounge, a place where people take smoking breaks, a stove, the classroom air filter/vent or the school's air intake/vent, etc.) Keep in mind that the collectors may have to stay at each site, undisturbed, for a few days.
- Ask students to make predictions about which area will have more visible pollutants and why. Have students record their predictions in their journals.
- Place jars in the test sites for several days. Have the groups check the jars daily and record observations in their journals.
- On the final day of observations, bring the jars back to the classroom for comparison.
- Have students observe the amount of pollutants on their collectors.
- Have students rank the jars from the one with the fewest visible pollutants to the one with the most, lining them up across a counter or table. Remember to include the control jar. Ask students to record this information in their journals.
- Discuss why certain areas have more visible pollutants than others.
- Remind students that these particles are in the air they breathe. Ask them to write about how they feel about this in their journals.
- Make a school map on large chart paper. For each test site, cut a jar shape from colored construction paper and write on it the ranking, location and number of particles collected (if possible to count). Adhere each cut-out jar to the correct location on the map. What conclusions can you draw from the map? Write a few of these conclusions neatly on index cards. Display the map and index card conclusions in a school hallway for others to see.
- Consider holding a classroom discussion and/or making a writing assignment about possible sources of the particles. How can we make the air more desirable to breathe? (Learn more about this in the lessons I've Gotta Get Some Air and Pollution Solutions.)
Alternate Collector Designs
- Cut rectangular strips from plastic milk jugs or index cards and hole-punch one end to make a hole for a string hanger. Smear petroleum jelly on one side. Leave hanging for a week or more. Be sure to apply a thick coat of petroleum jelly to prevent the jelly from drying out over the course of the experiment.
- Use index cards with a hole cut in the middle (about size of a silver dollar). Cover the hole in transparent tape so the sticky side is exposed. Hole-punch one end to make a hole for a string hanger. Make three cards for each site (one for 24 hours, one for three days, and one for one week). Be sure to apply a thick coat of petroleum jelly to prevent the jelly from drying out over the course of the experiment. Note: The index cards are not wet weather resistant, so be sure they are placed in protected areas.
- Experiment with using clear vegetable oil instead of petroleum jelly in the collectors.
Assessment
Pre-Activity Assessment
Discussion Question: Ask the students and discuss as a class:
- What does air pollution look like? What are causes of air pollution? What are the effects? Why would we want to reduce air pollution? Tell students they will learn more about what air pollution looks like in this activity.
Activity Embedded Assessment
Student Observations: During the activity, ask students for their observations, as directed in the Procedure section.
Post-Activity Assessment
Informing Others / Map Making: Make a school map on large chart paper. For each test site, cut a shape from colored construction paper and write on it the ranking and location. Adhere each shape to the correct location on the map. What conclusions can you draw from the map? Write a few of these conclusions neatly on index cards. Display the map and index card conclusions in a school hallway for others to see.
Local Awareness: Ask students what they think they could do to help reduce the amount of air pollution in their community. What forms of transportation and energy use does not emit air pollutants? (Answer: bicycles, walking, solar energy, wind energy)
Safety Issues
- Make sure you place collectors in low-traffic areas as to avoid having unaware students and school visitors tripping or breaking the glass.
- Demos 1 and 2 use matches and fire; they should not be conducted by students without adult supervision.
Troubleshooting Tips
This activity is not a rapid or neat experiment. To obtain significant results, the jars need to be placed in very dirty areas.
Set the collectors on white paper while observing them; it makes the particulates easier to see.
Activity Extensions
Compare the different types and amounts of pollution created from burning different brands and types of candles. For example, paraffin wax vs. beeswax.
Post a chart listing the causes of visible pollutants and what can be done to prevent them. Leave the chart up so students can add to it whenever they have an idea.
Try all the different types of collectors in the same place. Does one type do a better job (collect more pollutants)? Do they each attract a different type of pollutant?
Have students make a bar graph showing the quantity of pollutants (vertical) vs. the jar locations (horizontal). What conclusions can you draw from the graph?
Activity Scaling
- For younger students, have them draw pictures of their observations, and make a graph as a hands-on experience for the entire class.
Subscribe
Get the inside scoop on all things Teach Engineering such as new site features, curriculum updates, video releases, and more by signing up for our newsletter!More Curriculum Like This

Students are introduced to the concepts of air pollution and technologies that engineers have developed to reduce air pollution. They develop an understanding of visible air pollutants with an incomplete combustion demonstration, a "smog in a jar" demonstration, construction of simple particulate ma...

Students develop an understanding of visible air pollutants with an incomplete combustion demonstration, a "smog in a jar" demonstration, building simple particulate matter collectors, and exploration of engineering roles related to air pollution. In an associated literacy activity, students learn b...

Looking at transportation and the environment, students learn that some human-made creations, such as vehicles, can harm the natural environment. They also learn about alternative fuels and vehicles designed by engineers to minimize pollution. The associated hands-on activity gives students a chance...

Students are introduced to the concepts of air pollution, air quality, and climate change. The three lesson parts (including the associated activities) focus on the prerequisites for understanding air pollution. First, students use M&M® candies to create pie graphs that express their understanding o...
References
Bosak, Susan V. Science is...: A Source Book of Fascinating Facts, Projects and Activities. Markham, Ontario: Scholastic Canada, Ltd., 1991. (Smog demo adapted from "Smog Alert," pg. 361.)
JJones, Maclyn. Air Pollution: Visible and Invisible. Updated August 2, 2004. Lesson Plans for Teachers, TCEQ, Texas Natural Resource Conservation Commission. Accessed September 18, 2006. Available at: https://www.greeneducationfoundation.org/institute/lesson-clearinghouse/download/file.html?fid=19.302
Maton, Anthea. Prentice Hall Science – Ecology Earth's Natural Resources. Upper Saddle River, NJ: Prentice-Hall, Inc., 1993. (Incomplete combustion demo adapted from activity book, pg. 53.)
Copyright
© 2004 by Regents of the University of Colorado.Contributors
Amy Kolenbrander; Sharon Perez; Daria Kotys-Schwartz; Janet Yowell; Natalie Mach; Malinda Schaefer Zarske; Denise CarlsonSupporting Program
Integrated Teaching and Learning Program, College of Engineering, University of Colorado BoulderAcknowledgements
The contents of this digital library curriculum were developed under a grant from the Fund for the Improvement of Postsecondary Education (FIPSE), U.S. Department of Education and National Science Foundation GK-12 grant no. 0338326. However, these contents do not necessarily represent the policies of the Department of Education or National Science Foundation, and you should not assume endorsement by the federal government.
Last modified: December 11, 2020


User Comments & Tips