
Quick Look
Grade Level: 10 (9-12)
Time Required: 5 hours
(Students' in-depth engineering design and build projects require multiple 60-minute periods to complete; suggest 60 minutes on five different days)
Expendable Cost/Group: US $5.00
Group Size: 3
Activity Dependency: None
Subject Areas: Biology, Life Science, Science and Technology
NGSS Performance Expectations:

| HS-ETS1-2 |
Quick Look

- Grade Level:
- 10 (9 – 12)
- Time Required:
- 5 hours
(Students' in-depth engineering design and build projects require multiple 60-minute periods to complete; suggest 60 minutes on five different days)
- Group Size:
- 3
- Subject Areas:
-
Biology Life Science Science and Technology -
NGSS Performance Expectations:
HS-ETS1-2

Summary
Students learn about how biomedical engineers aid doctors in repairing severely broken bones. They learn about using pins, plates, rods and screws to repair fractures. They do this by using the engineering design process to design, create and test their own prototype devices to repair broken turkey bones.Engineering Connection
Biomedical and materials engineers create devices that doctors use to repair severe bone fractures. Materials engineers develop biocompatible materials that integrated into the body easily. Biomedical engineers use these materials to design pins, plates, rods and screws that can be used to help support and repair broken bones.
Learning Objectives
After this activity, students should be able to:
- Describe how engineers aid doctors in repairing severe bone fractures.
- Create prototype devices to aid in the healing of a bone fractures and test them for strength.
- Evaluate the strengths and weaknesses of a prototype medical device based on model testing.
- Describe the steps of the engineering design process.
Educational Standards
Each Teach Engineering lesson or activity is correlated to one or more K-12 science,
technology, engineering or math (STEM) educational standards.
All 100,000+ K-12 STEM standards covered in Teach Engineering are collected, maintained and packaged by the Achievement Standards Network (ASN),
a project of D2L (www.achievementstandards.org).
In the ASN, standards are hierarchically structured: first by source; e.g., by state; within source by type; e.g., science or mathematics;
within type by subtype, then by grade, etc.
Each Teach Engineering lesson or activity is correlated to one or more K-12 science, technology, engineering or math (STEM) educational standards.
All 100,000+ K-12 STEM standards covered in Teach Engineering are collected, maintained and packaged by the Achievement Standards Network (ASN), a project of D2L (www.achievementstandards.org).
In the ASN, standards are hierarchically structured: first by source; e.g., by state; within source by type; e.g., science or mathematics; within type by subtype, then by grade, etc.
NGSS: Next Generation Science Standards - Science
| NGSS Performance Expectation | ||
|---|---|---|
|
HS-ETS1-2. Design a solution to a complex real-world problem by breaking it down into smaller, more manageable problems that can be solved through engineering. (Grades 9 - 12) Do you agree with this alignment? |
||
| Click to view other curriculum aligned to this Performance Expectation | ||
| This activity focuses on the following Three Dimensional Learning aspects of NGSS: | ||
| Science & Engineering Practices | Disciplinary Core Ideas | Crosscutting Concepts |
| Design a solution to a complex real-world problem, based on scientific knowledge, student-generated sources of evidence, prioritized criteria, and tradeoff considerations. Alignment agreement: Evaluate a solution to a complex real-world problem, based on scientific knowledge, student-generated sources of evidence, prioritized criteria, and tradeoff considerations.Alignment agreement: | Criteria may need to be broken down into simpler ones that can be approached systematically, and decisions about the priority of certain criteria over others (trade-offs) may be needed. Alignment agreement: | |
International Technology and Engineering Educators Association - Technology
-
Medical technologies include prevention and rehabilitation, vaccines and pharmaceuticals, medical and surgical procedures, genetic engineering, and the systems within which health is protected and maintained.
(Grades
9 -
12)
More Details
Do you agree with this alignment?
-
Evaluate final solutions and communicate observation, processes, and results of the entire design process, using verbal, graphic, quantitative, virtual, and written means, in addition to three-dimensional models.
(Grades
9 -
12)
More Details
Do you agree with this alignment?
State Standards
Colorado - Math
-
Quantitative reasoning is used to make sense of quantities and their relationships in problem situations.
(Grades
9 -
12)
More Details
Do you agree with this alignment?
Colorado - Science
-
Discuss how two or more body systems interact to promote health for the whole organism
(Grades
9 -
12)
More Details
Do you agree with this alignment?
Materials List
For the teacher's introductory presentation:
- Bone Repair Challenge (ppt)
- computer and LCD projector to show a PowerPoint presentation (or make overhead transparencies of the PPT file and use an overhead projector)
Each group needs:
- 1 turkey femur (drumstick)
- safety glasses or goggles, one per student
- other supplies, depending on group design (see below)
- Repairing Broken Bones Design Worksheet, one per person
For the entire class to share:
[Note: These supplies depend on student designs, so wait to purchase them after designs are finalized.]
- ~1 yard (~1 m), half-inch diameter steel or aluminum rod
- ~20 metal screws (suggestion: 10 half-inch long plus 10 one-inch long)
- epoxy
- metal strip (sold in coils at hardware stores, usually with plumbing supplies; already has screw holes in it)
- 1-2 extra turkey bones
- other materials or supplies that students include in their designs
Suggested tools:
[Use any of these items that are accessible; a machine shop may have some items]
- drill (a drill press is preferred, but a hand drill is okay)
- hack saw
- screw driver
- (optional) tile drill bit (makes drilling into bone easier and less likely to crack)
Worksheets and Attachments
Visit [www.teachengineering.org/activities/view/cub_biomed_lesson10_activity1] to print or download.Pre-Req Knowledge
A basic understanding of bones, how they work and what they are made of. See the Our Amazing Skeleton lesson.
Introduction/Motivation
(Have ready to show to the class the attached Bone Repair Challenge PowerPoint presentation.)
Who has ever broken a bone? How did you repair it? When a bone breaks, it immediately begins healing itself. Usually, a doctor can assist a minor bone fracture by "immobilizing" the broken region with a cast or a sling to minimize its movement while healing. However, when severe fractures occur, sometimes more intense measures must be taken. For severe fractures, doctors must consider the risk of infection, the length of time needed to heal the break, and how to best heal the bone correctly to restore function and mobility.
For severe fractures, biomedical and materials engineers assist doctors by developing various devices used to help heal bones. Two categories of bone repair are internal and external fixation. Internal fixation is a temporary or permanent fixture that directly attaches to the bone under the skin for alignment and support. These include pins, rods, plates, screws, wires and bone grafting. External fixation is a temporary repair support outside of the skin that stabilizes and aligns the bone while the body heals. These devices include screws, metal braces and casts. External fixation devices can be adjusted outside of the bone. In some cases, internal fixation methods are chosen because they can provide increased patient mobility and quicker healing time.
Biomedical and materials engineers must consider the strength and biocompatibility of the device as well as ease of implantation and minimal invasiveness for the patient. Over the next few class periods, we will break turkey femurs and then work in groups to engineer ways to repair the bones. Let's see if you can make the bone stronger than before it was broken!
(Show the class the attached Bone Repair Challenge PowerPoint presentation to introduce or review the kinds of broken bones and the current medical internal fixation approaches to repair them [pins, rods, plates, screws, etc.]. The presentation includes medical illustration and x-ray examples, and concludes with the activity design challenge on one slide.)
Procedure
Before the Activity
- Purchase enough turkey drumsticks to equal to the number of groups plus one or two extras, the bigger the bones the better. Ask if a butcher or meat plant might donate them. Eat the turkey or remove the meat from the bones.
- To make the turkey femurs as clean as possible, boil them and remove any remaining meat and other tissue. If necessary, soak the bones in a solution of 90% warm water and 10% bleach or ammonia to make cleaning them easier.
- Let the bones dry for ~24 hrs.
- Gather materials and make copies of the Repairing Broken Bones Design Worksheet, one per person.
Day 1: Bone Breaking
- Divide the class into groups of three students each.
- Break the turkey femurs, keeping track of the maximum weight each bone could bear before breaking in part 5 of the Repairing Broken Bones Design Worksheet. Two suggested methods:
- Use a stress tester, such as an Instron universal testing machine, to break bone from the side and/or from compression. Universities often have stress testing equipment.
- Bridge a bone across two desk edges and hang enough weight from the center of the bone until it breaks. Expect a turkey femur to bear up to 200 lbs (91 kg), depending on its size. (This approach is described in more detail as part of the Sticks and Stones Will Break That Bone! activity.)
Days 2-4: Bone Repair

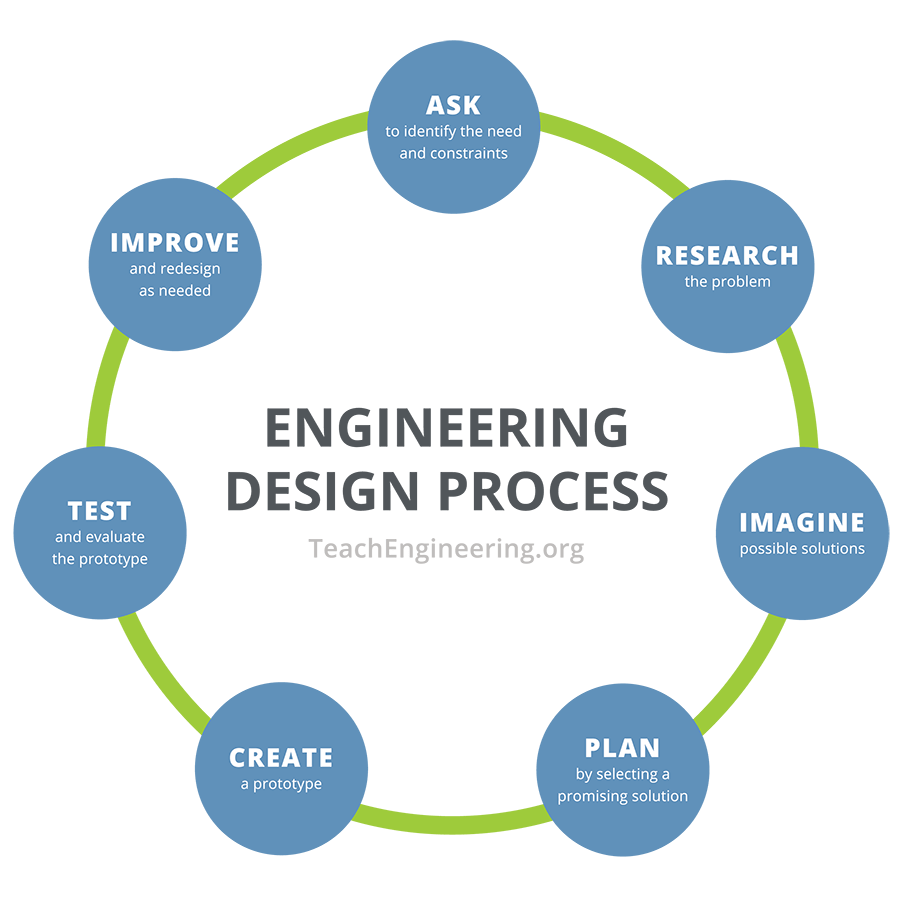
- Ask if any of the students have heard of the engineering design process (EDP) before? (Elicit student answers). Explain that engineers around the world use the engineering design process to solve problems. Either display the graphic below on a projector or draw the seven steps on the board so the students can see what the process looks like.
- Challenge teams to design and build repairs for their fractured bones. Encourage them to try to make the bone even stronger than before. Have students follow along with the design worksheet during this process.
- Have students carefully examine the extent and nature of the bone fracture(s), and brainstorm possible ways to repair their broken turkey bones.

Using an Instron universal testing machine to test the strength of a repaired turkey bone. - Guide students to move into the third step in the engineering design process: imagine possible solutions. Have students draw two or three engineering designs (sketches) to repair bone in part 2 of the design worksheet. Make sure they label the parts and materials that they intend to use in each prototype design. For each of the three designs, have students complete part 3 of the design worksheet and evaluate each design based on five different questions.
- Encourage student teams to start the fourth step of the EDP: plan and share their designs with each other and choose their best design and present it to the class. Require presentations to include reasons for their design choices, and engineering advantages and disadvantages (and other factors, as described in the Assessment section). Encourage the rest of the students to provide constructive feedback and suggestions. Ensure they document their design in part 4 of the design worksheet.
- Direct students to move to the fifth step of the EDP (create) and begin fixing their bone, as designed. Encourage careful work, bones can be brittle and are not replaceable.
- Have students present their final prototype "products" to the class again. In these presentations, have them explain what steps they took as well as what they would improve upon.
Day 5: Bone Testing
The sixth step of the engineering design process involves testing and evaluating the design they implemented. Ensure all students fill out parts 5, 6, and 7 of the design worksheet.
- Have each group predict the performance of their repaired bone.
- Break each reinforced bone using the same method used before.
- Have students record how well their bone resisted the weight compared to its unbroken state. Record how much weight the reinforced bone withstood, and any other observations during the test. Have students complete their worksheets while others complete the stress testing.
- When testing is complete, discuss and compare all results as a class.
- Have students give final presentations, answering questions as described in the Assessment section.
Vocabulary/Definitions
biocompatibility: A characteristic of some materials that when they are inserted into the body do not produce a significant rejection or immune response.
bone graft: Bone taken from a patient during surgery or a bone substitute that is used to take the place of removed bone or to fill a bony defect.
external fixation: The process of installing temporary repair supports outside of the skin to stabilize and align bone while the body heals. Examples: screws in bone, metal braces, casts, slings.
fracture: An injury to a bone in which the tissue of the bone is broken.
internal fixation: The process of fastening together pieces of bone in a fixed position for alignment and support, using pins, rods, plates, screws, wires, grafting, and other devices, all under the skin. Can be temporary or permanent fixtures.
prototype: An original, full-scale, and usually working model of a new product, or new version of an existing product.
Assessment
Pre-Activity Assessment
Brainstorming: In small groups, have students engage in open discussion. Remind them that no idea or suggestion is "silly." Respectfully listen to all ideas. Ask the students:
- What are different ways to reinforce a broken bone?
Activity Embedded Assessment
Design Presentations: After creating two or three design solutions for fixing the broken bone, have each group present their best design and answer the following questions:
- How does the design support the weight and movement of the patient?
- Is it minimally invasive (easy for a doctor to implant)? Why or why not?
- Are the materials biocompatible?
- Is it realistic?
- What are the design strong points and weaknesses?
- Which design did you choose? Why?
Post-Activity Assessment
Final Presentations and Project Reflection: After testing their devices, have students consider again the questions from the activity-embedded assessment, as well as the following:
- How did your repair handle the load during testing?
- Where on the bone did the repair fail? Why do you think it failed there?
- How could you have improved your device?
Safety Issues
- Have students wear eye protection throughout the activity as bone fragments may splinter and fly.
- Provide proper training and safety measures when using any power tools.
Troubleshooting Tips
Experiment with bone breaking in advance of the activity to make sure your method works well.
Have on hand one or two extra bones in case students have problem when fixing their original bone or with which students can practice drilling.
Activity Extensions
Have students, individually or in groups, draw final designs based on what they learned from the testing and presentations.
Activity Scaling
- For lower grades, have students work on smaller bones, such as chicken wings. Or conduct the fourth-grade Sticks and Stones Will Break That Bone! activity, which includes a class demonstration to break a chicken bone by applying a load until it fails (fractures), followed by student teams acting as biomedical engineers, designing (on paper) their own splints or casts to help mend fractured bones.
- For lower grades, have students repair their bones solely with external fixation, such as bracing, casts or splints.
Subscribe
Get the inside scoop on all things Teach Engineering such as new site features, curriculum updates, video releases, and more by signing up for our newsletter!More Curriculum Like This

Students learn about the role engineers and engineering play in repairing severe bone fractures. They acquire knowledge about the design and development of implant rods, pins, plates, screws and bone grafts.

Students learn how forces affect the human skeletal system through fractures and why certain bones are more likely to break than others depending on their design and use in the body. They learn how engineers and doctors collaborate to design effective treatments with consideration for the location, ...

Students learn about the strength of bones and methods of helping to mend fractured bones. Working as biomedical engineers, student teams design their own splint or cast to help repair a fractured bone, learning about the strength of materials used.

References
Bone fracture repair-series, Procedure. Last updated September 21, 2009. MedlinePlus Medical Encyclopedia, US National Library of Medicine, National Institutes of Health. Accessed October 29, 2009. http://www.nlm.nih.gov/medlineplus/ency/presentations/100077_3.htm
Prototype. The American Heritage® Dictionary of the English Language, Fourth Edition. Houghton Mifflin Company. Accessed November 2, 2009, from Dictionary.com website. http://dictionary.reference.com/browse/Prototype
Copyright
© 2008 by Regents of the University of Colorado.Contributors
Todd Curtis, Malinda Schaefer Zarske, Janet Yowell, Denise W. CarlsonSupporting Program
Integrated Teaching and Learning Program, College of Engineering, University of Colorado BoulderAcknowledgements
This digital library content was developed by the Integrated Teaching and Learning Program under National Science Foundation GK-12 grant no. 0338326. However, these contents do not necessarily represent the policies of the National Science Foundation, and you should not assume endorsement by the federal government.
Last modified: March 22, 2022
User Comments & Tips