Quick Look
Grade Level: 7 (6-7)
Time Required: 1 hour
The activity can easily be extended to take more time, especially if you want to implement a redesign and rebuild component.
Expendable Cost/Group: US $2.00
Group Size: 4
Activity Dependency: None
Subject Areas: Earth and Space
NGSS Performance Expectations:

| MS-ETS1-1 |
| MS-ETS1-2 |
| MS-ETS1-3 |
Summary
Students design and build model landfills using materials similar to those used by engineers for full-scale landfills. Their completed small-size landfills are "rained" on and subjected to other erosion processes. The goal is to create landfills that hold the most garbage, minimize the cost to build and keep trash and contaminated water inside the landfill to prevent it from causing environmental damage. Teams create designs within given budgets, test the landfills' performance, and graph and compare designs for capacity, cost and performance.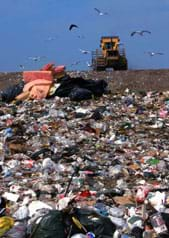
Engineering Connection
Engineers design landfills to contain waste from many types of anthropogenic (human-generated) sources. The garbage comes from many places, including household trash cans, worn-out tires, sludge from wastewater treatment plants, old couches, and scrap metal. The main challenge for engineers is to keep the waste materials from being a health hazard. Also, because of economic constraints, landfills must be as small as possible while holding the most amount of waste material possible. Engineers work with regulators to design landfills that are suitable for hazardous and non-hazardous waste.
Learning Objectives
After this activity, students should be able to:
- Describe a landfill and its purpose.
- Explain the alternatives to dumping human-made garbage in landfills and ways to decrease the amount of waste that ends up in landfills.
- Describe how landfills can be hazardous for the environment if they are not well engineered.
- Describe the kinds of materials make good liner systems for landfills.
- Explain what it means to optimize something.
Educational Standards
Each TeachEngineering lesson or activity is correlated to one or more K-12 science,
technology, engineering or math (STEM) educational standards.
All 100,000+ K-12 STEM standards covered in TeachEngineering are collected, maintained and packaged by the Achievement Standards Network (ASN),
a project of D2L (www.achievementstandards.org).
In the ASN, standards are hierarchically structured: first by source; e.g., by state; within source by type; e.g., science or mathematics;
within type by subtype, then by grade, etc.
Each TeachEngineering lesson or activity is correlated to one or more K-12 science, technology, engineering or math (STEM) educational standards.
All 100,000+ K-12 STEM standards covered in TeachEngineering are collected, maintained and packaged by the Achievement Standards Network (ASN), a project of D2L (www.achievementstandards.org).
In the ASN, standards are hierarchically structured: first by source; e.g., by state; within source by type; e.g., science or mathematics; within type by subtype, then by grade, etc.
NGSS: Next Generation Science Standards - Science
| NGSS Performance Expectation | ||
|---|---|---|
|
MS-ETS1-1. Define the criteria and constraints of a design problem with sufficient precision to ensure a successful solution, taking into account relevant scientific principles and potential impacts on people and the natural environment that may limit possible solutions. (Grades 6 - 8) Do you agree with this alignment? |
||
| Click to view other curriculum aligned to this Performance Expectation | ||
| This activity focuses on the following Three Dimensional Learning aspects of NGSS: | ||
| Science & Engineering Practices | Disciplinary Core Ideas | Crosscutting Concepts |
| Define a design problem that can be solved through the development of an object, tool, process or system and includes multiple criteria and constraints, including scientific knowledge that may limit possible solutions. Alignment agreement: | The more precisely a design task's criteria and constraints can be defined, the more likely it is that the designed solution will be successful. Specification of constraints includes consideration of scientific principles and other relevant knowledge that is likely to limit possible solutions. Alignment agreement: | All human activity draws on natural resources and has both short and long-term consequences, positive as well as negative, for the health of people and the natural environment. Alignment agreement: The uses of technologies and any limitations on their use are driven by individual or societal needs, desires, and values; by the findings of scientific research; and by differences in such factors as climate, natural resources, and economic conditions.Alignment agreement: |
| NGSS Performance Expectation | ||
|---|---|---|
|
MS-ETS1-2. Evaluate competing design solutions using a systematic process to determine how well they meet the criteria and constraints of the problem. (Grades 6 - 8) Do you agree with this alignment? |
||
| Click to view other curriculum aligned to this Performance Expectation | ||
| This activity focuses on the following Three Dimensional Learning aspects of NGSS: | ||
| Science & Engineering Practices | Disciplinary Core Ideas | Crosscutting Concepts |
| Evaluate competing design solutions based on jointly developed and agreed-upon design criteria. Alignment agreement: | There are systematic processes for evaluating solutions with respect to how well they meet the criteria and constraints of a problem. Alignment agreement: | |
| NGSS Performance Expectation | ||
|---|---|---|
|
MS-ETS1-3. Analyze data from tests to determine similarities and differences among several design solutions to identify the best characteristics of each that can be combined into a new solution to better meet the criteria for success. (Grades 6 - 8) Do you agree with this alignment? |
||
| Click to view other curriculum aligned to this Performance Expectation | ||
| This activity focuses on the following Three Dimensional Learning aspects of NGSS: | ||
| Science & Engineering Practices | Disciplinary Core Ideas | Crosscutting Concepts |
| Analyze and interpret data to determine similarities and differences in findings. Alignment agreement: | There are systematic processes for evaluating solutions with respect to how well they meet the criteria and constraints of a problem. Alignment agreement: Sometimes parts of different solutions can be combined to create a solution that is better than any of its predecessors.Alignment agreement: Although one design may not perform the best across all tests, identifying the characteristics of the design that performed the best in each test can provide useful information for the redesign process—that is, some of the characteristics may be incorporated into the new design.Alignment agreement: | |
Common Core State Standards - Math
-
Reason abstractly and quantitatively.
(Grades
K -
12)
More Details
Do you agree with this alignment?
-
Fluently add, subtract, multiply, and divide multi-digit decimals using the standard algorithm for each operation.
(Grade
6)
More Details
Do you agree with this alignment?
-
Construct and interpret scatter plots for bivariate measurement data to investigate patterns of association between two quantities. Describe patterns such as clustering, outliers, positive or negative association, linear association, and nonlinear association.
(Grade
8)
More Details
Do you agree with this alignment?
International Technology and Engineering Educators Association - Technology
-
Students will develop an understanding of the attributes of design.
(Grades
K -
12)
More Details
Do you agree with this alignment?
-
Students will develop an understanding of engineering design.
(Grades
K -
12)
More Details
Do you agree with this alignment?
-
The management of waste produced by technological systems is an important societal issue.
(Grades
6 -
8)
More Details
Do you agree with this alignment?
-
Analyze how the creation and use of technologies consumes renewable and non-renewable resources and creates waste.
(Grades
6 -
8)
More Details
Do you agree with this alignment?
State Standards
Colorado - Math
-
Fluently add, subtract, multiply, and divide multidigit decimals using standard algorithms for each operation.
(Grade
6)
More Details
Do you agree with this alignment?
-
Construct and interpret scatter plots for bivariate measurement data to investigate patterns of association between two quantities.
(Grade
8)
More Details
Do you agree with this alignment?
Materials List
Each group needs:
- clear plastic tub (~12-in long × 6-in wide × 5-in deep) (~30-cm x 15-cm x 13-cm) with about 1 inch (2.54 cm) of sand in the bottom
- clay (~750 cm3), this clay does not need to be the high-quality type used for modeling; clayey or silty soil from your backyard works fine
- sand (~1500 cm3) (available at home and garden stores)
- gravel (~100 cm3) (available at home and garden stores)
- ~15 cotton balls
- (optional) tiny houses and buildings (such as Monopoly game houses and hotels), or any other simple representation to simulate the presence of a town sitting on the sand base
- Roles and Optimization Worksheet
- Budget Worksheet
Note: The amounts of clay, gravel and sand are approximate (based on experience with teaching the activity), but because students can choose how much of each type of material they want to use, it is helpful to have a bit extra on hand.
For the entire class to share:
- food coloring
- clear plastic tub in which to mix together food coloring, water and cotton balls ("garbage")
- (optional) gloves or spoon to "mix" the garbage
- strips of plastic garbage bags, to simulate geosynthetics used in landfills
- toothpicks
- straws
- popsicle sticks
- small, paper "Dixie" cups (~85 ml size), to measure and distribute clay, gravel and sand
- access to water
- watering can, water bottle or other "rain storm" device
- (optional) electric fan, to simulate the erosion force of wind
- (optional) graph paper
Worksheets and Attachments
Visit [www.teachengineering.org/activities/view/cub_enveng_lesson05_activity2] to print or download.Pre-Req Knowledge
A basic understanding of what water (and, hence, leachate) does and does not flow through. Specifically, water flows very slowly through clay so clay is a good material for a landfill liner system.
Introduction/Motivation
The people living in the US make about 250 million tons of trash every single year! (EPA, 2009) And, about 300 million people live in the US. So, that works out to about 4½ pounds of trash generated per person — every single day!
How much of this garbage do you think gets recycled and composted? Only about one-third of this trash gets recycled or composted, which means that on average, you make three pounds of trash every day that we have to put somewhere (and the US makes 470 tons of trash every day).
Where do you think we should put this trash? Can we just dump it out in a field? Why not? What if the dump or landfill is near a lake or a river? Groundwater that is stored in aquifers is always flowing. People use wells to bring groundwater up from the aquifers to drink. We must keep dirty water that comes from the landfill (leachate) from getting into the groundwater, otherwise we can make people sick.
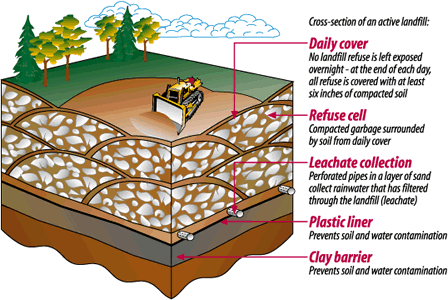
So what should be put underneath all the trash in the landfill? How about once the landfill is finished? Should we cover the landfill or leave it open to the air? What should we cover it with? Erosion can affect your landfill if you are not careful. Landfills must be designed well enough to withstand erosion from rain, wind or even earthquakes. Let's make some models and learn what works best.
Procedure
Before the Activity
- Gather materials and make copies of the Roles and Optimization Worksheet and Budget Worksheet.
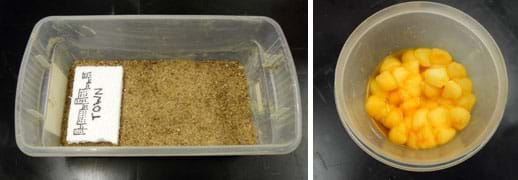
- Prepare for each group a tub with a bottom sand layer to serve as a landscape upon which to build a landfill (see Figure 1). Set up a town using small houses (or other materials) to represent a population using the groundwater (for drinking, cooking, cleaning, gardening, recreation, etc.).
- Prepare the "garbage" by mixing cotton balls, food coloring and water (see Figure 1).
With the Students: Create Model Landfills
- Divide the class into groups of four students each. Hand out the Roles and Optimization Worksheets.
- Assign each group member one of four team roles (or let the students decide amongst themselves). Have them indicate on their worksheets who is responsible for each role.
- Project engineer: The project engineer is the project leader. This person is in charge of final decisions. S/he listens to all of the engineers and helps to decide the best idea. S/he makes sure the landfill gets built on schedule.
- Design engineer: The design engineer plans how the landfill will work and look. This person is in charge of picking materials and deciding how the landfill should be built. S/he works with the budget office (when picking materials) and construction engineer (when deciding how to build the landfill).
- Construction engineer: The construction engineer builds the landfill. This person gets the plans about how to build the landfill from the design engineer. If the landfill design must be fixed, s/he talks to the budget office about getting more or different materials.
- Budget office: The budget office makes sure that the project spends the least amount of money possible. This person helps the design engineer pick materials. S/he is in charge of filling out the budget worksheet, doing the calculations, and keeping track of how much money has been spent. You cannot go over budget!!
- Introduce the project objectives to the students: Each group must design a landfill that 1) can hold the most garbage, 2) minimizes the cost, while making sure that, 3) the landfill is able to contain the waste during a rainstorm without allowing leachate to get to the town. As you do this, just like engineers, you will be following the steps of the engineering design process: understand the need, brainstorm different designs, select a design, plan, create, test, analyze and improve.
- Hand out the budget worksheets to the "budget office" students in each group and talk with them about the different materials.
- Have the "design engineer" students draw out his/her team's landfill design and complete the budget worksheet. If time permits, have the "design engineer" calculate the volume of the plastic bin and compare this to the volumes of materials (e.g., sand, clay, etc) they are using. Note: 1 cup ≈ 15 in3.
- Sign-off on the engineering landfill designs and budget worksheets for each group.
- Have students bring both their approved (signed) designs and completed budgets to the "supply shop" to get their supplies.

- Have students construct the base liner systems for their model landfills (see Figure 2). The goal is to keep water from getting out of the landfill. Therefore, materials such as clay and geosynthetics are good choices, because water cannot flow through them easily. (Basically, the liner should look like a clay bowl or box. Of course, not all teams will choose this path — so you may see Popsicle sticks, toothpicks, etc., at this stage. The word "system" is used because students can use a combination of materials to make base liners [however, because of the budget constraint, they cannot afford to buy many things].) Remember to save some funds to purchase materials to build your top cap (to put on after the garbage is inserted). A landfill without a top is no good for anybody!
- Fill the landfill with "garbage" (see Figure 2) making sure not to let the food coloring seep out into the area around the landfill before construction is completed. Count how many cotton balls you put in. Have the Project Engineer tell you how many to put in.
- Have students record the quantity of garbage cotton balls that their landfills can hold on the worksheet.
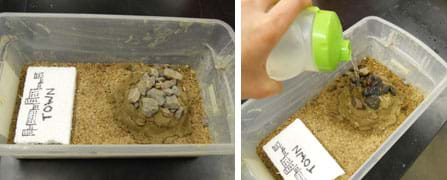
- Give students time to finish constructing the top cap liner systems for their landfills (see Figure 3). The purpose of the top cap is to keep the rain out of the landfill. Therefore, like the bottom liner system, it should be made of materials water cannot flow through. Additionally, some protection (such as gravel) can be placed on top to keep rainwater and sunlight from eroding away the liner.
With the Students: Test Landfill Performance
- Create "rainstorms" by pouring water on the model landfills (see Figure 3).
- Use a pencil or Popsicle stick to dig into the sand outside of the landfill and near the town to look for any seeping food coloring (leachate) (see Figure 4). Make multiple soils tests.
- Repeat the rainstorm, if desired.
- (optional) Apply other erosion forces to the model landfill, such as wind or earthquakes.
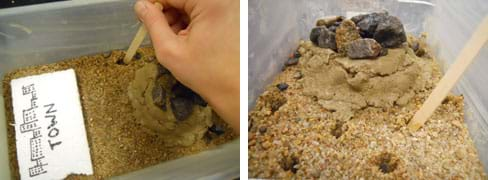
- Have students document on their worksheets the performance of their landfills (how much garbage it held, how much it cost and whether or not it leaked).
- Once students have recorded the garbage capacity, cost and performance, have them present their designs to the class. See the embedded assessment "Design Presentations" questions in the Assessment section.
With the Students: Design Comparison
- Create a table that compiles data (amount of garbage, cost and performance) from each group.
- Present the data on large, colorful posters.
- Make a line graph of the amount of garbage each landfill held.
- Make a line graph of the cost of each landfill.
- Make a line graph of the performance of each landfill (rate as pass/fail or on a 1-to-5 scale).
- Discuss the differences between presenting data in graphs as opposed to tables.
- Lead a class discussion that compares and analyzes all group data. Analyze similarities and differences among the several design solutions to identify the best characteristics of each that can be combined into a new solution to better meet the criteria for success. Explore the concept of optimization. Use the post-activity assessment questions provided in the Assessment section. Determine which landfill is most optimal.
Vocabulary/Definitions
anthropogenic: Created by people or caused by human activity.
aquifer: An underground layer of permeable rock, sand, gravel or soil that contains or conducts groundwater. The pore spaces in aquifers are filled with water and are interconnected, so that water flows through them. Source of water for springs and wells.
geosynthetic: Human-made materials for earth systems (such as landfills, dams, roads and retaining walls).
impermeable: A material characteristic that does not allow a fluid (such as water) to flow through it.
landfill: An engineered site used to dispose of garbage by burying it.
leachate: Contaminated water that seeps out of landfills. Often contains high amounts of organic matter and toxic chemicals.
liner system: The technical term for the layers of materials (such as clay and geosynthetics) that protect landfills from erosion, and keep trash and leachate from escaping from landfills.
optimize: To make a system as good or functional as possible.
requirement: What a particular product, system or service should do. A necessary attribute, capability, characteristic, quality or limitation. In engineering, sets of requirements are inputs into the design stages of product development.
Assessment
Pre-Activity Assessment
Brainstorming: Engage the students in open discussion as a class. Remind them that no idea or suggestion is "silly." All ideas should be respectfully heard. Ask the students:
- What can we do with garbage that does not get recycled or composted? (Answer: Put it in landfills.)
- How might we decrease the amount of trash that gets put in landfills? (Possible answers: Do a better job recycling, use less packaging, reuse more things, do more composting, burn our waste, use fewer things [buy fewer clothes, toys, products, etc.].)
- What materials do we want to use to use to keep garbage "juice" (leachate) from flowing out of our landfills? (Possible answers: Impermeable materials, low-permeability materials, clay.)
Activity Embedded Assessment
Activity Worksheets: Have student teams complete the Roles and Optimization Worksheet and Budget Worksheet. Gauge their understanding of the subject matter by observing their use of the worksheets.
Design Presentations: Have groups present descriptions of the model landfills they designed and created, addressing the following questions:
- Did your landfill keep the town safe? Why or why not?
- What was the most effective part of your design?
- What was the least effective part of your design?
- How did the different materials perform?
Post-Activity Assessment
Optimization Discussion: Lead a class discussion asking students the following questions:
- What does optimization mean? (Answer: For any given engineering challenge, many possible design solutions exist. In engineering, optimization means finding the best solution, which is usually a compromise among several often conflicting requirements [such as cost, capacity, performance, etc.].)
- Which group had the most optimal design (most garbage, least cost and best performance)?
- What were some characteristics of good vs. bad designs?
Safety Issues
- If using a fan to simulate wind, watch that students are not too near to the landfill model that dirt blows into their eyes.
Activity Extensions
Give students more time and different project constraints to redesign and rebuild their landfill models. For example, change the price of the materials and see how that affects the landfill designs. Or, require each landfill to hold at least a certain amount of trash (cotton balls). Or, have the class collectively make a new design that incorporates the best aspects of all the designs, as well as improvements suggested through testing.
Activity Scaling
- For lower grades, give a far more specific design with more constraints. For example, only allow the use of clay. See which group can use the least amount of clay to hold the most trash. Walk the students through the activity step-by-step. Build the bottom liner as a class. Help each group to make sure they are successful.
- For upper grades, put a tracer in the "garbage" and do chemical testing of the water seeping out of the landfill. For example, one simple tracer to measure for is pH. Lemon juice has a low pH and can be measured with litmus paper. Then have students discuss how to clean up the acidic leak (such as by adding a material with a higher pH, such a baking soda).
- Vary the activity to suit the class and available supplies. Perhaps leave the material choices more open ended, and/or add the idea of removing leachate from the landfill (using straws, turkey basters, etc.). Have teams design and build the best model landfill possible.
Additional Multimedia Support
Look online for example diagrams of how engineers have designed landfills. Examples:
https://www.mackinac.org/media/images/2007/ms2007-01-12a.jpg
http://www.pollutionissues.com/images/paz_02_img0144.jpg
Review the steps of the engineering design process at https://www.teachengineering.org/engrdesignprocess.php
Subscribe
Get the inside scoop on all things Teach Engineering such as new site features, curriculum updates, video releases, and more by signing up for our newsletter!More Curriculum Like This

In this lesson, students learn about the three methods of waste disposal in use by modern communities. They also investigate how engineers design sanitary landfills to prevent leachate from polluting the underlining groundwater.

In this lesson, students explore solid waste and its effects on the environment. They collect classroom trash for analysis and build model landfills in order to understand the process and impact of solid waste management.

Students construct model landfill liners using tape and strips of plastic, within resource constraints. The challenge is to construct a bag that is able to hold a cup of water without leaking.

Through the use of models and scientific investigation, students explore the causes of water pollution and its effects on the environment. Through the two associated activities, they investigate filtration and aeration processes that are used for removing pollutants from water.
References
Municipal Solid Waste Generation, Recycling, and Disposal in the United States: Facts and Figures for 2008. Published November 2009. US Environmental Protection Agency. Accessed December 16, 2010. (source of statistics) http://www.epa.gov/epawaste/nonhaz/municipal/pubs/msw2008rpt.pdf
Solid Waste and Recycling (The Cedar Hills Regional Landfill). Updated August 16, 2000. Natural Resources Kids Page, King County, WA. Accessed January 4, 2011. http://your.kingcounty.gov/dnr/kidsweb/landfill.htm
Copyright
© 2010 by Regents of the University of Colorado.Contributors
Jean Parks, Denise W. CarlsonSupporting Program
Integrated Teaching and Learning Program, College of Engineering, University of Colorado at Boulder, University of Colorado BoulderAcknowledgements
The contents of this digital library curriculum were developed under a grant from the Fund for the Improvement of Postsecondary Education (FIPSE), U.S. Department of Education and National Science Foundation GK-12 grant no. 0338326. However, these contents do not necessarily represent the policies of the Department of Education or National Science Foundation, and you should not assume endorsement by the federal government.
Last modified: April 20, 2020


User Comments & Tips