Quick Look
Grade Level: 4 (3-5)
Time Required: 1 hour
Expendable Cost/Group: US $3.00
Group Size: 2
Activity Dependency: None
Associated Informal Learning Activity: Get Your Motor Running
Subject Areas: Physical Science, Physics
NGSS Performance Expectations:

| 3-PS2-4 |
| 4-PS3-2 |
Summary
Students investigate motors and electromagnets as they construct their own simple electric motors using batteries, magnets, paperclips and wire.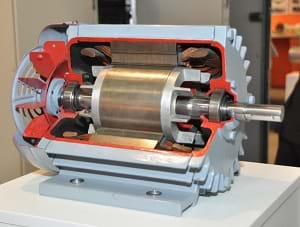
Engineering Connection
Look around you... motors are used in an unlimited number of everyday devices designed by engineers. Engineers must fully understand and apply the connection between electricity and magnetism as they design and build motors, or design better and more efficient motors.
Learning Objectives
After this activity, students should be able to:
- Create a simple motor.
- Describe how a motor uses an electromagnet and magnetic forces to work.
- Explain that motors are designed by engineers for use in various applications.
Educational Standards
Each TeachEngineering lesson or activity is correlated to one or more K-12 science,
technology, engineering or math (STEM) educational standards.
All 100,000+ K-12 STEM standards covered in TeachEngineering are collected, maintained and packaged by the Achievement Standards Network (ASN),
a project of D2L (www.achievementstandards.org).
In the ASN, standards are hierarchically structured: first by source; e.g., by state; within source by type; e.g., science or mathematics;
within type by subtype, then by grade, etc.
Each TeachEngineering lesson or activity is correlated to one or more K-12 science, technology, engineering or math (STEM) educational standards.
All 100,000+ K-12 STEM standards covered in TeachEngineering are collected, maintained and packaged by the Achievement Standards Network (ASN), a project of D2L (www.achievementstandards.org).
In the ASN, standards are hierarchically structured: first by source; e.g., by state; within source by type; e.g., science or mathematics; within type by subtype, then by grade, etc.
NGSS: Next Generation Science Standards - Science
| NGSS Performance Expectation | ||
|---|---|---|
|
3-PS2-4. Define a simple design problem that can be solved by applying scientific ideas about magnets. (Grade 3) Do you agree with this alignment? |
||
| Click to view other curriculum aligned to this Performance Expectation | ||
| This activity focuses on the following Three Dimensional Learning aspects of NGSS: | ||
| Science & Engineering Practices | Disciplinary Core Ideas | Crosscutting Concepts |
| Define a simple problem that can be solved through the development of a new or improved object or tool. Alignment agreement: | Electric, and magnetic forces between a pair of objects do not require that the objects be in contact. The sizes of the forces in each situation depend on the properties of the objects and their distances apart and, for forces between two magnets, on their orientation relative to each other. Alignment agreement: | Scientific discoveries about the natural world can often lead to new and improved technologies, which are developed through the engineering design process. Alignment agreement: |
| NGSS Performance Expectation | ||
|---|---|---|
|
4-PS3-2. Make observations to provide evidence that energy can be transferred from place to place by sound, light, heat, and electric currents. (Grade 4) Do you agree with this alignment? |
||
| Click to view other curriculum aligned to this Performance Expectation | ||
| This activity focuses on the following Three Dimensional Learning aspects of NGSS: | ||
| Science & Engineering Practices | Disciplinary Core Ideas | Crosscutting Concepts |
| Make observations to produce data to serve as the basis for evidence for an explanation of a phenomenon or test a design solution. Alignment agreement: | Energy can be moved from place to place by moving objects or through sound, light, or electric currents. Alignment agreement: Energy is present whenever there are moving objects, sound, light, or heat. When objects collide, energy can be transferred from one object to another, thereby changing their motion. In such collisions, some energy is typically also transferred to the surrounding air; as a result, the air gets heated and sound is produced.Alignment agreement: Light also transfers energy from place to place.Alignment agreement: Energy can also be transferred from place to place by electric currents, which can then be used locally to produce motion, sound, heat, or light. The currents may have been produced to begin with by transforming the energy of motion into electrical energy.Alignment agreement: | Energy can be transferred in various ways and between objects. Alignment agreement: |
International Technology and Engineering Educators Association - Technology
-
Energy comes in different forms.
(Grades
3 -
5)
More Details
Do you agree with this alignment?
-
Describe the properties of different materials.
(Grades
3 -
5)
More Details
Do you agree with this alignment?
State Standards
Colorado - Math
-
Appropriate measurement tools, units, and systems are used to measure different attributes of objects and time.
(Grade
4)
More Details
Do you agree with this alignment?
Colorado - Science
-
Identify and describe the variety of energy sources
(Grade
4)
More Details
Do you agree with this alignment?
-
Describe the energy transformation that takes place in electrical circuits where light, heat, sound, and magnetic effects are produced
(Grade
4)
More Details
Do you agree with this alignment?
Materials List
Each group needs:
- 1 D-cell battery
- 1 wide rubber band
- 2 large paperclips (metal, with no coating)
- 1 rectangular-shaped ceramic magnet (available large hardware stores such as Home Depot)
- 43.5 in (111 cm) medium-gauge magnet wire; magnet wire is copper wire insulated with a polymer-based film, or red enamel, not plastic; available at large hardware or electronics stores such as Radio Shack
- Student Instructions Handout
For the entire class to share:
- fine sandpaper
- needle-nose pliers or wire cutters
- (optional) a few compasses
- thread
Worksheets and Attachments
Visit [www.teachengineering.org/activities/view/cub_mag_lesson2_activity2] to print or download.Pre-Req Knowledge
Students should have some knowledge of magnetic forces (poles, attraction forces). Good information on electromagnets is provided in the Magnetism unit, lesson 2: Two Sides of One Force.
Introduction/Motivation
Today we are going to learn a little bit about how motors work. Engineers design motors for many different uses. Motors take electrical energy, and convert it into mechanical or moving energy. Basically, motors take the electrical energy from an electricity source, such as an outlet or battery, and change that energy into something that spins, moves or does some sort of work. We interact with all sorts of motors every day. Can anyone think of some different items that have motors?
Have you ever felt the force pushing or pulling between two magnets? What happens when you put two magnets next to each other? Sometimes they stick together quickly and sometimes they push each other away. Sometimes, the magnets actually move around and then stick together. When two magnets pull together, it is because one magnet wants to align its south pole (S) with the north pole (N) of another magnet. Engineers use this magnetic force to get motors to work.
Do you know the difference between an electromagnet and a permanent magnet? Well, one difference is that the magnetic field of an electromagnet can be turned on and off by turning on or off the source of electricity to the coiled wire. Many of the magnets used in machines are actually electromagnets rather than permanent magnets. However, even though we call them "permanent," permanent magnets are not really permanent either. They can be de-magnetized by hitting them with a hammer or heating them up.
The motor that we are going to build today has three parts: a permanent magnet, a coil of wire and a battery. Something that is really important to remember is that when electricity moves through a wire, it turns the wire into an electromagnet. So, our wire coil is going to eventually act like another magnet (when we run current from the battery through it). Our simple motor will really have two magnets, and they are going to work together to create movement by pushing and pulling on each other. Building motors can be kind of tricky, and engineers must learn a lot about magnetism and electricity to get them to work. Let's get started!
Procedure
Background
Electric motors are devices that convert electrical energy into mechanical energy (electricity into motion). Everyday we are surrounded by electric motors. For example, cars contain dozens of electric motors—rolling up the windows, wiping the windshield, adjusting the seats and side-view mirrors, starting the engine with the turn of a key or push of a button, and even a motor connected in reverse to recharge the battery when the car is moving. You'll find electric motors in washing machines, refrigerators, blenders, can-openers, computers, and in other devices in your homes, and they all work on the same basic principle.
If you have ever played with magnets, then you have felt the force associated with magnetic fields. This force is always working to align the fields of the two magnets. A magnet wants to align its south pole (S) with the north pole (N) of another magnet. This is like the famous saying, "opposites attract." Harnessing this magnetic force is how we make motors work.
The motor in this activity consists of three parts: a ceramic magnet, a solenoid electromagnet (a coil of wire) and a battery. When there is current in the wire coil, it produces a magnetic field. One face of the coil becomes a north pole, and the other becomes a south pole. The ceramic magnet attracts its opposite pole on the coil and repels its like pole, causing the coil to rotate. The commutator and brushes of a typical motor are not required for this motor. Instead, half of the insulation is removed on one end of the wire. This means that for half of each spin there is no current in the wire. Therefore, the electromagnet cannot produce a magnetic field for that half spin. As the pole of the electromagnet comes closest to the permanent magnet, the insulated part of the wire turns off the electric current. However, the inertia of the rotating coil carries it through half of a turn, past the insulation. When the uninsulated part of the wire makes contact again, there is an electric current through the coil again. This produces a magnetic field that is in the same direction as when the coil was previously in the same orientation. Therefore, the twisting force on the coil is in the same direction as it was before and the coil rotates in the same direction. That is why this motor requires a push to get started, unlike a typical motor.
Before the Activity
- Gather materials and make copies of the Student Instructions Handout, one per group.
- Cut one, two-foot (.6 m) piece of magnet wire for each team.
With the Students: Part 1—Making the Motor
- Divide the class into teams of two students each.
- Conduct the pre-activity assessment activities, as described in the Assessment section.
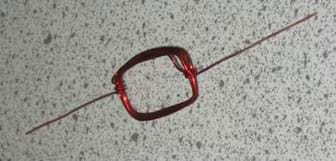
- Start about 1.5 in (38 mm) from the end of the wire and wrap it seven times around the short side of a rectangular magnet. Gently slide out the magnet, careful to not alter the rectangular shape of the wire. Leaving a 1.5 in (38 mm) tail opposite the original starting point, cut the wire with wire cutters or needle-nose pliers. Carefully wrap each of the two tails around the coil (closest to that end) so that the coil is securely bound together, and the two tails extend perpendicular to the coil. Your coil should look similar to Figure 1. Note: Be sure that the tails are opposite each other on the coil.
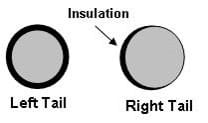
- On one tail, use sandpaper to remove the insulation completely from the end of the tail up to ¼ in (6 mm) from the point at which the tail meets the coil. This tail should look like the left tail in the wire cross section in Figure 2. On the other tail—again leaving a ¼ in (6 mm) section of wire at the point of connection with the coil—lay the coil flat and carefully sand off the insulation from the top half of the wire. This tail should look like the right tail shown in Figure 2.
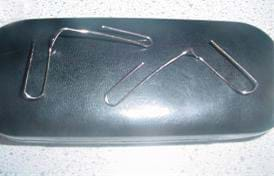
- Bend the two paperclips to look like those in Figure 3. Use needle-nosed pliers if necessary.
- To ensure good contact at the battery terminals, sand the paperclips lightly on the surfaces that will touch the battery and the surfaces that the coil will rest on.
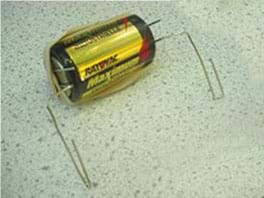
- Use a rubber band to secure the large loop ends of each paperclip to the terminals of the D-cell battery. The battery, rubber band and paperclips device should look like Figure 4.
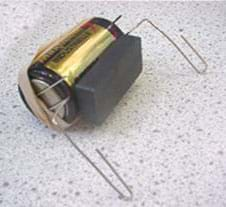
- Place a ceramic magnet on the side of the battery (it will "stick" to the battery) as shown in Figures 5.
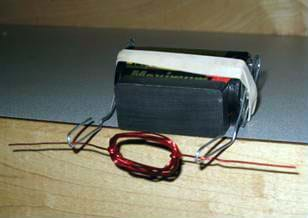
- Place the coiled wire with tails into the small loops formed by the unattached ends of the paperclips ("cradles"). Your motor should look like the one in Figure 6.
- Turn the coil slowly by hand (only touch the insulated part of the wire) and observe the magnetic attraction and repulsion between the electromagnet and the ceramic magnet.
- (Optional) Remove the magnet from the battery. Use a compass to determine the orientation of the magnetic field of the coil. Remove the coil and replace it on the paperclips in the opposite direction. Use the compass to determine the orientation of magnetic field of the coil again.
With the Students: Part 2—Making the Motor Do Work
- Position the motor on the edge of a table or countertop (see Figure 6).
- Bend the end of the wire that has the insulation completely removed into a very small, tight loop.
- Tie one end of a 1-foot (.3 m) long piece of thread around this loop. Tie the other end around a small paperclip.
- Give the coil a little push to get it to start winding up the string. Once the extra loop and string are added, it may throw the motor off balance. Getting the motor to wrap the string correctly takes a significant bit of tweaking, but it will work. Use your finger as a guide.
- Once the motor picks up one paperclip, unwind it and try connecting a second paperclip to the first. Keep adding paperclips and trying again until the motor is no longer able to lift the load. We were able to lift 16 paperclips with just this motor, so it is possible!
Vocabulary/Definitions
battery: A cell that provides electric current.
commutator: A cylindrical arrangement of metal bars connected to the coils of a DC (direct current) motor that provides for a reversal of current into the coils of the motor with every half spin, allowing the motor to spin continuously in one direction.
current: A flow of electrons.
engineer: A person who applies scientific and mathematical principles to creative and practical purposes such as the design, manufacture and operation of efficient and economical structures, machines, processes and systems.
insulated wire: Wire that is covered with a coating of some kind.
magnet: Something that attracts iron and generates a magnetic field.
magnetic field: The field generated by a magnet or by an electric current.
motor: An electrical device that converts electrical energy into mechanical energy.
north pole: The end of a magnet that points north.
solenoid: A coil of insulated wire.
south pole: The end of a magnet that points south.
uninsulated wire: Wire that is not covered with a coating.
Assessment
Pre-Activity Assessment
Voting: Ask a true/false question and have students vote by holding thumbs up for true and thumbs down for false. Tally the votes and write the totals on the board. Give the right answer.
- True or False: Like magnetic poles attract and unlike magnetic poles repel. (Answer: False The opposite is true.)
- True or False: A moving magnet can create an electric current. (Answer: True)
- True or False: Engineers design motors, and work to make motors work better. (Answer: True)
- True or False: An electric current does not create a magnetic field (Answer: False, an electric current does generate a magnetic field.)
Activity-Embedded Assessment
Questions/Answers: Ask students the following questions as they work on the activity.
- What is making the coil spin? (Answer: The magnetic field of the electromagnet [the coil] is interacting with the magnetic field of the ceramic magnet, rotating the coil.)
- Which part of the motor is the electromagnet? (Answer: The coil.)
Post-Activity Assessment
Figure Drawing: Ask students to draw pictures of their motors and then have them draw arrows to show how the energy flowed through their motors. (Answer: Starting at the battery, moving through the paperclips, into the coil.)
Engineering Discussion Questions: Solicit, integrate and summarize student responses.
- Engineers design many things using electromagnets and motors. What are some examples of items engineers have designed that have motors? (Possible answers: Fan, blender, washing machine, dryer, CD player, electronic toys that move, etc.)
- Which of these (appliances/equipment/devices) might require the most powerful motor? Why? (Answer: Any machine that has to move a heavy load, such as a washing machine, requires a more powerful motor than machines that move small loads, such as an electric can opener. Accept reasonable answers.)
- What parts of the motor should engineers change to build more powerful motors? (Answer: The electromagnet, since the engineers can change the amount of electrical current in an electromagnet as well as the number of coils. The permanent magnet does not have those options for changing.)
- If you were an engineer who was deigning a motor for a new electronic toy, what things would you consider in designing your motor? (Possible answers: How much the motor needs to turn, how big the motor should be, how much work the motor needs to perform, etc.)
Safety Issues
Advise students to use caution when bending the paperclips so as not to puncture the skin on their fingers.
Troubleshooting Tips
Sanding the magnet wire is the trickiest part. Students need to be careful to follow the instructions exactly. Go through each step slowly with them.
You may need to check the battery with a voltmeter to make sure that it is not drained (less than 1.5V is drained). Use a fresh battery, if necessary.
When making the motor "do" work, it helps to guide the string with your finger so that it wraps evenly along the coil's tail, like a winch.
Activity Extensions
Have students experiment with coils of various shapes (but with the same number of wire wraps): oval, rectangular and square. Which shape spins the fastest?
Have students vary the number of wire wraps in the coil. Try a number less than seven. How about more than seven? Does the number of wraps affect the motor's speed?
Have students investigate how the thickness of the wire affects the motor? (If the wire is too thin, it might not be able to pick up paperclips without bending. If it is too thick, it might be too rigid and not get good contact with the cradles.)
Have students change the design of the paperclip cradles. They might want to try smaller paperclips, more rubber bands, bending the paperclips completely differently or even sanding their surfaces for better contact.
Have students use a ring-shaped magnet instead of a rectangular-shaped magnet. Does the shape of the magnet matter?
Have students change one or more variables from the suggested changes in the extension activities and suggest a design for the best motor possible.
Activity Scaling
- For lower grades and younger students, this activity may be too challenging. Two alternate options include: make the wire coils in advance and have students put together the simple motor as a group; or complete the activity as a class demonstration. For younger students, eliminate Part 2 of the activity procedure.
- For upper grades, discuss the use of iterations in engineering, and how engineers usually try many different approaches to a problem before they solve it. Much is learned from failures! Have students choose one design change from the Activity Extensions section and implement it.
Subscribe
Get the inside scoop on all things Teach Engineering such as new site features, curriculum updates, video releases, and more by signing up for our newsletter!More Curriculum Like This

Students learn more about magnetism, and how magnetism and electricity are related in electromagnets. They learn the fundamentals about how simple electric motors and electromagnets work. Students also learn about hybrid gasoline-electric cars and their advantages over conventional gasoline-only-pow...

Students investigate the properties of magnets and how engineers use magnets in technology. Specifically, students learn about magnetic memory storage, which is the reading and writing of data information using magnets, such as in computer hard drives, zip disks and flash drives.

Students are briefly introduced to Maxwell's equations and their significance to phenomena associated with electricity and magnetism. Basic concepts such as current, electricity and field lines are covered and reinforced. Through multiple topics and activities, students see how electricity and magne...

Students are introduced to the role of electricity and magnetism as they build speakers. They also explore the properties of magnets, create electromagnets, and determine the directions of magnetic fields.
References
Merriam-Webster Online. 2005-06. Merriam-Webster, Incorporated. Accessed May 2, 2006. (Source of some vocabulary definitions, with some adaptation) http://www.m-w.com
Copyright
© 2006 by Regents of the University of Colorado.Contributors
Joe Friedrichsen; Malinda Schaefer Zarske; Abigail Watrous; Denise Carlson; Janet Yowell; Ashleigh BaileySupporting Program
Integrated Teaching and Learning Program, College of Engineering, University of Colorado BoulderAcknowledgements
The contents of this digital library curriculum were developed under a grant from the Fund for the Improvement of Postsecondary Education (FIPSE), U.S. Department of Education, and National Science Foundation GK-12 grant no 0338326. However, these contents do not necessarily represent the policies of the Department of Education or National Science Foundation, and you should not assume endorsement by the federal government.
Last modified: October 30, 2020


User Comments & Tips