Quick Look
Grade Level: 7 (6-8)
Time Required: 2 hours
(can be split into two 60-minute sessions)
Expendable Cost/Group: US $5.00
Group Size: 4
Activity Dependency: None
Associated Informal Learning Activity: Prosthetic Party: Making New Legs
Subject Areas: Biology, Life Science, Science and Technology
NGSS Performance Expectations:

| MS-ETS1-1 |
| MS-ETS1-2 |
Summary
Student teams investigate biomedical engineering and the technology of prosthetics. Students create lower-leg prosthetic prototypes using various ordinary materials. Each team demonstrate its device's strength and consider its pros and cons, giving insight into the characteristics and materials biomedical engineers consider in designing artificial limbs.
Engineering Connection
For one reason or another, many people require replacement body parts. Those who need artificial legs must have a structurally stable one to replace a critical part of the skeletal system. One specialty of biomedical engineering is designing and creating new and better prostheses (replacement body parts). Biomedical engineers are continually improving the strength, durability, longevity and lifelikeness so amputees can lead full lives.
Learning Objectives
After this activity, students should be able to:
- Describe the engineering design considerations that go into developing quality prostheses.
- List characteristics and features that are important for a prosthetic leg.
- Analyze a prototype prosthetic leg and make suggestions for design improvements.
Educational Standards
Each TeachEngineering lesson or activity is correlated to one or more K-12 science,
technology, engineering or math (STEM) educational standards.
All 100,000+ K-12 STEM standards covered in TeachEngineering are collected, maintained and packaged by the Achievement Standards Network (ASN),
a project of D2L (www.achievementstandards.org).
In the ASN, standards are hierarchically structured: first by source; e.g., by state; within source by type; e.g., science or mathematics;
within type by subtype, then by grade, etc.
Each TeachEngineering lesson or activity is correlated to one or more K-12 science, technology, engineering or math (STEM) educational standards.
All 100,000+ K-12 STEM standards covered in TeachEngineering are collected, maintained and packaged by the Achievement Standards Network (ASN), a project of D2L (www.achievementstandards.org).
In the ASN, standards are hierarchically structured: first by source; e.g., by state; within source by type; e.g., science or mathematics; within type by subtype, then by grade, etc.
NGSS: Next Generation Science Standards - Science
| NGSS Performance Expectation | ||
|---|---|---|
|
MS-ETS1-1. Define the criteria and constraints of a design problem with sufficient precision to ensure a successful solution, taking into account relevant scientific principles and potential impacts on people and the natural environment that may limit possible solutions. (Grades 6 - 8) Do you agree with this alignment? |
||
| Click to view other curriculum aligned to this Performance Expectation | ||
| This activity focuses on the following Three Dimensional Learning aspects of NGSS: | ||
| Science & Engineering Practices | Disciplinary Core Ideas | Crosscutting Concepts |
| Define a design problem that can be solved through the development of an object, tool, process or system and includes multiple criteria and constraints, including scientific knowledge that may limit possible solutions. Alignment agreement: | The more precisely a design task's criteria and constraints can be defined, the more likely it is that the designed solution will be successful. Specification of constraints includes consideration of scientific principles and other relevant knowledge that is likely to limit possible solutions. Alignment agreement: | The uses of technologies and any limitations on their use are driven by individual or societal needs, desires, and values; by the findings of scientific research; and by differences in such factors as climate, natural resources, and economic conditions. Alignment agreement: |
| NGSS Performance Expectation | ||
|---|---|---|
|
MS-ETS1-2. Evaluate competing design solutions using a systematic process to determine how well they meet the criteria and constraints of the problem. (Grades 6 - 8) Do you agree with this alignment? |
||
| Click to view other curriculum aligned to this Performance Expectation | ||
| This activity focuses on the following Three Dimensional Learning aspects of NGSS: | ||
| Science & Engineering Practices | Disciplinary Core Ideas | Crosscutting Concepts |
| Evaluate competing design solutions based on jointly developed and agreed-upon design criteria. Alignment agreement: | There are systematic processes for evaluating solutions with respect to how well they meet the criteria and constraints of a problem. Alignment agreement: | |
International Technology and Engineering Educators Association - Technology
-
Students will develop an understanding of the attributes of design.
(Grades
K -
12)
More Details
Do you agree with this alignment?
-
Students will develop an understanding of engineering design.
(Grades
K -
12)
More Details
Do you agree with this alignment?
-
Advances and innovations in medical technologies are used to improve healthcare.
(Grades
6 -
8)
More Details
Do you agree with this alignment?
-
Apply the technology and engineering design process.
(Grades
6 -
8)
More Details
Do you agree with this alignment?
-
Refine design solutions to address criteria and constraints.
(Grades
6 -
8)
More Details
Do you agree with this alignment?
State Standards
Colorado - Science
-
Develop, communicate, and justify an evidence-based scientific explanation regarding the functions and interactions of the human body
(Grade
7)
More Details
Do you agree with this alignment?
-
Gather, analyze, and interpret data and models on the functions and interactions of the human body
(Grade
7)
More Details
Do you agree with this alignment?
Materials List
Each group needs:
- yardstick, ruler or tape measure, for measuring
- scissors
- 1 type of prosthetic structural material with which to create a prototype (see suggestions below); note: the number of groups depends on how many different prosthetic resource materials are collected
- Prosthetic Party Worksheet, one per person
For the entire class to share:
- 1 roll duct tape
Provide a variety of prosthesis structural material resources. Suggestions:
- For leg structure: toilet plungers (unused), plastic pipes, metal pipes, metal strips, cardboard tube (from wrapping paper roll), wooden "2 x 4," thin metal duct material (to be rolled and taped into a tube shape), all generally 1.5 ft (or .46 m) long
- For comfort: large sponges, scrap bubble wrap, scrap cardboard, etc.
- For lifelikeness: bath towels, pairs of pants, shoes (use students')
- For body attachment: string, rope, twine (about 30 ft [or 10 m])
Worksheets and Attachments
Visit [www.teachengineering.org/activities/view/cub_biomed_lesson01_activity1] to print or download.Pre-Req Knowledge
Familiarity with the idea of bones providing a body's structure, as described in the Engineering Bones lesson.
Introduction/Motivation
What is a prosthesis? (Answer: An artificial body part that replaces a missing body part.) Who might need a prosthesis? Many people are in need of various types of prostheses, including injured soldiers, people who live in war zones, and people who have been in accidents. Biomedical engineers design prostheses for these amputees so that they can live as easily as others.

What are some important features required for a good prosthetic leg? The most important characteristics are strength, durability, longevity, shock absorption, lifelikeness and comfort. Biomedical engineers research and design new ways to create prosthetic legs that have all of these characteristics.
Today, we will be biomedical engineers, and design and create our own prosthetic lower legs! Then we will test our prototypes by bending a knee and resting it on the prosthesis. Our goal is to provide all the important features that we talked about. Then, we'll figure out some way to connect our prostheses to a body. Since we do not have real manufacturing equipment, we will use some everyday, around-the-house materials.
Procedure
Before the Activity
- Gather materials and make copies of the Prosthetic Party Worksheet, one per person.
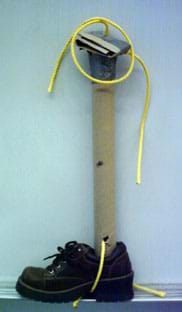
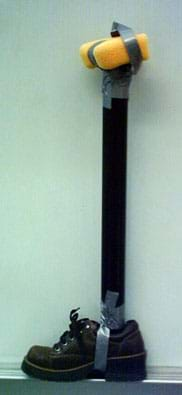
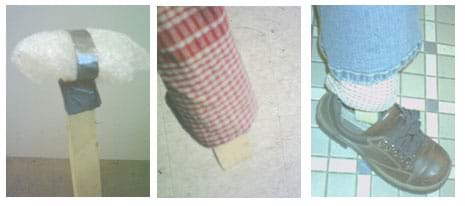
- Review the attached, three-page Images of Example Prototype Prostheses, for how students might create their own prostheses, and ideas to address comfort and lifelikeness.
With the Students
- Divide the class into enough teams so each has a different structural prosthetic material.
- Lead a pre-activity discussion and brainstorming session (as described in the Assessment section) so students have a good understanding of the various prosthetic requirements and material resources to meet these needs.
- Explain to the students that when engineers design a new or improved product, they work in groups and follow the steps of the engineering design process: 1) understand the problem or need, 2) come up with creative ideas, 3) select the most promising idea, 4) communicate and make a plan to describe the idea, 5) create or build a prototype or model of the design, and 6) evaluate what you have made.
- Assign teams different material resources with which to construct their prostheses. Make available other materials for the students to consider incorporating into their design.
- Hand out worksheets and have students follow along with its questions throughout the activity.
- Have students discuss ideas within their groups, while completing the first page of the worksheet.
- Have each group choose one teammate for whom to make the prosthesis. So that the prosthesis fits him/her, measure that student's lower leg from where it bends at the knee.

- Have students collect other materials, such as tape and string, and begin creating their prototypes, creatively addressing the requirements of strength, stability, durability, longevity, shock absorption, lifelikeness, comfort, etc.

- After all teams are finished, have each group present its prosthesis to the rest of the class, explaining the design concepts and material choices, as well as demonstrating the prototype's strength by having the teammate use it to walk (while bending his/her knee and wearing the prosthesis). See post-activity presentation suggestions in the Assessment section.
- Conclude with a class discussion using the questions provided in the Assessment section.
Vocabulary/Definitions
amputee: A person who has had a limb removed.
bioengineering: The use of artificial tissues, organs or organ components to replace damaged or absent parts of the body, such as artificial limbs and heart pacemakers. Source: The Oxford Pocket Dictionary of Current English, http://encyclopedia.com/doc/1O999-bioengineering.html
biomedical engineer: An occupation that includes designing artificial body parts.
engineer: A person who applies his/her understanding of science and math to creating things for the benefit of humanity and our world.
prosthesis: An artificial body part to replace a missing one. Plural: prostheses.
prosthetics: A specialty of medicine and engineering that designs, constructs and fits artificial limbs and body parts (prostheses).
prototype: An original, full-scale and usually working model of a new product, or new version of an existing product. Source: American Heritage Dictionary: http://dictionary.reference.com/browse/Prototype
Assessment
Pre-Activity Assessment
Discussion/Brainstorming: As a class, have students engage in open discussion. Solicit, integrate and summarize student responses. Give prompts as necessary. Remind students that in brainstorming, no idea or suggestion is "silly." All ideas should be respectfully heard. Take an uncritical position, encourage wild ideas and discourage criticism of ideas. Have students raise their hands to respond. Record their ideas on the board. Ask the students:
- What features would make a useful prosthetic lower leg? (Possible answers: Strength, stability, durability, longevity, shock absorption, lifelikeness, comfort.)
- How can you achieve some of these qualities, using the provided resources? (Possible answers: Use the plunger head for a comfortable knee support, use rope or duct tape for connection to the body, use tube or pipe or wood for strong and sturdy support.)
Activity Embedded Assessment
Worksheet: Have students complete the activity worksheet; review their answers to gauge their mastery of the subject.
Post-Activity Assessment
Conference Presentation: Have each group present their prosthetic lower leg as if they were presenting it at an engineering conference. Have them include the following in their presentations:
- List of materials and purpose of each
- How they came up with the design
- Important design features
- Estimated cost
- Demonstration of use
Concluding Discussion Questions: Conclude with a class discussion to gauge students' comprehension of the subject matter covered. Ask the students:
- What improvements would you make to your prototype prosthesis?
- What other materials and fasteners would help improve your design?
- What would be different if you had to make the whole leg, including the knee?
- What design constraints or limitations might be different for biomedical engineers developing real prostheses?
Safety Issues
Be careful when testing prostheses. Have student "spotters" positioned around the teammate who is testing the prosthesis to catch him/her if s/he falls.
Troubleshooting Tips
If the prostheses are not strong enough to hold the body weight, test them with heavy objects (such as books) while students hold the prosthetic steady.
Since students may be unable to cut certain materials to the correct length, advise groups with these materials to choose their "amputee" teammate by finding the person who has a lower leg length closest to the material length. Or, if the material is too long, they could adjust by elevating the opposite foot (perhaps by standing on a book or strapping an object to the foot). Engineers realize that all materials have pros and cons; if a material is difficult to work with, it is a disadvantage to ultimately choosing it to make prostheses.
Activity Extensions
Expand the design challenge to have teams make a functional prosthetic arm. For an artificial arm, the primary purpose shifts from being structural to enabling movement. Have students brainstorm ways to make the prosthetic arm move. A bonus challenge is to create a prosthetic arm and/or hand that can pick up an object.
See if your local hospital, rehab center, veteran's hospital or medical center can loan you real prosthestic devices to show students. Or, find images of the latest designs on the Internet.
Have students research gait analysis and how engineers help measure a person's gait. How would this analysis be helpful in designing prosthetic limbs?
Activity Scaling
- For lower grades, instead of testing the device with the weight of an entire body, test it with heavy objects (such as books) while students hold the prototype steady. This way, the prosthetic need not be as strong or dependant on a secure leg attachment.
- For upper grades, have students draw more than one design. Have them predict and explain why one of their designs would be best, and construct a prototype of that one.
Additional Multimedia Support
As featured in Copper-Hewitt National Design Museum's Design for the Other 90% exhibit (http://archive.cooperhewitt.org/other90/other90.cooperhewitt.org/Design/jaipur-foot-and-below-knee-prosthesis.html), have students investigate the Jaipur prosthesis at http://jaipurfoot.org/.
Subscribe
Get the inside scoop on all things Teach Engineering such as new site features, curriculum updates, video releases, and more by signing up for our newsletter!More Curriculum Like This

Students extend their knowledge of the skeletal system to biomedical engineering design, specifically the concept of artificial limbs and joints. Students relate the skeleton as a structural system, focusing on the leg as structural necessity. They learn about the design considerations involved in t...

Students are introduced to prosthetics—history, purpose and benefits, main components, main types, materials, control methods, modern examples—including modern materials used to make replacement body parts and the engineering design considerations to develop prostheses. They learn how engineers and ...

Students design, build and test prosthetic legs.
References
The American Heritage® Dictionary of the English Language, Fourth Edition. Accessed October 9, 2008. Dictionary.com. http://dictionary.reference.com/browse/prototype
Copyright
© 2008 by Regents of the University of ColoradoContributors
Megan Podlogar; Malinda Schaefer Zarske; Denise W. CarlsonSupporting Program
Integrated Teaching and Learning Program, College of Engineering, University of Colorado BoulderAcknowledgements
The contents of this digital library curriculum were developed under grants from the Fund for the Improvement of Postsecondary Education (FIPSE), U.S. Department of Education and National Science Foundation (GK-12 grant no. 0338326). However, these contents do not necessarily represent the policies of the DOE or NSF, and you should not assume endorsement by the federal government.
Last modified: October 9, 2021


User Comments & Tips